Navigation is an important concept in many games. Some turn-based games require a player to choose the optimal path toward a goal in terms of places on a board. Many action and adventure games place characters in some form of labyrinth—the player character must solve the maze to achieve gameplay goals, and enemy characters must work their way through it to present a challenge to the player. The process of determining how to traverse a game board, maze, or other navigable space is called pathfinding. GameplayKit offers a set of utilities for mapping your game world and finding paths through it, which you can then use to move characters or other game entities.
Using the pathfinding utilities in GameplayKit requires describing the navigable areas in your game as a graph—a collection of distinct locations, or nodes, and the connections that specify how an entity navigates from one location to another. Because most games that involve 2D movement fit this description, adapting such games to use pathfinding is typically a matter of finding a convenient way to create graph descriptions of the game world.
Example: Pathfinder
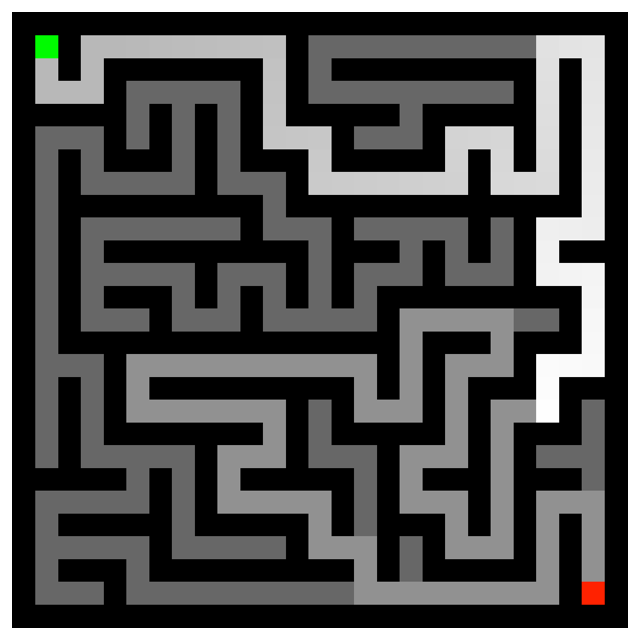
Before exploring the full capabilities of GameplayKit’s pathfinding features in this chapter, you can get a quick taste by downloading the sample code project Pathfinder: GameplayKit Pathfinding Basics. This simple game automatically creates mazes, then uses GameplayKit to solve them, highlighting the shortest path through each maze, as shown in Figure 6-1.
Figure 6-1The Pathfinder Sample Code Project in Action
Designing Your Game for Pathfinding
You describe a graph using the GKGraph class and related APIs, which offer three ways to model navigable areas.
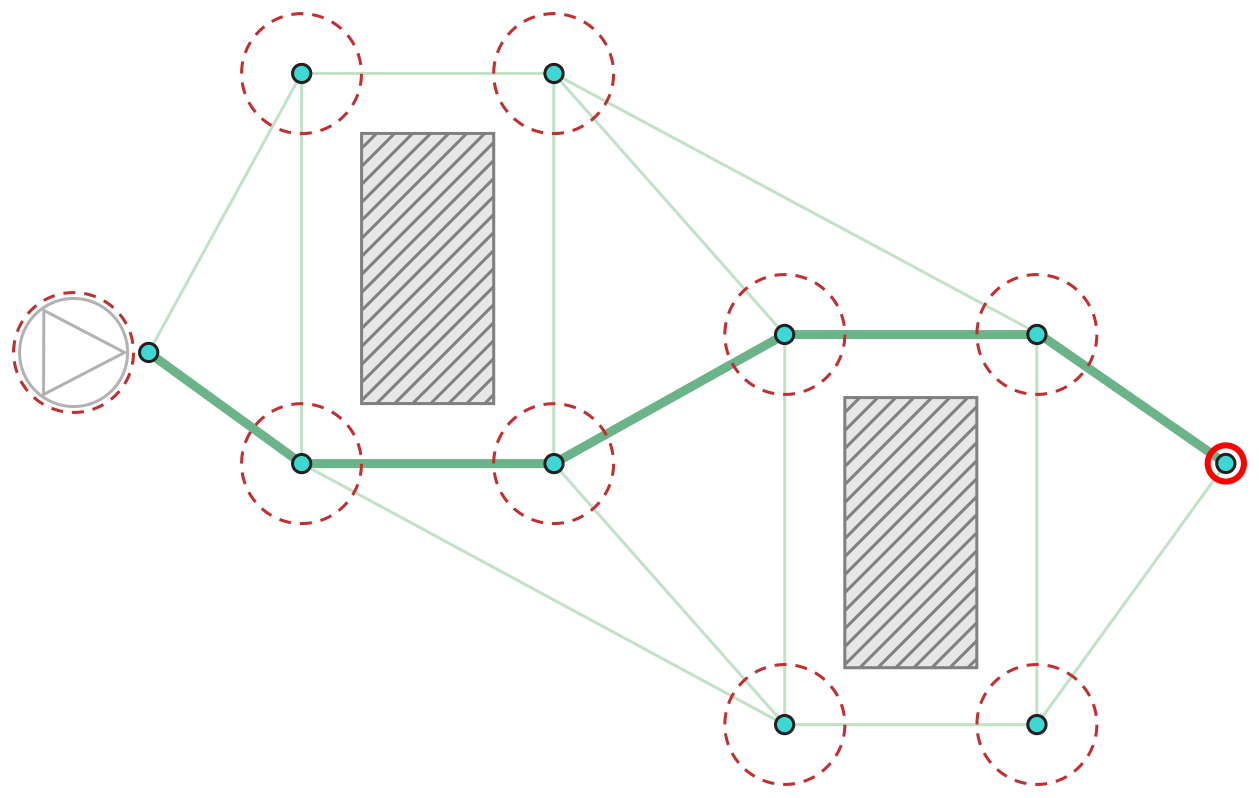
As a continuous space interrupted by obstacles. Use the GKPolygonObstacle class to model impassable areas, the GKGraphNode2D class to model locations of interest within open spaces, and the GKObstacleGraph class to create graphs containing both. Figure 6-2 illustrates this format, which can be found in many 2D action, adventure, and puzzle games, as well as 3D games in which gameplay-relevant movement is strictly 2D.
Figure 6-2Finding a Path Around Obstacles
When building games with SpriteKit, you can generate a collection of GKPolygonObstacle objects based on the contents of a scene or node. With this technique, you can define navigable regions using methods you might already be using for other game mechanics. For example, you can design a level with the SpriteKit Scene Editor in Xcode and use physics bodies to mark regions that the player (or other game entities) cannot pass through, then use the obstaclesFromNodePhysicsBodies: method to generate GKPolygonObstacle objects marking impassable regions.
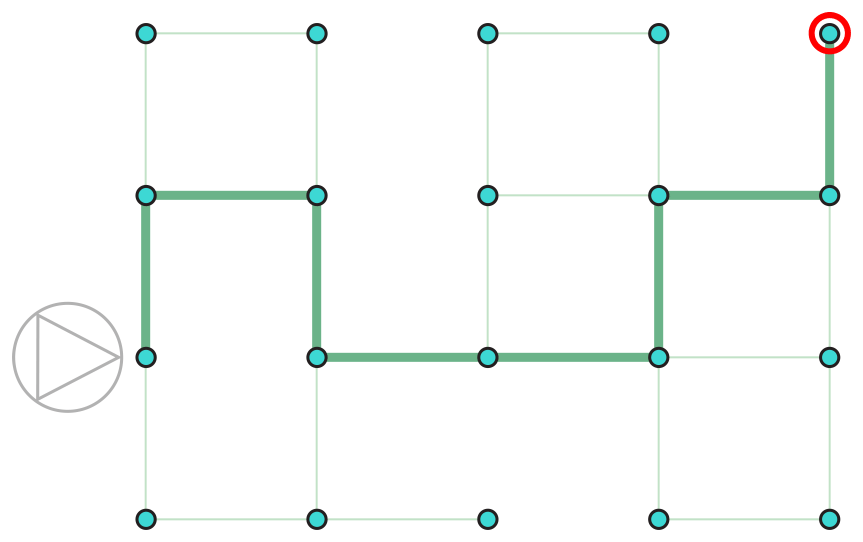
As a discrete two-dimensional grid, where the only valid locations are those with integer coordinates. Use the GKGridGraph and GKGridGraphNode classes to create grid-based graphs. Figure 6-3 illustrates this format, which appears in many classic arcade games, board games, and tactical role-playing games.
Figure 6-3Finding a Path Through a Grid
In some such games, character movement appears to be continuous, but for purposes of game logic all positions are constrained to an integer grid.
As a collection of discrete locations and the connections between them. Use the GKGraphNode class to model nodes and connections with no associated geometry information, then use the GKGraph class to work with the graph as a whole. This style works well for games in which entities move between distinctly marked spaces but their actual location within a space is irrelevant to gameplay. Figure 6-4 illustrates this format, which works well for certain types of board games and strategy games.
Figure 6-4Finding a Path in an Arbitrary Graph
The connections between nodes are directed—that is, a connection from Node A to Node B indicates only that one can navigate from Node A to Node B. For navigation from Node B to Node A to also be possible, a separate connection from Node B to Node A must also exist.
After you create a graph, you can use that GKGraph object to connect new nodes based on their relationships to existing nodes in the graph, remove nodes from the graph regardless of their relationships to existing nodes, and most importantly, find paths from one node in the graph to another.
Adding Pathfinding to Your Game
The typical workflow for using pathfinding in a game involves three or four steps:
Before gameplay begins, create an instance of the GKGraph class or one of its subclasses to represent the static content of a game scene, using either of the styles described in Designing Your Game for Pathfinding.
When you need to find a path for use by dynamic entities in your game—for example, to cause a player character to navigate around obstacles to the location of a click or tap event—either find existing nodes that match the positions of those entities, or create temporary nodes representing those entities and connect them to the graph.
This method returns an array of GKGraphNode objects representing the path to follow. (The subclass of GKGraphNode in the array depends is the same subclass you used to create the graph.) You can use the position data contained in the nodes along the path to move your game entities—for example, a SpriteKit game can create a sequence of SKAction objects to move a game character to the locations on the path.
(Optional) After finding a path, disconnect any temporary nodes from the graph so that they don’t interfere with future pathfinding.
The sections below illustrate the use of pathfinding in two example games.
Pathfinding on a Grid
The Maze sample code project (already seen in the Entities and Components and State Machines chapters) implements a variation on several classic arcade games. In this game both the player and enemy characters move through a maze on an integer grid. Movement appears to be continuous only because animation interpolates between grid positions.
This game creates a GKGridGraph object to represent the maze, as shown in Listing 6-1.
// Remove wall tiles from the graph so that paths go around them.
[graphremoveNodes:walls];
The graphFromGridStartingAt:width:height:diagonalsAllowed: method creates a graph with a node for every location in a specified rectangular grid. This code then removes the nodes at grid positions corresponding to walls in the maze, leaving only the traversable areas of the maze as graph nodes.
When enemy characters are in their Chase state, they use pathfinding to obtain routes toward the player’s current position. Listing 6-2 shows the implementation of this behavior.
In this example, both the enemy and the player occupy positions that are already in the graph. (Again, even though the characters’ movement is animated to appear continuous, for gameplay purposes each character is always at an integer grid position.) Thus, to find a path for the enemy to chase the player, this method need only look up the GKGridGraphNode objects corresponding to the enemy’s and player’s current positions, then use the findPathFromNode:toNode: method to find a path.
To move the enemy character, this method examines only the first two nodes in the path. This method is called from an updateWithDeltaTime: method, so it executes for every frame of animation—possibly finding a new path in response to the changes in the player’s location. Because it takes longer to animate the enemy character’s move along the first step of the path than to calculate a new path, this method simply starts that animation by setting a target position for the game’s SpriteComponent class. (See the Entities and Components chapter for discussion of this class.)
Pathfinding Around Obstacles
The DemoBots sample code project implements a different game in which characters can move freely in open space, so grid-based pathfinding is not feasible. Instead, this game uses obstacle-based pathfinding.
To prepare for this style of pathfinding, this example uses a set of nodes in each level’s scene file (created with the SpriteKit Scene Editor in Xcode) whose physics bodies designate areas of the game world that should be impassable to game characters. Then, the LevelScene class implements a graph property that builds a GKObstacleGraph object, as shown in Listing 6-3.
The graph property’s initializer first reads the polygonObstacles property, which searches the level’s node tree (see Searching the Node Tree in SKNode Class Reference) to provide an array of all child nodes of the obstacles node. Then, the SKNode method obstaclesFromNodePhysicsBodies: creates an array of GKPolygonObstacle objects corresponding to the shapes of each obstacle node’s physics body. Finally, these objects create a graph.
When it comes time to plan a route for a game character, the game’s TaskBotBehavior class uses the method shown in Listing 6-4.
Listing 6-4Finding Paths in an Obstacle-Based Graph
The addGoalsToFollowPathFromStartPoint method follows a similar set of steps as those shown in Listing 6-2, but with some variations for an obstacle-based graph:
This method creates and connects temporary nodes representing the desired start and end points for a path.
Unlike a grid-based graph, a graph of continuous 2D space does not already contain nodes at those positions. (The connectedNodeForPoint call is a convenience function in this project that both creates a new node and uses the connectNodeUsingObstacles: method to add it to the graph.)
The findPathFromNode:toNode: method returns an array of graph nodes representing a route between the temporary nodes.
This project’s addFollowAndStayOnPathGoalsForPath method then uses GameplayKit’s Agents feature to move a game character along the path.
For a discussion of the addFollowAndStayOnPathGoalsForPath method’s implementation, see Listing 7-1.
After that work has been done, the startNode and endNode nodes are removed from the graph so that they don’t interfere with future pathfinding operations.
Finally, the method also returns an array of CGPoint structures so that the game can optionally draw an overlay illustrating the path for use in debugging.