Real-Time Matches
In a real-time match, the players are connected to Game Center (and thus to each other) simultaneously. This form of match is suitable for implementing any type of game that requires live participation. A key advantage of real-time matches is that Game Kit and Game Center provide extensive support for real-time matches, which simplifies the code you need to write. In particular, it solves many of the problems when trying to find players to join into a match, it provides a high-level networking interface that lets you ignore many of the problems of the underlying networking layer, and it provides extensive built-in support for voice chat. Game Kit allows you to focus on implementing your game without worrying about the precise mechanics of how game and voice data are delivered.
However, even though Game Kit solves many of these problems, your game design still needs to be prepared to deal with complex issues that arise from real-time networking, including:
The need for multiple instances of your game (running on different devices) to perform tasks simultaneously or near simultaneously, while synchronizing states between the devices
Network reliability
Network latency
Implementing a real-time match requires extensive work designing, implementing, and testing your game.
Checklist for Adding Real-Time Matchmaking to Your Game
The checklist for creating a game that supports real-time matches is more extensive than that for other Game Center technologies and comprises three main areas: matchmaking, data exchange, and voice chat. As part of this process, you also have many design decisions to make about how matches are played in your game, including:
How many players can play at once
What does a network version of your game looks like
What data needs to be shared to build your design
These and other questions impact the design of your gameplay and networking code.
Getting Started
The following tasks must be performed before starting your matchmaking implementation:
If your app is an OS X app, you must add the following entitlements or all real-time functionality fails:
com.apple.security.network.client
com.apple.security.network.server
Add code to your game to authenticate the local player. See Working with Players in Game Center.
Familiarize yourself with the matchmaking concepts described in Matchmaking Overview as well as the contents of this chapter.
Finding Players for a Match
Determine whether your game will use the standard matchmaking interface, display a custom matchmaking interface, or use a combination of both. Regardless of which implementation you choose, you must support the chosen implementation behavior inside your game as well as add support for handling invitations received from outside of your game.
If you are implementing the standard user interface, see Using the Standard Matchmaking User Interface.
If you are implementing a custom user interface, see Implementing a Custom Match User Interface.
Exchanging Data Between Match Participants
This is the most complex step of the process as it requires you to perform extensive design work for both the game mechanics for a real-time match and the low-level details of synchronizing communication between the participants of the match.
Design the network messages your game uses to communicate with other participants in the match. Most games exchange information at the start of the match to provide each participant the same initial game state, and then send updates as events occur within the game. See Designing Your Network Game.
Write code to use the match object to send data to other match participants. Your game encodes the game state into binary data and uses the match object to transmit it to other players. See Sending Data to Other Players.
Implement a match delegate to handle events that can occur during the match:
The delegate is notified when other players are connected at the start of the game. Your delegate usually waits until everyone is connected before starting the game. See Starting the Match.
The delegate receives the data that other players send. Your delegate reverses the procedure used to send the data by decoding and acting on the data from the other players. See Receiving Data from Other Players.
If players get disconnected while your game is running, the delegate receives a notification and must decide whether to discontinue the match or reconfigure your game to handle the reduced number of players. See Disconnecting from a Match.
Adding Voice Chat to a Match
Voice chat support is optional, but can take a good game and turn it into a great game. It allows the players a closer and more natural level of interaction. Here are the steps for implementing voice chat in your game:
Decide how many voice channels your game needs. For example, a free-for-all match can use a single channel for all participants while a match with multiple teams might use a separate channel for each team and an additional channel that includes all players in the game.
If your game is running in iOS, configure an audio session to enable the microphone. All games that record or play audio must have an audio session. See Creating an Audio Session (iOS only).
Create the voice channel by calling the match object’s
voiceChatWithName:method. The match returns aGKVoiceChatobject. See Creating Voice Channels.Call the voice chat object’s
startmethod to activate the channel. See Starting and Stopping Voice Chat.Enable the microphone for a chat channel when a player needs to speak into it. Each participant can speak into only one channel at a time. See Enabling and Disabling the Microphone.
Provide controls in your game that allow the user to enable and disable voice chat, set volume levels or mute players within a channel. See Controlling the Volume of a Voice Chat.
Decide whether your game should support a push-to-talk model or whether it should continuously sample the microphone. In a push-to-talk game, provide a control that the player presses to transmit voice data to other players. In a game that continuously samples the microphone, provide a control to mute the microphone.
Implement an update handler that is called when a player connects or disconnects, or when a player starts or stops speaking. Typically, you use this handler to update your game’s user interface to display up to date information for each player in the voice chat—for example, highlighting a user interface item when a player is speaking. See Seeing When a Player’s State Changes.
Overview of Real-Time Matches in Game Center
Table 7-1 lists the classes you use when designing a game that uses real-time matches in Game Center.
Class | Description |
|---|---|
A match request object specifies the properties of the match to be created. See Creating Any Kind of Match Starts with a Match Request. | |
This singleton is used by all games that support real-time matchmaking. A game must provide an invitation handler to the matchmaker object so that push notifications that launch the game are handled promptly. Optionally, a game that wants to create a custom matchmaking user interface uses the matchmaker to programmatically search for matches. | |
Delivered when a player accepts an invitation to play in a match. | |
A view controller class that displays the standard matchmaking user interface. The default user interface allows players to add friends to the match, search for other players connected to Game Center, or even find players that are physically in close proximity to each other, even if they do not currently have a connection to Game Center. | |
This object, which is returned to your game, holds information about the players in the match. Each instance of your game uses its own | |
Returned by the match object and represents a specific voice channel players can communicate over. |
Finding Players for a Match
When a player wants to create a match, your game must display a user interface to allow the player to see and configure the state of the match. The simplest way to implement this is to use the standard user interface provided by the GKMatchmakerViewController class. It implements many common matchmaking scenarios with a small investment in code. However, if you want to implement your own custom behavior, you can design your own custom user interface and then call the GKMatchmaker class to perform this task programmatically. The matchmaker class returns data to your game so that it can update its own user interface.
Using the Standard Matchmaking User Interface
The standard matchmaking user interface is often displayed in response to the user tapping a button on your game’s title screen. It can appear immediately after the button is tapped or after several interim screens between the title screen and the matchmaking screen. For example, if your match request includes player groups or player attributes, you usually have your own custom user interface screen to configure the match request before displaying the default matchmaking user interface.
Presenting the Matchmaking User Interface
Create and configure a new match request and initialize a new GKMatchmakerViewController object using the match request. The presenting view controller makes itself the matchmaking view controller’s delegate and then presents the matchmaking interface over itself. The player interacts with the matchmaking screen until the match is ready to start or an error occurs.
As the delegate, your view controller (or some other class) must implement a few methods to respond to events. Each of these methods dismisses the view controller, and then performs any specific actions required for your game.
The matchmakerViewControllerWasCancelled: delegate method is called when the player cancels the matchmaking process before a match has been created. Typically, your game dismisses the view controller and then backs out to the title screen (or some other reasonable user interface screen).
The matchmakerViewController:didFailWithError: delegate method is called when matchmaking encounters an error while trying to set up the match—for example, when a device loses its network connection. Similar to when the player cancels the matchmaking process, your game dismisses the view controller and moves to a previous screen.
Finally, if a match has been created and everyone is ready to start, your delegate’s matchmakerViewController:didFindMatch: method is called. This method returns a GKMatch object to your game. Typically, when the match starts, the match is returned to all of the participants, so this delegate method is called on multiple devices at the same time.
Processing Invitations from Other Players
When a player accepts an invitation from another player, your game is launched (if necessary) and an invitation is delivered to your game. Your game receives this invitation by registering a listener to the local player. Create a class that implements the GKLocalPlayerListener protocol. Inside of your class, implement the player:didAcceptInvite: method to handle the invitation.
Adding Players to an Existing Match
Occasionally, a match may drop below the number of players your game requires. For example, this situation can occur if a player loses their network connection. In this case, instead of disbanding the match entirely, you might want to add additional players.
To implement this in your game, create and present a matchmaker view controller just as you did in the default case. You only do this from one device already participating in the match. After presenting the view controller, call the view controller’s addPlayersToMatch: method, passing in the match to add the players to. The match interface uses the information in the match request to add players to the existing match, rather than creating a new match. The match object is still returned to your delegate’s matchmakerViewController:didFindMatch: method.
The match is still active while the matchmaking screen is displayed; the devices in the match can still exchange data with each other. However, you might need to pause the actual gameplay until a new player is found. Because the match is active, voice chat channels continue to work.
Implementing a Custom Match User Interface
Implementing a complete custom match interface can be as simple as displaying a network progress indicator until auto-matching completes, or as sophisticated as implementing a complete custom view controller that replicates the standard behavior. The latter is potentially a significant investment in programming time, as it needs to include support for all of the following:
Inviting specific players into a match
Listening for responses from invited players
Looking for nearby players (available via Wi-Fi or Bluetooth)
This section starts with the simplest scenario—finding a match with no user-interface implementation—and then builds to more detailed concepts needed to build your own user interface.
Auto-matching to Fill a Match
The simplest interface your game can provide is an “instant match” button. When this button is pressed, the player is added to a match without needing to enter any additional information. Create your own method that contains a GKMatchRequest. Retrieve the matchmaker singleton object and ask it to find a match for the player using the findMatchForRequest:withCompletionHandler: method. The match’s completion handler is called when a match is found or if an error occurs. If a match is returned to the completion handler, the match is assigned to a property. As before, your game executes code to determine whether the match is ready to begin.
You can also add players to an existing match. Instead of calling the findMatchForRequest:withCompletionHandler: method, your game calls the addPlayersToMatch:matchRequest:completionHandler: method, passing in the match to add the players to.
Canceling a Search
The matchmaking process takes time and may not complete quickly enough for some players. If your game includes support for programmatic matching, it needs to provide a user interface that allows the player to cancel an active search. Call the cancel method on the matchmaker singleton object to cancel an active search.
Inviting Specific Players to a Match
If you are implementing a complete custom user interface, you need to allow players to invite their friends to a match. Typically, this means that your game presents an interface that shows all the players currently in the match, with empty slots for positions to be filled. A player can then pick one or more of those empty slots and issue an invitation to a specific player. To accomplish this, your game needs to be able to send the invitations and receive notifications when the invitations are processed.
You handle both of these problems by assigning more information to the match request. Assign the list of players to the recipients property and implement the block statement for the recipientResponseHandler property.
When a response is received, if the response is equal to GKInviteeResponseAccepted, the player is added to the match. Update the user interface to show that this player is now part of the match. If any other response is received, the player is removed from the user interface so that the slot appears empty again.
When a match request includes a list of player objects, then the matchmaking behavior changes (regardless of whether you are creating a new match or adding players to a specific match). The normal process of finding players for the match is suspended. Instead, the only thing the matchmaking code does is extend the invitations to the players in the match request and wait for responses. Assuming your game does not cancel the matchmaking process, it completes and returns a match to your game when all the invitations are processed.
Because some of the invitations may not be accepted, it is possible you may receive a match that still needs more players. With this in mind, your custom user interface should implement the following behavior:
The first time the player invites players to join the match, create the match request with those players and call the
findMatchForRequest:withCompletionHandler:method. Wait for the match to be returned (or cancel the request if the player cancels the invitations).If the player wants to add more players to the match after the invitations are processed, perform the same procedure again, but call the
addPlayersToMatch:matchRequest:completionHandler:method instead.If the player wants to automatch the remaining slots, create a match request but do not include a list of players to invite. Call the
addPlayersToMatch:matchRequest:completionHandler:method to fill the remaining slots. You must wait until all invited players have connected as all pending match requests are cancelled when automatching the remaining player slots.If the player wants to start the match with the players already in the match, call the
finishMatchmakingForMatch:method to end matchmaking entirely.
If you want to create a match that contains both invited players and automatched players, you must first create the match with the invited players. After all invited players have connected, you can then add players through automatching.
Searching for Nearby Players
The standard user interface allows players to discover other nearby players, even when neither player is currently connected to Game Center directly. The discovery uses local Wi-Fi or Bluetooth to find other players. This capability is very useful when players are away from their normal network but still want to play against each other. You can implement similar behavior in your custom user interface.
Here’s how you typically implement this behavior:
Provide a button in your user interface to allow the player to search for nearby players. When pressed, this button presents a new user interface screen that displays any nearby players it finds. Alternatively, your user interface can simply display nearby players automatically. If you choose this approach, it usually makes sense to keep this player list separated from the rest of the user interface.
Call the shared matchmaker’s
startBrowsingForNearbyPlayersWithReachableHandler:method, passing in a block to receive notifications of players as they enter and leave the area. When a player is found, add the player to your visible list of players. When a player disappears, remove the player.If the player selects one or more players to send an invitation to, create a match request and add the player identifiers for those players to the match request. Then, follow the behavior described in Inviting Specific Players to a Match.
When your browsing screen is removed from the screen (either because the player canceled browsing or because they invited players already) call the
stopBrowsingForNearbyPlayersmethod.
Finding Player Activity in Your Game
Players who are looking for a multiplayer match often want to be matched immediately, or at least be aware of when matchmaking may take longer. For example, if a player is online during a period of time when players are not regularly online, the number of players who are interested in joining a match may be substantially smaller than during prime time. The determination of how many players are online is referred to as player activity. The GKMatchmaker class provides the queryActivityWithCompletionHandler: and queryPlayerGroupActivity:withCompletionHandler: methods to test for activity on Game Center related to your game. The value returned by either method is the number of players who have recently requested a match.
Exchanging Data Between Match Participants
After you have created your match, the participants in the match need to exchange data to synchronize the state of the match between each other. This section describes how to implement and design this part of your matchmaking code.
Designing Your Network Game
Each participant in the match relies on a GKMatch object to exchange data with the other participants connected to the match. The GKMatch class does not define the format or content of your network messages. Instead, it simply sees your messages as bytes to transmit. This gives you great flexibility in designing your network game. The rest of this section describes key concepts you need to understand before implementing your network game.
Whenever you send data to other participants, you decide how much effort the match should use to send the data. Matches can send your data reliably, which means the match retransmits the data until it is received by the target(s), or unreliably, which means it sends the data only once.
A reliable transmission is simpler, but potentially slower; a slow or error-prone network may require the device to send the message multiple times before it is successfully delivered to its intended recipients. A match also guarantees that multiple reliable messages sent from one device to the same recipient are delivered in the order they were sent.
Messages transmitted unreliably may never reach their destination or may be delivered out of order. Unreliable transmissions are most useful for real-time transactions where any delay in transmission caused by using reliable messaging invalidates the contents of the message. For example, if your game transmits position and velocity information for a dead-reckoning algorithm, reliable messages might provide positioning data that is badly out of date by the time it is delivered to the recipient. By using unreliable messages, messages are delivered faster. Your game takes responsibility for network errors by sending new messages with updated position and reckoning information.
The size of your messages also plays an important role in how quickly the data can be delivered to its targets. Large messages must be split into smaller packets (such splitting is called fragmentation) and reassembled by each target. Each of these smaller packets might be lost during transmission or delivered out of order. Large messages should be sent reliably, so that Game Kit can handle the fragmentation and assembly. However, the process of resending and assembly takes time. You should not use reliable transmissions to send large amounts of real-time data.
Be mindful that your network data is being transmitted across servers and routers that are out of your control. Your messages are subject to inspection and modification by other devices on the network. When your game on one device receives network data from participants on other devices, it should treat that message as untrusted data, and validate its contents before using it. See Secure Coding Guide for information on how to avoid security vulnerabilities.
Here are some general guidelines to follow when designing your game’s networking:
Your message format needs to include a way to differentiate between message types. The
GKMatchclass does not know anything about the contents of your messages, so you must implement that functionality in your game. For example, you might create an enumerated type that identifies different kinds of messages, and start each message with that enumerated type.Send messages at the lowest frequency that allows your game to function well. Your game’s graphics engine may be running at 30 to 60 frames per second, but your networking code can send updates much less frequently.
Use the smallest message format that gets the job done. Messages that are sent frequently or messages that must be received quickly by other participants should be carefully scrutinized to ensure that no unnecessary data is being sent.
Pack your data into the smallest representation you can without losing valuable information. For example, an integer in your program may use 32 or 64 bits to store its data. If the value stored in the integer is always in the range
1through10, you can store it in your network message in only 4 bits.Limit the size of unreliable messages to 1000 bytes or smaller.
Limit the size of reliable messages to 87 kilobytes or smaller.
Send messages only to the participants that need the information contained in the message. For example, if your game has two different teams, team-related messages should be sent only to the members of the same team. Sending data to all participants in the match uses up networking bandwidth for little gain.
Although the
GKMatchobject creates a full peer-to-peer connection between all the participants, you can reduce the network traffic by layering a ring or client-server networking architecture on top of it. Figure 7-1 shows three possible network topologies for a four-player game. On the left, a peer-to-peer game has 12 connections between the various devices. However, you could layer a client-server architecture on top of this by nominating one of the devices to act as the host. If your game transmits to or from the host only, you can halve the number of connections. A ring architecture allows devices to forward network packets to the next device only, but further reduces the number of connections. Each topology provides different performance characteristics, so you will want to test different models to find one that provides the performance your game requires.Figure 7-1 Network topologies 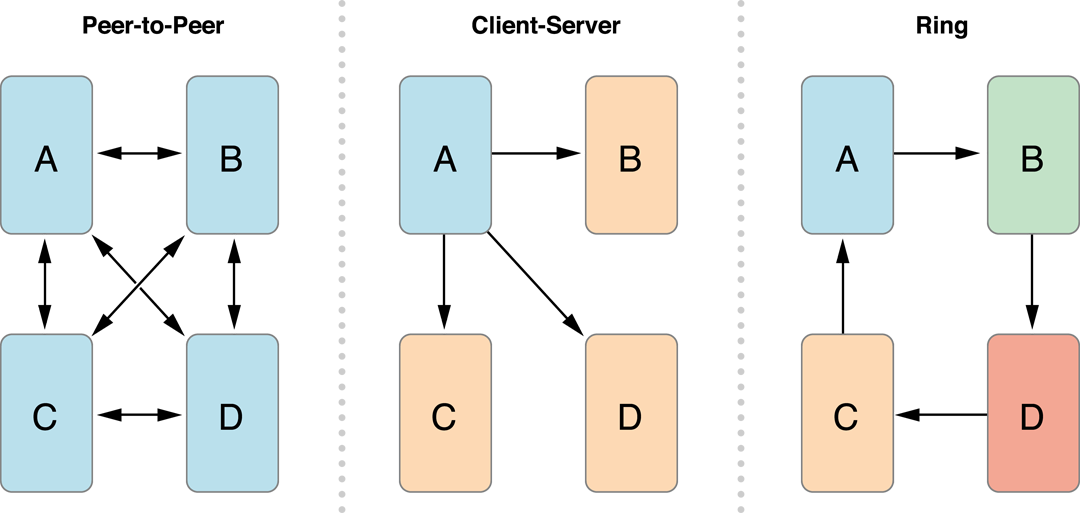
Specify how to handle network disruptions. Networks are an inherently unreliable medium of communication. A participant can be disconnected at any time while the match is in progress. Your game must handle disconnection messages. For example, if you implemented your game to use a client-server topology, then when the server disconnects from the match, your game might want to nominate a new device to become the new server.
Starting the Match
When Game Kit delivers a GKMatch object to your game, the connections to other participants in the match may not be established yet. The players array on that user’s device can be empty if no other players are connected, or it might hold a subset of players that have already been connected. Your game must wait until all players are connected before starting the match. To determine how many players are waiting to join the match, your game reads the match’s expectedPlayerCount property. When the value of this property reaches 0, all players are connected and the match is ready to start. The appropriate place to perform this check is in the match delegate’s match:player:didChangeConnectionState: method. This method is called whenever a member of the match connects or disconnects.
Even before the match starts, all players already connected to the match can already exchange data with each other. This allows your game to create voice channels (or your own user interface) that allows the players already there to communicate with each other.
Determining the Best Server
If you are implementing a client-server architecture on top of the peer-to-peer model provided by the match object, choosing the right server is critical to achieving good network performance and latency in the resulting match. For this reason, Game Kit provides built-in support that allows all the peers in the game to test each other to determine the best server. You implement this by calling the chooseBestHostPlayerWithCompletionHandler: method. When the operation completes, the player identifier that is returned is the person whose device would make the best server for your game.
If you intend to search for the best server using this method, all devices in the match must be running on versions of Game Kit that support this method, and every device in the match must call this method at the same time. This allows all the devices to test and communicate with each other simultaneously. Typically, you find the best server after everyone is connected and gameplay is ready to start.
Sending Data to Other Players
To send data from one device to other devices connected to the match, your game creates a message and encapsulates it in an NSData object. You send this message to all connected players using the sendDataToAllPlayers:withDataMode:error: method, or to a subset of the players using the sendData:toPlayers:dataMode:error: method.
Receiving Data from Other Players
When the match receives data sent by another participant, the message is delivered by calling your match delegate’s match:didReceiveData:fromRemotePlayer: method. Your implementation of this method needs to decode the message and act on its contents.
Disconnecting from a Match
When a player is ready to leave a match, your game calls the match object’s disconnect method. A player may also be automatically disconnected if their device does not respond for a certain period of time. When a player disconnects from the match, the other participants in the match are notified by calling the match delegate’s match:player:didChangeState: method.
Adding Voice Chat to a Match
Game Kit provides all of the low-level voice encoding and transmission so that you do not have to handle this yourself. However, any game that supports voice chat should provide its own custom user interface that allows players to configure the voice chat. This means that a player should be able to:
Opt-in or out of any voice chat options you provide.
Mute other players as well as control the overall volume of voice chat.
Mute the microphone.
Choose which channel they speak into, if your game supports multiple channels.
See which player is speaking.
Creating an Audio Session (iOS only)
Before your iOS game can use the voice chat services provided by the match object, you must create an audio session that has the capability to both play and record sounds. If your game provides other sound effects, you probably already have an audio session.
For more details on creating and using audio sessions, see Audio Session Programming Guide.
Creating Voice Channels
Your game never directly creates GKVoiceChat objects. Instead, voice chat objects are created on your behalf by the GKMatch object. Create new channels using the voiceChatWithName: method. A single match can create multiple channels, and a single player can be assigned to more than one channel at a time. Audio received on any of the channels is mixed together and outputted through the speakers.
For multiple participants on different devices to join the same channel, they need a way to identify a particular channel. This identification is accomplished through a channel name. A channel name is a string, defined by your game, that uniquely names the channel. When two or more participants join a channel with the same name, they are automatically connected to a voice chat with each other.
Starting and Stopping Voice Chat
Voice data is not sent or received through a voice channel until the channel is started. You start a voice chat by calling the voice chat object’s start method. After the start method is called, the voice chat object on that device connects to other participants in the channel if the following are true:
The device is on a Wi-Fi network.
There is a microphone connected to the device.
If either of these conditions is not met, the voice chat object waits until both are true before connecting to the channel.
Similarly, when a player is ready to leave a channel or whenever you want a channel to be temporarily turned off, you call the voice chat object’s stop method. An advantage to stopping the channel (rather than simply muting the other players) is that the other players are not required to send data to the player who has left the channel. This decrease in data transmission leaves more bandwidth available for your game’s messaging.
Enabling and Disabling the Microphone
When you want the player to be able to speak, you enable the microphone. Depending on the nature of your game, you may want to enable the microphone continuously while your game is running, or you may want to include a push-to-talk button in your interface.
A channel enables the microphone by setting the voice chat object’s active property to YES:
Only one channel can enable the microphone at a time. When you enable the microphone for one channel, the active property on the previous owner is automatically set to NO.
Controlling the Volume of a Voice Chat
Your game can control the volume of a voice chat in two ways. First, your game can set the overall volume level for the chat by changing the voice chat object’s volume property: The volume property accepts values between 0.0 and 1.0, inclusive. A value of 0.0 mutes the entire channel; a volume of 1.0 outputs voice data at full volume.
Second, your game can selectively mute players in a channel. Typically, if your game intends to mute players, it should offer a user interface that allows the player to choose which players they want to mute. To mute a player, you call the voice chat object’s setPlayer:muted: method and YES. To unmute a player, you make the same call, passing NO instead.
Seeing When a Player’s State Changes
You can implement an update handler when your game wants to be notified about changes in a player’s status. The playerVoiceChatStateDidChangeHandler property handler is a block object that the voice chat object calls when a player connects to or disconnects from the channel and when a player starts and stops speaking. For example, you use the update handler to highlight a player’s name in your user interface when that player is speaking.
Copyright © 2016 Apple Inc. All Rights Reserved. Terms of Use | Privacy Policy | Updated: 2016-06-13