Custom Layouts: A Worked Example
Creating a custom collection view layout is simple with straightforward requirements, but the implementation details of the process may vary. Your layout must produce layout attributes objects for every view your collection view contains. The order in which these attributes are created depend on the nature of your application. With a collection view that houses thousands of items, computing and caching layout attributes upfront is a time-consuming process, so it makes more sense to create attributes only when requested for a specific item. For an application with fewer items, computing layout information once and caching it to reference whenever attributes are requested can save your application a lot of unneeded recalculation. The worked example in this chapter belongs in the second category.
Keep in mind that the provided sample code is by no means the definitive way to create a custom layout. Before you begin creating your custom layout, take time to devise an implementation structure that makes the most sense for your app to get the best performance. For a conceptual overview of the layout customizing process, see Creating Custom Layouts.
Because this chapter presents the custom layout implementation in a specific order, follow along the example from top to bottom with a specific implementation goal in mind. This chapter focuses on creating a custom layout, not on implementing a complete app. Therefore, implementations of the views and controllers used to create the final product are not provided. The layout uses custom collection view cells as its cells and a custom view for creating the lines connecting cells to one another. Creating custom cells and views for collection views, as well as the requirements for using a collection view, are covered in previous chapters. To review this information, see Collection View Basics and Designing Your Data Source and Delegate.
The Concept
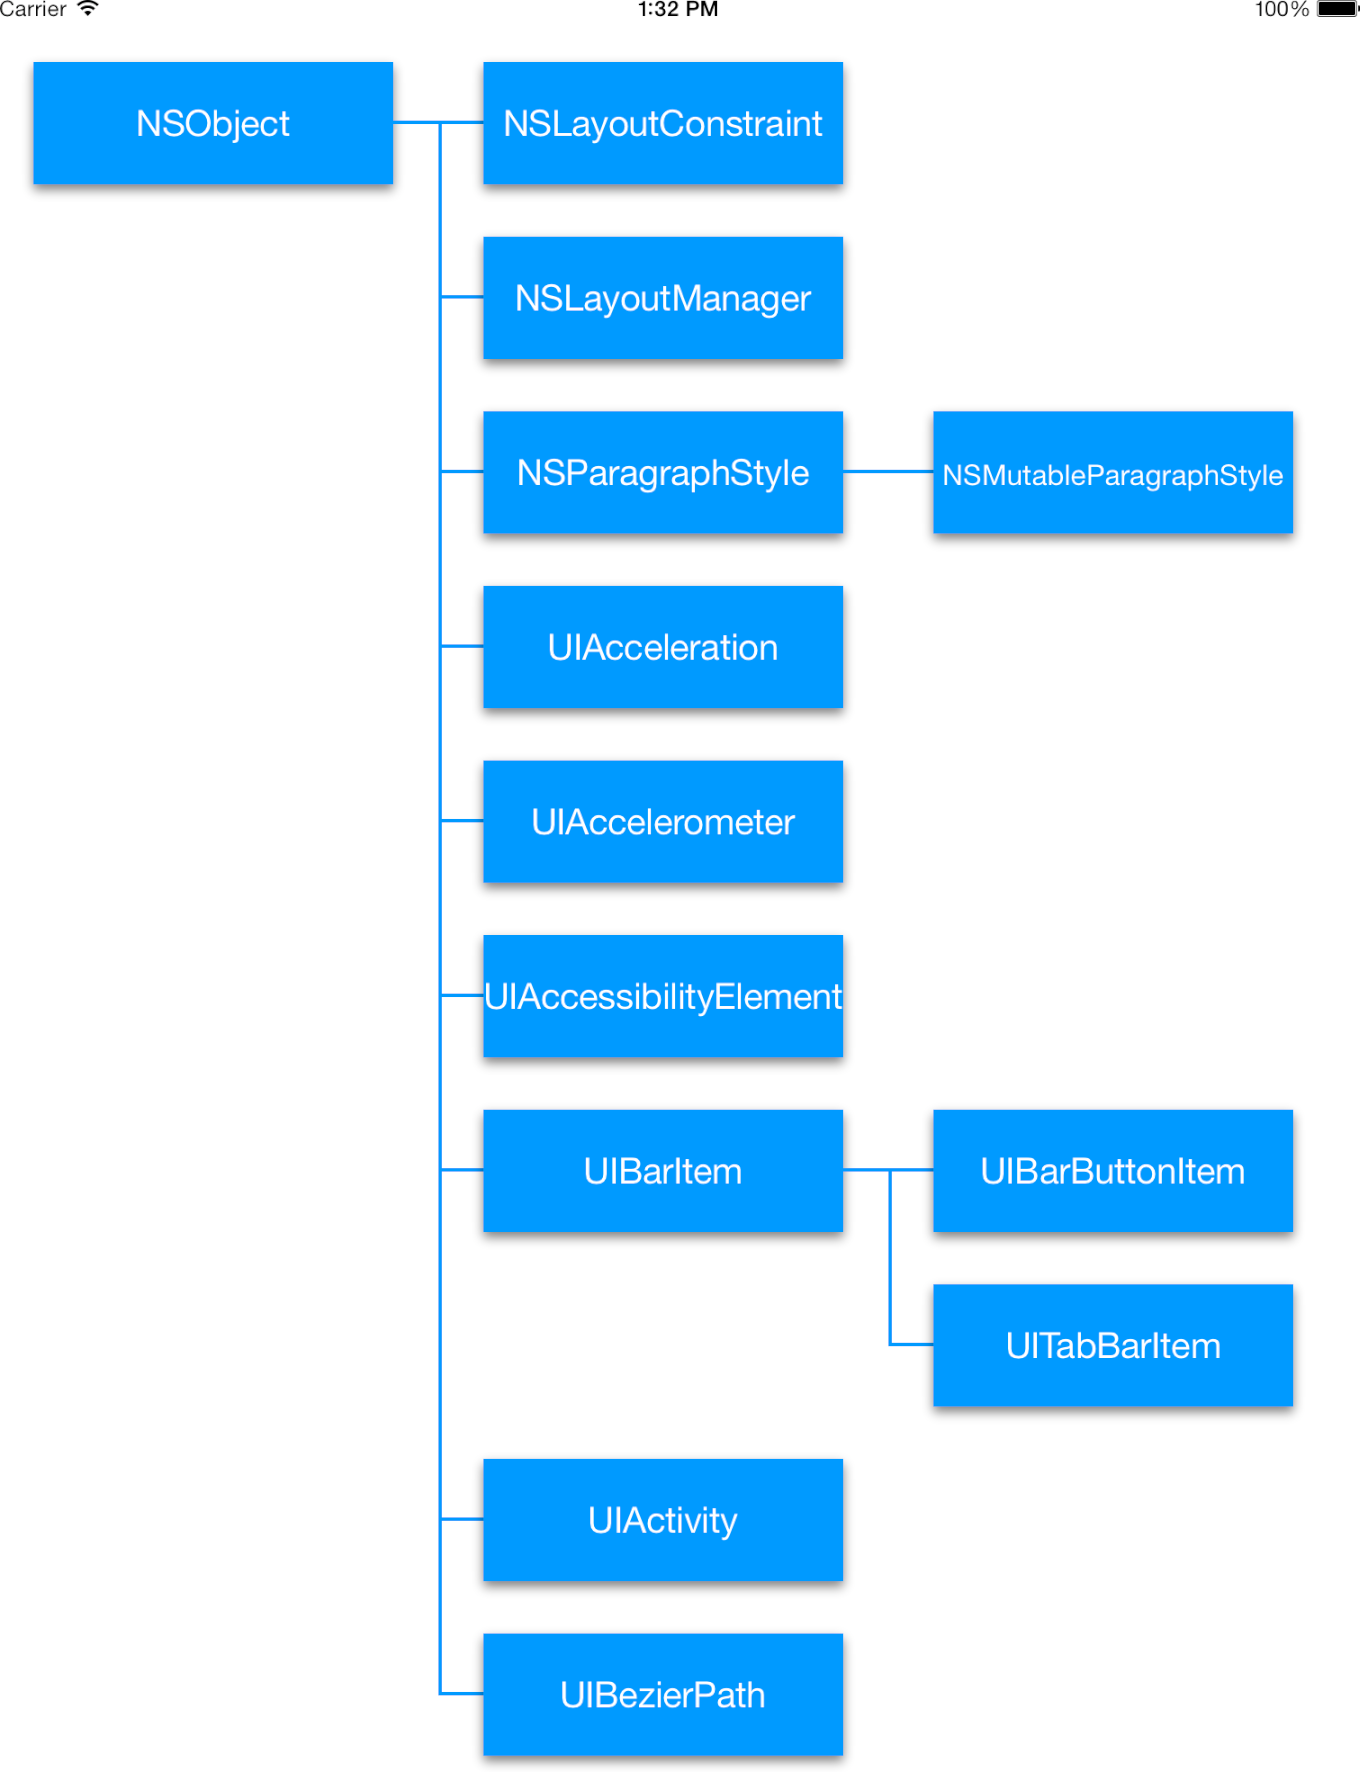
The purpose of this worked example is to implement a custom layout for displaying a hierarchichal tree of information such as the diagram seen in Figure 6-1. The example provides snippets of code followed by an explanation of the code, along with the point in the customization process you have reached. Each section of the collection view constitutes one level of depth into the tree: Section 0 contains only the NSObject cell. Section 1 contains all of the children cell’s of NSObject. Section 2 contains all of the children cells of those children, and so on. Each of the cells is a custom cell, with a label for the associated class name, and the connections between cells are supplementary views. Because the connector view class must determine how many connections to draw, it needs access to the data in our data source. It therefore makes sense to implement these connections as supplementary views and not decoration views.
Initialization
The first step in creating a custom layout is to subclass the UICollectionViewLayout class. Doing so provides you with the foundations necessary to build a custom layout.
For this example, a custom protocol is necessary to inform the layout’s spacing between certain items. If the attributes of specific items require extra information from the data source, it’s best to implement a protocol for a custom layout rather than to initiate a direct connection to the data source. Your resulting layout is more robust and reusable; it won’t be attached to a specific data source but will instead respond to any object that implements its protocol.
Listing 6-1 shows the necessary code for the custom layout’s header file. Now, any class that implements the MyCustomProtocol protocol can utilize the custom layout, and the layout can query that class for the information it needs.
Listing 6-1 Connecting to the custom protocol
@interface MyCustomLayout : UICollectionViewLayout |
@property (nonatomic, weak) id<MyCustomProtocol> customDataSource; |
@end |
Next, because the number of items the collection view will manage is relatively low, the custom layout makes use of a caching system to store the layout attributes it generates when preparing the layout and then retrieves these stored values whenever the collection view asks for them. Listing 6-2 shows the three private properties our layout will need to maintain and the init method. The layoutInformation dictionary houses all of the layout attributes for all types of views within our collection view, and the maxNumRows property keeps track of how many rows are needed to populate the tallest column of our tree. The insets object controls spacing between cells and is used in setting the frames for views and the content size. The values for the first two properties are set while preparing the layout, but the insets object should be set using the init method. In this case, INSET_TOP, INSET_LEFT, INSET_BOTTOM, and INSET_RIGHT refer to constants you define for each parameter.
Listing 6-2 Initializing variables
@interface MyCustomLayout() |
@property (nonatomic) NSDictionary *layoutInformation; |
@property (nonatomic) NSInteger maxNumRows; |
@property (nonatomic) UIEdgeInsets insets; |
@end |
-(id)init { |
if(self = [super init]) { |
self.insets = UIEdgeInsetsMake(INSET_TOP, INSET_LEFT, INSET_BOTTOM, INSET_RIGHT); |
} |
return self; |
} |
The last step for this custom layout is to create custom layout attributes. Although this step is not always necessary, in this case, as cells are being placed, the code needs access to the index paths of the current cell’s children so that it can adjust the children cell’s frames to match that of their parent. So subclassing UICollectionViewLayoutAttributes to store an array of the cell’s children provides that information. You subclass UICollectionViewLayoutAttributes, and in the header file add the following code:
@property (nonatomic) NSArray *children; |
As explained in the UICollectionViewLayoutAttributes class reference, subclassing layout attributes requires that you override the inherited isEqual: method in iOS 7 and later. For more information on why this is, see UICollectionViewLayoutAttributes Class Reference.
The implementation for the isEqual: method in this case is simple because there’s only one field to compare—the contents of the children array. If the arrays of both layout attributes objects match, then they must be equal because children can belong to only one class. Listing 6-3 shows the implementation for the isEqual: method.
Listing 6-3 Fulfilling requirements for subclassing layout attributes
-(BOOL)isEqual:(id)object { |
MyCustomAttributes *otherAttributes = (MyCustomAttributes *)object; |
if ([self.children isEqualToArray:otherAttributes.children]) { |
return [super isEqual:object]; |
} |
return NO; |
} |
Remember to include the header file for the custom layout attributes in the custom layout file.
At this point in the process, you are ready to start implementing the main part of the custom layout with the foundations you have laid.
Preparing the Layout
Now that all of the necessary components have been initialized, you can prepare the layout. The collection view first calls the prepareLayout method during the layout process. In this example, the prepareLayout method is used to instantiate all of the layout attributes objects for every view in the collection view and then cache those attributes in our layoutInformation dictionary for later use. For more information on the prepareLayout method, see Preparing the Layout.
Creating the Layout Attributes
The example implementation of the prepareLayout method is split into two parts. Figure 6-2 shows the goal for the first half of the method. The code iterates over every cell, and if that cell has children, relates those children to the parent cell. As you can see in the figure, this process is done for every cell, including the children cells of other parent cells.

Listing 6-4 shows the first half of the prepareLayout method’s implementation. Both mutable dictionaries initialized at the beginning of the code form the basis of the caching mechanism. The first, layoutInformation, is the local equivalent of the layoutInformation property. Creating a local mutable copy allows the instance variable to be immutable, which makes sense in the custom layout’s implementation because layout attributes should not be modified after the prepareLayout method finishes running. The code then iterates over each section in increasing order and then over each item within each section to create attributes for every cell. The custom method attributesWithChildrenForIndexPath: returns an instance of the custom layout attributes, with the children property populated with the index paths of the children for the item at the current index path. The attributes object is then stored within the local cellInformation dictionary with its index path as the key. This initial pass over all of the items allows the code to set the children for each item before setting the item’s frame.
Listing 6-4 Creating layout attributes
- (void)prepareLayout { |
NSMutableDictionary *layoutInformation = [NSMutableDictionary dictionary]; |
NSMutableDictionary *cellInformation = [NSMutableDictionary dictionary]; |
NSIndexPath *indexPath; |
NSInteger numSections = [self.collectionView numberOfSections;] |
for(NSInteger section = 0; section < numSections; section++){ |
NSInteger numItems = [self.collectionView numberOfItemsInSection:section]; |
for(NSInteger item = 0; item < numItems; item++){ |
indexPath = [NSIndexPath indexPathForItem:item inSection:section]; |
MyCustomAttributes *attributes = |
[self attributesWithChildrenAtIndexPath:indexPath]; |
[cellInformation setObject:attributes forKey:indexPath]; |
} |
} |
//end of first section |
Storing the Layout Attributes
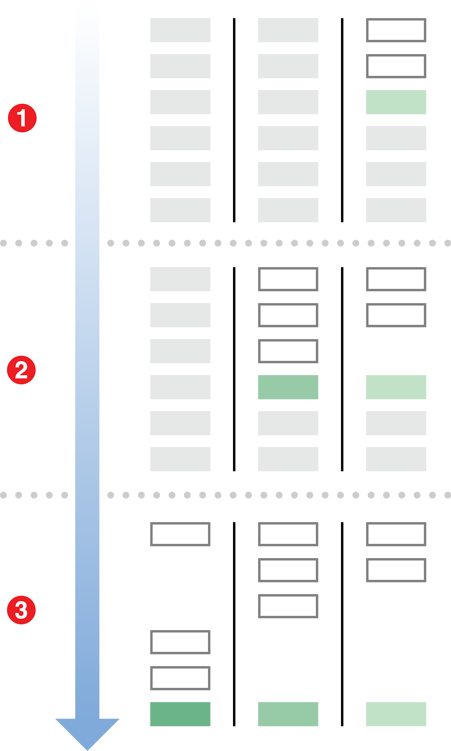
Figure 6-3 depicts the process that occurs in the second half of the prepareLayout method in which the tree hierarchy is built from the last row to the first. This approach may at first seem peculiar, but it is a clever way of eliminating the complexity involved with adjusting children cell’s frames. Because the frames of children cells need to match up with those of their parent, and because the amount of space between cells on a row-to-row basis is dependent upon how many children a cell has (including how many children each child cell has and so on), you want to set the child’s frame before setting the parent’s. In this way, the child cell and all of its children cells can be adjusted to match their overall parent’s cell.
In step 1, the cells of the last column have been placed in sequential order. In step 2, the layout is determining the frames for the second column. In this column, the cells can be laid out sequentially since no cell has more than one child. However, the green cell’s frame must be adjusted to match that of its parent cell, so it is shifted down one space. In the final step, the cells for the first column are being placed. The first three cells of the second column are the children of the first cell in the first column, so the cell’s following the first cell in the first column are shifted down. In this case, it is not actually necessary to do so since the two cell’s following the first have no children of their own, but the layout object is not smart enough to know this. Rather, it always adjusts the space in case any cell following one with children has children of its own. As well, the green cells have now both shifted down to match that of their parent.
Listing 6-5 shows the second half of the prepareLayout method, in which the frames for each item are set. The commented numbers following some lines of code correspond to the numbered explanations found after the code.
Listing 6-5 Storing layout attributes
//continuation of prepareLayout implementation |
for(NSInteger section = numSections - 1; section >= 0; section—-){ |
NSInteger numItems = [self.collectionView numberOfItemsInSection:section]; |
NSInteger totalHeight = 0; |
for(NSInteger item = 0; item < numItems; item++){ |
indexPath = [NSIndexPath indexPathForItem:item inSection:section]; |
MyCustomAttributes *attributes = [cellInfo objectForKey:indexPath]; // 1 |
attributes.frame = [self frameForCellAtIndexPath:indexPath |
withHeight:totalHeight]; |
[self adjustFramesOfChildrenAndConnectorsForClassAtIndexPath:indexPath]; // 2 |
cellInfo[indexPath] = attributes; |
totalHeight += [self.customDataSource |
numRowsForClassAndChildrenAtIndexPath:indexPath]; // 3 |
} |
if(section == 0){ |
self.maxNumRows = totalHeight; // 4 |
} |
} |
[layoutInformation setObject:cellInformation forKey:@"MyCellKind"]; // 5 |
self.layoutInformation = layoutInformation |
} |
In Listing 6-5, the code traverses the sections in descending order, building the tree from the back to the front. The totalHeight variable tracks how many rows down the current item needs to be. This implementation does not track spacing smartly, simply leaving empty space below cells with children so that two cell’s children never overlap, and the totalHeight variable helps accomplish this. The code accomplishes this in the following order:
The layout attributes created in our first pass over the data are retrieved from the local dictionary before the cell’s frame is set.
The custom
adjustFramesOfChildrenAndConnectorsForClassAtIndexPath:method recursively adjusts the frames of all the cell’s children and grandchildren and so on to match the cell’s frame.After putting the adjusted attributes back in the dictionary, the
totalHeightvariable is adjusted to reflect where the next item’s frame needs to be. This is where the code takes advantage of the custom protocol. Whatever object implements that protocol needs to implement thenumRowsForClassAndChildrenAtIndexPath:method, which returns how many rows each class needs to occupy given how many children it has.The
maxNumRowsproperty (later needed to set the content size) is set to section 0’s total height. The column with the longest height is always section 0, which has a height adjusted for all of the children in the tree, because this implementation doesn’t include smart space adjusting.The method concludes by inserting the dictionary with all of the cell attributes into the local
layoutInformationdictionary with a unique string identifier as its key.
The string identifier used to insert the dictionary in the final step is used throughout the rest of the custom layout to retrieve the correct attributes for the cells. It becomes even more important when supplementary views come into play further along in the example.
Providing the Content Size
In preparing the layout, the code sets the value of maxNumRows to be the number of rows in the largest section in the layout. This information can be leveraged to set the appropriate content size, which is the next step in the layout process. Listing 6-6 shows the implementation for collectionViewContentSize. It relies on the constants ITEM_WIDTH and ITEM_HEIGHT, which are presumably global to the application (for instance, they are needed in the custom cell implementation to size the cell label correctly).
Listing 6-6 Sizing the content area
- (CGSize)collectionViewContentSize { |
CGFloat width = self.collectionView.numberOfSections * (ITEM_WIDTH + self.insets.left + self.insets.right); |
CGFloat height = self.maxNumRows * (ITEM_HEIGHT + _insets.top + _insets.bottom); |
return CGSizeMake(width, height); |
} |
Providing Layout Attributes
With all of the layout attributes objects initialized and cached, the code is fully prepared to provide all of the layout information requested in the layoutAttributesForElementsInRect: method. This method is the second step in the layout process, and unlike the prepareLayout method, it is required. The method provides a rectangle and expects an array of layout attributes objects for any views contained within the provided rectangle. In some cases, collection views that house thousands of items might wait until this method is called to initialize layout attributes objects for only the elements contained within the provided rectangle, but this implementation relies on caching instead. Therefore, the layoutAttributesForElementsInRect: method simply requires looping over all of the stored attributes and gathering them into a single array returned to the caller.
Listing 6-7 shows the implementation of the layoutAttributesForElementsInRect: method. The code traverses all of the subdictionaries that contain layout attributes objects for specific types of views within the main dictionary _layoutInformation. If the attributes examined within the subdictionary are contained within the given rectangle, they’re added to an array storing all of the attributes within that rectangle, which is returned after all of the stored attributes have been checked.
Listing 6-7 Collecting and processing stored attributes
- (NSArray*)layoutAttributesForElementsInRect:(CGRect)rect { |
NSMutableArray *myAttributes [NSMutableArray arrayWithCapacity:self.layoutInformation.count]; |
for(NSString *key in self.layoutInformation){ |
NSDictionary *attributesDict = [self.layoutInformation objectForKey:key]; |
for(NSIndexPath *key in attributesDict){ |
UICollectionViewLayoutAttributes *attributes = |
[attributesDict objectForKey:key]; |
if(CGRectIntersectsRect(rect, attributes.frame)){ |
[attributes addObject:attributes]; |
} |
} |
} |
return myAttributes; |
} |
Providing Individual Attributes When Requested
As discussed in the section Providing Layout Attributes On Demand, the layout object must be prepared to return layout attributes for any singular item of any kind of view within your collection view at any time once the layout process is complete. There are methods for all three kinds of views—cells, supplementary views and decoration views—but the app currently uses cells exclusively, so the only method that requires an implementation for the time being is the layoutAttributesForItemAtIndexPath: method.
Listing 6-8 shows the implementation for this method. It taps into the stored dictionary for cells, and within that subdictionary, it returns the attributes object stored with the specified index path as its key.
Listing 6-8 Providing attributes for specific items
- (UICollectionViewLayoutAttributes *)layoutAttributesForItemAtIndexPath:(NSIndexPath *)indexPath { |
return self.layoutInfo[@"MyCellKind"][indexPath]; |
} |
Figure 6-4 shows what the layout looks like at this point in the code. All of the cells have been placed and adjusted correctly to match their parents, but the lines connecting them haven’t been drawn yet.
Incorporating Supplementary Views
In its current state, the app displays all of its cells correctly in a hierarchical sense, but because there are no lines connecting parents to their children, the class diagram is difficult to interpret. To draw lines connecting class cells to their children, this app implementation relies on a custom view that can be incorporated into the layout as a supplementary view. For more information on designing supplementary views, see Elevating Content Through Supplementary Views.
Listing 6-9 shows the lines of code that could be incorporated into the implementation of prepareLayout to include supplementary views. The minor difference between creating attributes objects for cells and for supplementary views is that the method for supplementary views requires a string identifier to tell what kind of supplementary view the attributes object is for. This is because a custom layout can have multiple different types of supplementary views, whereas each layout can have only one type of cell.
Listing 6-9 Creating attributes objects for supplementary views
// create another dictionary to specifically house the attributes for the supplementary view |
NSMutableDictionary *supplementaryInfo = [NSMutableDictionary dictionary]; |
… |
// within the initial pass over the data, create a set of attributes for the supplementary views as well |
UICollectionViewLayoutAttributes *supplementaryAttributes = [UICollectionViewLayoutAttributes layoutAttributesForSupplementaryViewOfKind:@"ConnectionViewKind" withIndexPath:indexPath]; |
[supplementaryInfo setObject: supplementaryAttributes forKey:indexPath]; |
… |
// in the second pass over the data, set the frame for the supplementary views just as you did for the cells |
UICollectionViewLayoutAttributes *supplementaryAttributes = [supplementaryInfo objectForKey:indexPath]; |
supplementaryAttributes.frame = [self frameForSupplementaryViewOfKind:@"ConnectionViewKind" AtIndexPath:indexPath]; |
[supplementaryInfo setObject:supplementaryAttributes ForKey:indexPath]; |
... |
// before setting the instance version of _layoutInformation, insert the local supplementaryInfo dictionary into the local layoutInformation dictionary |
[layoutInformation setObject:supplementaryInfo forKey:@"ConnectionViewKind"]; |
Because the code for supplementary views is similar to that for cells, incorporating this code into the prepareLayout method is simple. The code employs the same caching mechanism for supplementary views as it does for the cells, using another dictionary specifically for the ConnectionViewKind supplementary view. If you were going to add more than one kind of supplementary view, you would create another dictionary for that kind of view and add these lines of code for that kind of view, too. But in this case, the layout requires only one kind of supplementary view. As in the code for initializing the cell layout attributes, this implementation employs the custom frameForSupplementaryViewOfKind:AtIndexPath: method for determining a supplementary view’s frame based on what kind of view it is. Remember that the custom adjustFramesOfChildrenAndConnectorsForClassAtIndexPath: shown in the implementation of the prepareLayout method needs to incorporate the adjustment of any supplementary views relevant to the class hierarchy layout.
In the case of the example code, nothing needs to be modified in the layoutAttributesForElementsInRect: implementation because it is designed to loop over all the attributes stored in the main dictionary. As long as the supplementary view attributes are added to the main dictionary, the provided implementation of layoutAttributesForElementsInRect: works as expected.
Last, as was the case for cells, the collection view may request supplementary view attributes for specific views at any time. As such, an implementation of layoutAttributesForSupplementaryElementOfKind:atIndexPath: is required.
Listing 6-10 shows the implementation for the method, which is nearly identical to that of layoutAttributesForItemAtIndexPath:. As an exception, using the provided kind string rather than hardcoding a type of view into the return value allows you to use multiple supplementary views in your custom layout.
Listing 6-10 Providing supplementary view attributes on demand
- (UICollectionViewLayoutAttributes *) layoutAttributesForSupplementaryViewOfKind:(NSString *)kind atIndexPath:(NSIndexPath *)indexPath { |
return self.layoutInfo[kind][indexPath]; |
} |
Recap
By including supplementary views, you now have a layout object that can adequately reproduce a class hierarchy diagram. In a final implementation, you probably want to incorporate adjustments into your custom layout to conserve space. This example explores what a real, base implmentation of a custom collection view layout might look like. Collection views are incredibly robust, and provide so much more capability than seen here. Highlighting and selecting (or even animating) cells when moved, inserted, or deleted are all easy enhancements that can be incorporated into your app. To take your custom layout to the next level, take a look at the last few sections of Creating Custom Layouts.
Copyright © 2014 Apple Inc. All Rights Reserved. Terms of Use | Privacy Policy | Updated: 2014-07-15