Optimizing for High Resolution
After you optimize your app for high resolution, users will enjoy its detailed drawings and sharp text. And depending on how you’ve designed and coded your app, you might not have that much optimization to perform. If your app is a Cocoa app and uses only the standard controls, doesn’t require custom graphics resources, and doesn’t use pixel-based APIs, your work is over. OS X handles the scaling for you.
If your app is like many apps, however, you probably need to perform some work to ensure your users will have a great visual experience. At a minimum, you will need to provide high-resolution versions of custom artwork, including the app icon. If your app uses a lot of graphics resources, creating these assets could require a significant amount of designer time.
You’ll also need to make sure your code uses the correct image-loading methods and other APIs that support high resolution.
The tasks listed in the following sections outline the work that most apps need to perform:
Provide High-Resolution Versions of All App Graphics Resources
Load Images Using High-Resolution-Savvy Image-Loading Methods
After you complete this work, look at Advanced Optimization Techniques to see if your app requires further adjustments for special scenarios, such as using pixel-based technologies (OpenGL, Quartz bitmaps) or custom Core Animation layers.
Provide High-Resolution Versions of All App Graphics Resources
Your app’s icons, custom controls, custom cursors, custom artwork, and any images you want to display need to have high-resolution versions in addition to their standard-resolution versions. Each version needs to be scaled so that it displays in the same point size. For example, if you supply a standard-resolution image sized at 50x50 pixels, the high-resolution version must be sized at 100x100 pixels. You can check for correct scaling using the tiffutil command (see Run the TIFF Utility Command in Terminal).
In some cases, scaling custom content does not result in the same perceptual effect that the content has at standard resolution. Shadows or outlines might look too heavy, or some graphics might require more detail added to them. For example, on a high-resolution display, using an NSBezierPath object to draw a line with a width of 1.0 point would result in a line that is 2 pixels wide. If the 2-pixels-wide line looks too heavy, consider adjusting the graphic to show a 1-pixel-wide line, regardless of whether it appears on a standard- or a high-resolution display. You might need to experiment to ensure the perceptual effect is equivalent across resolutions.
Adopt the @2x Naming Convention
When you create a high-resolution version of an image, follow this naming convention for the image pair:
Standard:
<ImageName>.<filename_extension>Example:
circle.pngHigh resolution:
<ImageName>@2x.<filename_extension>Example:
circle@2x.png
The <ImageName> and <filename_extension> portions specify the name and extension for the file. The inclusion of the @2x modifier for the high-resolution image lets the system know that the image is the high-resolution variant of the standard image. The two component images should be in the same folder in the app’s sources. Ideally, package the image pairs into one file (see Package Multiple Versions of Image Resources into One File).
Create a Set of Icons That Includes High-Resolution Versions
You should create a set of icons that consist of pairs of icons (standard and high resolution) for each icon size—16x16, 32x32, 128x128, 256x256, 512x512. The naming convention is:
icon_<sizeinpoints>x<sizeinpoints>[@<scale>].png
where <sizeinpoints> is the size of the icon in points, and <scale> is @2x for the high-resolution version. (Don’t add a scale for standard resolution.) Additionally, the filename must use the icon_ prefix.
The images must be square and have the dimensions that match the name of the file.
Ideally, you would supply a complete set of icons. However, it is not a requirement to have a complete set; the system will choose the best representation for sizes and resolutions that you don’t supply. Each icon in the set is a hint to the system as to the best representation to use. A complete set consists of the following:
icon_16x16.pngicon_16x16@2x.pngicon_32x32.pngicon_32x32@2x.pngicon_128x128.pngicon_128x128@2x.pngicon_256x256.pngicon_256x256@2x.pngicon_512x512.pngicon_512x512@2x.png
You might be wondering whether some of these icons are redundant. But, from a perceptual standpoint, a 16x16@2x version isn’t equivalent to a 32x32 version. Although they might have the same number of pixels, the user size is different. You might need to make adjustments to achieve the optimal look for an icon at a particular user size and pixel density.
The set needs to be put into a folder whose name is <folder name>.iconset, where <folder name> is whatever name you’d like. The folder must have the .iconset extension. It might seem a little unusual for a folder to have an extension, but this extension is a signal to the system that the folder contains a set of icons.
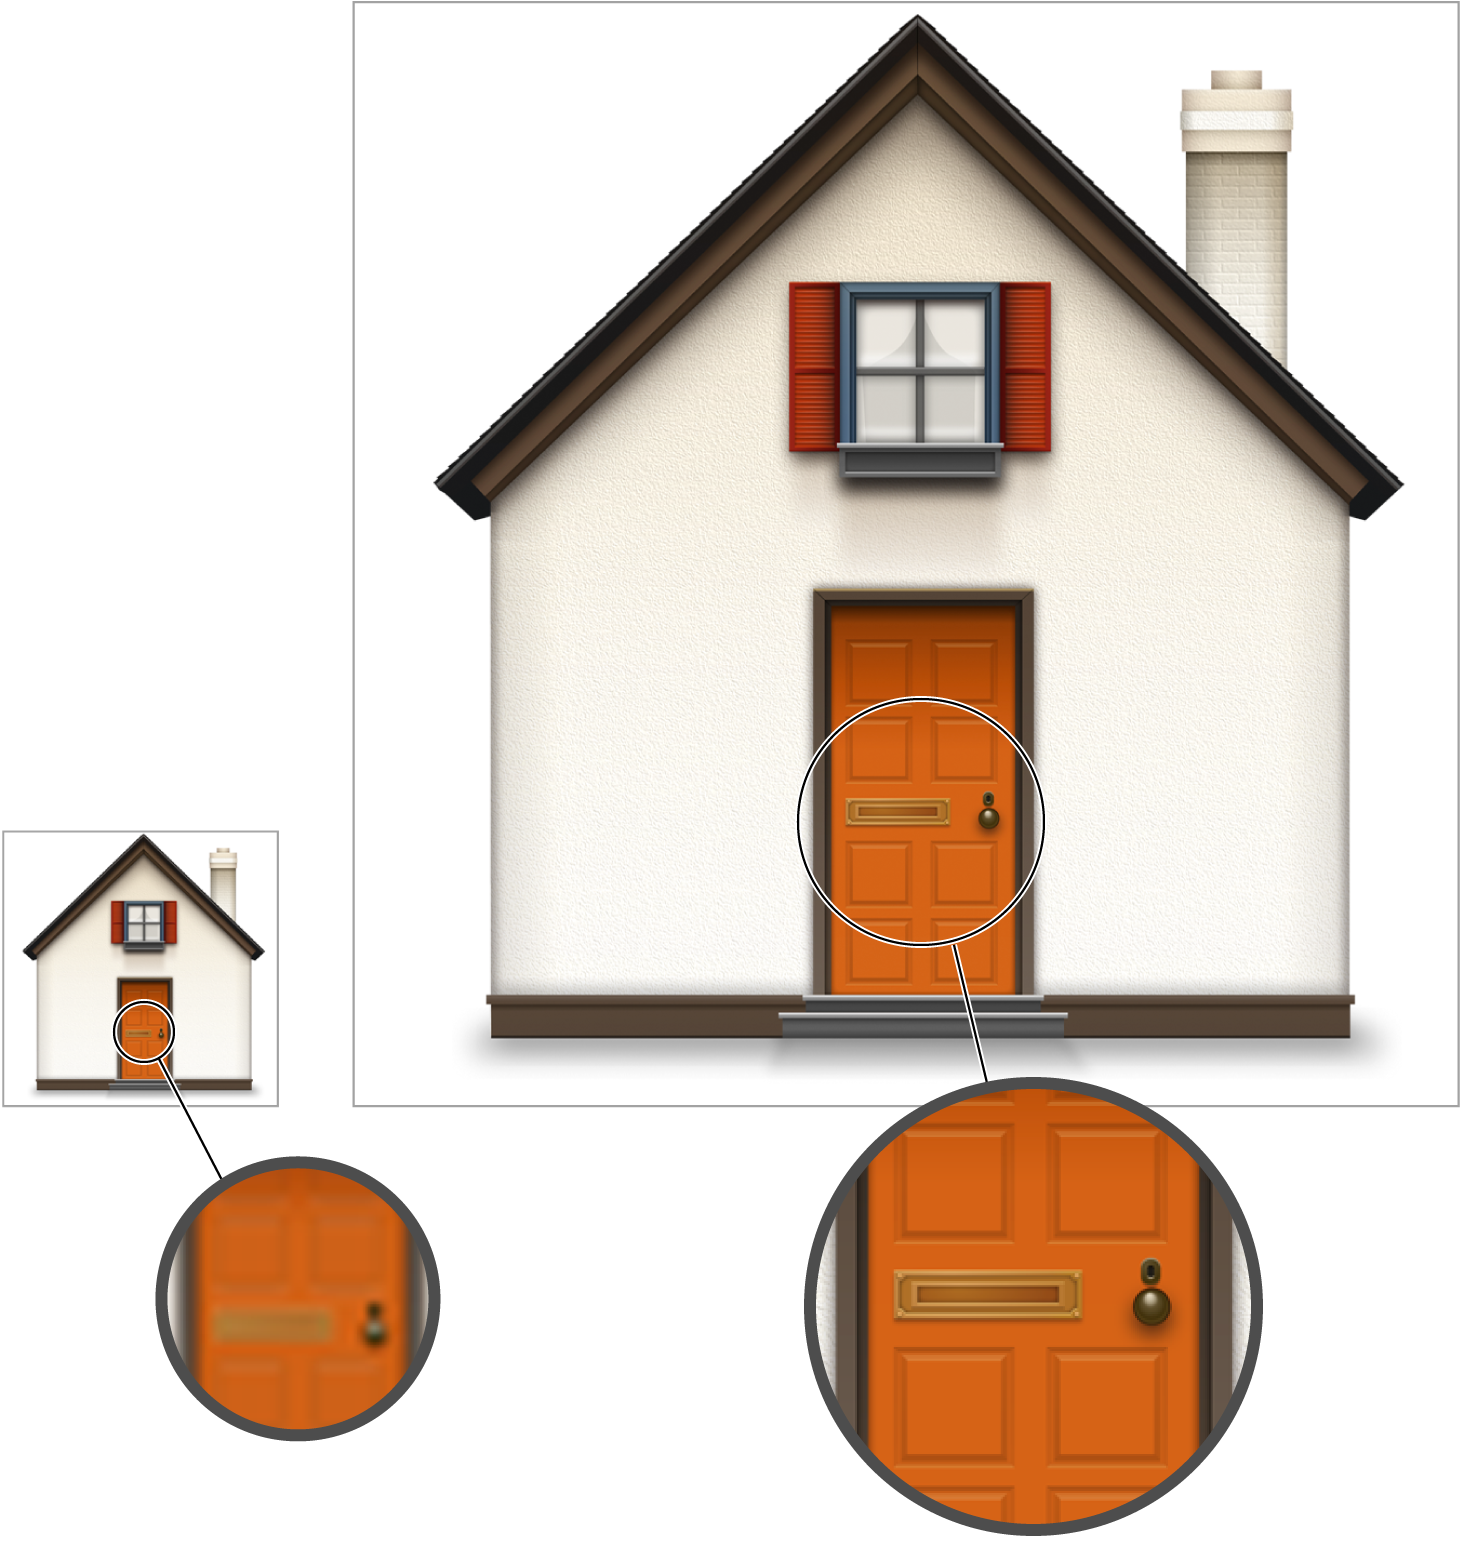
For new icons, it’s easiest to design the large icons first and then decide how to scale them down. When scaling up existing icons, the enlarged versions should look like close-ups of the existing icons, with the appropriate level of detail. For example, a house icon could show shingles or shutters in the larger sizes, while a large book icon might actually contain readable text. Do not simply create a pixel-for-pixel upscaled version of the existing icon. Figure 2-1 shows the changes in detail for different icon sizes. The larger icon has much more detail; you can see the bolts holding the mail slot on the door.
For detailed information on designing icons, see OS X Human Interface Guidelines.
Let Xcode Create an icns File Automatically
Xcode 4.4 automatically validates and converts an iconset folder to an icns file. All you need to do is add the iconset folder to your project and build the project. The generated icns file is added automatically to the built product.
Use iconutil to Create an icns File Manually
The iconutil command-line tool converts iconset folders to deployment-ready, high-resolution icns files. (You can find complete documentation for this tool by entering man iconutil in Terminal.) Using this tool also compresses the resulting icns file, so there is no need for you to perform additional compression.
Enter this command into the Terminal window:
iconutil -c icns <iconset filename>
where
<iconset filename>is the path to the folder containing the set of icons you want to convert toicns.The output is written to the same location as the
iconsetfile, unless you specify an output file as shown:iconutil -c icns -o <icon filename> <iconset filename>
Enter this command into the Terminal window:
iconutil -c iconset <icns filename>
where
<icns filename>is the path to theicnsfile you want to convert to aniconset.The output is written to the same location as the
icnsfile, unless you specify an output file as shown:iconutil -c iconset -o <iconset filename> <icns filename>
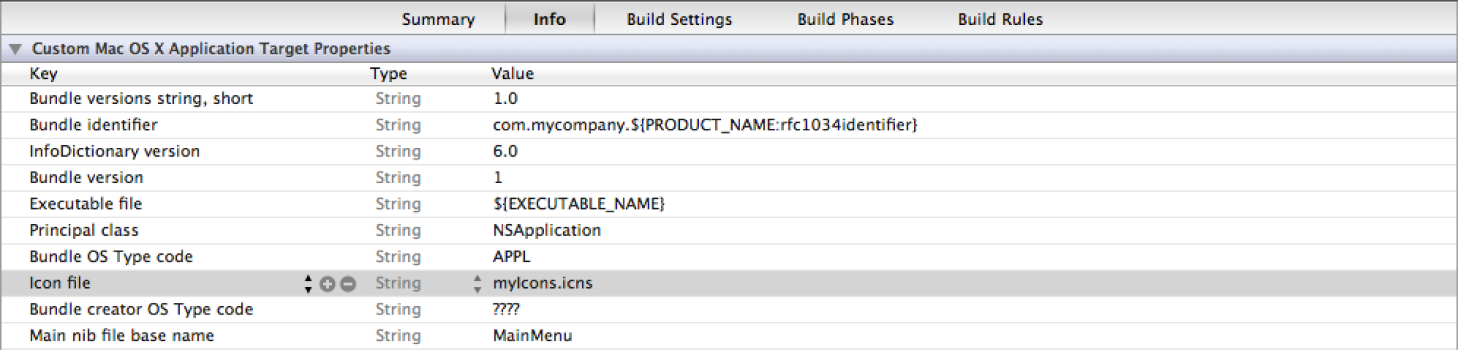
After creating the icns file, enter the filename in Xcode for the Icon file key located in Custom OS X Application Target Properties.
Package Multiple Versions of Image Resources into One File
There are two options for packaging standard- and high-resolution versions of app image resources. You can:
Set up Xcode to combine high-resolution artwork into one file.
Use the
tiffutilcommand-line tool.
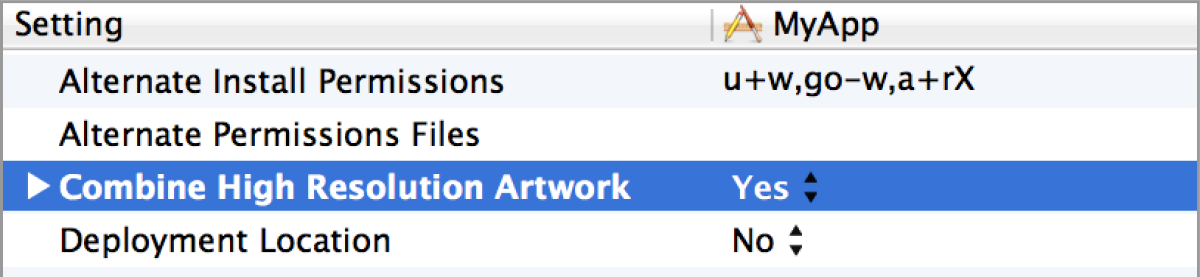
Set Up Xcode to Combine Art
The easiest way to package art is to let Xcode perform the work for you.
Run the TIFF Utility Command in Terminal
You can use the man command tiffutil with the option -cathidpicheck. The command lets you manipulate TIFF files using the specified options. The -cathidpdicheck option writes a single output file containing the files supplied as arguments to the option. This option also checks to make sure that the standard- and high-resolution files you supply are sized correctly. That is, the dimensions of the high-resolution image must be twice that of the standard-resolution image. Running tiffutil explicitly changes the dpi. Using tiffutil also compresses the resulting output file, so there is no need for you to perform additional compression.
Running the following command creates a single file from the two input files:
tiffutil -cathidpicheck infile1 infile2 -out outfile |
For example, if the input files are:
myimage.pngwith width = 32 pixels, height = 32 pixelsmyimage@2x.pngwith width = 64 pixels, height = 64 pixels
running this command:
tiffutil -cathidpicheck myimage.png myimage@2x.png -out myimage.tiff |
will produce a single TIFF file that contains the two input images.
See the tiffutil man pages documentation in Terminal for more information, including options for extracting an image from a multirepresentation TIFF file.
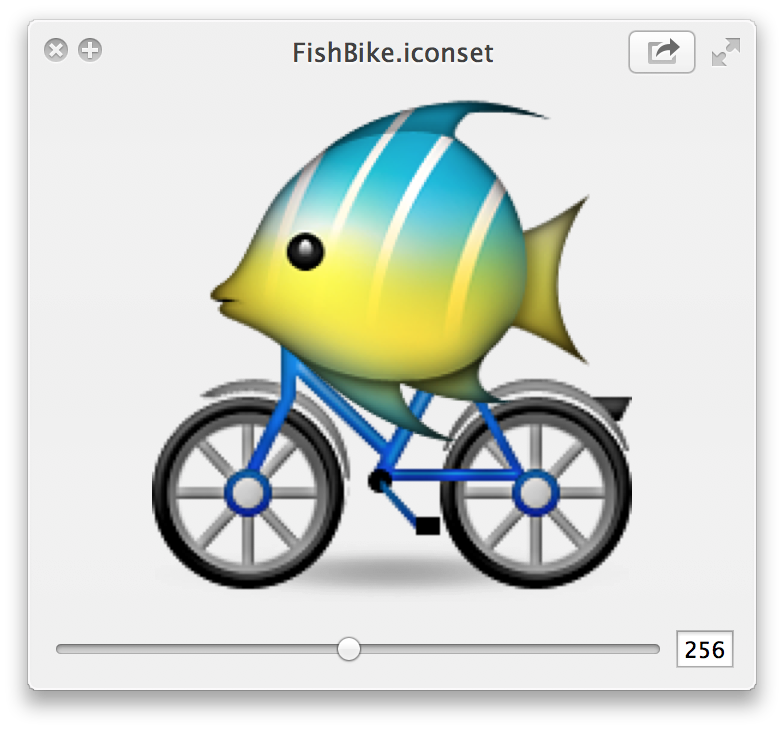
Use QuickLook to Check Your Packaged Art
You can check an iconset or multirepresentation TIFF file by choosing its icon in the Finder and pressing the Space bar. As shown in Figure 2-3, the QuickLook window that appears has a slider that allows you to look through each image contained in the file.
Load Images Using High-Resolution-Savvy Image-Loading Methods
An NSImage object can contain multiple representations of an image, making it ideal for supporting high-resolution graphics. You can use NSImage to load standard- and high-resolution versions of an image, but you can also use it to load multiple representations from a single TIFF file. (For details on creating TIFF files for multiple representations, see Package Multiple Versions of Image Resources into One File.)
If you follow the naming convention described in Adopt the @2x Naming Convention, there are two methods available that will load standard- and high-resolution versions of an image into an NSImage object, even if you don’t provide a multirepresentation image file.
The
imageNamed:method of theNSImageclass finds resources located in the main application bundle, but not in frameworks or plug-ins.The
imageForResource:method of theNSBundleclass will also look for resources outside the main bundle. Framework authors should use this method.
If you do not provide a high-resolution version of a given image, the NSImage object loads only the standard-resolution image and scales it during drawing. Figure 2-4 shows a comparison of an image on a high-resolution display when an @2x version is available and when it is not. Note that the @2x version has much more detail.

When you draw the image, the NSImage object automatically chooses the best representation for the drawing destination. For images with the @2x suffix in the filename, it calculates the user size to be half the width and height of the pixels, which renders the image correctly.
Listing 2-1 shows how to use imageNamed: to load an image into a view. The system displays the correct image for the resolution, provided a pair of images—myPhoto.png and myPhoto@2x.png—are available. Keep in mind that the @2x version must have dimensions that are twice the size as its standard-resolution counterpart.
Listing 2-1 Loading an image into a view
- (id)initWithFrame:(NSRect)frame |
{ |
self = [super initWithFrame:frame]; |
if (self) { |
[self setImage:[NSImage imageNamed:@"myPhoto"]]; |
} |
return self; |
} |
Here are a few additional tips for working with high-resolution images:
If your app uses an
NSImageViewobject for both an image and a highlight image, or to animate several images, it’s advisable that all images in the view have the same resolution.If you want to create an
NSImageobject from aCGImageRefdata type, use theinitWithCGImage:size:method, specifying the image size in points, not pixels. For the image to be sharp on a high-resolution display, make sure that the pixel height and pixel width of the image are twice that of the image height and width in points.For custom cursors, you can pass a multirepresentation TIFF to the
NSCursorclass methodinitWithImage:hotSpot:.If your app tiles or stretches images to fill a space, you should use the
NSDrawThreePartImagefunction or theNSDrawNinePartImagefunction instead of usingimageNamed:. AppKit treats the parts as a group, matching the parts appropriately and handling pixel cracks. These methods are more performant than stretching an image.
Use the Most Recent APIs That Support High Resolution
Cocoa apps must replace deprecated APIs with their newer counterparts. Apps that use older Carbon technologies need to replace those technologies with newer ones.
Replace Deprecated APIs
A number of methods that support high resolution are available for converting geometry, detecting scaling, and aligning pixels (see APIs for Supporting High Resolution). These more recent methods support the Quartz-based, high-resolution imaging model. Earlier APIs do not and are deprecated; these APIs are listed in Deprecated APIs, which also provides advice as to what to use in their place.
Update Code That Relies on Old Technologies
Check to make sure that your app—or any code it calls into, such as a plug-in—does not use any of the following:
QuickDraw or any API, such as the
NSMovieViewclass, that calls into QuickDrawQuickTime Movie Toolbox—instead, use AVFoundation (if you can’t migrate to AVFoundation, use the QTKit framework)
The Display Manager
Carbon windows that are not composited
If your app uses any of these, the system will magnify your app when it runs on a high-resolution device, regardless of whether you provide @2x image resources. For details on this user experience, see Magnified Mode Accommodates Apps That Aren’t Yet Ready for High Resolution.
Copyright © 2012 Apple Inc. All Rights Reserved. Terms of Use | Privacy Policy | Updated: 2012-09-19