Using an Apple Button
Apple provides a JavaScript class that makes it simple to add custom-styled buttons in your widget's user interface. The class that provides this, AppleButton, is one of the Apple Classes included in OS X v10.4.3 and newer.
For more on using all of the Apple Classes, including AppleButton, read Introduction to the Apple Classes.
Working with an Apple Button
The AppleButton class provides all of the standard button behaviors that you expect from a button, including looking depressed when clicked on and sizing based on the button's label width. To use an AppleButton, you need to:
Include the
AppleButtonclass in your HTML fileProvide a
<div>in your HTML to represent your buttonDeclare an
onloadhandler, a JavaScript function called when your widget loads that constructs anAppleButtonobjectPlace the button using CSS
Construct your button using the
AppleButtonclass in JavaScript
Once the button has been created, you can also change its parameters in JavaScript. Figure 27 shows two standard versions of the AppleButton provided by Dashcode.
AppleButton class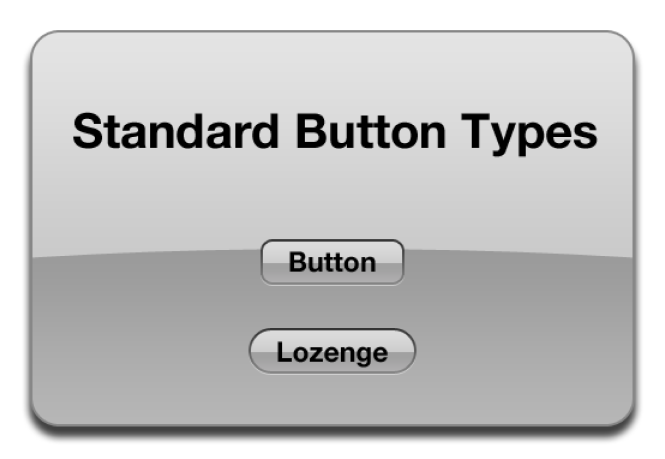
Most developers are interested in using the AppleButton class for its AppleGlassButton subclass. The AppleGlassButton is the standard style button commonly used on widget backs and is discussed in The Apple Glass Button Subclass.
An Apple Button, in HTML
In order to declare an AppleButton and to use it in JavaScript, you need to include the class in your widget's HTML file, provide a <div> that represents your button in your widget's structure, and have an onload handler that's called when your widget's HTML is loaded; the handler is used in JavaScript to construct the AppleButton.
First, you need to include the AppleButton class in your main HTML file. If you're planning backward compatibility with pre-OS X v.10.4.3 versions, follow the directions in Backwards Compatible Usage and include this path:
<script type='text/javascript' src='AppleClasses/AppleButton.js' charset='utf-8'/> |
If you plan on requiring OS X v.10.4.3 or newer for your widget, include the AppleButton class in its location in /System/Library/WidgetResources/:
<script type='text/javascript' src='/System/Library/WidgetResources/AppleClasses/AppleButton.js' charset='utf-8'/> |
Once you've included the AppleButton class, you also need to declare a <div> element to represent the button:
<body onload="setup();"> |
... |
<div id="myButton"></div> |
... |
</body> |
Typically, this entails using a <div> element somewhere in the <body> portion of your HTML. The only attribute required of this element is an id, which is used by CSS to position the button and by JavaScript to construct the button. The id attribute is required over the class attribute, because elements with id attributes can be accessed via JavaScript.
Also note the declaration of an onload handler within the <body> tag. This handler is called when your widget's HTML is loaded. It's used to construct the AppleButton object in your JavaScript, as discussed in An Apple Button, in JavaScript.
An Apple Button, in CSS
Now that the button is properly declared in your HTML file, you need to position it in your CSS. This entails including a style with the element's name and any other placement parameters you see fit to use:
#myButton { |
position: absolute; |
right: 20px; |
bottom: 20px; |
} |
An Apple Button, in JavaScript
In your HTML file, you should have included an onload handler as an attribute of the <body> tag. That handler is called once Dashboard has loaded your widget's HTML file and should be used to call the constructor for the AppleButton class. The constructor for an AppleButton is defined as:
AppleButton( |
buttonElement, |
label, |
height, |
leftImage, |
leftImageDown, |
leftImageWidth, |
middleImage, |
middleImageDown, |
rightImage, |
rightImageDown, |
rightImageWidth, |
onclick |
); |
The AppleButton parameters are defined as:
Parameter | Expected Value | Example |
|---|---|---|
| A DOM object; namely, the |
|
| A string; the label to be shown on the button |
|
| A number; the height of all of the images used in the button |
|
| A string; the path to an image, used for the left portion of the button |
|
| A string; the path to an image, used for the left portion of the button as it's being clicked |
|
| A number; the width of the images for the left portion of the button |
|
| A string; the path to an image, used for the middle portion of the button |
|
| A string; the path to an image, used for the middle portion of the button as it's being clicked |
|
| A string; the path to an image, used for the right portion of the button |
|
| A string; the path to an image, used for the right portion of the button as it's being clicked |
|
| A number; the width of the images for the left portion of the button |
|
| A function name; the function to be called when the button is clicked |
|
The AppleButton constructor is used in the onload handler you specified in your HTML, which is located within your JavaScript and could look like:
var gMyButton; |
function setup() |
{ |
gMyButton = new AppleButton( |
document.getElementById("myButton"), |
"Click Me", |
23, |
"button/buttonLeft.png", |
"button/buttonLeftDown.png", |
11, |
"button/buttonMiddle.png", |
"button/buttonMiddleDown.png", |
"button/buttonRight.png", |
"button/buttonRightDown.png", |
11, |
buttonClicked); |
} |
Note the global variable gMyButton. This variable holds a reference to the AppleButton object, which lets you interact with the button at any point after it's been constructed. These properties and methods are available for you to interact with:
Option | Type | Explanation |
|---|---|---|
| Property | Read/Write; the handler for when the button is clicked |
| Method | Sets the images used to represent the button after it is disabled using |
| Property | Read only; returns a boolean reflecting if the button is active or not |
| Method | Sets whether or not the button is active; takes in either |
| Method | Removes the button |
| Property | Read/Write; the label text element; allows you to style the label text |
The Apple Glass Button Subclass
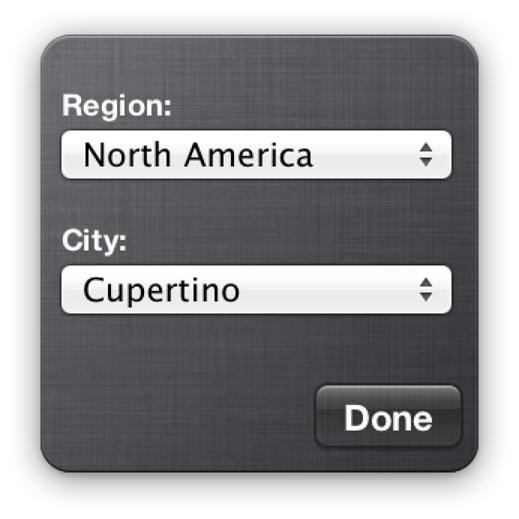
Apple provides a subclass of the AppleButton, called the AppleGlassButton, to make it easy to use the standard glass-style buttons found commonly on widget backs. For example, the Done button on the back of a widget is usually a glass button, as shown in Figure 28.
To create an AppleGlassButton, follow the directions found above in An Apple Button, in HTML and An Apple Button, in CSS. When it comes time to use the AppleGlassButton in JavaScript, however, use the AppleGlassButton constructor instead of the AppleButton constructor, as shown below:
AppleGlassButton( |
buttonElement, |
label, |
onclick |
); |
The AppleGlassButton constructor uses Apple-supplied art to render a standard glass-style button for your widget. Its parameters are defined as:
Parameter | Expected Value | Example |
|---|---|---|
| A DOM object; namely, the |
|
| A string; the label to be shown on the button |
|
| A function name; the function to be called when the button is clicked |
|
Like the Apple Button constructor, the Apple Glass Button constructor is used in the onload handler in your JavaScript and could look like:
var gMyGlassButton; |
function setup() |
{ |
gMyGlassButton = new AppleGlassButton( |
document.getElementById("myButton"), |
"Click Me", |
buttonClicked); |
} |
Note the global variable gMyGlassButton. This variable holds a reference to the AppleGlassButton object, which lets you interact with the button at any point after it's been constructed. These properties and methods are available for you to interact with:
Option | Type | Explanation |
|---|---|---|
| Property | Read/Write; the handler for when the button is clicked |
| Property | Read only; returns a boolean reflecting if the button is active or not |
| Method | Sets whether or not the button is active; takes in either |
| Method | Removes the button |
Copyright © 2010 Apple Inc. All Rights Reserved. Terms of Use | Privacy Policy | Updated: 2010-02-01