Retired Document
Important: Apple recommends that developers explore QTKit and Core Video for new development in this technology area. See QTKit Framework Reference and Core Video Programming Guide for more information.
Playing a Movie
There are several different tool sets available for playing movies in QuickTime. The high-level tool sets all make use of a movie controller component; these components do most of the work required to play the movie, such as setting up any streams or buffers, resizing the movie, and redrawing the movie when it is moved or part of it is uncovered.
A movie controller component can include a human interface, allowing the user to start, stop, rewind, scrub, and adjust the sound volume, without you having to write any supporting code. This user interface need not be displayed, however.
You can override or augment any of the movie controller component functions with your own code by installing a callback function using MCSetActionFilterWithRefCon, and you can call any of the movie controller component’s functions directly from your code (in response to input from your own custom user interface, for example). For details, see Working Directly with Movie Controller Components.
There are low-level commands in the Movie Toolbox that you can also use to control movies. This is usually neither necessary nor desirable, however, as it adds considerably to the complexity of your application. It also increases the risk that your application will not be able to take advantage of new features as they are added to QuickTime. If you use a movie controller component, the control code is updated with new versions of QuickTime and generally takes advantage of new features.
You can also enable a simple editing interface in a movie controller, giving the user the ability to perform cut-and-paste movie editing without requiring you to write supporting code. For more information, see QuickTime Movie Basics.
Once you have attached a movie controller component to your movie, to play the movie all you have to do is grant time to the controller.
In QuickTime 7 and later on Mac OS X, you can display the movie using an HIMovieView; the operating system automatically grants time to the controller as needed. You can create and initialize an HIMovieView using Interface Builder, greatly simplifying your code.
In QuickTime 6 and later on Mac OS X, you can display the movie using a Carbon movie controller. While somewhat more limited and more complex to set up than an HIMovieView, a Carbon movie controller also gets the processing time it needs automatically.
In older versions of QuickTime for Mac OS X, you can use a Carbon timer to generate an event whenever the movie needs processor time; you set a callback procedure that responds to this event by granting time to the controller and resetting the timer.
For versions of QuickTime running on Windows, or on Mac OS 9, you must periodically give idle time to the movie controller in your run loop.
Playing a Movie Using HIMovieView
An HIMovieView is a specialized human interface object that displays QuickTime movies. It is a subclass of HIView, which is a subclass of HIObject. HIMovieView includes a movie controller component, a set of display coordinates, and more.
HIView is an object-oriented view system. Using the HIView model, every item within a window is a view: the root control, all embedded controls, the close, zoom, and minimize buttons, the resize control, and so on. Current Control Manager function calls are layered on top of this HIView model, so you can also control a view using existing Control Manager functions.
Some benefits of the HIView model include the following:
Core Image (Quartz) is the native drawing system, but you can still use QuickDraw if desired.
Coordinate system is not limited by the 16-bit space of QuickDraw. Floating point coordinates are valid.
Simpified coordinate system for view bounds and view position within its parent.
Views can be layered; you can easily place controls in front of, or behind, other controls.
Views can be attached to, and detached from, parent windows, allowing you to move a view between windows.
Because HIMovieView is a subclass of HIView, it inherits these benefits over traditional controls.
Creating an HIMovieView
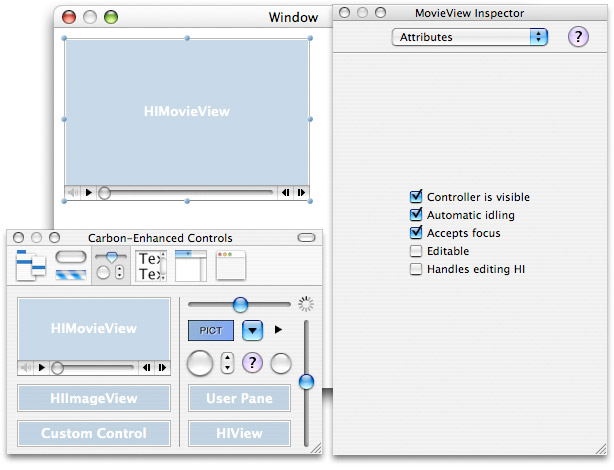
An HIMovieView can be created in Interface Builder by dragging an icon from a palette; you can then use the inspector window to set most of the viewing parameters without writing any code at all. In this case, you set the parent window, initial position of the movie within the window, and the initial size of the movie’s display area, all in Interface Builder. There are attribute buttons to select whether the movie control bar is visible, whether the system automatically grants time to the movie as needed, whether the controller accepts keyboard input, whether the movie is editable, and whether the controller should enable its editing user interface as shown in Figure 1-1. All this information is stored in the nib file that specifies the parent window.
Alternatively, you can create and configure an HIMovieView entirely in code, in which case you must also set the various parameters, such as height and width, from your code when you instantiate the view. An example would look like this:
HIViewRef theHIMovieView; |
// create an HIMovieview |
HIObjectCreate(kHIMovieViewClassID, NULL, &theHIMovieView); |
// set the movie attributes for the HIMovieView |
HIMovieViewChangeAttributes(theHIMovieView, kHIMovieViewStandardAttributes, 0); |
// attach my movie to the HIMovieView |
HIMovieViewSetMovie(theHIMovieView, myMovie); |
As a third alternative, you can create a generic HIView using Interface Builder, setting some of the view parameters there, then subclass it as an HIMovieView and configure it further from your code at runtime.
If you create a generic HIView in Interface Builder (in this case with an ID of 'moov',0, in a window named MovieWindow), your code would look something like this:
HIViewID kMovieViewID = {'moov', 0}; |
HIViewRef theHIMovieView; |
... |
// get the window |
CreateWindowFromNib(nib, CFSTR("MovieWindow"), &window); |
// find our HIMovieView |
HIViewFindByID(HIViewGetRoot(window), kMovieViewID, &theHIMovieView); |
// set some attributes and a movie for the HIMovieView |
HIMovieViewChangeAttributes(theHIMovieView, kHIMovieViewAutoIdlingAttribute | |
kHIMovieViewControllerVisibleAttribute, |
kHIMovieViewEditableAttribute | |
kHIMovieViewHandleEditingHIAttribute | |
kHIMovieViewAcceptsFocusAttribute); |
HIMovieViewSetMovie(theHIMovieView, aMovie); |
// install some event handlers |
InstallWindowEventHandler(window, &MainWindowEventHandler, |
GetEventTypeCount(windowEvents), windowEvents, window, NULL); |
InstallHIObjectEventHandler((HIObjectRef)theHIMovieView, &HIMovieViewEventSniffer, |
GetEventTypeCount(viewEvents), viewEvents, window, NULL); |
// on with the show |
ShowWindow(window); |
... |
Configuring an HIMovieView
An HIMovieView object responds to all the usual HIView commands, as well as Control Manager commands. For details, see HIView Programming Guide, and Control Manager Reference.
Use the standard HIView commands or the Control Manager commands to identify the view, find its parent window, change its visibility, and so on. For example, the GetControlBounds and SetControlBounds functions can be used to obtain and modify the view’s size and location.
In addition to the standard HIView API, the following functions and constants are available specifically for use with HIMovieView:
Functions:
HIMovieViewChangeAttributes—Changes the movie view attributes.
HIMovieViewCreate—Creates an
HIMovieViewobject.HIMovieViewGetAttributes—Returns the movie view’s current attributes.
HIMovieViewGetControllerBarSize—Returns the size of the visible movie control bar.
HIMovieViewGetMovie—Returns the view’s current movie.
HIMovieViewGetMovieController—Returns the view’s current movie controller.
HIMovieViewPause—Pauses the view’s current movie.
HIMovieViewPlay—Plays the view’s current movie.
HIMovieViewSetMovie—Sets the view’s current movie.
Constants:
kEventClassMovieViewkEventMovieViewOptimalBoundsChangedkHIMovieViewClassIDkHIMovieViewAcceptsFocusAttributekHIMovieViewAutoIdlingAttributekHIMovieViewControllerVisibleAttributekHIMovieViewEditableAttributekHIMovieViewHandleEditingHIAttributekHIMovieViewNoAttributeskHIMovieViewStandardAttributes
Use HIMovieViewChangeAttributes to set the HIMovieView’s unique movie controller attributes, such as whether it allows editing or provides a user interface.
Use HIMovieViewSetMovie to attach a movie to the view.
Use HIMovieViewPlay and HIMovieViewPause to play and pause the movie programmatically.
Use kHIMovieViewDataMovieController to obtain the movie controller component instance if you need to communicate with the movie controller directly. You can then address commands to the movie controller component directly. For details, see Working Directly with Movie Controller Components.
You can also configure an HIMovieView object using Control Manager commands such as SetControlData. In addition to the applicable standard control parameters, an HIMovieView accepts the following constants with SetControlData:
kHIMovieViewDataMovieController (read-only MovieController) |
kHIMovieViewDataControllerBarHeight (read-only UInt32) |
kHIMovieViewDataMovie (Movie) |
kHIMovieViewDataControllerVisible (Boolean) |
kHIMovieViewDataLocateTopLeft (Boolean) |
kHIMovieViewDataEditable (Boolean) |
kHIMovieViewDataHandleEditingHI (Boolean) |
kHIMovieViewDataKeysEnabled (Boolean) |
kHIMovieViewDataManualIdling (Boolean) |
To override or augment any of the functions HIMovieView performs, add an event handler using InstallHIObjectEventHandler. To override the controller, handle the associated event and mark it as handled; to augment the controller, perform the augmenting action but do not mark the event as handled. Alternatively, you can subclass the HIMovieView and create a custom view that inherits the features of HIMovieView as a base feature set.
HIMovieView and Your Run Loop
You don’t actually need to do anything special in your run loop to play a movie in an HIMovieView. Just attach a movie using HIMovieViewSetMovie, set the auto-idling and visible-controller attributes (kHIMovieViewAutoIdlingAttribute and kHIMovieViewControllerVisibleAttribute), and HIMovieView does the rest.
Playing a Movie Using a Carbon Movie Control
QuickTime 6 for Mac OS X introduced the Carbon movie control. The CreateMovieControl function takes a movie and a window as arguments and creates a control containing a standard movie controller component. The movie control can then act as a Carbon event target, receiving Carbon events and dispatching them to its movie controller.
In other words, the Carbon movie control is implemented as a custom control that includes an event handler that handles any Carbon events sent to controls. When a Carbon movie control is created for a movie, a movie controller component instance is also created. The movie control then directs user interface events to its movie controller.
Your application can install additional event handlers on the Carbon movie control to handle such things as contextual menu clicks or to intercept events to do special processing. Control Manager calls can be made as well.
The movie controller is automatically idled by means of an event loop timer, using the Idle Manager to optimize idling frequency.
Creating and Configuring a Carbon Movie Control
Create a Carbon movie control by calling CreateMovieControl, passing in the parent window, position of the controller within the window, the movie to play, and the movie controller options, such as whether to make the control bar visible or enable editing.
The control’s position in the window is passed as a Rect using local coordinates of the parent window. The movie control is centered within the specified rectangle by default and sized to fit within it while maintaining the movie’s aspect ratio. If NULL is passed, the movie control is positioned at 0,0 in the window and has the natural dimensions of the movie (plus height of the movie control bar, if visible).
You can pass the following flags in the options field:
kMovieControlOptionHideController—The movie controller is hidden when the movie control is drawn.kMovieControlOptionLocateTopLeft—The movie is pinned to the top left oflocalRectrather then being centered within it.kMovieControlOptionEnableEditing—Allows programmatic editing of the movie and enables drag and drop.kMovieControlOptionHandleEditingHI—Installs event handler for Edit menu commands and menu updating (also assertskMovieControlOptionEnableEditing).kMovieControlOptionSetKeysEnabled—Allows the movie control to react to keystrokes and participate in the keyboard focus mechanism within the window.kMovieControlOptionManuallyIdled—Rather than being idled by the movie control event loop timer, this movie control is idled by the application, manually.
Once instantiated, a Carbon movie control accepts the standard Control Manager commands. For example, the GetControlBounds and SetControlBounds functions can be used to obtain and modify the movie control’s size and location. See Control Manager Reference for more information.
In addition to the standard Control Manager selectors, you can use the following selectors for the GetControlData and SetControlData routines with Carbon movie controls:
kMovieControlDataMovieController—(read only) Use withGetControlDatato obtain the movie controller instance. You can then address the movie controller component directly usingMCDoAction.
kMovieControlDataMovie—(read only) Obtain the movie associated with a movie control after its creation.kMovieControlDataManualIdling—Obtain or modify the state of the movie control’s idling behavior. By default, all movie controls are given time by the movie control event loop timer. If this Boolean item isTRUE, the application is required to give time to the movie controller in its run loop, using theMCIdlefunction.
Carbon Movie Controls and Your Run Loop
You do not need to do anything special in your run loop to play movies using a Carbon movie control, provided you enable the movie control’s user interface and do not set the manual idle flag. The Carbon movie control takes care of all event routing to the movie. In order to distribute time to these movies, an event loop timer is set up which “idles” all movie controllers associated with Carbon movie controls within the application.
Playing a Movie Using a Movie Controller Component
If you are working in Windows OS or compiling for a version of QuickTime prior to QuickTime 6, you do not have access to either HIMovieView or Carbon movie controls. Consequently, you need to work with movie controller components directly. This is more complicated than playing a movie with an HIMovieView or a Carbon movie control, but it is still relatively straightforward; there’s just more housekeeping.
You need to decide where your visual output should appear in the parent window and how much space to give it. This defines the movie controller’s bounding box, the rectangle that encompasses the movie display area, and the movie control bar. You can get the movie’s natural bounds and set the size of the display area to match, or choose an arbitrary display area and scale the movie to fit. If the movie is too large for the bounding box, it will be scaled down automatically, but it will only be scaled up to fill the display area if you request this behavior.
Once you’ve decided where your movie should appear, you open a movie controller component and attach it to your movie. You then provide time to the movie controller from within your application run loop.
Listing 1-5 is an example of opening a movie controller component and using it to play a movie.
Listing 5-1 Using a movie controller component to play a movie
WindowPtr myWindow = NULL; |
Rect myBounds = {50, 50, 100, 100}; |
Rect myRect; |
StringPtr myTitle = QTUtils_ConvertCToPascalString(kWindowTitle); |
OSErr myErr; |
MovieController gController; |
// Initialize QuickTime |
myErr = EnterMovies(); |
if (myErr != noErr) |
goto bail; |
// Create a display window |
myErr = memFullErr; |
myWindow = NewCWindow(NULL, &myBounds, myTitle, false, 0, (WindowPtr)-1, false, 0); |
if (myWindow == NULL) |
goto bail; |
myErr = noErr; |
// Align the movie bounding box with the display window |
GetMovieBox(theMovie, &myRect); /* Get the movie box. */ |
OffsetRect(&myRect, -myRect.left, -myRecct.top); /* topleft=0 */ |
SetMovieBox(theMovie, &myRect); |
// Get a movie controller component and attach it to the movie |
// Pin the movie to the top left corner |
gController = NewMovieController (theMovie, &myBounds, mcTopLeftMovie); |
if (gController == nil) |
goto bail; |
// Get the movie controller's bounds and resize the window accordingly |
myErr = MCGetControllerBoundsRect (gController, &myRect); |
SizeWindow (myWindow, myRect.right, myRect.bottom, true); |
ShowWindow (myWindow); |
// Enable the controller to accept keyboard focus |
myErr = MCDoAction (gController, mcActionSetKeysEnabled,(Ptr)true); |
// Check for unforeseen errors |
myErr = GetMoviesError(); |
if (myErr != noErr) |
goto bail; |
// Application event loop goes here |
// Idle the movie controller component inside your application event loop |
// ... |
myErr = MCIdle(gController); |
// ... |
// On error or exit, dispose of the controller, movie, window (in that order) |
bail: |
free(myTitle); |
if (gController != NULL) |
DisposeMovieController(gController); |
if (theMovie != NULL) |
DisposeMovie(theMovie); |
if (myWindow != NULL) |
DisposeWindow(myWindow); |
Note that you should not call MCIsPlayerEvent in Mac OS X, even though you may see this in some older sample code. Instead, use MCIdle or MoviesTask to grant time to the controller, or MCKey to have the movie controller handle a keystroke.
Working Directly with Movie Controller Components
Regardless of whether you play your movie using an HIMovieView, a Carbon movie control, or a naked movie controller component, your application can call the movie controller component instance directly and give it commands.
You obtain the component instance if you open the component directly using NewMovieController. If you use an HIMovieView, you can obtain the component instance by calling HIMovieViewGetMovieController. If you use a Carbon movie control, you can obtain the component instance by calling GetControlData with kMovieControlDataMovieController.
The following commands to the movie controller component are available to your application:
MCActivateMCAdjustCursorMCAddMovieSegmentMCClearMCClickMCCopyMCCutMCDoActionMCDrawMCDrawBadgeMCEnableEditingMCGetClipMCGetControllerBoundsRectMCGetControllerBoundsRgnMCGetControllerInfoMCGetControllerPortMCGetCurrentTimeMCGetDoActionsProcMCGetIndMovieMCGetInterfaceElementMCGetMenuStringMCGetVisibleMCGetWindowRgnMCIdleMCInvalidateMCIsControllerAttachedMCIsEditingEnabledMCIsPlayerEvent(deprecated)MCKeyMCMovieChangedMCNewAttachedControllerMCPasteMCPositionControllerMCPtInControllerMCRemoveAllMoviesMCRemoveAMovieMCRemoveMovieMCSetActionFilterMCSetActionFilterWithRefConMCSetClipMCSetControllerAttachedMCSetControllerBoundsRectMCSetControllerCapabilitiesMCSetControllerPortMCSetDurationMCSetIdleManagerMCSetMovieMCSetUpEditMenuMCSetVisibleMCTrimMovieSegmentMCUndo
The MCDoAction function is of particular importance. MCDoAction can perform dozens of different operations, including starting and stopping the movie, setting the movie rate (playback speed), setting the audio volume, and so on. MCDoAction takes a selector as an argument. The selector tells MCDoAction which action to perform. For details, see Movie Controller Actions.
Obviously, all these functions allow you to do far more than just play a movie. They enable you to programmatically edit the movie, associate new movies with the controller, and configure the controller in various ways (enable editing, make the controller visible or invisible, and so on).
You can augment or override any controller function by installing a callback function, using MCSetActionFilterWithRefCon. See also “Using Movie Controllers” in the Programming Summary of QuickTime API Reference.
You will probably see references to MCIsPlayerEvent in sample code. In the past, MCIsPlayerEvent served two purposes: It granted processing time to the movie controller, and it allowed the movie controller to handle events such as mouse clicks and keystrokes. Both these features were based on the Apple Event Manager and event records, which are no longer used in Mac OS X.
If you use a Carbon movie control or an HIMovieView, processing time and event handling are taken care of automatically, so calls to MCIsPlayerEvent serve no purpose.
If your target system does not support Carbon movie controls or HIMovieView, you can call MCIdle to grant processing time to the movie controller, MCClick to have the movie controller handle a mouse click, and MCKey to have the movie controller handle a keystroke.
Bypassing the Movie Controller
It is possible to control a movie directly, without using an HIMovieView, a Carbon movie control, or a movie controller component. This is not recommended practice, however.
The low-level functions that allow you to work directly with movies can also be used when a movie controller of some sort is attached. This requires you to notify the controller that the movie has changed, and is also not recommended practice.
The low-level functions that work directly on movies are described in Appendix A, Playing a Movie Using Low-Level Commands.
Copyright © 2005, 2009 Apple Inc. All Rights Reserved. Terms of Use | Privacy Policy | Updated: 2009-06-01