Designing User Interfaces in Xcode 4
In the Xcode 3 development environment, Xcode and Interface Builder are separate applications. In Xcode 4, Interface Builder is an editor within the Xcode application. Although most of the features of the Xcode 3 Interface Builder application work identically in Xcode 4, there are some differences—most notably, the ability to make connections from Interface Builder objects directly into source code. This chapter describes the main differences between the two implementations of Interface Builder.
Design Your UI in Xcode
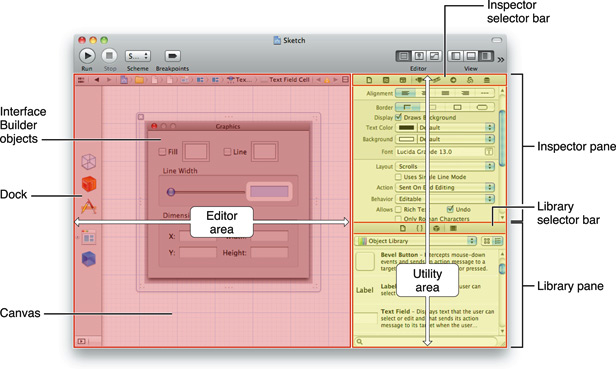
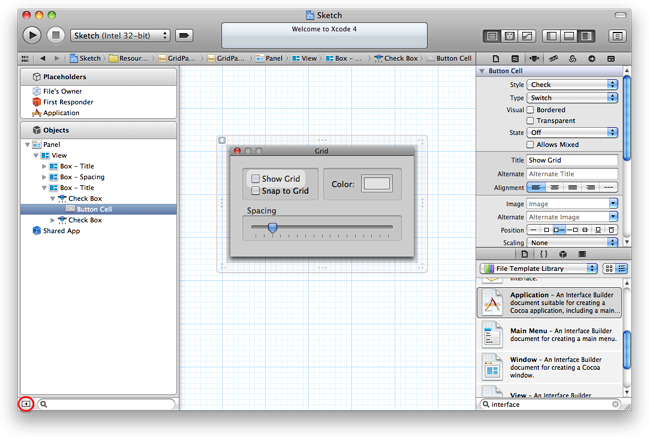
In Xcode 4, Interface Builder appears in the editor area of the workspace window when you select a nib file in the project navigator. (A nib file is a file created by Interface Builder containing the user interface design information that you enter. A nib file may have the file name extension nib or xib.) When you open a nib file, the Interface Builder inspectors appear in the utility area. You can also open an assistant editor (see Use Assistant with Interface Builder), which shows a file or files associated with whatever object you’ve selected in the Interface Builder pane. You can select Interface Builder objects in the library pane and drag them onto the Interface Builder canvas. Figure 4-1 shows Interface Builder and associated panes open in the workspace window.
Create a New Nib File
When you create a new Cocoa application or iOS view-based project, Xcode includes a nib file for your main view and a view controller class. The view controller is represented in the nib file as the “file’s owner” object. When you need a new nib file for a project, you should create the interface and implementation files for the controller first. In many cases, Xcode creates a nib file as well. As nib files usually have controllers already assigned to them, it is rarely necessary to add a separate view controller to a nib file.
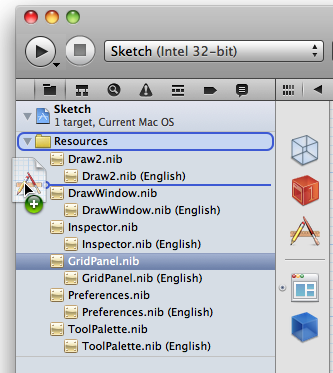
You can add a new nib file to your project either by choosing File > New > New File and selecting a User Interface template, or by dragging an interface file from the File Template library into the project navigator. When dragging into the project navigator, be sure the group into which you want to drop the file is highlighted before you drop (Figure 4-2); you won’t get the results you want if you accidentally drop the file inside another file.
Whether you choose New File or drag the nib file from the File Template library, be sure you select the appropriate file type for the correct platform. For example, there are two nib templates named Application: one for iPhone and iPad, and one for Cocoa.
Create New UI Classes in Xcode
In Xcode 3, you typically add a new class to the class hierarchy in Interface Builder, add outlets and action methods, and then ask Interface Builder to create the corresponding header and implementation files for you in Xcode. Keeping your class files synchronized between Interface Builder and Xcode can be a problem with Xcode 3. In Xcode 4, on the other hand, all class creation is done directly by Xcode. In Interface Builder, you only need to make your connections to the file’s owner or controller object.
Add Source Files First
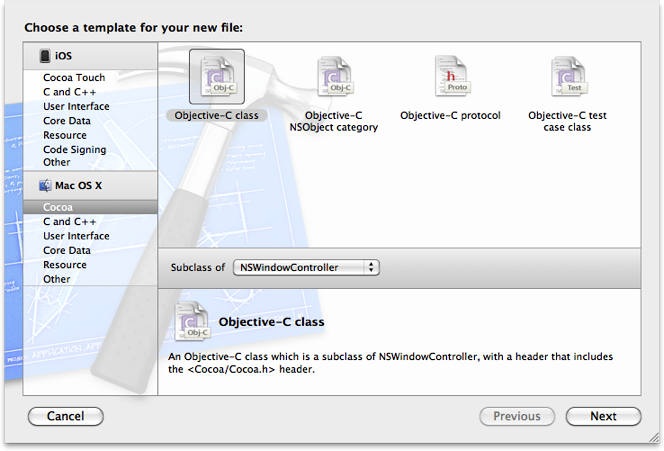
To add a new nib file to a project, first choose File > New > New File and add interface and implementation file templates for a controller class for the nib file. For example, if your new nib file is going to start with a Cocoa window, add a Cocoa Objective-C class that’s a subclass of NSWindowController. Xcode creates both a header file and an implementation file and adds them to your project. In Figure 4-3, for example, the new class will be a subclass of NSWindowController.
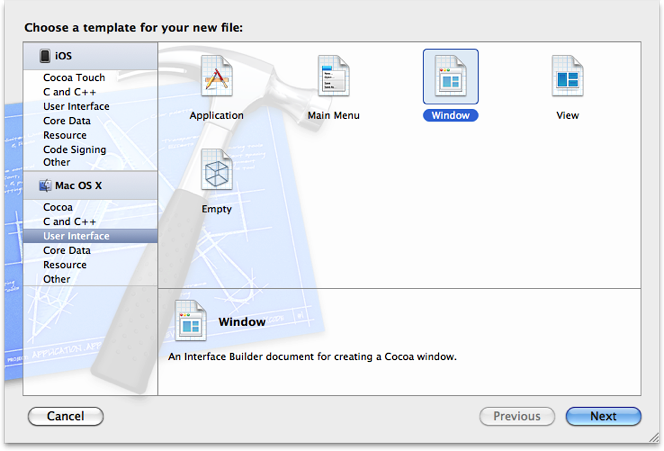
Next, add the nib file by selecting a User Interface template of type Window in the New File dialog (Figure 4-4).
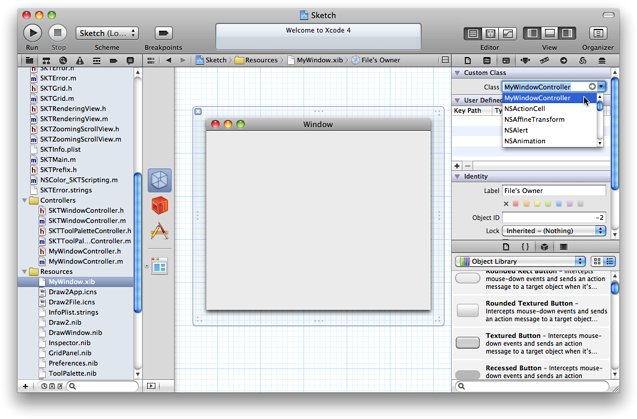
Open the new nib file by selecting it in the project navigator so that it appears in the Interface Builder editor. Then select the File’s Owner object in the Interface Builder dock and choose your controller in the class field under Custom Class in the Identity inspector (Figure 4-5).
To see the outlets and actions provided by the parent class of the file’s owner, click the File’s Owner object in the dock and open the Connections inspector. To add new actions or outlets to the nib file’s controller, see Make Connections Directly with Source Code.
Add a Custom View
If you need to add a new custom view to your nib file, first create header and implementation files for the view by choosing File > New > New File and selecting the Objective-C class template. Be sure to choose the appropriate parent class in the “Subclass of” pop-up menu.
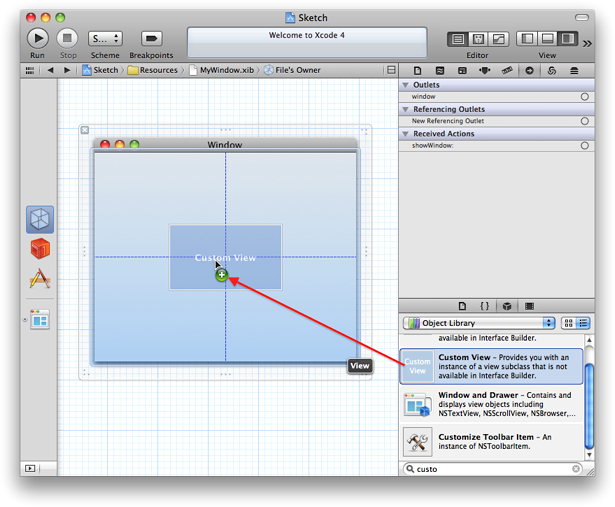
After adding the source file templates to your project, drag a custom view object from the library into the nib file, as shown in Figure 4-6.
After adding the custom view to your nib, select the custom view and assign the correct class to it in the class field under Custom Class in the Identity inspector (Figure 4-5).
Create an Interface Controller
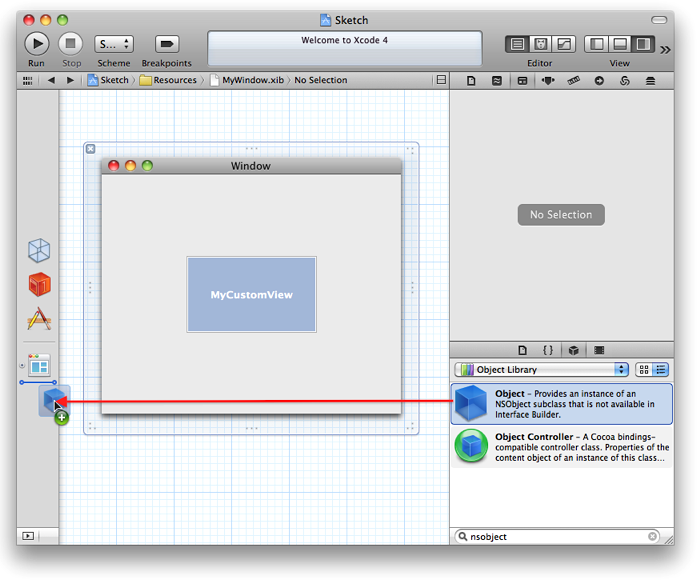
To create a new controller for a nib file, first use the New File dialog to create interface and implementation files for the new class. Use the Objective-C class template and make the templates a subclass of NSObject. If you want to make connections in Interface Builder to the outlets and actions of the controller, drag the Object object from the Object library in the Utilities pane into the dock of your Interface Builder nib file (Figure 4-7). (Tip: Type nsobject into the search field to find the object quickly.) Select the new object in the dock and use the class field under Custom Class in the Identity inspector (Figure 4-5) to assign the class of your controller to the object. Then use the Label field in that same inspector to change its display name.
To see the outlets and actions provided by the controller, click the controller object in the dock and open the Connections inspector. To add new actions or outlets to the controller, see Make Connections Directly with Source Code.
Use Assistant to Work on Your UI Code
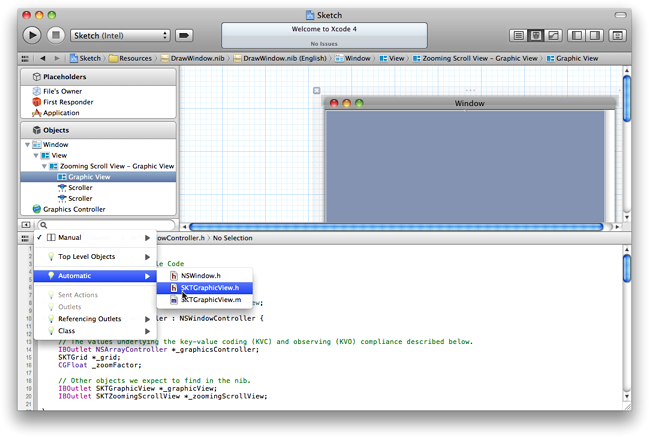
When you use custom subclasses in your interface, or add outlets and actions to a controller, you can use Assistant to work on your interface design and your interface code at the same time. To do so, select your nib file in the project navigator to open Interface Builder and click the Assistant button to open the assistant editor pane. If the assistant editor does not automatically display the header file you want, use the assistant editor pane jump bar to select the source file containing the controller code for the object. Figure 4-8 shows a window with a graphic view selected in Interface Builder and the header file for the graphic view being chosen from the Automatic mode of Assistant. By default, the assistant editor pane is displayed below the Interface Builder editor. Choose View > Assistant Layout to switch between a vertical or horizontal split for the two editor panes.
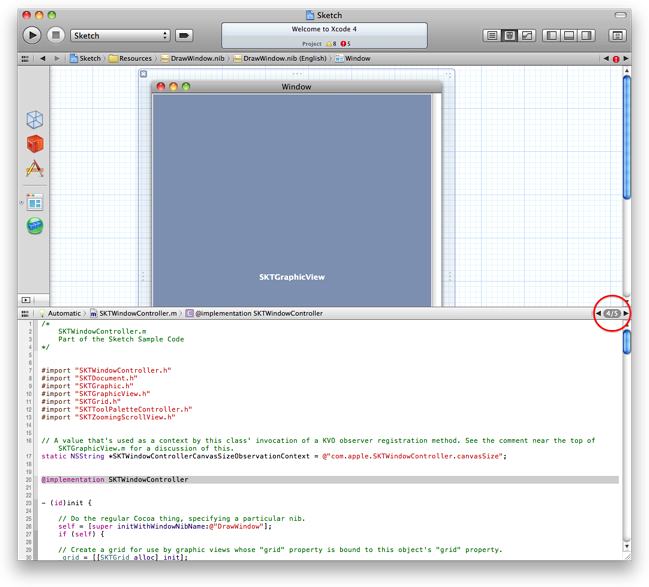
In Figure 4-9 you can see that, with a window object selected in the Interface Builder pane, the assistant editor pane displays the file SKTWindowController.m. The oval containing the characters 4/5 at the right end of the editor jump bar indicates that the fourth of five counterpart files is being displayed (in this case the others are SKTWindowController.h, SKTGraphicView.h, SKTGraphicView.m, and NSWindow.h). Click the right or left arrows to display the others in turn.
You can therefore write code for the window controller at the same time you are designing your window, and you can make connections directly between Interface Builder objects and lines in your code (see Make Connections Directly with Source Code.
Because Interface Builder is now a fully integrated part of Xcode, it is no longer necessary to switch back and forth between two applications to create custom subclasses and define actions and outlets. Therefore, Xcode 4 does not provide the special Interface Builder commands used with Xcode 3 to create new subclasses and copy them into Xcode.
Make Connections Directly with Source Code
In Xcode 3, when you want to create a new action or outlet connection, you have to make it between the Interface Builder Object and a placeholder object representing the controller or other source code file. After creating and saving the connection in Interface Builder, you then have to open the source code file in Xcode to add the corresponding IBAction or IBOutlet statement.
In Xcode 4, on the other hand, you can make the connection directly from the Interface Builder object to the appropriate header file, and, if needed, Xcode inserts the statement directly into your header file.
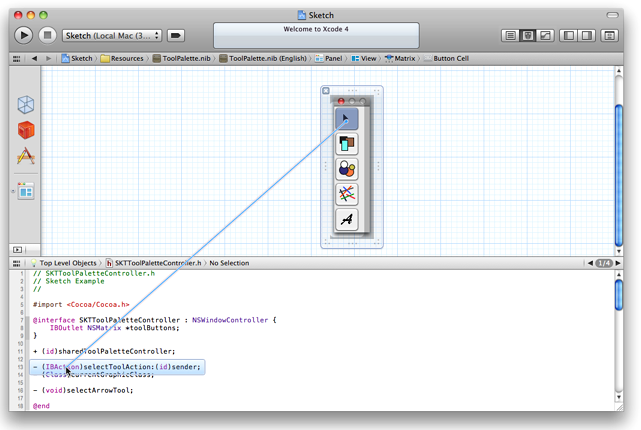
Figure 4-10 shows a connection being made to an existing IBAction statement.
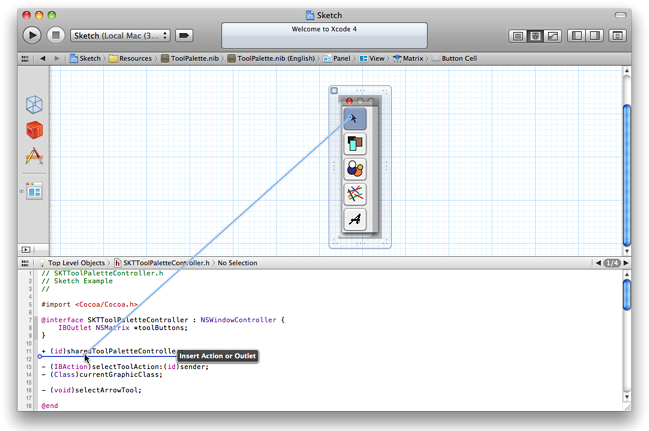
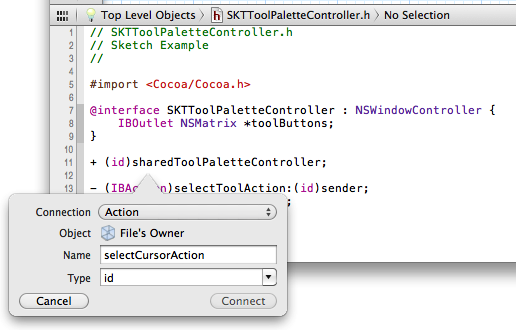
If you need to add a new IBAction or IBOutlet statement, Control-drag to the location in the header file where you want to add the new statement. If the location is a valid connection destination, Xcode displays an insertion indicator (Figure 4-11). When you release the mouse button, Xcode displays a small dialog where you specify the nature of the connection (Figure 4-12). Click Connect to insert the code in your header file.
Get Online Help in IB
Use the shortcut menu to see online help articles, including some with videos illustrating the procedure to make connections from Interface Builder objects to source code. Note that, because the Control-click key combination is used by Interface Builder to make connections, you must Control-click on the canvas (not on any object in the user interface) to get the shortcut menu (Figure 4-6).

Find UI Objects in the Dock
The dock on the left side of the Interface Builder pane (see Figure 4-9) shows the Interface Builder objects and placeholders in your nib file. These are displayed in the document window in Xcode 3; otherwise, they work in the same way. To get a list (called the outline view—Figure 4-14) showing all the objects nested in higher-level objects—for convenience in selecting the object in which you’re interested—click the small triangle below the placeholders. Note that you can also use the Interface Builder jump bar to select objects in the interface. To return to the icon view, click the small triangle next to the search field at the bottom of the list.
Get More Information on IB
For more information on Interface Builder in Xcode 4, including information on making binding connections, see Designing User Interfaces in Xcode in Xcode Overview. For short tutorials illustrating the use of Interface Builder, see Xcode Quick Start Guide.
It’s important to note the differences between the work flow in Xcode 4 and the way you do things in Xcode 3. In Xcode 3, if you want to create a new class and use it in an interface file, you have to create the class twice: once in Xcode, and once in Interface Builder. You need to fully define the class with all outlets and actions, and connect to those outlets and actions in Interface Builder. You must keep Interface Builder and Xcode synchronized. By contrast, in Xcode 4, once you’ve created the class, you can connect to the code directly from Interface Builder (see Make Connections Directly with Source Code), and Xcode adds outlet and action code for you. You only need to add the implementation for the actions. If you need to see your new class in Interface Builder, you can add an object to the Interface Builder editor representing that class, but you never create a class in Interface Builder.
If you have worked through the tutorial in the Xcode 3 Interface Builder User Guide, you are already familiar with the application created in the User Guide tutorial. However, the workflow is quite different.
Copyright © 2011 Apple Inc. All Rights Reserved. Terms of Use | Privacy Policy | Updated: 2011-08-10