Orientation to Xcode 4
Once you’ve got your projects open in Xcode 4, you can start writing code. This chapter describes many of the features of Xcode 4 that are located in different places, or used somewhat differently, from the same features in Xcode 3. It also describes a couple of features that are new in Xcode 4. For information in the debugging features of Xcode 4, see Debugging and Analyzing Your Code. For changes in the workflow of designing user interfaces using Xcode 4, which has a fully integrated Interface Builder, see Designing User Interfaces in Xcode 4.
Much of Your Project’s Content Is in New Locations
The following sections tell you where in the Xcode 4 workspace window to find information that was in your Xcode 3 Groups & Files list. Bookmarks and source control repositories, along with other information, are in the Organizer window. See Organize Projects and Devices for more information about the Organizer window.
Set Build Settings for Each Target
Click the project in the project navigator. The project editor appears to the right of the project navigator, displaying project and target information. Figure 3-1 shows some of the target information in the project editor.
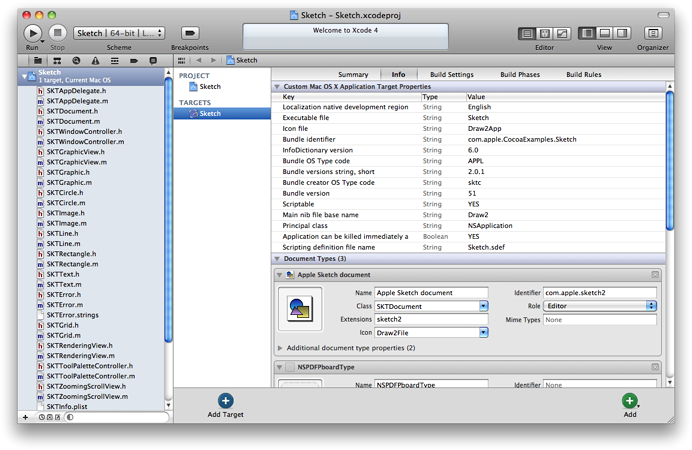
Click the various buttons and icons in the project editor to see the information that’s in there. Note that some of this information is in the Targets group in Xcode 3, but much of it, although actually related to the target, is found in other places in Xcode 3. Xcode 4 brings all this information together and makes some of the relationships clearer.
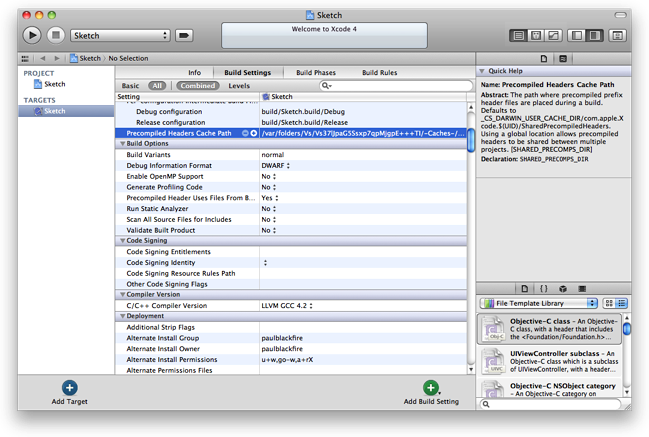
In particular, in Xcode 3, if you need to alter any build settings or create any custom settings, you need to select the target in the Groups & Files list and then open the Info window. To change the list of what files were included in the build or in what order they were used, you need to open all levels of disclosure triangles under the target in the Groups & Files list. Although some build settings are specified at the project level, some are specified at the target level, and some use defaults, these relationships are not obvious in Xcode 3. In Xcode 4, on the other hand, you can view all the levels of build settings simultaneously, as seen in Figure 3-2.
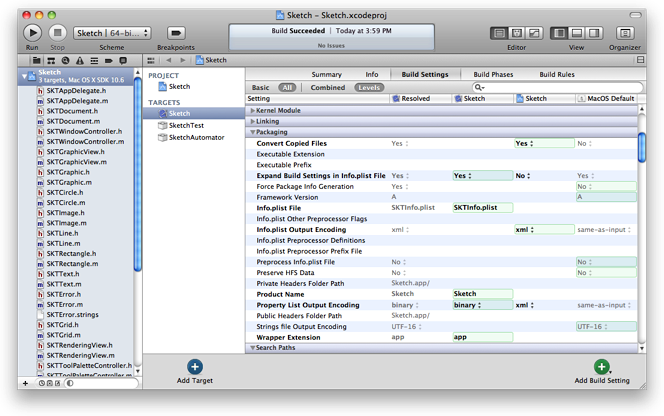
You can edit a build setting at any level. The level at which the build setting is actually set is highlighted in green. The value to which the build setting is set is listed in the Resolved column. If you have changed or customized a setting, it’s shown in boldface.
Set Basic Build Settings
Most developers never need to change the default of the vast majority of the build settings. However, there are a few basic settings that you must check, and possibly edit, for each target. These settings are gathered into one pane in the Project editor—labeled the Summary pane—and are somewhat different for OS X and iOS projects. Figure 3-3 shows the build settings summary pane for an OS X project.
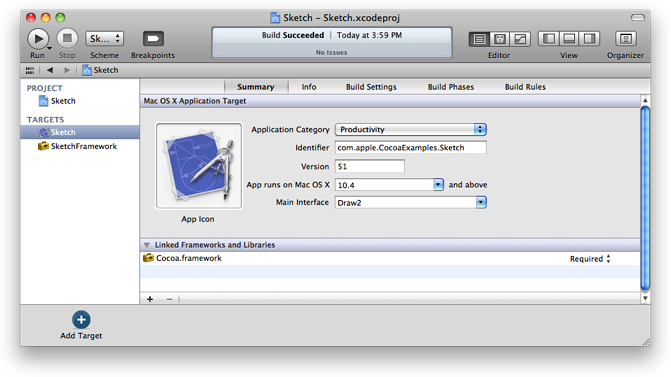
Each setting in the Summary pane is also found in one of the other panes. When you edit a setting, Xcode updates the other pane automatically.
Set Up a Sandbox for Each Target
An application sandbox enforces restrictions, known as entitlements, on how an application can interact with the rest of the system. A sandboxed application is harder to compromise and therefore enhances security for users. For example, if your application has no need to have access to the network, you can specify that the application’s sandbox should prohibit network access. Then, if a hostile hacker manages to take over control of your application on a user’s computer, the hacker won’t be able to use the application to send email or connect to the internet.
In Xcode 4.1 and later, the project editor provides a UI for setting up entitlements for Mac apps. You can set entitlements for each target in the project editor (Figure 3-4). There is also a default code-signing entitlements file available in the file templates in the utilities pane.
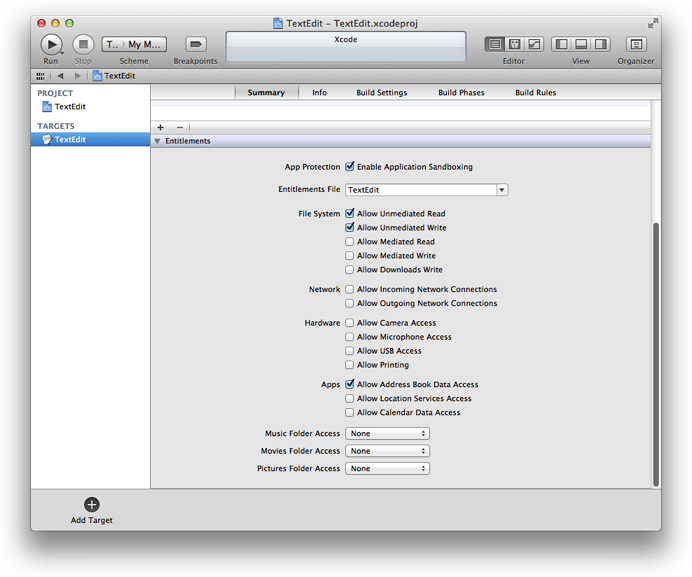
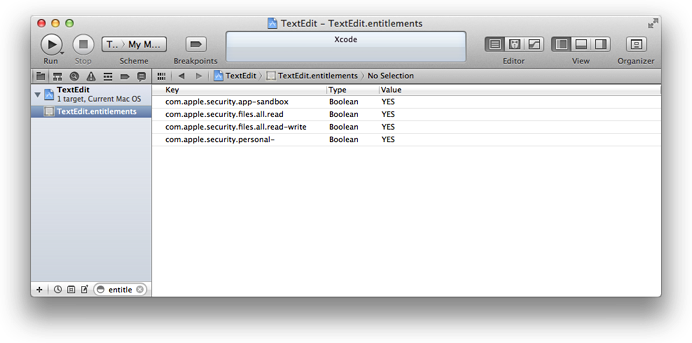
When you enable application sandboxing, you can select an entitlements file if you already have one. If you do not, Xcode creates one with the name of your project and the extension entitlements. You can view and edit this file with the property list editor in Xcode (Figure 3-5).
Select Any File to Open an Editor
Xcode 4 includes editors for source code, property list (.plist) files, rich text (.rtf) files, Core Data model files, nib files, and others. To open or display any of these editors, select a file of that type in the project navigator. The editor opens automatically in the editor area of the workspace window. Any file for which Xcode does not have an editor is displayed using the same Quick Look facility used by the Finder.
Each document-type editor has custom commands in the Navigate and Editor menus to act on the information in that document type.
Write and Edit Source Code
The features you’re used to in Xcode 3 are also present in Xcode 4. For example, code folding, code completion, Quick Help, automatic indentation, syntax coloring, edit all in scope, and automatic balancing of delimiters are all available and similar to the same features in Xcode 3. Look through the Edit menu, the shortcut menu, and Xcode preferences to find these features. Many of the keyboard shortcuts are unchanged. Use the Key Bindings pane in Xcode preferences to see and edit the keyboard shortcuts.
Speed Up Typing with Code Completion
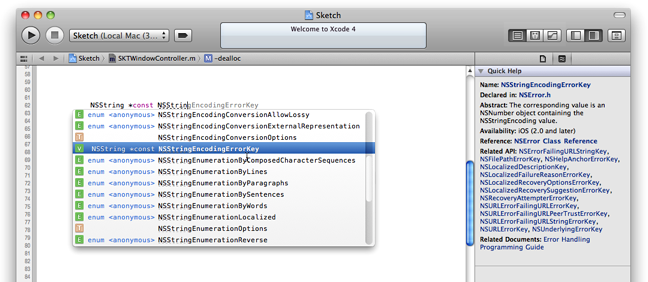
The user interface for code completion is similar to that in Xcode 3, but there are some important differences. One of the first changes that you’ll notice is that you always get both an inline suggestion for completing the symbol name plus a list of possibilities (Figure 3-6). Click an item in the suggestion list or use the up and down arrows to select one. As you do so, the inline suggestion changes as well. Furthermore, as you can see in the figure, if you open the Quick Help inspector, you can read documentation about each selection. You can disable automatic code completion in the Text Editing pane of Xcode preferences, but you can always invoke code completion by pressing Control-Spacebar.
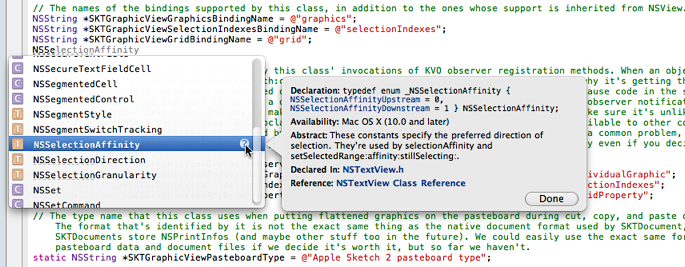
A Quick Help pop-up dialog is also available from code completion, even when the Quick Help inspector is not open. Hold the pointer over the code completion option you’re interested in until a question mark icon appears. Click the question mark or press Command-Shift-Control-Question Mark to open Quick Help. As before, press the Tab key to accept the prefix or Return to accept the entire suggestion. Click the Done button in the Quick Help pop-up dialog to cancel the operation.
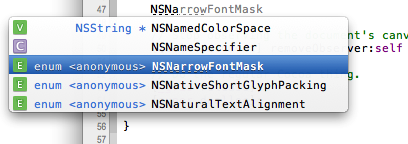
If all of the possible completions have a common prefix (NSString in Figure 3-6), the prefix is indicated with a dotted underline. Press the Tab key to accept only the prefix. Press Return to accept the entire autocompletion suggestion. If there is no common prefix, code completion shows the dotted underline up to the next uppercase letter in the symbol (Figure 3-6). Again, press Tab to accept only the subword, or press Return to accept the entire suggestion.
Press Control–Space bar to toggle the completion suggestion on or off. That is, if the inline suggestion and list are being displayed, pressing Control–Space bar cancels the code completion operation. If there is no suggestion displayed, place the cursor at the end of a partially typed symbol and press Control–Space bar to get completion suggestions.
Note that in Xcode 4, pressing the Esc (Escape) key cancels the operation and pressing the Delete key always deletes the preceding character.
Have Fix-it Flag Errors as You Type
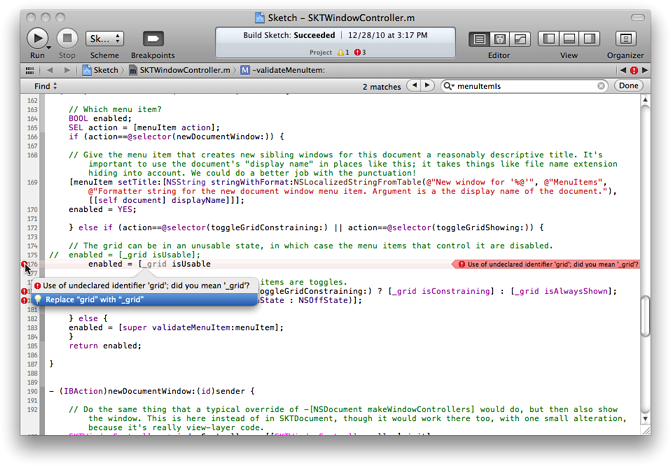
When your target is set to use the LLVM compiler, a new feature called Fix-it scans your source text as you type. Fix-it marks syntax errors with a red underscore or a caret at the position of the error, and a symbol in the gutter. Clicking the symbol displays a message describing the possible syntax error and in many cases offers to repair it automatically (Figure 3-9).
Open a File in the Assistant Editor Pane
By default, when you Option-click a file in one of the navigators or jump bars, an assistant editor opens in manual mode and displays the file in the assistant editor pane (see Split the Editor Area). To change this behavior and to set other keyboard shortcuts for opening files, open the General pane of Xcode preferences.
View Files in Hexadecimal Format
You can view and edit many types of files in hexadecimal format, including some (such as graphics files) that you can’t edit otherwise. To do so, Control-click the file in the project navigator and choose Open As > Hex from the shortcut menu.
You can edit the hexadecimal code directly, or you can edit in the plain text column. Editing either updates the other.
When the hex editor has focus, you can use the Editor menu to customize its display.
View Preprocessor or Assembly Output
You can use commands in the Product > Generate Output menu to process source files and generate the preprocessed output or assembly output.
The preprocessor evaluates directives in your source code (for example, instructions starting with the number sign (#), such as includes, defines, and conditional logic) and converts them into C code to be sent to the compiler. You can examine the preprocessed output to make sure that the logic in your source code is being interpreted by the preprocessor as you expect in order to debug compilation problems.
The assembly output is the set of instructions that the compiler generated from the preprocessed output. You can study the assembly output to see how the instructions were formed or ordered, to seek out better optimization patterns, or to look for compiler bugs.
The output type is also a new category in the assistant editor for a selected primary file.
View Key Names or Raw Keys
For known property list types, the Key column in the property list editor shows a descriptive name of the key instead of the key’s literal text. Choose Editor > Show Raw Keys & Values to display the literal text instead. You can also see the raw key value in Quick Help in the Quick Help.
Select a Scheme
In Xcode 3 you have to set an active target, a build configuration, and an executable as separate items. The problem with this approach is that targets, configurations, and executables are intimately linked. At its simplest, for example, a target contains one product, which is executed without any special options or environmental settings. However, sometimes the product requires values for input parameters or other customization before it can be executed. In Xcode 4, you select a scheme, which specifies which targets to build, what build configuration to use, which debugger to use, and which executable to launch when you choose Run from the Product menu or click the Run button at the left end of the toolbar. Each scheme also specifies a set of options for several possible actions:
Running a product for debugging
Running unit tests
Profiling your application with Instruments
Performing a static analysis of your code
Archiving your product for distribution or submission to iTunes Connect
You can set each action to do either a debug or release build.
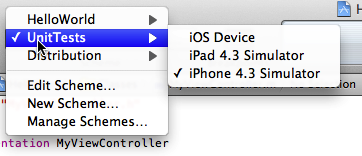
When you open an existing Xcode project (or create a new one), Xcode 4 automatically creates a scheme for you. To select a scheme, you use the Scheme pop-up menu in the upper-left corner of the Xcode window (Figure 3-10). To create a new scheme, choose New Scheme from that menu. To edit existing schemes, choose the scheme you want to edit and then choose Edit Active Scheme from that menu. To change the list of schemes, where they’re stored, and whether they’re shared, choose Manage Schemes.
You can have as many schemes as you want, but only one can be active at a time.
Specify Which Targets Are Built
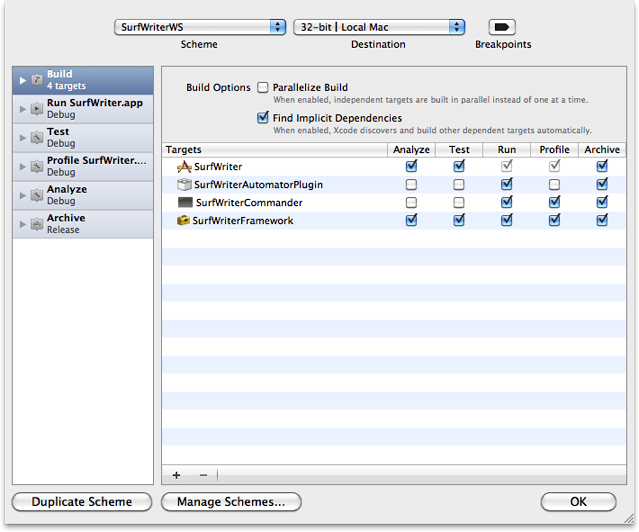
By default, Xcode creates one scheme per target in your project or workspace. For each target, you use the build pane of the scheme editor (Figure 3-11) to specify which targets are built for each type of action. You can add as many targets from your project or workspace to a single scheme as you wish. The figure shows four targets: the SurfWriter application, a custom framework needed to build the application, an Automator plug-in to be provided with the application, and a command-line tool that can be used with the application. In the figure, the SurfWriter application and framework are set to be built for every action, but the plug-in is set to be built only when the application is built for running (that is, for debugging) and for archiving (that is, for distribution). Each of these actions has associated options that you can customize with the scheme editor.
Customize Executables
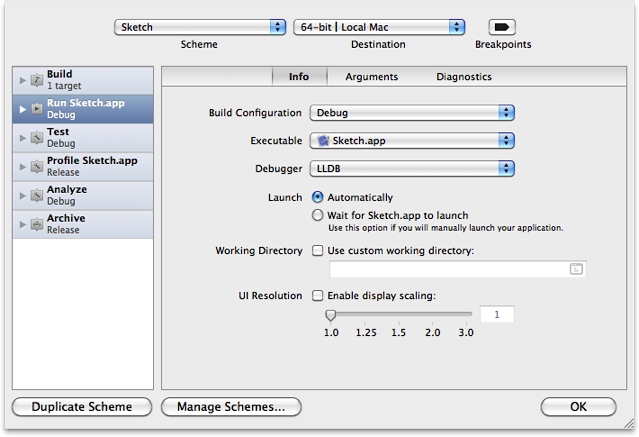
To customize the environment in which a product is launched in Xcode 3, you click the executable in the Groups & Files list and then open the Info window. In Xcode 4, choose Edit Active Scheme from the Scheme pop-up and choose the product you want to run (Figure 3-12). Note that you can choose to display the running product at a higher UI resolution to simulate running at a different display resolution.
Rename or Reorganize Your Schemes
Choose Product > Manage Schemes or choose Manage Schemes from the Scheme pop-up menu (Figure 3-10) to see a list of all the schemes in the project and to rename or reorganize the schemes in the menu. You can also specify whether each scheme should be displayed in the pop-up menu, where the scheme is stored (in the project or workspace) and whether the scheme should be shared with others using the project or workspace.
Search Your Workspace
Rather than a Find group and batch find panel, Xcode 4 has a find navigator. Click the magnifying glass icon in the navigation pane, type a term in the search field, and press Return to search through the entire project or all the projects in the Xcode workspace (workspaces are discussed in Work with Multiple Related Projects). The results are displayed in the find navigator (Figure 3-13). Just as in Xcode 3, click a find result to see the instance of the term in the source editor.

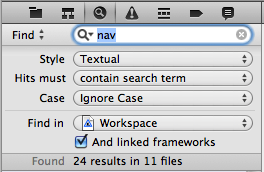
To customize the search, click the magnifying glass in the search field and choose Show Find Options to get the Find Options dialog (Figure 3-14).
Browse to Project Symbols
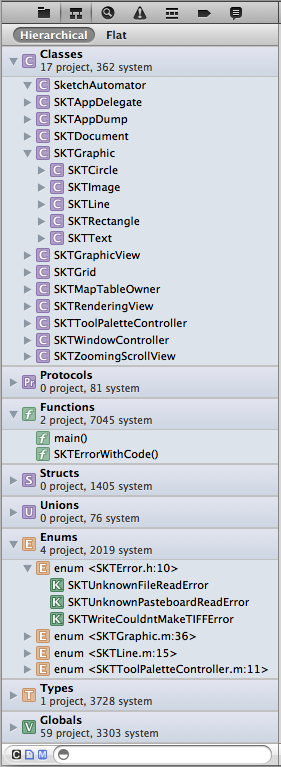
Click the second button from the left in the navigator selector bar to browse through the symbols in your project (Figure 3-15). Note that you need to wait until Xcode finishes indexing your project before you can use this feature.
Use the search field and scope buttons at the bottom of the navigator to specify exactly what is listed. The scope buttons are blue when toggled on and black when off. Use the buttons in any combination:
 —hides symbols other than classes and their members, including protocols, functions, structs, enums, unions, types, and globals
 —hides symbols defined only in external frameworks, displaying only symbols defined in the project or workspace,
  —hides member symbols defined within the classes such as methods, properties, and variables
When you select the Flat button at the top of the symbol navigator, the navigator displays all classes arranged alphabetically. When you select the Hierarchical button, the navigator displays the class hierarchy.
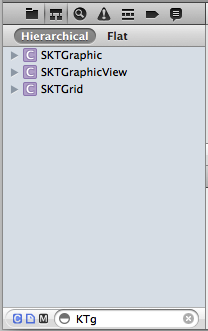
Use the search field at the bottom of the symbol navigator to filter the results. For example, in Figure 3-16, only those symbols that include the string KTg are displayed. This filter is not case sensitive.
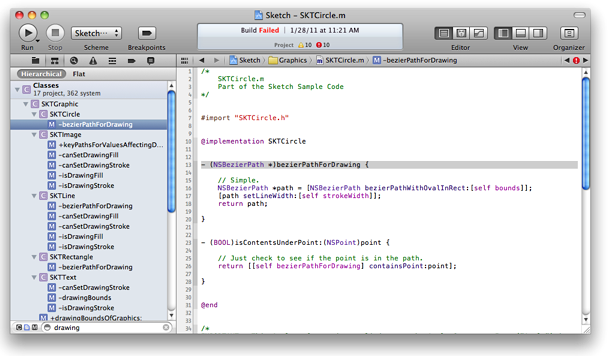
Click a symbol to see it displayed in the source editor (Figure 3-17). Option-click the file in the symbol navigator to open Assistant and display the file in the assistant editor pane (see Split the Editor Area).
Each of the navigation elements in the jump bar is also a pop-up menu with a list of symbols at that level in the project hierarchy. The jump bar shows the same structure as seen in the project navigator down to individual files, and then the symbols in the files. Click one of the navigation elements in the jump bar to see the list and to select a symbol to display (Figure 3-18). Hold down the Option key when selecting a file in the jump bar to display the file in the assistant editor pane (see Split the Editor Area).
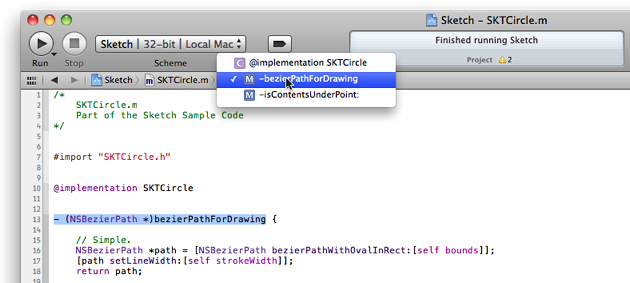
The jump bar also has back and forward buttons for moving through previously viewed files, and a pop-up menu (![]() ) that displays a variety of useful information about related items, as you can see in Figure 3-19.
) that displays a variety of useful information about related items, as you can see in Figure 3-19.

Filter to FInd Related Content
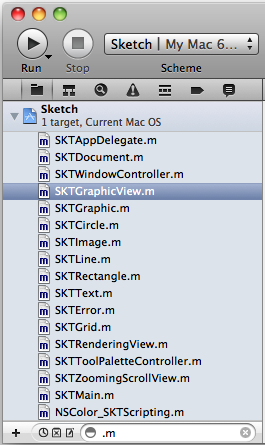
Rather than providing smart groups to gather together related information, Xcode 4 provides a variety of navigators and filters. The project navigator (Figure 1-2), for example, has filters for recently edited files, files with source control status, unsaved files, and filename strings. Figure 3-20, for example, shows a project filtered to show only implementation (*.m) files. The filter field and buttons are at the bottom of the navigator area.
In addition to the structure, symbol, and find navigators already discussed, there are navigators that display:
Warnings, errors, and other issues found when analyzing or building your project
Threads and stacks in a debugging session
Breakpoints
Build logs
For more information on using these navigators to analyze and debug your code, see Debugging and Analyzing Your Code.
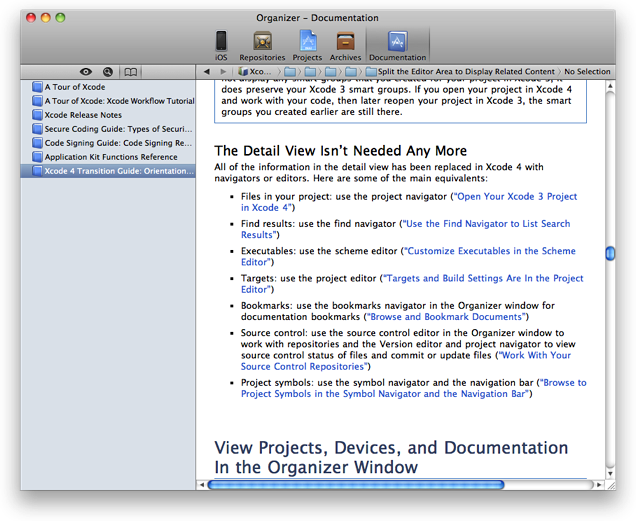
View Details
All of the information in the detail view has been replaced in Xcode 4 with navigators or editors. Here are some of the main equivalents:
Files in your project: use the project navigator (see Open Your Xcode 3 Project in Xcode 4)
Find results: use the find navigator (see Search Your Workspace)
Executables: use the scheme editor (see Customize Executables)
Targets: use the project editor (see Set Build Settings for Each Target)
Bookmarks: use the bookmarks navigator in the Organizer window for documentation bookmarks (see Browse and Bookmark Documents)
Source control: use the source control editor in the Organizer window to work with repositories and the version editor and project navigator to view source control status of files and to commit or update files (see Work with Source Control Repositories)
Project symbols: use the symbol navigator and the jump bar (see Browse to Project Symbols)
Customize the Build and Run Workflow
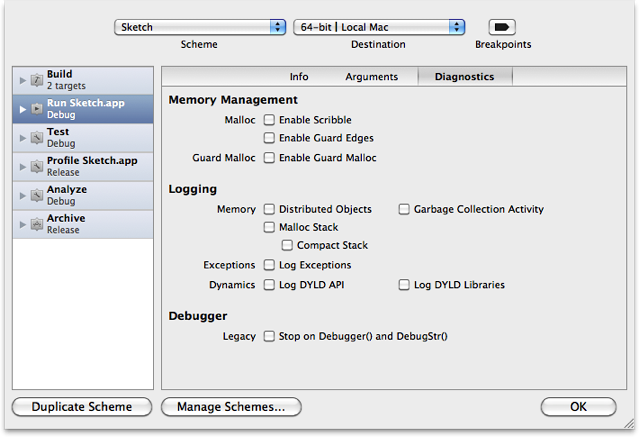
As pointed out in Select a Scheme, Xcode 4 schemes replace several settings in Xcode 3 that affect how your project is built and run. The Xcode 4 scheme editor enables you to specify many settings that affect your workflow, including build, test, and launch settings. For example, you can specify what targets to build; whether to build with debug symbols; which targets are built for each type of action; what debugger to use; what scripts to run before and after each type of action; arguments to pass to the application on launch; a variety of diagnostic options (Figure 3-21); and what unit tests to run.
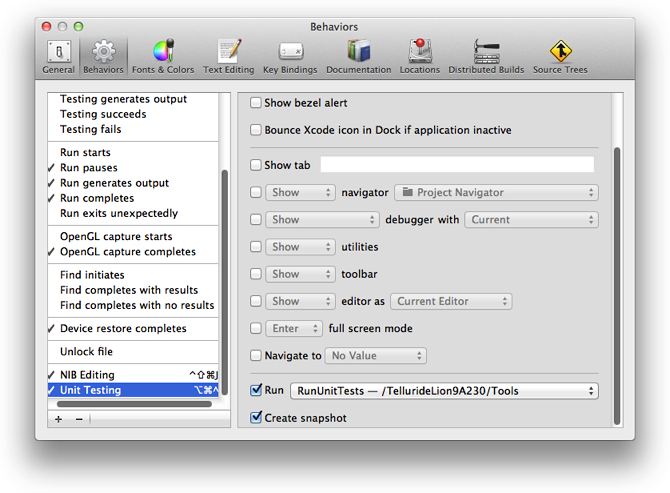
Once you’ve got one or more schemes set up exactly as you want them, the next thing you may do when setting up your build and run workflow is to open Xcode preferences and click Behaviors. This preferences pane lets you specify what should happen when a variety of events occur (Figure 3-22).
For example, you can have Xcode display the debug area when your code pauses at a breakpoint, or it can display the issues navigator when a build fails. Note that, in addition to the Behaviors preferences setting to create a snapshot, you can specify that Xcode create a snapshot before a mass-editing operation such as a refactoring transformation. To do so, select the Snapshots pane in the File > Project Settings dialog. (Snapshots are discussed in Take a Snapshot of Your Workspace.)
You can name a tab and specify that tab as the display to use when an event occurs. Then you can set up the display in that tab exactly as you want it; for instance, with a specific source-code file open in the editor, the debug area open, the Utility area closed, and the issues navigator open. To name a tab, double-click the title of the tab and type in the new name (Figure 3-23). Tab names are case sensitive in the Show Tab field of Alerts preferences.
When Xcode reopens the named tab, it remembers the tab’s state—including which window it was in. By naming a tab in a separate window, you can use the Show tab option in Behaviors preferences to automatically open a new window. To do so, create a named tab, set it up exactly as you want it, and drag the tab out of the window to create a new window. Now, each time Xcode recreates the tab, it opens a new window to hold the tab.
You can also can design custom behaviors that are triggered by menu items or their key equivalents. This feature allows you to create behaviors that you can invoke at any time. For example, you can create a "Unit Testing" behavior that creates a snapshot and runs your unit tests (Figure 3-22). After you’ve created a behavior, it appears in the Xcode > Behaviors menu. To assign key equivalents to custom behaviors, find the behavior in the Customized tab of the Key Bindings preferences pane.
Check on the Progress of Xcode Tasks
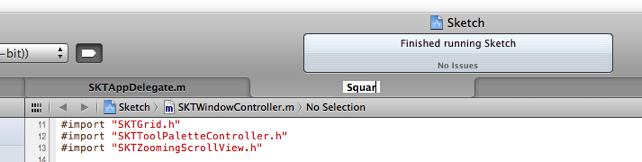
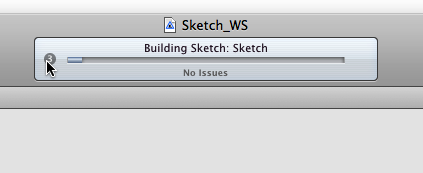
The activity viewer in the workspace window toolbar shows the progress of any task Xcode is currently executing. If two or more tasks are currently underway, a small number appears at the left edge of the activity viewer (Figure 3-24).
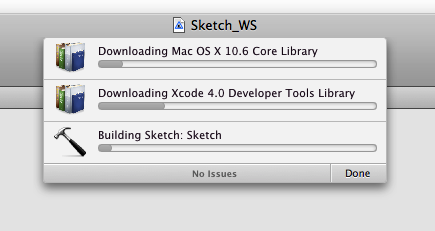
Click the number to open a pop-up window that shows the individual status of each current task (Figure 3-25).
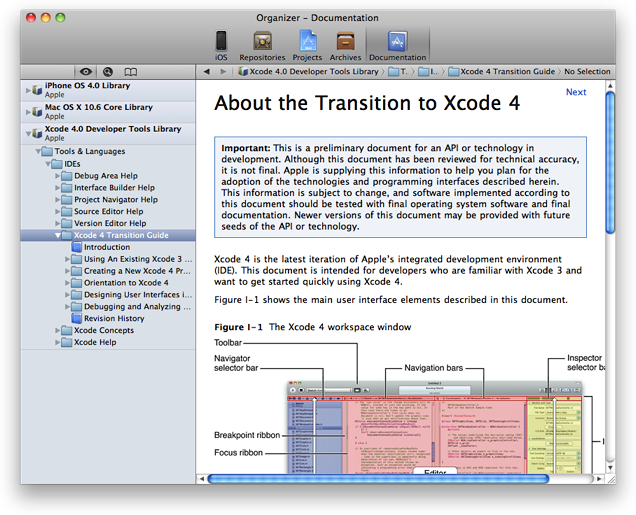
View Projects, Devices, and Documentation
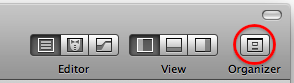
Xcode 4 has two main windows. You’ve seen the workspace window (Figure 1-1), used for editing, debugging, and interface design. The other main window, called the Organizer window, displays documentation, source control, project organization, and for iOS, access to your mobile devices. To display the Organizer window, choose Window > Organizer, or click the Organizer button in the toolbar (Figure 3-26).
Browse and Bookmark Documents
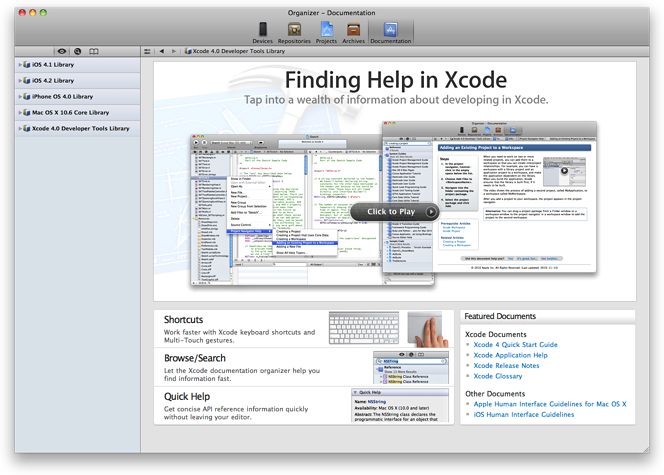
To browse documentation, open the Organizer window, click the Documentation button in the toolbar, and click the Browse button in the jump bar (Figure 3-27).
While reading any page of documentation, you can choose Editor > Add Bookmark or Control-click and choose Add Bookmark for Current Page to bookmark that page. Click the Bookmark button in the navigator pane to see a list of bookmarks (Figure 3-28).
To select which documentation sets to download, use the Documentation pane in Xcode preferences.
Browse for Task-Based Help
New in Xcode 4, online help is available for the Xcode IDE. To browse the Xcode 4 online help, click the disclosure triangle next to Xcode Help in the documentation navigator (Figure 3-27) or choose Help > Xcode Help (Figure 3-29).
Many of the articles in Xcode 4 help include a short video that illustrates the described procedure. Click the video thumbnail to play the video.
To help you discover and understand the many user interface features of Xcode 4, many of the help articles are also available as contextual help. See FInd Answers with Contextual Help for details.
Work with Source Control Repositories
Click the Repositories button in the Organizer window toolbar to work with your source control repositories. You can create local repositories, connect to and manage repositories on servers, and so forth. You can also perform many common SCM operations, such as submitting files, from the workspace window. To do so, select the file or files in the project navigator, Control-click, and choose Source Control from the menu. For more information on repositories, see Keep Track of Changes and Coordinate Work Groups .
Organize Projects and Devices
Whereas Xcode 4 allows you to have several workspace windows open simultaneously, there is only one Organizer window. The Organizer window displays information for all your workspaces, projects, repositories, devices, and documentation, regardless of how many projects you have and how many are open.
Click the Projects button in the toolbar to display all your projects and their snapshots. See Take a Snapshot of Your Workspace for more information on snapshots.
If you’re working with iOS, the Xcode Organizer window also can display the devices that you have connected to your computer. It indicates which of these devices are currently available and lets you select the one to use. The iOS organizer in Xcode 4 provides the same information and capabilities as the Xcode 3 Organizer window.
Archive Your Product for Distribution
In Xcode 3, to distribute your product, you need to configure build settings for a release. It’s often easier to use the command line than to create an installable application in Xcode. In Xcode 4, when you’re ready to share your program with others, you choose Archive from the Product menu. In the Archives pane of the Organizer window, you can then share the application with others or submit to iTunes Connect.
Find Answers with Contextual Help
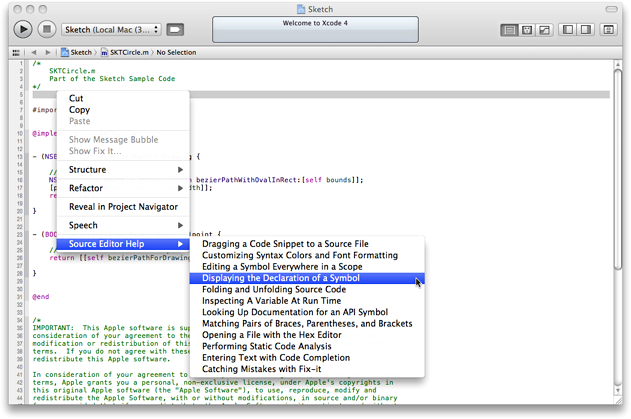
In addition to being listed in the documentation browser in Xcode 4 (see Browse for Task-Based Help), many of the help articles are available from shortcut menus throughout the application. Control-click in any of the main user-interface areas in the workspace or Organizer window to see a list of help articles available for that area (Figure 3-30). If there are more articles than can be listed in the shortcut menu, then choose Show All Help Topics and the help opens in the Organizer window. You can use this facility to find information about a specific task that you’re trying to accomplish, or just to learn what tasks can be performed using that area of Xcode 4.
Save Changes Automatically
When you edit a file in Xcode 4, the file’s icon is shaded in the project navigator to indicate that there are unsaved changes. By default, if you build the project or quit Xcode, Xcode 4 automatically saves all changed files for you. You can change this behavior in the General pane of Xcode preferences . To ensure you can return to a known state before you build your project or perform another operation that affects many files in your project and that might be difficult to undo, create a snapshot (see Take a Snapshot of Your Workspace).
Split the Editor Area
Xcode 3 lets you split the editor window to look at two locations in a source code file, or two different files, at the same time. Although this ability is also present in Xcode 4, the new user interface provides a much more powerful use of split editor windows, called Assistant.
Assistant has two modes: tracking (or automatic) mode and manual mode. Tracking mode has several criteria from which you can choose, such as counterparts, superclasses, subclasses, or siblings. Assistant selects the file or files that best meet the selected criterion and opens those files in the Assistant pane of the source editor. In manual mode, you select the file to display in the Assistant pane. You can also split the assistant editor pane to create multiple assistant editors.
Find Related Content
To enable Assistant, click the Assistant button in the workspace toolbar (Figure 3-31).
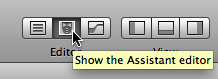
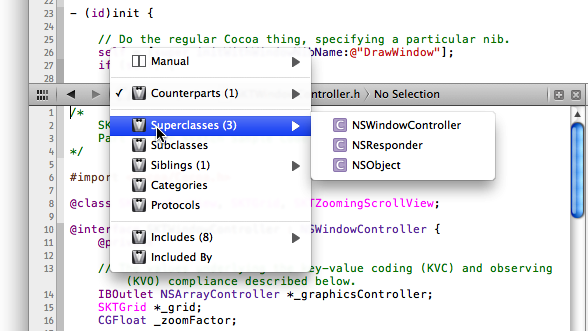
Assistant opens a second pane in the editor area of the workspace window. For source files, the default behavior for Assistant is to display the counterpart of the file displayed in the standard editor pane. That is, if you’ve opened an implementation file, Assistant displays the corresponding header file, and vice versa. You can choose any of several other possible criteria to be used by Assistant using the Assistant pop-up menu. The Assistant pop-up menu is the first item in the path shown in the jump bar above the assistant editor. To do so, open the pop-up menu and choose an item, as shown in Figure 3-32. The choices offered depend on the type of file being edited.
Selecting a file in the project navigator causes that file to be shown in the normal editor pane. Unless Assistant is set to manual mode (see Display Content of Your Choosing), it tracks the change. Option-click when selecting a file in the project navigator or hold down the Option key when selecting a file in the jump bar to display that file in the Assistant pane rather than the standard pane. Doing so switches Assistant to manual mode.
The assistant editor pane can be displayed to the right of the standard editor pane or below it. Choose View > Assistant Layout to switch between a vertical or horizontal split for the editor panes.
Use Assistant with Interface Builder
When you’re using Interface Builder to design a user interface, you can use Assistant to automatically display the code file most relevant to the interface element you’re working with. See Use Assistant to Work on Your UI Code for details.
Display Content of Your Choosing
Choose Manual from the Assistant pop-up menu (Figure 3-32) to put the editor in manual mode. In this mode, Assistant acts like the split editor in Xcode 3. You can open any file in the assistant editor pane, including the same file as one you’re working on in the other editor pane. You can use the pop-up menus in the jump bar above the assistant editor pane to select the file or symbol to edit in that pane (Figure 3-18). The standard editor pane (the left editor pane, or the top one if you have a horizontal split) is always the one that’s affected by changing your selection in the project navigator. Option-click a file in the project navigator to open it in the Assistant pane.
Compare Two Versions of Your File
Use the version editor to compare different revisions from your source control repository. It can also show the difference between the saved file and what's in memory. In addition, the version editor lets you see source control logs and blame/annotation information. See Compare Revisions for more information.
Open a New Tab or a New Window
For fast switches between different editors or files, you can add tabs to the Xcode 4 workspace window, or you can open additional windows. To activate tabs, choose View > Show Tab Bar, or add a new tab by choosing File > New > New Tab. Choose File > New > New Window to open a new workspace window. If you open the same file in two tabs or two windows, the changes you make in one tab or window are reflected in the other.
Tabs can be reordered, closed independently, or dragged out of the tab bar to create a new window, just as they can in Safari. You can use items in the Window menu (or their keyboard equivalents) to move between tabs.
Open Files with Keyboard Shortcuts
Selecting a file in the project navigator or jump bar causes that file to open in the normal editor pane. If Assistant is set to tracking mode, it tracks the change. By default, if you hold down the Option key when selecting a file in the project navigator or jump bar, Xcode displays that file in the Assistant pane rather than the standard pane. Doing so switches Assistant to manual mode.
You can customize the behavior of the single click, Option-click, Option-Shift-click, and double-click keyboard shortcuts in the General pane of Xcode preferences. Choose one of the following options from each keyboard-shortcut pop-up menu:
Primary editor: Opens the file in the primary editor pane in the window and tab already open.
Focused editor: Opens the file in whichever editor pane currently has focus.
Single assistant editor: When the navigation originates in a navigator pane or the primary editor (using the jump bar or the jump to definition command), if the assistant editor is not open or is not split, opens the file in the assistant editor.
If the assistant editor is split, displays a navigation chooser dialog (The Single Assistant navigation chooser dialog) showing the current layout of editor panes in the window that has focus, with the option of selecting any open editor pane or adding a new one. Double-click your selected pane, or make your selection and press Return. Press Esc to cancel.
Figure 3-33 The Single Assistant navigation chooser dialog 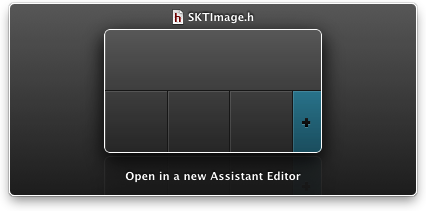
If the file is already open in one of the editor panes, the navigation chooser displays a star to indicate the pane containing the file.
When the navigation originates in an assistant editor pane, Xcode opens the file in the primary editor.
Separate assistant editor: If the assistant editor is closed and is not split, opens the file in the assistant editor.
If the assistant editor is open, opens the file in a new assistant editor pane.
If the assistant editor is split but closed, opens the file in the most-recently-opened assistant editor pane, replacing the file that was in that pane.
If the file is already open in an assistant editor pane, switches the focus to that pane.
Separate tab: If the file is not already open in the current window, opens the file in a new tab.
If the file is already open in another tab in the same window, switches the focus to that tab.
Separate window: If the file is not already open in a separate window, opens the file in a new window.
If the file is already open in a separate window, switches the focus to that window.
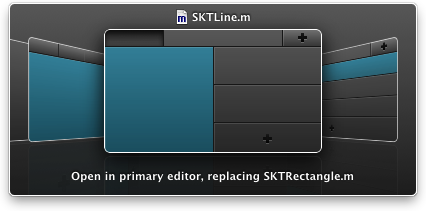
The Option-Shift-Click key combination opens a navigation chooser dialog (Figure 3-34) showing the current layout with the options of selecting any open editor pane in any window and any tab, or adding a new editor pane, window, or tab. Double-click your selection, or make your selection and press Return. Press Esc to cancel.
The Open Quickly command works in Xcode 4 in much the same way that it worked in Xcode 3. In Xcode 4, however, you can open a file in the assistant editor by holding the Option key when you double-click or click Open. To open the file in a separate window, hold down Option-Shift. To see the navigation chooser dialog, hold down Option-Shift-Click. These behaviors follow the preferences you set for navigation in the General preferences pane.
Open the Utility Area
There are several types of information located in the utility area of the workspace window, including Quick Help, the File inspector, Interface Builder inspectors, and libraries of file templates, code snippets, interface builder objects, and media files.
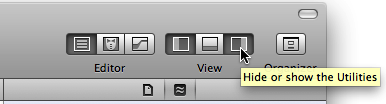
To open the utility area, choose View > Utilities, or click the Utility button in the toolbar (Figure 3-35).
View Quick Help
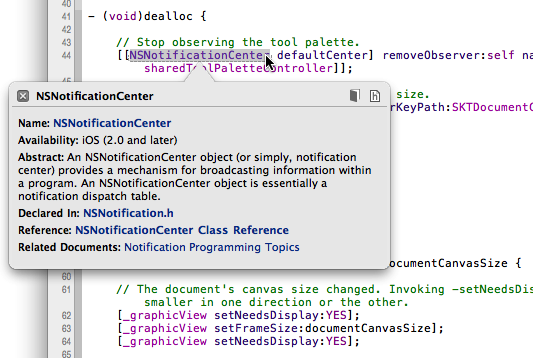
In Xcode 3, you can open a Quick Help window with information about an API symbol by Option–double-clicking the symbol. In Xcode 4, you can use an Option-single-click to open Quick Help (Figure 3-36).
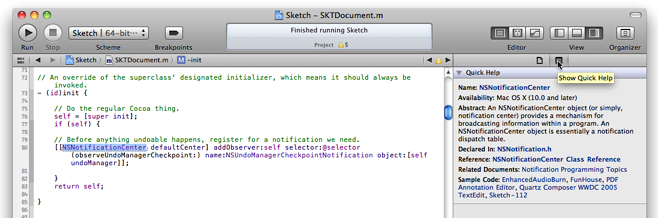
Whereas in Xcode 3, you can make the Quick Help window permanent by moving it from its original location, in Xcode 4, Quick Help is always available in the Symbol inspector in the utility area (Figure 3-37). Just click any symbol while the Symbol inspector is open to see its Quick Help information.
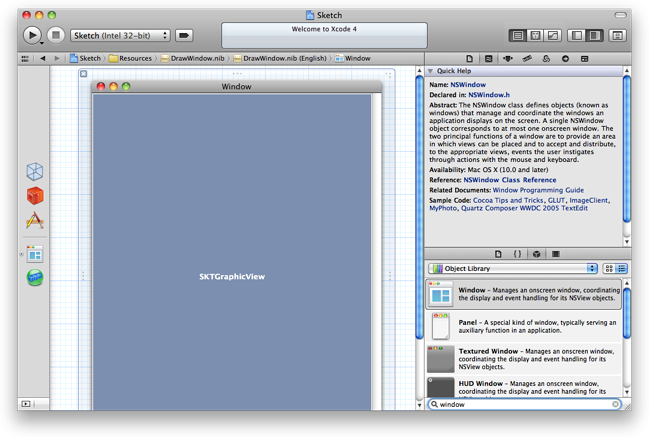
Quick Help is also available for user interface objects in Interface Builder (Figure 3-38) and for build settings (Figure 3-39).
View and Edit File and Interface Builder Data
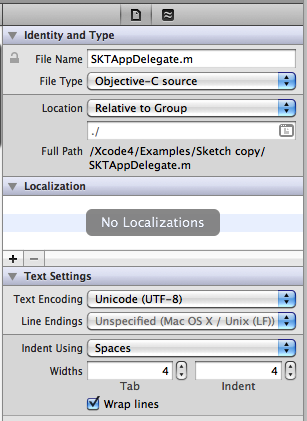
Inspectors are panes in the utility area that you can use to read or enter data about files and Interface Builder objects. Figure 3-40 shows a file inspector. For more information about Interface Builder, see Designing User Interfaces in Xcode 4.
Drag Files and Code from the Library
Xcode provides libraries of file templates and code snippets that you can use in your program. It also has libraries of Interface Builder objects and media files that you can use in your nib files. The libraries pane is in the lower part of the utility area (see Figure I-1). Each of the buttons at the top of this pane selects a category of library objects, as follows:
File templates range from templates for applications to subclasses of commonly used Cocoa classes. To use a template, drag it from the library to a folder in the project navigator. File templates have subcategories, which you can choose from the pop-up menu below the line of buttons. You can display the templates as icons only or as icons and text. Regardless of which you choose, when you click a template, an information window pops open with information about the use of the template (Figure 3-41).
Figure 3-41 A file template information pop-up window 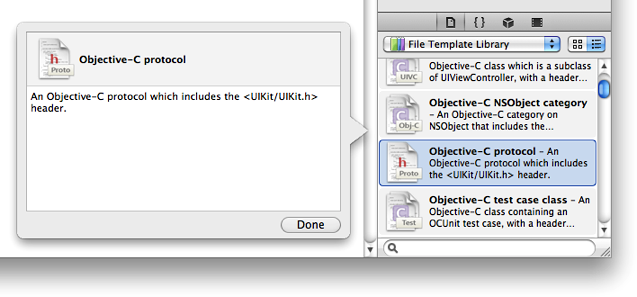
Code snippets are short pieces of source code that you can use in your software. To use one, you can drag it directly into your source code file. Alternatively, you can copy a portion of the code from the code information pop-up window (Figure 3-42) and drag that into your file.
To create your own code snippet, highlight the code for the snippet in a source file and drag it into the Code Snippet library pane. You’ll need to edit the snippet to give it a meaningful name and, optionally, a completion shortcut. You can use a completion shortcut to add a snippet when editing source code. Type the shortcut in your source code file and select the snippet from the code completion list to add the code to your file. Note that a new or edited code snippet is flagged with the word “User” (Figure 3-43).
Figure 3-42 Dragging a piece of a code snippet into your file 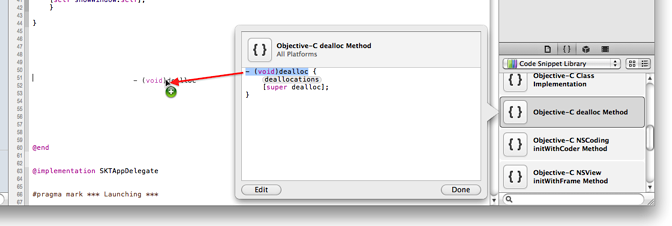
Figure 3-43 A user-customized code snippet 
Interface Builder objects are used the same way as those in the Xcode 3 Interface Builder. In Xcode 4 they are organized with subcategories and provide information pop-up windows like those for the file templates and code snippets.
Media files include a selection of graphics and icons that you can use in your program. All media files in your workspace or project are listed here.
At the bottom of the library pane is a search field that you can use to filter the library items displayed in the selected library. In , for example, only the Interface Builder objects whose name or description contains the word “window” are displayed.Figure 3-38
Close a Project or a Workspace
Choose Close Project or Close Workspace from the File menu to close a project or workspace without closing Xcode. In Xcode 4.1 and later, Xcode remembers which windows you had open and how they were configured, and restores them when you reopen the project or workspace. Also in Xcode 4.1 or later, press Command-Option-W—or hold down the Option key and click the close box—to close the project or workspace without first closing all windows and tabs. In this way, you can ensure that Xcode restores your window configuration the next time you open the project.
Copyright © 2011 Apple Inc. All Rights Reserved. Terms of Use | Privacy Policy | Updated: 2011-08-10