Retired Document
Important: This document is retired. Use the information in View Controller Programming Guide for iOS instead.
Custom View Controllers
Custom view controllers are what you use to present the content of your application. The job of any view controller is to manage the presentation of some content and coordinate the update and the synchronization of that content with the application’s underlying data objects. In the case of a custom view controller, this involves creating a view to present the content and implementing the infrastructure needed to synchronize the contents of that view with your application’s data structures.
The UIViewController class provides the basic behavior required for all view controllers—custom or otherwise. This chapter explains the fundamental behaviors provided by this class and also shows you how to modify those behaviors to suit the needs of your application. Understanding these behaviors and how you can modify them is essential to implementing your application’s custom view controllers; it is also useful when interacting with view controllers of any type.
Anatomy of a Custom View Controller
The UIViewController class provides the fundamental infrastructure for implementing all custom view controllers. Although you can configure an instance of the UIViewController class to display some views, you need to define a custom subclass if you want to do anything interesting. In your subclass, you use custom methods to populate views with data and respond to taps in buttons and other controls. However, when you want to make adjustments to the default behavior of the view controller, you need to override methods of the UIViewController class. You may also need to interact with other UIKit classes to implement the behavior you want.
Figure 2-1 shows some of the key objects associated directly with a custom view controller. These are the objects that are essentially owned and managed by the view controller itself. The view (accessible via the view property) is the only object that must be provided, although most view controllers also have some custom objects containing the data they need to display. Other objects are used only as needed to support features such as navigation and tab bar interfaces, and even so, most provide default behavior that is often sufficient.
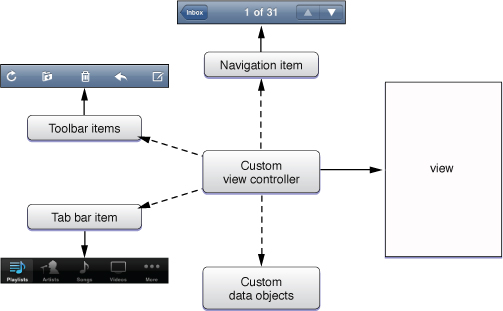
Although view controllers rarely act alone, custom view controllers should always be designed to be independent objects. In other words, a view controller should encapsulate all of the behavior associated with managing the views in its view hierarchy. Your view controller should contain the data it needs (or at least a reference to that data that it controls), the views needed to display that data, the logic to assimilate changes in the system (such as orientation changes), and the code needed to validate or process user interactions. Any custom objects needed to manage portions of the view hierarchy or data model should be created and managed wholly by the view controller.
Implementation Checklist for Custom View Controllers
When you want to implement a custom view controller for your application, you use Xcode to set up your source files. Most iOS project templates include at least one view controller class and you can create new view controllers in Xcode as needed.
For any custom view controllers you create, there are several tasks that you should always handle:
You must configure the view to be loaded by your view controller; see Creating the View for Your View Controller.
You must decide which orientations your view controller supports; see Managing a View Controller’s Interface Orientation.
You must clean up the memory that is managed by your view controller; see Managing Memory Efficiently.
As you configure your view controller’s view, you will likely discover that you need to define action methods or outlets to use with those views. For example, if your view hierarchy contains a table, you probably want to store a pointer to that table in an outlet so that you can access it later. Similarly, if your view hierarchy contains buttons or other controls, you may want those controls to call an associated action method in response to user interactions. As you iterate through the definition of your view controller class, you may therefore find that you need to add the following items to your view controller class:
Member variables pointing to the objects containing the data to be displayed by the corresponding views
Member variables (or outlets) pointing to key view objects with which your view controller must interact
Action methods that perform tasks associated with buttons and other controls in the view hierarchy
Any additional methods needed to implement your view controller’s custom behavior
The preceding items are the ones that you are the most likely to include in every custom view controller class you create. However, there are other methods you might add to your view controller to implement specific behaviors. Many of these methods take advantage of hooks in the view controller infrastructure to implement common tasks.
You can adjust your view hierarchy or application state in response to the view controller’s view appearing or disappearing from the screen; see Responding to Display-Related Notifications.
You can configure objects used by navigation and tab bar controllers, including:
The navigation item (if the controller is used in conjunction with a navigation controller interface); see Customizing the Navigation Bar Appearance.
The toolbar items (if an associated navigation controller displays a toolbar); see Specifying the Toolbar Items.
The tab bar item (if the view controller is used in conjunction with a tab bar controller interface); see Creating a Tab Bar Interface.
You can adjust your view hierarchy when the interface orientation changes; see Responding to Orientation Changes.
You can implement event handlers to catch any events not handled by the view or its subviews; see Event Handling Guide for iOS.
You can implement an editable version of your view; see Enabling Edit Mode for a View.
Understanding the View Management Cycle
In a view controller object, management of the corresponding view occurs in two distinct cycles: the load and unload cycles. The load cycle occurs whenever some part of your application asks the view controller for a pointer to its view object and that object is not currently in memory. When that happens, the view controller loads the view into memory and stores a pointer to the view for future reference.
If your application receives a low-memory warning at some point in the future, the view controller may subsequently try to unload the view. During the unload cycle, the view controller attempts to release its view object and return the view controller to its initial viewless state. If it is able to release the view, the view controller remains without a view object until the view is once again requested, at which point the load cycle begins again.
During the load and unload cycles, the view controller does most of the work of loading and unloading the view. However, if your view controller class stores references to views in the view hierarchy or needs to perform some additional configuration of the views at load time, you can override specific methods (which are described in the material that follows) to perform any extra tasks.
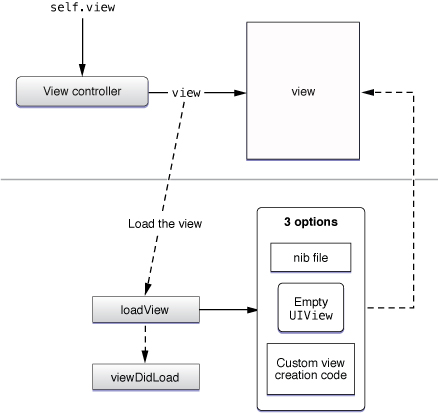
The steps that occur during the load cycle are as follows:
Some part of your application asks for the view in the view controller’s
viewproperty.If the view is not currently in memory, the view controller calls its
loadViewmethod.The
loadViewmethod does one of the following:If you override this method, your implementation is responsible for creating all necessary views and assigning a non-
nilvalue to theviewproperty.If you do not override this method, the default implementation uses the
nibNameandnibBundleproperties of the view controller to try to load the view from the specified nib file. If the specified nib file is not found, it looks for a nib file whose name matches the name of the view controller class and loads that file.If no nib file is available, the method creates an empty
UIViewobject and assigns it to theviewproperty.
The view controller calls its
viewDidLoadmethod to perform any additional load-time tasks.
Figure 2-2 shows a visual representation of the load cycle, including several of the methods that are called. Your application can override both the loadView and viewDidLoad methods as needed to facilitate the behavior you want for your view controller.
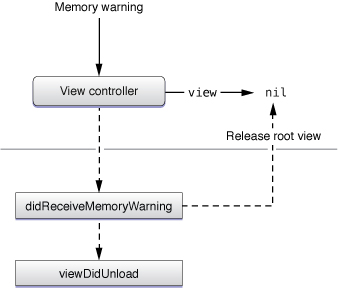
The steps that occur during the unload cycle are as follows:
The application receives a low-memory warning from the system.
Each view controller calls its
didReceiveMemoryWarningmethod:If you override this method, you should use it to release any custom data that your view controller object no longer needs. You should not use it to release your view controller’s view. You must call
superat some point in your implementation to perform the default behavior.The default implementation releases the view only if it determines that it is safe to do so.
If the view controller releases its view, it calls its
viewDidUnloadmethod. You can override this method to perform any additional cleanup required for your views and view hierarchy.
Figure 2-3 shows a visual representation of the unload cycle for a view controller.
Defining a Custom View Controller Class
A custom view controller is a subclass of UIViewController that you use to present your application’s content. Many of the Xcode project templates come with a custom view controller class that you can modify for your needs. If you need to create additional custom view controllers, do the following:
Choose File > New File to add a new source file to your project.
You want to create a new
UIViewControllersubclass. There is a template for this type of class in the Cocoa Touch Classes section of the New File dialog.Give your new view controller file an appropriate name and add it to your project.
Save your source files.
Once you have your view controller source files, you can implement the behaviors needed to present your content. The following sections describe the key tasks you can perform using a custom view controller. For additional information about creating a view controller, see UIViewController Class Reference.
Creating the View for Your View Controller
The main job of a view controller is to load and unload its view as needed. Most view controllers load their views from an associated nib file. The advantage of using nib files is that they allow you to lay out and configure your views graphically, making it easier and faster to adjust your layout. However, you can also create the view programmatically if you prefer.
Creating the View in Interface Builder
Interface Builder provides an intuitive way to create and configure the views for your view controllers. As its name suggests, Interface Builder is a tool for building your application’s interface graphically, as opposed to programmatically. Using this application, you assemble views and controls by manipulating them directly, dragging them into the workspace, positioning them, sizing them, and modifying their attributes using an inspector window. The results are then saved in a nib file, which stores the collection of objects you assembled along with information about all the customizations you made.
There are two ways to configure a nib file for use with a view controller:
Create a detached nib file by storing the view in a nib file by itself.
Create an integrated nib file by storing both the view and view controller in the same nib file.
Of the two techniques, using a detached nib file is by far the preferred way to go. Detached nib files offer a more robust solution, especially in the realm of memory management. During a low-memory condition, the contents of a detached nib file can be purged from memory as needed without affecting the state of the owning view controller object. The same is not true in the case of an integrated nib file, the contents of which must stay in memory until all nib-file objects are no longer needed.
Storing the View in a Detached Nib File
The process for creating a detached nib file involves two separate implementation steps:
You must configure a nib file with the view.
You must associate that nib file with your view controller object.
The configuration of the nib file itself is relatively straightforward. If you are creating the nib file from scratch, you should use the Cocoa Touch View template in Interface Builder as your starting point. The nib file created by this template contains the File’s Owner placeholder and a single custom view object. Add this new nib file to your Xcode project and then configure its contents as follows:
Set the class name of the File’s Owner placeholder to your view controller class.
You should have already created the class in your Xcode project. For new nib files, the class of File’s Owner is set to
NSObjectby default. (If you are editing a nib file that was provided for you by one of the Xcode project templates, the class may already be set to the correct view controller class name.)Make sure the
viewoutlet of the File’s Owner placeholder is connected to the top-level View object in the nib file.This
viewoutlet is defined by theUIViewControllerclass and inherited by all view controller objects. If you do not see this outlet in the File’s Owner placeholder, check to see whether you added the nib file to your Xcode project. Associating the nib file with an Xcode project lets Interface Builder retrieve information about the classes in that project automatically. This is necessary to determine the available outlets and actions of those classes.If you forget to connect this outlet, the
viewproperty of your view controller class is set tonilwhen the nib file is loaded, which prevents your view from being presented on the screen.Configure the view itself and add any subviews you need to display your application’s content.
Save the nib file.
After creating the nib file and adding it to your Xcode project, you need to initialize your view controller object with the name of that nib file. How you initialize your view controller object depends on how you create it. If you are creating your view controller programmatically, pass the name of the nib file to the initWithNibName:bundle: method when you initialize your view controller object. If you are loading your view controller object from a separate nib file (one other than the one containing the view), use Interface Builder to set the value NIB Name attribute of the view controller object to the name of your view’s nib file.
Listing 2-1 shows an example of how you would create and initialize a view controller programmatically. In this case, the custom class uses a nib file with the same name to store its view. After initializing the view controller, you can use the view controller as you see fit, including presenting it to the user, as is done in the example.
Listing 2-1 Creating a view controller object programmatically
- (void)displayModalView |
{ |
MyViewController* vc = [[[MyViewController alloc] initWithNibName:@"MyViewController" |
bundle:nil] autorelease]; |
[self presentModalViewController:vc animated:YES]; |
} |
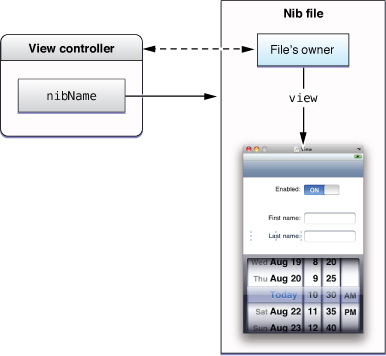
For a detached nib file, the actual loading of the nib file occurs automatically when the view property of the view controller object is accessed and the view is not currently in memory. The default loadView method uses the nibName and nibBundle properties to locate the desired nib file and load its contents into memory.
Figure 2-4 shows the runtime configuration of a view controller and its detached nib file prior to loading. The nibName property of the view controller stores a string with the name of the nib file. This string is used to locate the nib file in the application’s bundle. Inside the nib file, the File’s Owner placeholder stands in for the view controller object and is used to connect the view controller’s outlets and actions to objects in the nib file. After the nib file is loaded, the view property of the view controller object points to the view from the nib file.
For more information about how to create a nib file or configure its contents, see Interface Builder User Guide. For information about configuring custom outlets and actions for your view controller, see Configuring Actions and Outlets for Your View Controller.
Storing the View and View Controller in the Same Nib File
If your application has only one screen, you can include both the views for that screen and the view controller that manages them in the same nib file. Storing views and custom view controller objects in the same nib file is generally not recommended because it often prevents the system from unloading the views in low-memory situations. However, if the view itself is never going to be unloaded, including it in the same nib file as its view controller object might make the most sense.
Figure 2-5 shows the main nib file of an application that presents a single screen in its window. In this case, the nib file includes both a custom view controller object (MyViewController) and the view managed by that view controller. Notice that the view object is nested inside the view controller object in the document window. Nesting the view in this manner is preferred because it allows Interface Builder to keep both the view and its view controller in sync.
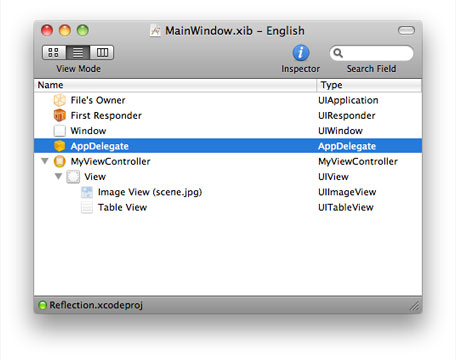
To configure the nib file shown in Figure 2-5, you would do the following:
Drag a View Controller (
UIViewController) object from the library to your Interface Builder document window.Add a generic View object to the view controller in one of the following ways:
Drag the view to the View Controller’s workspace window.
Drag the view to the view controller object in the Interface Builder document window.
Drag an Image View from the library to the generic view.
Drag a Table View from the library to the generic view.
Save the nib file.
Whenever you add objects to the top-level of your nib file, you should always connect those objects to outlets somewhere else in the nib file. In the case of the preceding nib file, this would mean defining an outlet in your application delegate object and connecting that outlet to the custom view controller object. Without the outlet, your code would have no way to access the view controller at runtime. In addition, because top-level objects are retained and then autoreleased, if you did not retain the object, it might possibly be released before you had a chance to use it.
Because they are stored in the same nib file, both the view controller and its view are ready to be used after the nib file has been loaded into memory. In the case of the main nib file, you would typically include some code in your application delegate’s applicationDidFinishLaunching: method to add the view controller’s view to your window, as described in Presenting a View Controller’s View.
Configuring the View Display Attributes in Interface Builder
To help you lay out the contents of your view properly, Interface Builder provides controls that let you specify whether the view has a navigation bar, a toolbar, or other objects that might affect the position of your custom content. Table 2-1 lists the items that you can configure and the impact they have on your view controller or views. For a detached nib file, you configure these items by modifying attributes of the view object. For integrated nib files, you configure these items by modifying attributes of the view controller object.
Configurable items | Description |
|---|---|
Status bar | You can specify whether the status bar is visible and what type of status bar your application displays by changing the Status Bar attribute in the Attributes inspector. This attribute is for design purposes only and is provided so that you can get a complete picture of how your views and controls will look when they are displayed with the status bar. The value of Status Bar attribute is not saved with your nib file. The actual style of the status bar (and whether it is present) must be set programmatically by your application at runtime. |
Navigation bar | You can specify whether your view has a navigation bar by changing the value of the Top Bar attribute in the Attributes inspector. This attribute is for design purposes only and is provided so that you can get a complete picture of how your views and controls will look when displayed with a navigation bar. Interface Builder lets you configure several different navigation bar styles, including navigation bars with extra space for prompt text. The value of the Top Bar attribute is not saved with your nib file. The actual style of the navigation bar (and whether it is present) is controlled by the owning navigation controller. For information on how to configure the navigation bar, see Customizing the Navigation Bar Appearance. |
Tab bar | You can specify whether your view has a tab bar by changing the value of the Bottom Bar attribute in the Attributes inspector. This attribute is primarily for design purposes and is provided so that you can get a complete picture of how your views and controls will look in the presence of a tab bar. If you are actually configuring a tab bar controller, tab bar items may be added to the individual view controllers associated with the tabs of the tab bar interface. For more information about configuring tab bar controllers and tab bar items, see Creating a Tab Bar Interface. |
Toolbar items | To specify that your view uses the toolbar provided by a navigation controller, set the Bottom Bar attribute in the Attributes inspector to Toolbar. This attribute is primarily for design purposes when creating a navigation interface. You can use it to see how your views and controls will look in the presence of a tab bar. If you are actually configuring a navigation controller, you can also include the bar button items for your view controller’s toolbar in your nib file. For more information on configuring toolbars in a navigation interface, see Displaying a Navigation Toolbar. |
Title | In an integrated nib file, you can specify a title for your view controller by assigning an appropriate value to the Title attribute. Navigation and tab bar controllers use the value of this attribute as a default value to use when displaying your view controller. |
Nib name | For view controllers embedded in a nib file, you use the NIB Name attribute to specify the name of the detached nib file containing the view controller’s view. For information on how to configure a detached nib file, see Storing the View in a Detached Nib File. When the view controller is loaded into memory at runtime, the value for this attribute is used to set the value of the view controller’s |
The configuration of navigation and tab bar controllers in nib files is a little more involved and is discussed in the following places:
For information about how to configure a navigation controller object by itself, see Creating a Navigation Interface.
For information about how to configure a tab bar controller by itself, see Creating a Tab Bar Interface.
For information about how to configure combinations of navigation and tab bar controllers, see Adding a Navigation Controller to a Tab Bar Interface.
Configuring Actions and Outlets for Your View Controller
Regardless of whether you use a detached or integrated nib file, the way you configure the actions and outlets of your view controller is essentially the same. Using Interface Builder, you create connections between the views and controls in your interface to the object representing your view controller. In an integrated nib file, you can make connections directly to the view controller object. However, in a detached nib file, you make connections to the File’s Owner placeholder, which stands in for your view controller object.
Listing 2-2 shows the definition of a custom MyViewController class that defines two custom outlets (designated by the IBOutlet keyword) and a single action method (designated by the IBAction return type). The outlets store references to a button and a text field in the nib file, while the action method responds to taps in the button.
Listing 2-2 Custom view controller class declaration
@interface MyViewController : UIViewController |
{ |
id myButton; |
id myTextField; |
} |
@property (nonatomic) IBOutlet id myButton; |
@property (nonatomic) IBOutlet id myTextField; |
- (IBAction)myAction:(id)sender; |
Figure 2-6 shows the connections you would create among the objects in such a MyViewController class. This nib file is configured as per the instructions in Configuring Actions and Outlets for Your View Controller, with the class of the File’s Owner placeholder set to the view controller class and the view outlet of File’s Owner connected to the top-level view object. The nib file also contains connections between the outlets and actions of the MyViewController class and the corresponding nib file objects.
MyViewController.nib
When the previously configured MyViewController class is created and presented modally, the view controller infrastructure loads the nib file automatically and reconfigures any outlets or actions. Thus, by the time the view is presented to the user, the outlets and actions of your view controller are set and ready to be used. This ability to bridge between your runtime code and your design-time resource files is one of the things that makes nib files very powerful.
Creating the View Programmatically
If you prefer to create views programmatically, instead of using a nib file, you do so from your view controller’s loadView method. You must override this method if you plan to create your views programmatically. Your implementation of this method should do the following:
Create a root view object that is sized to fit the screen.
The root view acts as the container for all other views associated with your view controller. You typically define the frame for this view to match the size of the application window, which itself should fill the screen. However, the view controller also adjusts the frame size as needed to accommodate the presence of assorted views, such as the system status bar, a navigation bar, or a tab bar.
You can use a generic
UIViewobject, a custom view you define, or any other view that can scale to fill the screen.Create any additional subviews and add them to the root view. For each view, you should do the following:
Create and initialize the view. For system views, you typically use the
initWithFrame:method to specify the initial size and position of the view.Add the view to a parent view using the
addSubview:method.Release the view by calling its
releasemethod.
Assign the root view to the
viewproperty of your view controller.Release the root view.
The notion of releasing each view shortly after creating it might sound strange, but once you add a view to your view hierarchy or save a reference to it, that is exactly what you want to do. The initial retain count of any object is 1 at creation time. Because parent views automatically retain their subviews, it is safe to release child views after they have been added to their parent. Similarly, the view property used to store your root view uses retain semantics to prevent the view from being released. Therefore, releasing each view transfers ownership to the appropriate place and prevents the object from being leaked later.
Listing 2-3 shows the loadView method from the MetronomeViewController class of the sample project Metronome. This method creates a custom view and does some basic setup, including assigning the custom view to the view controller’s view property, which retains the view. In this example, the metronomeView property of the view controller is an additional property that stores a pointer to the view; however, this property uses assignment semantics to avoid potential retention problems.
Listing 2-3 Creating views programmatically in the Metronome application
- (void)loadView { |
self.wantsFullScreenLayout = YES; |
MetronomeView *view = [[MetronomeView alloc] |
initWithFrame:[UIScreen mainScreen].applicationFrame]; |
view.metronomeViewController = self; |
self.view = view; |
self.metronomeView = view; |
[view release]; |
} |
If you retain any view objects using properties or custom setter methods, you should always remember to implement a viewDidUnload method to set those properties to nil. This is especially true if you use outlets to store references to your views and those outlets use a property or other setter method with retain semantics. For more information about managing the memory associated with your views, see Managing Memory Efficiently.
Cleaning Up After Unloading a View
After it is loaded into memory, a view controller’s view remains in memory until a low-memory condition occurs or the view controller itself is deallocated. In the case of a low-memory condition, the default UIViewController behavior is to release the view object stored in the view property if that view is not currently being used. However, if your custom view controller class stores outlets or pointers to any views in the view hierarchy, you must also release those references when the top-level view object is released. Failure to do so prevents those objects from being removed from memory right away and could potentially cause memory leaks later if you subsequently overwrite any pointers to them.
There are two places where your view controller should always clean up any references to view objects:
The
deallocmethodThe
viewDidUnloadmethod
If you use a declared property to store a reference to your view, and that property uses retain semantics, assigning a nil value to it is enough to release the view. Properties are by far the preferred way to manage your view objects because of their convenience. If you do not use properties, you must send a release message to any view that you explicitly retained before setting the corresponding pointer value to nil.
For information about memory management best practices, see Managing Memory Efficiently.
Managing Memory Efficiently
When it comes to view controllers and memory management, there are two issues to consider:
How do you allocate memory efficiently?
When and how do you release memory?
Although some aspects of memory allocation are strictly yours to decide, there are a handful of methods in the UIViewController class that usually have some connection to memory management tasks. Table 2-2 lists the places in your view controller object where you are likely to allocate or deallocate memory along with information about what you should be doing in each place.
Task | Methods | Discussion |
|---|---|---|
Allocating critical data structures required by your view controller | Initialization methods | Your custom initialization method (whether it is named |
Creating your view objects | Overriding the | |
Allocating or loading data to be displayed in your view | Any data that is tied to your view objects should be created or loaded in the | |
Releasing references to view objects | If you retain any view objects in your view hierarchy using outlets or other member variables in your class, you must always release those outlets when the views are no longer needed. After releasing a view object, always be sure to set your outlet or variable to | |
Releasing data that is not needed when your view is not displayed | You can use the | |
Responding to low-memory notifications | Use this method to deallocate all noncritical custom data structures associated with your view controller. Although you would not use this method to release references to view objects, you might use it to release any view-related data structures that you did not already release in your | |
Releasing critical data structures required by your view controller | Use this method to release all data structures associated with your view controller. If your view controller still has outlets or other variables with non- |
Managing a View Controller’s Interface Orientation
The accelerometers in iOS–based devices make it possible to determine the current orientation of the device. The UIKit framework takes advantage of this information and uses it to orient your application’s user interface to match the device orientation when appropriate. Although applications support only a portrait orientation by default, you can configure your view controllers to support other orientations as needed.
Supporting alternate orientations requires additional configuration for both your views and the view controllers that manage them. The simplest way to support multiple interface orientations is to do the following:
Override your view controller’s
shouldAutorotateToInterfaceOrientation:method and declare the orientations it supports; see Declaring the Supported Interface Orientations.Configure the autoresizing mask for each view in your view controller’s view hierarchy; see Configuring Your Views to Support Multiple Orientations.
These two steps should be sufficient for many applications. However, if the autoresizing behavior of views does not yield the layout you need for each orientation, you can override additional view controller methods and use them to tweak your layout when orientation changes occur. The UIViewController class provides a series of notifications that let you respond to different phases of the orientation change and make adjustments to your views (or other parts of your application) as needed. These notifications are described in more detail in Responding to Orientation Changes
Understanding the Rotation Process
When the orientation of an iOS–based device changes, the system sends out a UIDeviceOrientationDidChangeNotification notification to let any interested parties know that the change occurred. By default, the UIKit framework intercepts this notification and uses it to update your interface orientation automatically. This means that with only a few exceptions, you should not need to handle this notification at all. Instead, all you need to do is implement the appropriate methods in your view controller classes to respond to orientation changes.
In an iOS application, the window object does much of the work associated with changing the current orientation. However, it works in conjunction with the application’s view controllers to determine whether an orientation change should occur at all, and if so, what additional methods should be called to respond to the change. Specifically, it works with the view controller whose root view was most recently added to, or presented in, the window. In other words, the window object works only with the frontmost view controller whose view was displayed using one of the mechanisms described in Presenting a View Controller’s View.
The actual rotation process proceeds along one of two paths depending on the implementation of the associated view controller. The most common path is to perform a one-step rotation but view controllers can also support a two-step rotation if it provides a better experience. The one-step rotation process is available in iOS 3.0 and later and is preferred because it is more efficient than the two-step process. The choice as to which path is taken is dependent on your view controller subclass and which methods you override. If you override any of the methods associated with the one-step process, the window object uses that process; otherwise, it uses the two-step process.
Regardless of which rotation process is used, methods of the view controller are called at various stages of the rotation to give the view controller a chance to perform additional tasks. You might use these methods to hide or show views, reposition or resize views, or notify other parts of your application about the orientation change. Because your custom methods are called during the rotation operation, you should avoid performing any time-consuming operations there. You should also avoid replacing your entire view hierarchy with a new set of views. There are better ways to provide unique views for different orientations, such as presenting a new view controller modally (as described in Creating an Alternate Landscape Interface).
For detailed information about the sequence of steps that occur during the one-step and two-step rotation processes, see Responding to Orientation Changes.
Declaring the Supported Interface Orientations
If the view managed by your view controller supports orientations other than the default portrait orientation, you must override the shouldAutorotateToInterfaceOrientation: method and indicate which orientations your view supports. You should always choose the orientations your view supports at design time and implement your code with those orientations in mind. There is no benefit to choosing which orientations you want to support dynamically based on runtime information. Even if you did so, you would still have to implement the necessary code to support all possible orientations, and so you might as well just choose to support the orientation or not up front.
Listing 2-4 shows a fairly typical implementation of the shouldAutorotateToInterfaceOrientation: method for a view controller that supports the default portrait orientation and the landscape-left orientation. Your own implementation of this method should be just as simple.
Listing 2-4 Implementing the shouldAutorotateToInterfaceOrientation: method
- (BOOL)shouldAutorotateToInterfaceOrientation:(UIInterfaceOrientation)orientation |
{ |
if ((orientation == UIInterfaceOrientationPortrait) || |
(orientation == UIInterfaceOrientationLandscapeLeft)) |
return YES; |
return NO; |
} |
If your application supports both landscape orientations, you can use the UIInterfaceOrientationIsLandscape macro as a shortcut, instead of explicitly comparing the orientation parameter against both landscape constants. The UIKit framework similarly defines a UIInterfaceOrientationIsPortrait macro to identify both variants of the portrait orientation.
Configuring Your Views to Support Multiple Orientations
When the user interface changes orientation, the bounds of the affected views are modified automatically according to their autoresizing mask. The autoresizingMask property of every view contains constants that describe how the bounds of that view change in relation to its superview. Each view adjusts its own bounds and then asks each of its subviews to resize itself based on its autoresizing behaviors. The net result is that if you configure the autoresizing behaviors of your views appropriately, your views can adjust to orientation changes automatically.
If the autoresizing behaviors of views do not provide the precise layout you need, you may want to replace or supplement their behavior by providing your own custom layout code. The UIViewController class defines several methods that are called before, during, and after an orientation change. You can use these methods to modify the layout of your views as needed.
For information about the methods that are called during the rotation process, see Responding to Orientation Changes. For more information on the autoresizing properties of views and how they affect the view, see View Programming Guide for iOS.
Responding to Orientation Changes
When the orientation of a device changes, view controllers can respond by making a corresponding change to the orientation of their view. If the new orientation is supported, the view controller generates notifications as it makes the change to give your code a chance to respond. Rotation notifications can occur as a one-step or two-step process.
The reason you might want to respond to orientation changes is to make adjustments to your view hierarchy. For example, you might use these notifications to make the following types of changes:
Show or hide views that are specific to a particular orientation.
Adjust the position or size of views based on the new orientation.
Update other parts of your application to reflect the orientation change.
Whenever possible, the UIKit framework uses the one-step rotation process to rotate your views. However, whether it actually uses the one-step or two-step process is up to you. There are methods used by the two-step process that are not used by the one-step process, and vice versa; if you override any of the one-step methods, the one-step process is used. If you override only methods that are used by the two-step process, that process is used. The following sections describe the methods associated with each process. You can also find information about these methods (including whether they trigger the one-step or two-step process) in UIViewController Class Reference.
Responding to Orientation Changes in One Step
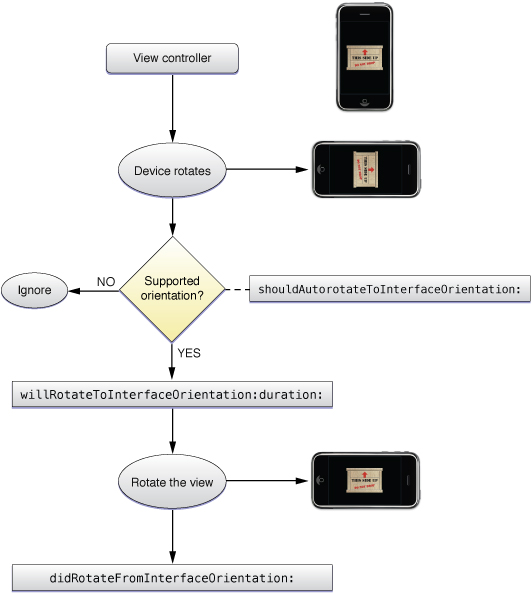
In iOS 3.0 and later, you can use one-step rotation methods to make changes just before and just after the orientation change occurs. During this process, the following sequence of events occurs:
The window detects that a change in the device orientation has occurred.
The window looks for an appropriate view controller and calls its
shouldAutorotateToInterfaceOrientation:method to determine if it supports the new orientation.Container view controllers may intercept this method and use their own heuristics to determine whether the orientation change should occur. For example, the tab bar controller allows orientation changes only if all of its managed view controllers support the new orientation.
If the new orientation is supported, the window calls the view controller’s
willRotateToInterfaceOrientation:duration:method.Container view controllers forward this message on to the currently displayed custom view controller. You can override this method in your custom view controllers to hide views or make other changes to your view layout before the interface is rotated.
The window adjusts the bounds of the view controller’s view.
This causes each view in the view hierarchy to be resized based on its autoresizing mask.
The window calls the view controller’s
didRotateFromInterfaceOrientation:method.Container view controllers forward this message to the currently displayed custom view controller. This marks the end of the rotation process. You can use this method to show views, change the layout of views, or make other changes to your application.
Figure 2-7 shows a visual representation of the preceding steps. It also shows how the interface would look at various stages of the process.
Responding to Orientation Changes in Two Steps
In all versions of iOS, you can use two-step notifications to respond to interface orientation changes. In the two-step process, two separate rotations occur. During the first step, the interface is rotated only halfway to its destination. During the second step, the rotation is rotated from this midpoint to its final orientation. Your application receives notifications throughout the process that allow you to respond before, during, and after the rotation.
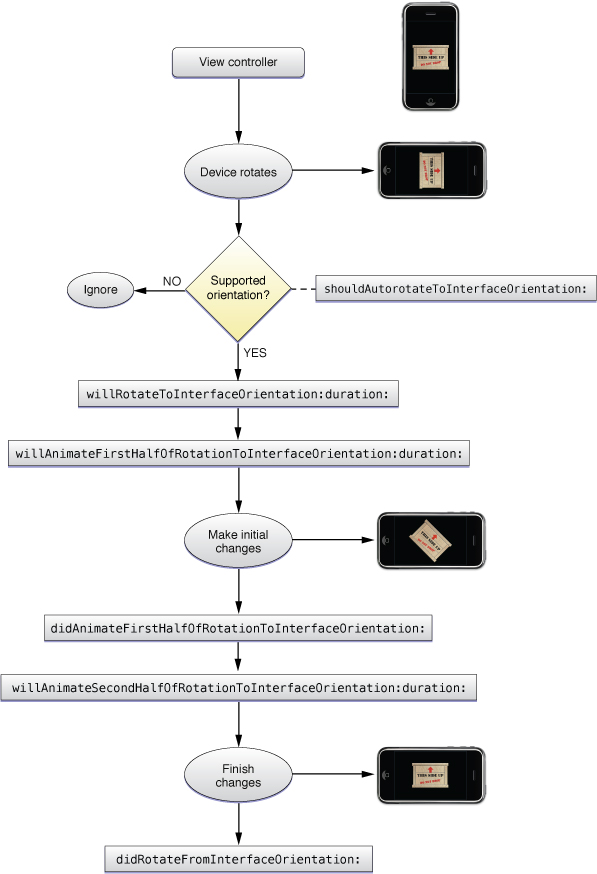
The following sequence of events occurs during a two-step rotation:
The window detects that a change in the device orientation has occurred.
The window looks for an appropriate view controller and calls its
shouldAutorotateToInterfaceOrientation:method to determine if it supports the new orientation.Container view controllers may intercept this method and use their own heuristics to determine whether the orientation change should occur. For example, the tab bar controller allows orientation changes only if all of its managed view controllers support the new orientation.
If the new orientation is supported, the window calls the view controller’s
willRotateToInterfaceOrientation:duration:method.Container view controllers forward this message to the currently displayed custom view controller. You can use this method to hide views or make other changes to your view layout before the interface is rotated.
The window calls the view controller’s
willAnimateFirstHalfOfRotationToInterfaceOrientation:duration:method.Container view controllers forward this message to the currently displayed custom view controller. You can use this method to hide views or make other changes to your view layout before the interface is rotated.
The window performs the first half of the rotation.
This causes the bounds of each view in the view hierarchy to be adjusted based on its autoresizing behaviors. Although most rotations involve moving from portrait to landscape mode (and thus rotating 45 degrees to the halfway point), it is possible to rotate from a landscape left to landscape right orientation or from a portrait to upside down portrait orientation. In these latter cases, the first half of the rotation would be 90 degrees.
The window calls the view controller’s
didAnimateFirstHalfOfRotationToInterfaceOrientation:method.Container view controllers forward this message to the currently displayed custom view controller.
The window calls the view controller’s
willAnimateSecondHalfOfRotationFromInterfaceOrientation:duration:method.Container view controllers forward this message to the currently displayed custom view controller.
The window performs the second half of the rotation.
By the end of this rotation, the autoresizing behaviors for all views have been applied and the views are in their “final” position.
The window calls the view controller’s
didRotateFromInterfaceOrientation:method.Container view controllers forward this message to the currently displayed custom view controller. You can use this method to show views, reposition or resize views, or make other changes once the rotation has finished.
Figure 2-8 shows a visual representation of the preceding steps. Along with each step, it shows how the view would appear to the user.
Creating an Alternate Landscape Interface
If you want to present the same data differently based on whether a device is in a portrait or landscape orientation, the way to do so is using two separate view controllers. One view controller should manage the display of the data in the primary orientation (typically portrait) while the other manages the display of the data in the alternate orientation. Using two view controllers is simpler and more efficient than making major changes to your view hierarchy each time the orientation changes. It allows each view controller to focus on the presentation of data in one orientation and to manage things accordingly. It also eliminates the need to litter your view controller code with conditional checks for the current orientation.
In order to support an alternate landscape interface, you have to do the following:
Implement two view controller objects:
One should present a portrait-only interface.
One should present a landscape-only interface.
Register for the
UIDeviceOrientationDidChangeNotificationnotification. In your handler method, present or dismiss the alternate view controller based on the current device orientation.
Because view controllers normally manage orientation changes internally, you have to tell each view controller to display itself in one orientation only. The implementation of the primary view controller then needs to detect device orientation changes and present the alternate view controller when the appropriate orientation change occurs. When the orientation returns to the primary orientation, the primary view controller would then dismiss the alternate view controller.
Listing 2-5 shows the key methods you would need to implement in a primary view controller that supports a portrait orientation. As part of its initialization, this view controller registers to receive orientation changed notifications from the shared UIDevice object. When such a notification arrives, the orientationChanged: method then presents or dismisses the landscape view controller depending on the current orientation.
Listing 2-5 Presenting the landscape view controller
@implementation PortraitViewController |
- (id)init |
{ |
self = [super initWithNibName:@"PortraitView" bundle:nil]; |
if (self) |
{ |
isShowingLandscapeView = NO; |
self.landscapeViewController = [[[LandscapeViewController alloc] |
initWithNibName:@"LandscapeView" bundle:nil] autorelease]; |
[[UIDevice currentDevice] beginGeneratingDeviceOrientationNotifications]; |
[[NSNotificationCenter defaultCenter] addObserver:self |
selector:@selector(orientationChanged:) |
name:UIDeviceOrientationDidChangeNotification |
object:nil]; |
} |
return self; |
} |
- (void)orientationChanged:(NSNotification *)notification |
{ |
UIDeviceOrientation deviceOrientation = [UIDevice currentDevice].orientation; |
if (UIDeviceOrientationIsLandscape(deviceOrientation) && |
!isShowingLandscapeView) |
{ |
[self presentModalViewController:self.landscapeViewController |
animated:YES]; |
isShowingLandscapeView = YES; |
} |
else if (UIDeviceOrientationIsPortrait(deviceOrientation) && |
isShowingLandscapeView) |
{ |
[self dismissModalViewControllerAnimated:YES]; |
isShowingLandscapeView = NO; |
} |
} |
Tips for Implementing Your Rotation Code
Depending on the complexity of your views, you may need to write a lot of code to support rotations or none at all. When figuring out what you need to do, you can use the following tips as a guide for writing your code.
Disable event delivery temporarily during rotations. Disabling event delivery for your views prevents unwanted code from executing while an orientation change is in progress.
Store the visible map region. If your application contains a map view, save the visible map region value prior to the beginning of rotations. When the rotations finish, use the saved value as needed to ensure that the displayed region is approximately the same as before.
For complex view hierarchies, replace your views with a snapshot image. If animating large numbers of views is causing performance issues, temporarily replace those views with an image view containing an image of the views instead. Once the rotations are complete, reinstall your views and remove the image view.
Reload the contents of any visible tables after a rotation. Forcing a reload operation when the rotations are finished ensures that any new table rows exposed are filled appropriately.
Use rotation notifications to update your application’s state information. If your application uses the current orientation to determine how to present content, use the rotation methods of your view controller (or the corresponding device orientation notifications) to note those changes and make any necessary adjustments.
Creating Custom View Controller Objects at Runtime
There are two ways to create a custom view controller object: programmatically or using a nib file. Which technique you should use depends on the structure of your user interface. For complex interfaces that incorporate tab bar controllers and navigation controllers, you usually include at least a few custom view controllers in your application’s main nib file and create the rest programmatically. In most other situations, you should create view controllers programmatically and only as they are needed.
To create a custom view controller programmatically, you could use code similar to the following:
MyViewController* vc = [[MyViewController alloc] initWithNibName:@"MyViewController" |
bundle:nil]; |
Such an example assumes that your view controller does not perform any significant initialization, or if it does, it does so in an overridden version of the initWithNibName:bundle: method. A common approach to take when designing custom view controllers though is to define one or more custom initialization methods. Doing so allows you to hide some of the more immutable aspects of the view controller initialization (such as specifying the nib file and bundle names) and focus instead on the data you want to use to initialize the view controller. For example, a custom initialization method that takes an array of objects might look something like the following:
- (id)initWithData:(NSArray*)data { |
if ((self = [super initWithNibName:@"MyViewController" bundle:nil])) { |
// Initialize the view controller with the starting data |
} |
return self; |
} |
Using such an initialization method, you would create and initialize the view controller so that it is immediately ready for use. You could then present the view controller or add it to a navigation interface. For example, to present the new view controller modally, you might define a method similar to the following on the current view controller:
- (void)presentModalViewControllerWithData:(NSArray*)data { |
MyViewController* vc = [[MyViewController alloc] initWithData:data]; |
[self presentModalViewController:vc animated:YES]; |
} |
When creating view controllers programmatically, it is your responsibility to set the frame of the view controller’s view appropriately before using the view. A programmatically created view controller that loads its view from a nib file does not try to change the size or position of that view. If the view controller is presented modally or used with a container view controller, the parent or container view controller often adjusts the view for you. But in cases where you add the view to a window yourself, the view’s existing frame is used as is. If your application has a status bar, failing to adjust the view’s frame could cause the misplacement of the view underneath the status bar.
The process for creating view controllers using a nib file is somewhat more involved and is described in Storing the View and View Controller in the Same Nib File. For information on how to display your view controller’s view at runtime, see Presenting a View Controller’s View.
Presenting a View Controller’s View
There are several options for displaying the view associated with a view controller:
Display the view directly by adding it to a window using the
addSubview:method.Display the view indirectly using one of the following techniques:
Present the owning view controller modally using the
presentModalViewController:animated:method.Push the owning view controller onto the navigation stack of a navigation controller object.
Make the owning view controller the root view controller of a tab in a tab bar interface.
On iPad, present the view controller using a popover.
Listing 2-6 shows an example of how to display a view directly in the application’s main window. In this example, the viewController variable is an outlet that stores a pointer to a view controller loaded from the main nib file. Similarly, the window variable stores a pointer to the application window. (This exact code is created for you in your application delegate when you use the View-based Application project template.) Adding the view to the window loads the view and causes it to be displayed when the window is subsequently shown.
Listing 2-6 Adding a view controller’s view to a window
- (void)applicationDidFinishLaunching:(UIApplication *)application { |
// At this point, the main nib file is loaded. |
// It is a good idea to set the view's frame before adding it to a window. |
[viewController.view setFrame:[[UIScreen mainScreen] applicationFrame]]; |
[window addSubview:viewController.view]; |
[window makeKeyAndVisible]; |
} |
It is recommended that you use only the suggested techniques for displaying the views of your view controllers. In order to present and manage views properly, the system makes a note of each view (and its associated view controller) that you display directly or indirectly. It uses this information later to report view controller-related events to your application. For example, when the device orientation changes, a window uses this information to identify the frontmost view controller and notify it of the change. If you incorporate a view controller’s view into your hierarchy by other means (by adding it as a subview to some other view perhaps), the system assumes you want to manage the view yourself and does not send messages to the associated view controller object.
Apart from your setting up your application’s initial interface, most other views are presented indirectly through their view controller objects. For information about how to present views indirectly, consult the following sections:
For information about how to present a view modally, see Presenting a View Controller Modally.
For information about how to display views in a navigation interface, see Modifying the Navigation Stack.
For information about displaying a view in a tab, see Creating a Tab Bar Interface.
For information about displaying a view using a popover, see Creating and Presenting a Popover.
Responding to Display-Related Notifications
When the visibility of a view controller’s view changes, the view controller calls some built-in methods to notify subclassers of the changes. You can use these built-in methods to respond to the change in visibility appropriately. For example, you could use these notifications to change the color and orientation of the status bar so that it matches the presentation style of the view that is about to be displayed. A view controller calls different methods depending on whether a view is about to appear or disappear from the screen.
Figure 2-9 shows the basic sequence of events that occurs when a view controller’s view is added to a window. (If the view is already in a window but currently hidden by another view, this same sequence of events occurs when those obstructions are removed and the view is once again revealed.) The viewWillAppear: and viewDidAppear: methods give subclasses a chance to perform any additional actions related to the appearance of the view.
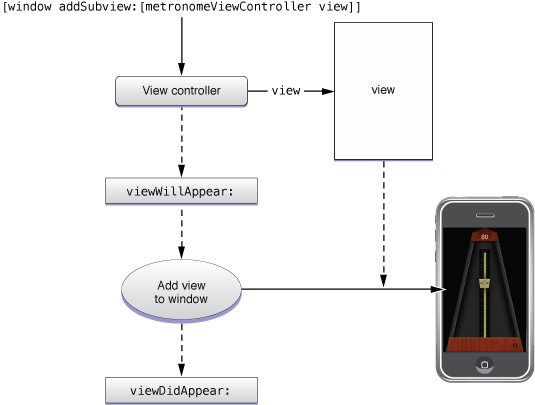
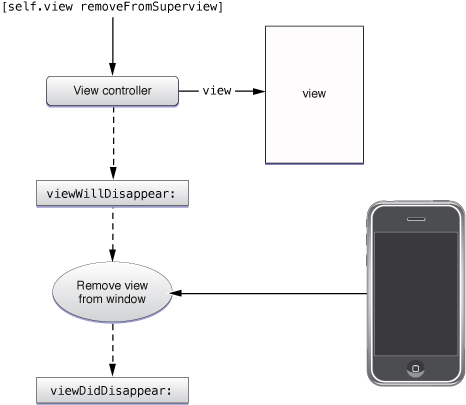
Figure 2-10 shows the basic sequence of events that occurs when a view is removed from its window. (This same sequence of events occurs when a view becomes completely hidden by another view, such as can occur when presenting new view controllers on top of the existing one.) When the view controller detects that its view is about to be removed or hidden, it calls the viewWillDisappear: and viewDidDisappear: methods to give subclasses a chance to perform any relevant tasks.
Adopting a Full-Screen Layout for Custom Views
If your application displays the status bar, the UIViewController class automatically shrinks its view so that the view does not underlap the status bar. After all, if the status bar is opaque, there is no way to see the content lying underneath or interact with it. However, if your application displays a translucent status bar, you can set the value of your view controller’s wantsFullScreenLayout property to YES to allow your view to underlap the status bar.
Underlapping the status bar is useful in situations where you want to maximize the amount of space available for displaying your content. When displaying content under the status bar, you should be sure to put that content inside a scroll view so that the user can scroll it out from under the status bar. Being able to scroll your content is important because the user cannot interact with content that is positioned behind the status bar or any other translucent views (such as translucent navigation bars and toolbars). Navigation bars automatically add a scroll content inset to your scroll view (assuming it is the root view of your view controller) to account for the height of the navigation bar; otherwise, you must modify the contentInset property of your scroll view manually.
For more information about adopting a full-screen layout for view controllers used in conjunction with a navigation controller, see Adopting a Full-Screen Layout for Navigation Views.
Enabling Edit Mode for a View
If you want to use the same view controller to display and edit content, you can override the setEditing:animated: method and use it to toggle the view controller’s view between display and edit modes. When called, your implementation of this method should add, hide, and adjust the view controller’s views to match the specified mode. For example, you might want to change the content or appearance of views to convey that the view is now editable. If your view controller manages a table, you can also call the table’s own setEditing:animated: method to put the table into the appropriate mode.
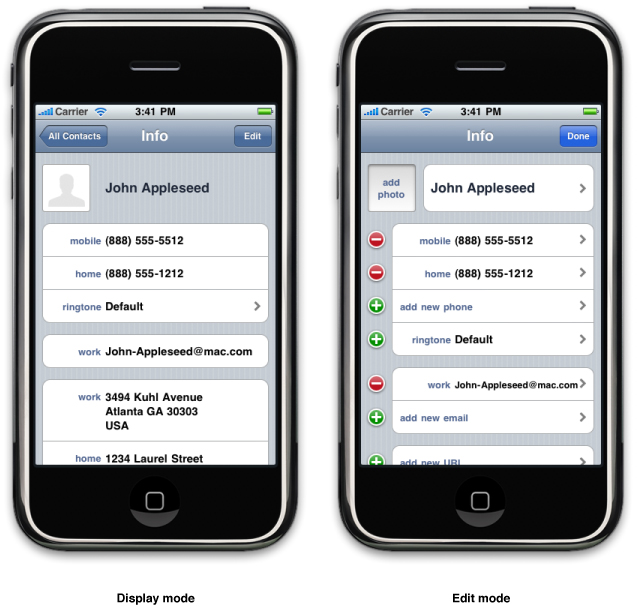
Figure 2-11 shows a view from the Contacts application that supports in-place editing. Tapping the Edit button in the upper-right corner tells the view controller to update itself for editing; the Done button returns the user to display mode. In addition to modifying the table, the view also changes the content of the image view and the view displaying the user’s name. It also configures the assorted views and cells so that tapping them edits their contents instead of performing other actions.
The implementation of your own setEditing:animated: method is relatively straightforward. All you have to do is check to see which mode your view controller is entering and adjust the contents of your view accordingly.
- (void)setEditing:(BOOL)flag animated:(BOOL)animated |
{ |
[super setEditing:flag animated:animated]; |
if (flag == YES){ |
// change views to edit mode |
} |
else { |
// save the changes if needed and change views to noneditable |
} |
} |
A common place in which to use an editable view is in a navigation interface. When implementing your navigation interface, you can include a special Edit button in the navigation bar when your editable view controller is visible. (You can get this button by calling the editButtonItem method of your view controller.) When tapped, this button automatically toggles between an Edit and Done button and calls your view controller’s setEditing:animated: method with appropriate values. You can also call this method from your own code (or modify the value of your view controller’s editing property) to toggle between modes.
For more information about adding an Edit button to a navigation bar, see Using Edit and Done Buttons. For more information about how you support the editing of table views, see Table View Programming Guide for iOS.
Handling Events
View controllers are themselves descendants of the UIResponder class and are therefore capable of handling all sorts of events. Normally, when a view does not respond to a given event, it passes that event to its superview. However, if the view is being managed by a view controller, it passes the event to the view controller object first. This gives the view controller the opportunity to absorb any events that are not handled by its views. If the view controller does not handle the event, then that event moves on to the view’s superview as usual.
Figure 2-12 demonstrates the flow of events within a view hierarchy. Suppose you have a custom view that is embedded inside a screen-sized generic view object, which is in turn managed by your view controller. Touch events arriving in your custom view’s frame are delivered to that view for processing. If your view does not handle an event, it is passed along to the parent view. Because the generic view does not handle events, it passes those events along to its view controller first. If the view controller does not handle the event, the event is further passed along to the superview of the generic UIView object, which in this case would be the window object.

Although you might not want to handle touch events specifically in your view controller, you could use it to handle motion-based events. You might also use it to coordinate the setting and changing of the first responder. For more information about how events are distributed and handled in iOS applications, see Event Handling Guide for iOS.
Accessing Related View Controller Objects
Although a view controller’s main responsibility is to provide and manage its view hierarchy, view controllers often work in concert with other view controllers to present more sophisticated interfaces. For example, a navigation controller manages the navigation bar view, which provides a back button and information specific to the current view controller. For the specific content, the navigation controller relies on your custom view controllers to provide that content. Tab bar controllers similarly expect your custom view controllers to provide information related to tabs.
A custom view controller is responsible for providing any specific objects needed by higher-level view controllers. Table 2-3 lists the types of objects your view controller should be prepared to provide and the situations in which you need to provide it. If you do not specify a custom object for any of these properties, the view controller provides an appropriate default item for you.
Object | Property | Description |
|---|---|---|
Navigation toolbar items | Used in conjunction with a navigation controller that provides a custom toolbar. You can use this property to specify any items you want displayed in that toolbar. As the user transitions from one screen to the next, the toolbar items associated with the new view controller are animated into position. The default behavior is to provide no custom toolbar items. Available in iOS 3.0 and later. For information about configuring a navigation toolbar, see Displaying a Navigation Toolbar. | |
Navigation bar content | Used in conjunction with a navigation controller. The navigation item object provides the objects to be displayed in the navigation bar when your view controller is displayed. You can use this to provide a custom title or additional controls for your view. The default navigation item uses the title of your view controller as the title of the navigation bar and does not provide any custom buttons. The navigation controller adds the back button automatically. For information about specifying the contents of the navigation bar, see Customizing the Navigation Bar Appearance. | |
Tab bar item | Used in conjunction with a tab bar controller. The tab bar item provides the image and text to display in the tab associated with your view controller. The default tab bar item contains the title of your view controller and no image. For information about specifying the tab contents for your view controller, see Creating a Tab Bar Interface. |
For more information about these properties, see UIViewController Class Reference.
Copyright © 2013 Apple Inc. All Rights Reserved. Terms of Use | Privacy Policy | Updated: 2013-09-18