 Table of Contents
  Previous Section
Design the Main page with the Database Wizard
Every WebObjects application has at least one component-usually named "Main"-that represents the first page the application displays. In Movies, the Main component represents the Browse Movies page shown below:
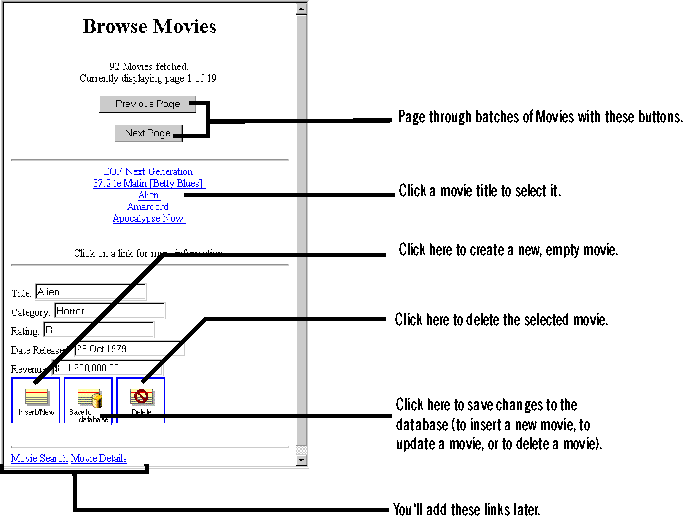
To design the Main page, you'll use the WebObjects Builder Database Wizard. The Database Wizard performs all the setup that's necessary to fetch database records and display them in a web page. Specifying different wizard options yields completely different pages. For example, both the Browse Movies and Movie Search pages are designed with the Database Wizard.
Create a new application
- Use WebObjects Builder to create a new application named Movies.woa.
Recall that you must create the application in a directory that's under DocumentRoot/WebObjects.
Start the Database Wizard
- Bring the Main component to the front.
- Choose Tools
 Database Wizard.
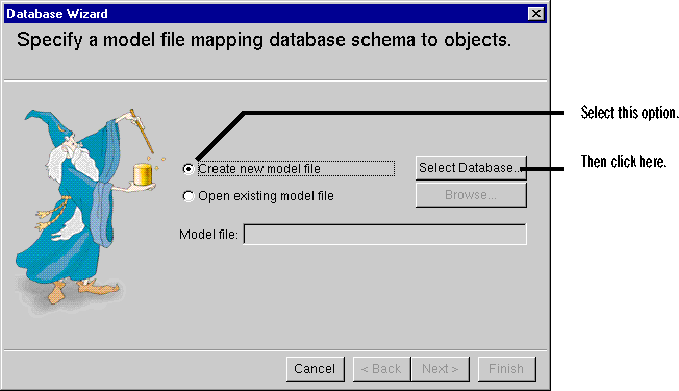
Specify a model file
A model file defines a database-to-object mapping that associates database columns with instance variables of objects. It also specifies object relationships based on database join criteria. You typically create model files using the EOModeler application, but the Database Wizard can create a default model as a starting point. Later on, you'll use EOModeler to modify the default model created by the wizard.
- In the Database Wizard panel, select Create a new model file.
- Click Select Database.
- Choose the adaptor for the database you want to use.
- Fill in the login panel.
A Choose Database Adaptor panel opens.
An adaptor is a mechanism that connects your application to a particular database server. For each type of server you use, you need a separate adaptor. WebObjects provides adaptors for Informix, Oracle, and Sybase servers, and for any server that is ODBC compliant.
Note: Not all adaptors are available with all versions of WebObjects.
A login panel for the database that corresponds to the selected adaptor opens. The examples in this chapter use the Oracle version of the Movies database included with WebObjects.

When you use the Database Wizard to create a model file, the wizard uses a database adaptor to read the data dictionary from the database you specified in the login panel and to create a default model.
Choose an entity
- In the Choose an entity panel, select the Movie entity.
When you choose the Movie entity, the wizard displays its attributes. An attribute is a part of the database-to-object mapping that associates a database column with one of a class's instance variables. For example, the title attribute in the Movie entity maps the TITLE column of the MOVIE table to the title instance variable of Movie objects.

Choose a primary key
- Select movieId as the Movie entity's primary key.
Enterprise Objects Framework uses primary keys to uniquely identify enterprise objects and to map them to the appropriate database row. Therefore, you must assign a primary key to each entity you use in your application. The Database Wizard sets the Movie entity's primary key to the attribute you choose; however, you'll need to explicitly assign primary keys to the other entities later on.
You should choose primary key attributes that are assigned initial values and then are never modified. Consequently applications usually assign primary key values automatically. For example, the Movies application assigns a movieId value to a new movie when it's created, and the value never changes afterward. The Movies interface doesn't even display movieId values because they aren't meaningful to users of the application.
Enterprise Objects Framework provides several mechanisms for generating and assigning unique values to primary key attributes. By default, Enterprise Objects Framework uses a native database mechanism to assign primary key values. The scripts that come with WebObjects for installing the Movies database set up the database for the default mechanism. See the chapter "Answers to Common Design Questions" in the Enterprise Objects Framework Developer's Guide for more information.
Choose a layout
The Database Wizard provides several page layout options for formatting objects fetched from the database.
- Choose Selected Record.
- Choose Paginated 10 per page.

Choose attributes to display
The Database Wizard lists all of the attributes of a Movie object. The next step is to choose which of these attributes the page should display. Most of these attributes will be displayed in the detail part at the bottom of the page.
- Add attributes from the All Attributes column to the Attributes to display column.
The order in which you add the attributes determines the order in which they appear on the page, so add them in the following order: title, category, rating, dateReleased, and revenue.
Don't add any of the remaining attributes. The language, movieId, and studioId attributes don't have meaning to users, and should not be displayed in the page.

Choose the attribute to display on the hyperlink
You now need to specify the attribute used in the middle part of the page to identify each record. This attribute will be displayed as a hyperlink. Clicking the hyperlink displays the corresponding record in the detail part of the page.
- Select the title attribute.
- Click Finish.
Almost all of the page's dynamic elements are bound to methods in the movies variable. This variable is a WODisplayGroup. WODisplayGroups (also referred to as display groups) provide a simple interface for interacting with relational databases in terms of objects. A display group manages objects associated with a single entity. The movies display group operates on Movie objects because you chose the Movie entity when you ran the wizard.
Later in this tutorial, you'll build a page by hand that contains some of the same features as this Main page. At that time, you'll learn more about what the display group can do.
Save the page
- Bring the Main component to the front.
- Choose File Save.
Run the application
- Use a web browser to run the application.
Table of Contents  Next Section