Creating Form-Based Dynamic HTML Elements
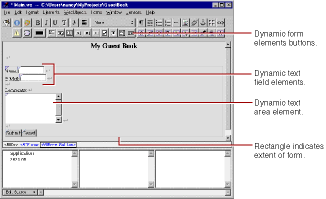
In this section, you'll create a form with several elements to capture input from a guest. The Submit and Reset buttons you add to the form will apply to all other elements in the form. These elements look and act like HTML form elements but are actually dynamic WebObjects elements, which enable your code to receive and manipulate the data entered by the user. Refer to the screen shot that follows these steps to see how the window should look.-
Place the cursor on the second line after the "My Guest Book" text.
-
Click
 .
. WebObjects Builder adds a form element to your component. The triangle at the upper-left corner indicates that it is a dynamic form, as opposed to a static form.The gray border indicates the extent of the form. You can increase its size by adding elements inside it.
- Type the text "Name: " and press Shift-Enter.
-
Type "E-mail: " and press Shift-Enter twice.
- Type "Comments: " followed by Shift-Enter.
-
Place the cursor to the right of the text "Name: ".
-
Click
 to create a dynamic text field element (WOTextField).
 -
Repeat steps 6 and 7 for "E-mail: ".
-
Use the
 button to create a multi-line text area below the "Comments: " line.
 -
Press Shift-Enter twice to create two blank lines.
-
Click
 to create a Submit button, which is used to send the data in the form to the server.
 -
Click
 to create a Reset button, which is used to clear the data in the form.
 The window should now look like this:

This text replaces the word "Form" that was displayed by default.
You have just entered three lines (and a blank line) of static text inside the form. Now you'll enter some dynamic elements to receive input from the user: two text fields and a multi-line text area.
© 1999 Apple Computer, Inc. – (Last Updated 24 Aug 99)