Retired Document
Important: This document has been replaced by App Distribution Guide. App Distribution Guide offers step-by-step instructions for configuring, testing, and submitting your app for approval. This new document describes how to use Xcode and other Apple developer tools to create and configure your project, request signing certificates, create provisioning profiles, configure special App Store technologies, test your app on devices, create your app record in iTunes Connect, and submit your app for approval to Apple. If you have a company Apple Developer Program membership, you’ll also learn how to manage your team’s certificates and provisioning assets.
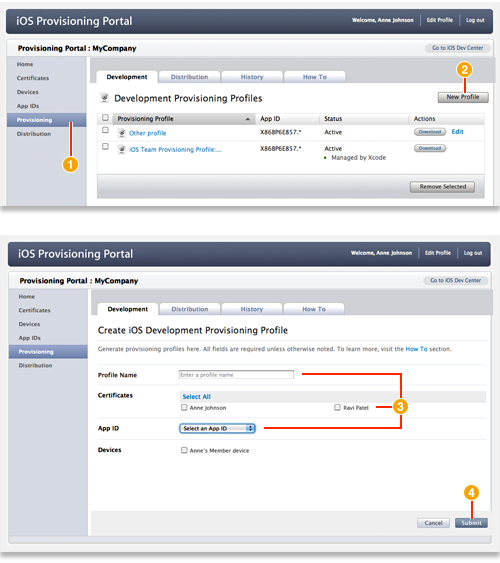
Creating a Development Provisioning Profile
After logging in to the iOS Provisioning Portal, click Provisioning in the sidebar.
Click New Profile.
Specify the profile name, select the certificates and devices you want to associate with this profile, and choose an app ID.
Click Submit to generate your profile.
Using iOS Provisioning Portal, create a development provisioning profile to specify which developers on your team can sign an app, or suite of apps, and specify a set of devices to run and test those apps.
Only team agents and admins can create development provisioning profiles. This profile contains a name, a set of development certificates, a set of device IDs, and an app ID. A development provisioning profile ties developers and devices to a development team. A profile is valid for one year.
When choosing devices and certificates, select all devices your team will use for testing and all certificates for developers working on the app.
If you, the team admin, recently enabled an app ID for Apple Push Notification Service, create a new provisioning profile containing that app ID. Provisioning profiles created before an app ID was enabled for APNS do not work for testing APNS.
After the team admin creates this profile, you will be able to download and install it on your device and test your app.
Copyright © 2013 Apple Inc. All Rights Reserved. Terms of Use | Privacy Policy | Updated: 2013-04-23