Retired Document
Important: This version of Start Developing iOS Apps Today has been retired. The replacement version provides a new, more streamlined walkthrough of the basics. For information covering the same subject area as this page, please see "App Development Process".
Know the Core Objects of Your App
The UIKit framework provides the infrastructure for all apps but it is your custom objects that define the specific behavior of your app. Your app consists of a handful of specific UIKit objects that manage the event loop and the primary interactions with iOS. Through a combination of subclassing, delegation, and other techniques, you modify the default behaviors defined by UIKit to implement your app.
In addition to customizing the UIKit objects, you are also responsible for providing or defining other key sets of objects. The largest set of objects is your app’s data objects, the definition of which is entirely your responsibility. You must also provide a set of user interface objects. Fortunately UIKit provides numerous classes to make defining your interface easy. In addition to code, you must also provide the resources and data files you need to deliver a shippable app.
iOS App Programming Guide describes in detail many of the topics mentioned in this article.
The Core Objects of Your App
From the time your app is launched by the user, to the time it exits, the UIKit framework manages much of the app’s core behavior. At the heart of the app is the UIApplication object, which receives events from the system and dispatches them to your custom code for handling. Other UIKit classes play a part in managing your app’s behavior too, and all of these classes have similar ways of calling your custom code to handle the details.
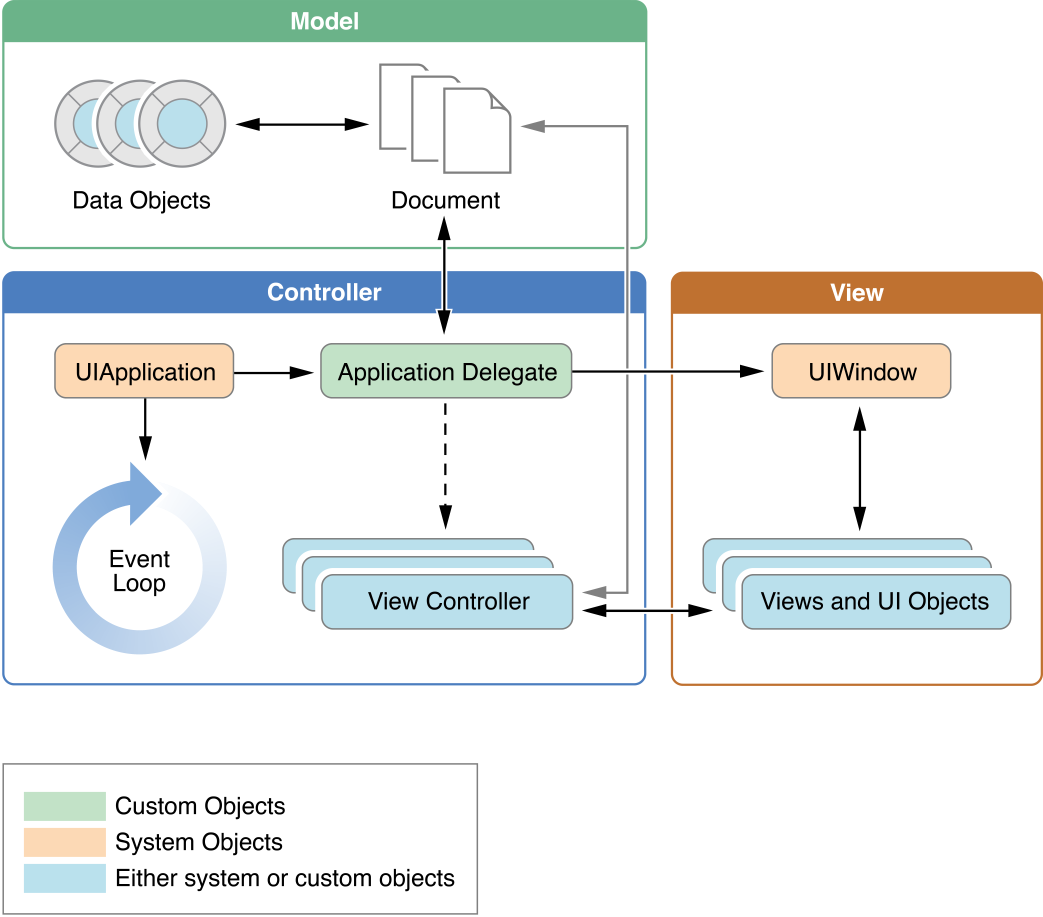
To understand how UIKit objects work with your custom code, it helps to understand a little about the objects that make up an iOS app. Figure 1 shows the objects that are most commonly found in an iOS app, and Table 1 describes the roles of each object. As you can see from the diagram, iOS apps are organized around the Model-View-Controller design pattern. This pattern separates the data objects in the model from the views used to present that data. This separation promotes code reuse by making it possible to swap out your views as needed and is especially useful when creating universal apps—that is, apps that can run on both iPad and iPhone.
Object | Description |
|---|---|
| You use the |
App delegate object | The app delegate is a custom object created at app launch time, usually by the In iOS 5 and later, you can use the app delegate to handle other app-related events. The Xcode project templates declare the app delegate as a subclass of |
Documents and data model objects | Data model objects store your app’s content and are specific to your app. For example, a banking app might store a database containing financial transactions, whereas a painting app might store an image object or even the sequence of drawing commands that led to the creation of that image. (In the case of the drawing commands, an image object is still a data object because it is just a container for the image data.) Apps can also use document objects (custom subclasses of UIDocument) to manage some or all of their data model objects. Document objects are not required but offer a convenient way to group data that belongs in a single file or file package. For more information about documents, see “Defining a Document-Based Data Model.” |
View controller objects | View controller objects manage the presentation of your app’s content on screen. A view controller manages a single view and its collection of subviews. When presented, the view controller makes its views visible by installing them in the app’s window. The |
| A To change the content of your app, you use a view controller to change the views displayed in the corresponding window. You never replace the window itself. In addition to hosting views, windows work with the |
View, control, and layer objects | Views and controls provide the visual representation of your app’s content. A view is an object that draws content in a designated rectangular area and responds to events within that area. Controls are a specialized type of view responsible for implementing familiar interface objects such as buttons, text fields, and toggle switches. The UIKit framework provides standard views for presenting many types of content. You can also define your own custom views by subclassing In addition to incorporating views and controls, apps can also incorporate Core Animation layers into their view and control hierarchies. Layer objects are actually data objects that represent visual content. Views use layer objects extensively behind the scenes to render their content. You can also add custom layer objects to your interface to implement complex animations and other types of sophisticated visual effects. |
What distinguishes one iOS app from another is the data it manages (and the corresponding business logic) and how it presents that data to the user. Most interactions with UIKit objects do not define your app but help you to refine its behavior. For example, the methods of your app delegate let you know when the app is changing states so that your custom code can respond appropriately.
The Data Model
Your app’s data model comprises your data structures and the business logic needed to keep that data in a consistent state. You never want to design your data model in total isolation from your app’s user interface; however, the implementation of your data model objects should be separate and not rely on the presence of specific views or view controllers. Keeping your data separate from your user interface makes it easier to implement a universal app—one that can run on both iPad and iPhone—and also makes it easier to reuse portions of your code later.
If you have not yet defined your data model, the iOS frameworks provide help for doing so. The following sections highlight some of the technologies you can use when defining specific types of data models.
Defining a Custom Data Model
When defining a custom data model, create custom objects to represent any high-level constructs, but take advantage of the system-supplied objects for simpler data types. The Foundation framework provides many objects (most of which are listed in Table 2) for managing strings, numbers, and other types of simple data in an object-oriented way. Using these objects is preferable to defining new objects both because it saves time and because many other system routines expect you to use the built-in objects.
Data | Classes | Description |
|---|---|---|
Strings and text |
| Strings in iOS are Unicode based. The string classes provide support for creating and manipulating strings in a variety of ways. The attributed string classes support stylized text and are used only in conjunction with Core Text. |
Numbers |
| When you want to store numerical values in a collection, use number objects. The |
Raw bytes |
| For times when you need to store raw streams of bytes, use data objects. Data objects are also commonly used to store objects in an archived form. The |
Dates and times |
| Use date objects to store timestamps, calendar dates, and other time-related information. |
URLs |
| In addition to their traditional use for referring to network resources, URLs in iOS are the preferred way to store paths to files. The |
Collections |
| Use collections to group related objects together in a single place. The Foundation framework provides several different types of collection classes. |
In addition to data-related objects, there are some other data types that are commonly used by the iOS frameworks to manage familiar types of data. You are encouraged to use these data types in your own custom objects to represent similar types of data.
NSInteger/NSUInteger—Abstractions for scalar signed and unsigned integers that define the integer size based on the architecture.NSRange—A structure used to define a contiguous portion of a series. For example, you can use ranges to define the selected characters in a string.NSTimeInterval—The number of seconds (whole and partial) in a given time interval.CGPoint—An x and y coordinate value that defines a location.CGSize—Coordinate values that define a set of horizontal and vertical extents.CGRect—Coordinate values that define a rectangular region.
Of course, when defining custom objects, you can always incorporate scalar values directly into your class implementations. In fact, a custom data object can include a mixture of scalar and object types for its member variables. Listing 1 shows a sample class definition for a collection of pictures. The class in this instance contains an array of images and a list of the indexes into that array representing the selected items. The class also contains a string for the collection’s title and a scalar Boolean variable indicating whether the collection is currently editable.
Listing 1 Definition of a custom data object
@interface PictureCollection : NSObject |
@property (nonatomic, copy) NSString * title; |
@property (nonatomic) BOOL editable; |
@property (nonatomic, readonly) NSOrderedSet* pictures; |
@property (nonatomic) NSMutableIndexSet *selection; |
// Method definitions... |
@end |
Consider how undo operations on your custom objects might be handled. Supporting undo means being able to reverse changes made to your objects cleanly. If your objects incorporate complex business logic, you need to factor that logic in a way that can be undone easily. Here are some tips for implementing undo support in your custom objects:
Define the methods you need to make sure that changes to your object are symmetrical. For example, if you define a method to add an item, make sure you have a method for removing an item in a similar way.
Factor out your business logic from the code you use to change the values of member variables.
For multistep actions, use the current
NSUndoManagerobject to group the steps together.
Defining a Structured Data Model Using Core Data
Core Data is a schema-driven object graph management and persistence framework. Fundamentally, Core Data helps you to save model objects (in the sense of the Model-View-Controller design pattern) to a file and get them back again. This is similar to archiving, but Core Data offers much more than that.
Core Data provides an infrastructure for managing all the changes to your model objects. It gives you automatic support for undo and redo, and for maintaining reciprocal relationships between objects.
It allows you to keep just a subset of your model objects in memory at any given time, which is very important for iOS apps.
It uses a schema to describe the model objects. You define the principal features of your model classes—including the relationships between them—in a GUI-based editor. This schema provides a wealth of basic functionality “for free,” including setting of default values and attribute value validation.
It allows you to maintain disjoint sets of edits of your objects. Disjoint sets are useful if you want to, for example, allow the user to make edits in one view that may be discarded without affecting data displayed in another view.
It has an infrastructure for data store versioning and migration. Versioning lets you easily upgrade an old version of the user’s file to the current version.
It allows you to store your data in iCloud and access it from multiple devices.
Defining a Document-Based Data Model
A document-based data model is a convenient way to manage the files your app writes to disk. In this type of data model, you use a document object to represent the contents of a single file (or file package) on disk. That document object is responsible for reading and writing the contents of the file and working with your app’s view controllers to present the document’s contents on screen. The traditional use for document objects is to manage files containing user data. For example, an app that creates and manages text files would use a separate document object to manage each text file. However, you can use document objects for private app data that is also backed by a file.
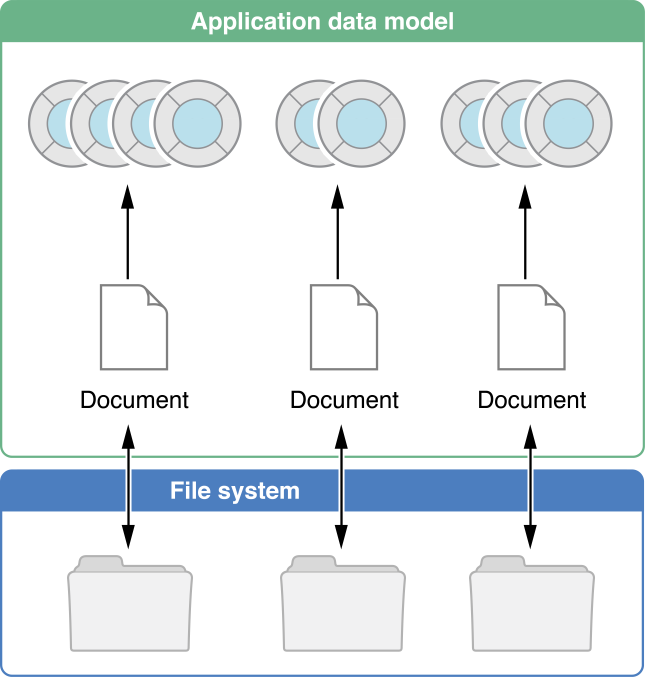
Figure 2 illustrates the typical relationships between documents, files, and the objects in your app’s data model. With few exceptions, each document is self-contained and does not interact directly with other documents. The document manages a single file (or file package) and creates the in-memory representation of any data found in that file. Because the contents of each file are unique, the data structures associated with each document are also unique.
You use the UIDocument class to implement document objects in your iOS app. This class provides the basic infrastructure needed to handle the file management aspects of the document. Other benefits of UIDocument include:
It provides support for autosaving the document contents at appropriate times.
It handles the required file coordination for documents stored in iCloud. It also provides hooks for resolving version conflicts.
It provides support for undoing actions.
You must subclass UIDocument in order to implement the specific behavior required by your app’s documents.
The User Interface
Every iOS app has at least one window and one view for presenting its content. The window provides the area in which to display the content and is an instance of the UIWindow class. Views are responsible for managing the drawing of your content (and handling touch events) and are instances of the UIView class. For interfaces that you build using view objects, your app’s window naturally contains multiple view objects. For interfaces built using OpenGL ES, you typically have a single view and use that view to render your content.
View controllers also play a very important role in your app’s user interface. A view controller is an instance of the UIViewController class and is responsible for managing a single set of views and the interactions between those views and other parts of your app. Because iOS apps have a limited amount of space in which to display content, view controllers also provide the infrastructure needed to swap out the views from one view controller and replace them with the views of another view controller. Thus, view controllers are how you implement transitions from one type of content to another.
You should always think of a view controller object as a self-contained unit. It handles the creation and destruction of its own views, handles their presentation on the screen, and coordinates interactions between the views and other objects in your app.
Building an Interface Using UIKit Views
Apps that use UIKit views for drawing are easy to create because you can assemble a basic interface quickly. The UIKit framework provides many types of views to help present and organize data. Controls—a special type of view—provide a built-in mechanism for executing custom code whenever the user performs appropriate actions. For example, clicking a button causes the button’s associated action method to be called.
The advantage of interfaces based on UIKit views is that you can assemble them graphically using Interface Builder—the visual interface editor built in to Xcode. Interface Builder provides a library of the standard views, controls, and other objects that you need to build your interface. After dragging these objects from the library, you drop them onto the work surface and arrange them in any way you want. You then use inspectors to configure those objects before saving them in a storyboard or nib file. The process of assembling your interface graphically is much faster than writing the equivalent code and allows you to see the results immediately, without the need to build and run your app.
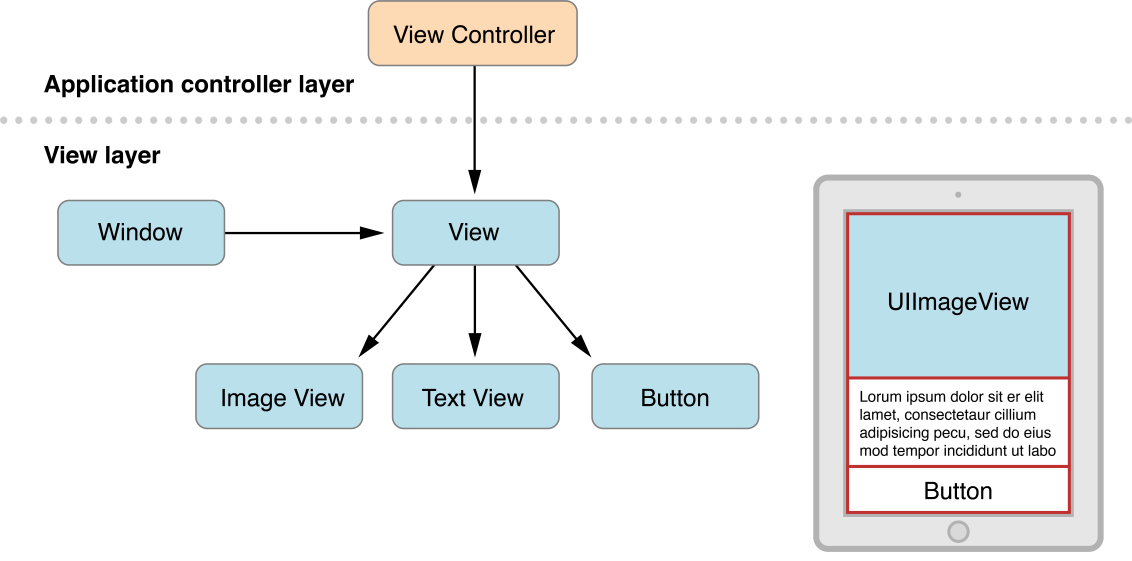
Figure 3 shows the basic structure of an app whose interface is constructed using only view objects. In this instance, the main view spans the visible area of the window (minus the status bar) and provides a simple white background. The main view also contains three subviews: an image view, a text view, and a button. Those subviews are what the app uses to present content to the user and respond to interactions. All of the views in the hierarchy are managed by a single view controller object.
In a typical view-based app, you coordinate the onscreen views using your view controller objects. An app always has one view controller that is responsible for presenting all of the content on the screen. That view controller has a content view, which itself may contain other views. Some view controllers can also act as containers for content provided by other view controllers. For example, a split view controller displays the content from two view controllers side by side.
Building an Interface Using Views and OpenGL ES
Games and other apps that need high frame rates or sophisticated drawing capabilities can add views specifically designed for OpenGL ES drawing to their view hierarchies. The simplest type of OpenGL ES app is one that has a window object and a single view for OpenGL ES drawing and a view controller to manage the presentation and rotation of that content. More sophisticated applications can use a mixture of OpenGL ES views and UIKit views to implement their interfaces.
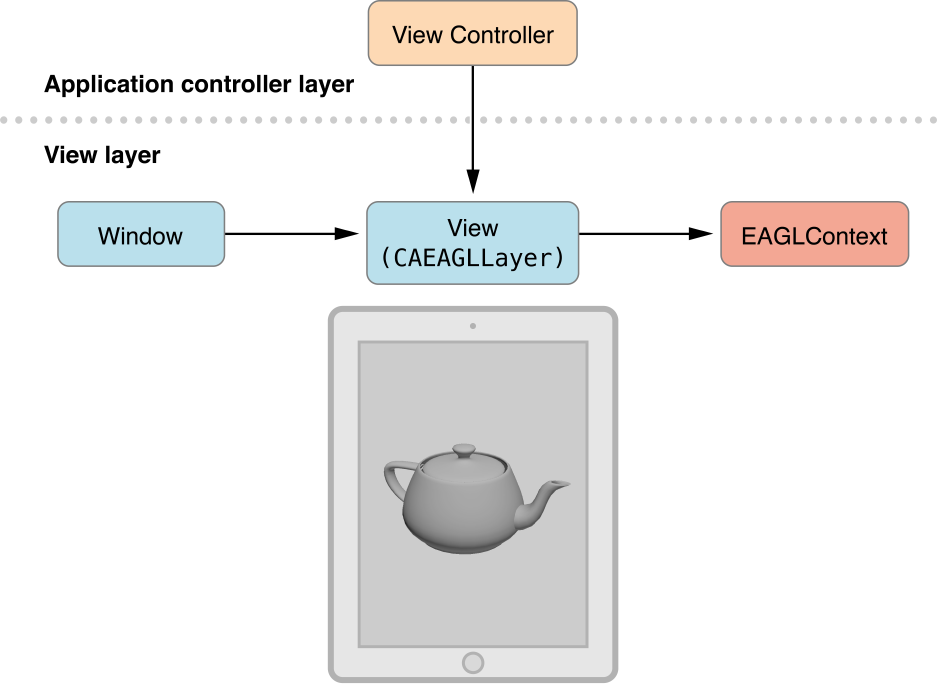
Figure 4 shows the configuration of an app that uses a single OpenGL ES view to draw its interface. Unlike a UIKit view, the OpenGL ES view is backed by a different type of layer object (a CAEAGLLayer object) instead of the standard layer used for view-based apps. The CAEAGLLayer object provides the drawing surface that OpenGL ES can render into. To manage the drawing environment, the app also creates an EAGLContext object and stores that object with the view to make it easy to retrieve.
The App Bundle
When you build your iOS app, Xcode packages it as a bundle. A bundle is a directory in the file system that groups related resources together in one place. An iOS app bundle contains the app executable file and supporting resource files such as app icons, image files, and localized content. Table 3 lists the contents of a typical iOS app bundle, which for demonstration purposes is called MyApp. This example is for illustrative purposes only. Some of the files listed in this table might not appear in your own app bundles.
File | Example | Description |
|---|---|---|
App executable |
| The executable file contains your app’s compiled code. The name of your app’s executable file is the same as your app name minus the This file is required. |
The information property list file |
| The This file is required and must be called |
App icons |
| Your app icon is used to represent your app on the device’s Home screen. Other icons are used by the system in appropriate places. Icons with An app icon is required. |
Launch images |
| The system uses this file as a temporary background while your app is launching. It is removed as soon as your app is ready to display its user interface. At least one launch image is required. |
Storyboard files (or nib files) |
| Storyboards contain the views and view controllers that the app presents on screen. Views in a storyboard are organized according to the view controller that presents them. Storyboards also identify the transitions (called segues) that take the user from one set of views to another. The name of the main storyboard file is set by Xcode when you create your project. You can change the name by assigning a different value to the The use of storyboards is optional but recommended. |
Ad hoc distribution icon |
| If you are distributing your app ad hoc, include a 512 x 512 pixel version of your app icon. This icon is normally provided by the App Store from the materials you submit to iTunes Connect. However, because apps distributed ad hoc do not go through the App Store, your icon must be present in your app bundle instead. iTunes uses this icon to represent your app. (The file you specify should be the same one you would have submitted to the App Store, if you were distributing your app that way.) The filename of this icon must be |
Settings bundle |
| If you want to expose custom app preferences through the Settings app, you must include a settings bundle. This bundle contains the property list data and other resource files that define your app preferences. The Settings app uses the information in this bundle to assemble the interface elements required by your app. This bundle is optional. |
Nonlocalized resource files |
| Nonlocalized resources include things like images, sound files, movies, and custom data files that your app uses. All of these files should be placed at the top level of your app bundle. |
Subdirectories for localized resources |
| Localized resources must be placed in language-specific project directories, the names for which consist of an ISO 639-1 language abbreviation plus the An iOS app should be internationalized and have a language |
© 2013 Apple Inc. All Rights Reserved. (Last updated: 2013-04-23)