Using AVKit Platform Features
AVKit makes it easy for you to create playback apps with the same user interface and features as those found in the native platform players. This chapter explores how to take advantage of certain platform-specific features in your own apps.
Working with Picture in Picture (iOS)
Picture in Picture (PiP) playback was introduced in iOS 9. It lets iPad users play video in a moveable, resizable window that floats over the apps onscreen. It brings a new level of multitasking capabilities to the iPad, enabling users to continue playback while performing other activities on their devices. This feature is found in Apple’s built-in video playback apps, and is available to your apps through the AVKit framework.
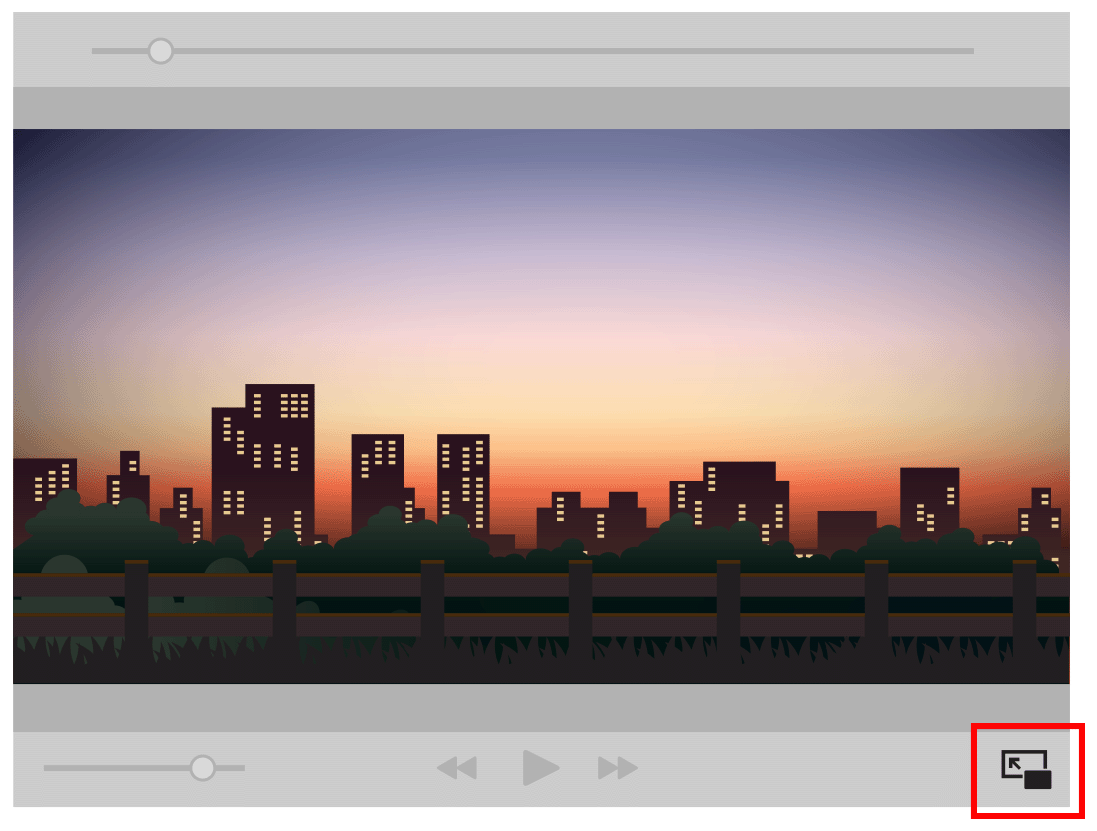
Applications that support PiP playback present a small button in the lower-right corner of the video playback window. Tapping this button minimizes the video display to a small floating window, letting the user perform other activities in the primary application or even in another application (see Figure 4-1).

You can add PiP playback to your apps using the AVKit framework’s AVPlayerViewController class or, if you have a custom player, the AVPictureInPictureController class. For your app to be eligible to use PiP playback, configure your app’s audio session and capabilities as described in Configuring Audio Settings for iOS and tvOS.
Adopting PiP with AVPlayerViewController
The easiest way to add PiP playback to your apps is with AVPlayerViewController. In fact, after you’ve configured your audio session and set the project capabilities as described in Configuring Audio Settings for iOS and tvOS, your player automatically supports PiP playback. If your app is running on a supported iPad device, you’ll see a new button in the lower-right corner of your player, as shown in Figure 4-2.
PiP playback starts when the user taps the PiP button in the player interface. Playback also starts automatically if your video is playing in full-screen mode and you exit the app by pressing the Home button. In either case, the player window is minimized to a movable, floating window, as shown in Figure 4-3.
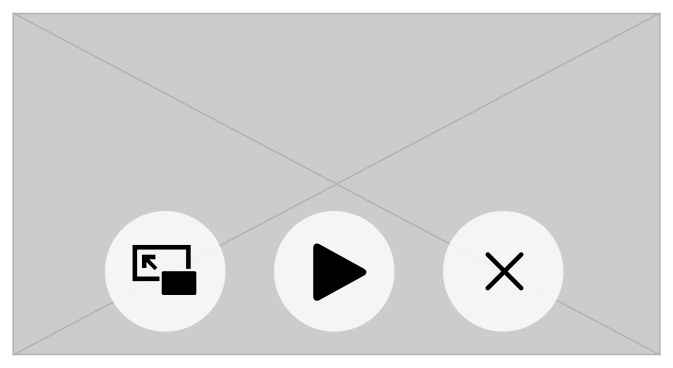
While the video is playing in PiP mode, the user has basic controls to play and pause the video as well as exit PiP playback. Tapping the leftmost button in this interface exits PiP and returns control to your app, but by default immediately terminates video playback. The reason is that AVKit can’t make assumptions about how your app is structured, and is unaware of how to properly restore your video playback interface. Instead, it delegates that responsibility to you.
To handle the restore process, your code needs to adopt the AVPlayerViewControllerDelegate protocol and implement the playerViewController:restoreUserInterfaceForPictureInPictureStopWithCompletionHandler: method. This method is called when control returns to your app, giving you the opportunity to determine how to properly restore your video player’s interface. If you originally presented your video player using the presentViewController:animated:completion: method of UIViewController, you can restore your player interface in the same way in the delegate callback method.
func playerViewController(_ playerViewController: AVPlayerViewController, |
restoreUserInterfaceForPictureInPictureStopWithCompletionHandler completionHandler: (Bool) -> Void) { |
present(playerViewController, animated: true) { |
completionHandler(false) |
} |
} |
Adopting PiP in a Custom Player
You can add PiP playback to your custom player using the AVKit framework’s AVPictureInPictureController class. This class lets you implement the same PiP behavior found in AVPlayerViewController, but requires some additional work from you.
You begin by adding a UI to your custom player interface to enable users to begin PiP playback. Make this UI consistent with the system default UI presented by AVPlayerViewController. You can access the standard images for controlling PiP playback using the pictureInPictureButtonStartImageCompatibleWithTraitCollection: and pictureInPictureButtonStopImageCompatibleWithTraitCollection: class methods of AVPictureInPictureController. These methods return system default images that you can present in your UI:
@IBOutlet weak var startButton: UIButton! |
@IBOutlet weak var stopButton: UIButton! |
override func viewDidLoad() { |
super.viewDidLoad() |
let startImage = AVPictureInPictureController.pictureInPictureButtonStartImage(compatibleWith: nil) |
let stopImage = AVPictureInPictureController.pictureInPictureButtonStopImage(compatibleWith: nil) |
startButton.setImage(startImage, for: .normal) |
stopButton.setImage(stopImage, for: .normal) |
} |
You create an instance of AVPictureInPictureController to control PiP playback in your app. You should attempt to create this object only if it’s supported by the current hardware, which you can determine using the controller’s isPictureInPictureSupported method, as shown in the following example:
func setupPictureInPicture() { |
// Ensure PiP is supported by current device |
if AVPictureInPictureController.isPictureInPictureSupported() { |
// Create new controller passing reference to the AVPlayerLayer |
pictureInPictureController = AVPictureInPictureController(playerLayer: playerLayer) |
pictureInPictureController.delegate = self |
let keyPath = #keyPath(AVPictureInPictureController.isPictureInPicturePossible) |
pictureInPictureController.addObserver(self, |
forKeyPath: keyPath, |
options: [.initial, .new], |
context: &pictureInPictureControllerContext) |
} else { |
// PiP not supported by current device. Disable PiP button. |
pictureInPictureButton.isEnabled = false |
} |
} |
This example creates a new instance of AVPictureInPictureController, passing it a reference to the AVPlayerLayer used to present the video content. You need to maintain a strong reference to the controller object for PiP functionality to work.
To participate in PiP life cycle events, your code should adopt the AVPictureInPictureControllerDelegate protocol and set itself as the controller’s delegate. Also, use key-value observing (KVO) on the controller’s pictureInPicturePossible property. This property indicates whether using PiP is possible in the current context, such as if an active FaceTime window is displayed. Observing this property enables you to determine when it’s appropriate to change the enabled state of your PiP button.
With the AVPictureInPictureController setup complete, you next add an @IBAction method to handle user-initiated requests to start or stop PiP playback.
@IBAction func togglePictureInPictureMode(_ sender: UIButton) { |
if pictureInPictureController.isPictureInPictureActive { |
pictureInPictureController.stopPictureInPicture() |
} else { |
pictureInPictureController.startPictureInPicture() |
} |
} |
A user can tap the button in the PiP window to return control to your app. By default, this action terminates playback when control returns to the app. The reason is that AVKit can’t make assumptions about how your app is structured and is unaware how to properly restore your video playback interface. Instead, it delegates that responsibility to you.
To handle the restore process, implement the pictureInPictureController:restoreUserInterfaceForPictureInPictureStopWithCompletionHandler: delegate method and restore your player interface as needed, calling the completion handler with a value of true when the restoration is complete as shown in the following example:
func picture(_ pictureInPictureController: AVPictureInPictureController, |
restoreUserInterfaceForPictureInPictureStopWithCompletionHandler completionHandler: @escaping (Bool) -> Void) { |
// Restore user interface |
completionHandler(true) |
} |
While PiP is active, dismiss playback controls in your main player and present artwork inside its bounds to indicate that PiP is under way. To implement this functionality, you can use the pictureInPictureControllerWillStartPictureInPicture: and pictureInPictureControllerDidStopPictureInPicture: delegate methods and take the required actions as shown in the following example:
func pictureInPictureControllerWillStartPictureInPicture(_ pictureInPictureController: AVPictureInPictureController) { |
// hide playback controls |
// show placeholder artwork |
} |
func pictureInPictureControllerDidStopPictureInPicture(_ pictureInPictureController: AVPictureInPictureController) { |
// hide placeholder artwork |
// show playback controls |
} |
Presenting Media Metadata (tvOS)
When you swipe down on the Siri Remote touchpad, AVPlayerViewController in tvOS presents an Info panel, revealing information and controls for the current presentation. The top section of the panel’s Info tab displays metadata describing the currently presented media (see Figure 4-4).

The Info panel is automatically populated if the presented media contains supported metadata. However, there are cases where this metadata doesn’t exist, is incomplete, or can be determined only at runtime. To handle these scenarios, AVKit in tvOS adds an externalMetadata property to AVPlayerItem. You can use this property to set an array of AVMetadataItem objects defining your custom metadata.
AVFoundation defines a large number of metadata identifiers (see AVMetadataIdentifiers.h), but the Info panel currently supports only the five listed in Table 4-1:
Type | Data Type | Metadata Identifier |
|---|---|---|
Artwork |
|
|
Title |
|
|
Description |
|
|
Genre |
|
|
Content Rating |
|
|
AVMetadataItem is an immutable type, so to create your custom metadata, you use its mutable subclass, AVMutableMetadataItem. For a metadata item to be presented in the Info panel, you need to provide values for the item’s identifier, value, and extendedLanguageTag. For the extendedLanguageTag property, provide a valid BCP-47 string value such as en or zh-TW (or und if undetermined).
The following example shows how to create the player item’s externalMetadata used to populate the player’s Info panel:
func setupPlayback() { |
... |
playerItem.externalMetadata = makeExternalMetadata() |
... |
} |
func makeExternalMetadata() -> [AVMetadataItem] { |
var metadata = [AVMetadataItem]() |
// Build title item |
let titleItem = |
makeMetadataItem(AVMetadataCommonIdentifierTitle, value: "My Movie Title") |
metadata.append(titleItem) |
// Build artwork item |
if let image = UIImage(named: "poster"), let pngData = UIImagePNGRepresentation(image) { |
let artworkItem = |
makeMetadataItem(AVMetadataCommonIdentifierArtwork, value: pngData) |
metadata.append(artworkItem) |
} |
// Build description item |
let descItem = |
makeMetadataItem(AVMetadataCommonIdentifierDescription, value: "My Movie Description") |
metadata.append(descItem) |
// Build rating item |
let ratingItem = |
makeMetadataItem(AVMetadataIdentifieriTunesMetadataContentRating, value: "PG-13") |
metadata.append(ratingItem) |
// Build genre item |
let genreItem = |
makeMetadataItem(AVMetadataIdentifierQuickTimeMetadataGenre, value: "Comedy") |
metadata.append(genreItem) |
return metadata |
} |
private func makeMetadataItem(_ identifier: String, |
value: Any) -> AVMetadataItem { |
let item = AVMutableMetadataItem() |
item.identifier = identifier |
item.value = value as? NSCopying & NSObjectProtocol |
item.extendedLanguageTag = "und" |
return item.copy() as! AVMetadataItem |
} |
Defining Navigation Markers (tvOS)
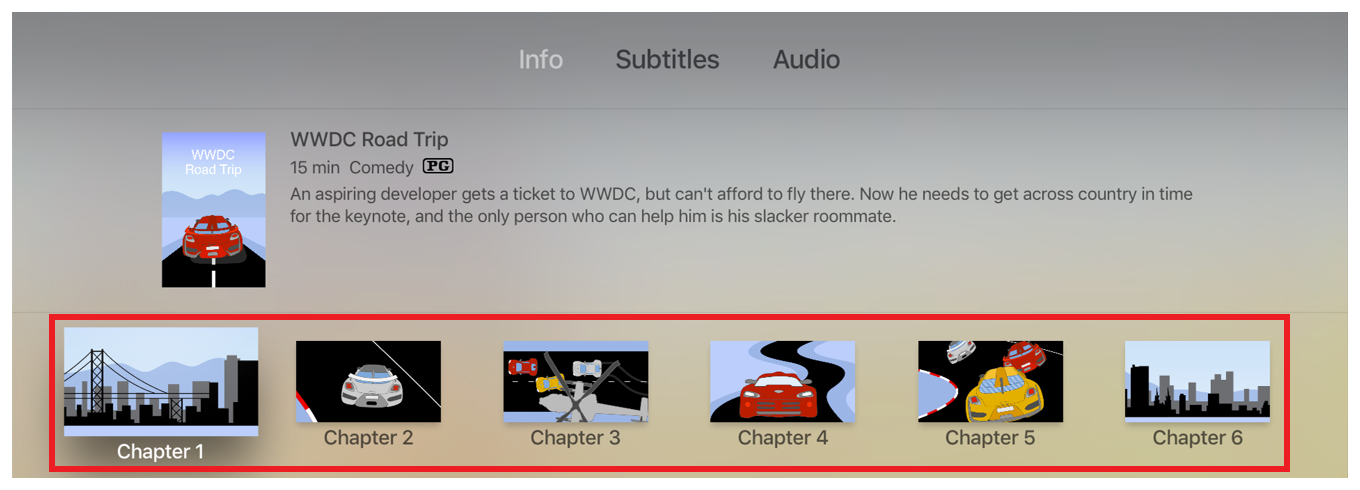
In addition to displaying metadata, the Info panel can also present navigation markers to help users quickly navigate your content. These markers represent points of interest within the media’s timeline to which you can skip by selecting the desired marker with the Siri Remote (see Figure 4-5).
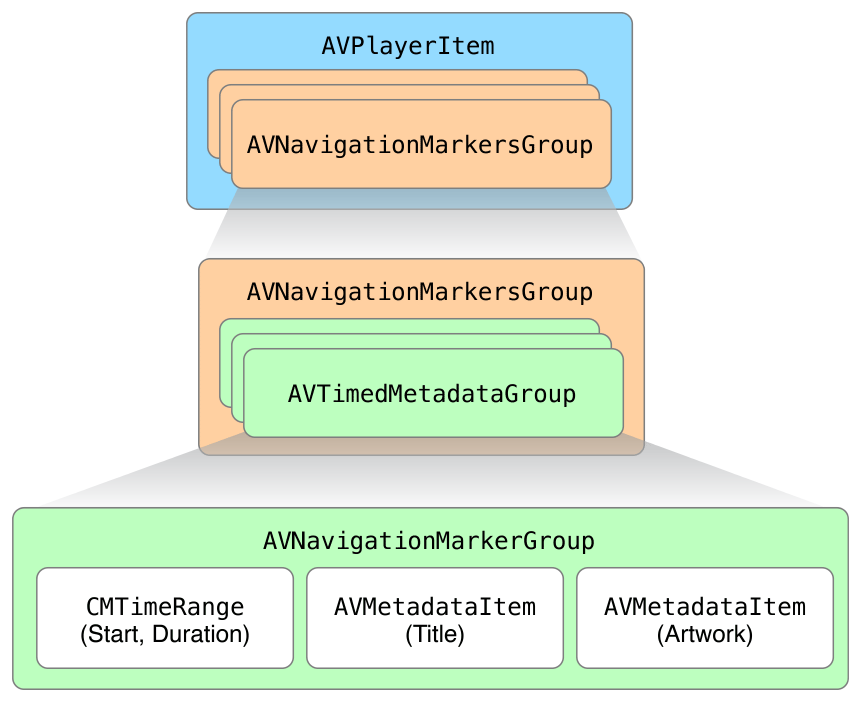
AVPlayerItem in tvOS adds a navigationMarkerGroups property. You can set this property with an array of AVNavigationMarkersGroup objects to define the navigation markers for the current media.
An AVNavigationMarkersGroup is composed of one or more AVTimedMetadataGroup objects, each representing an individual marker presented in the player’s Info panel. Each AVTimedMetadataGroup is composed of a time range in the asset’s timeline to which this marker applies and an array of AVMetadataItem objects to define the marker’s title and, optionally, its thumbnail artwork (see Figure 4-6).
The following code example shows how you can present a chapter list for your media:
func setupPlayback() { |
... |
playerItem.navigationMarkerGroups = makeNavigationMarkerGroups() |
... |
} |
private func makeNavigationMarkerGroups() -> [AVNavigationMarkersGroup] { |
let chapters = [ |
["title": "Chapter 1", "imageName": "chapter1", "start": 0.0, "end": 60.0], |
["title": "Chapter 2", "imageName": "chapter2", "start": 60.0, "end": 120.0], |
["title": "Chapter 3", "imageName": "chapter3", "start": 120.0, "end": 180.0], |
["title": "Chapter 4", "imageName": "chapter4", "start": 180.0, "end": 240.0] |
] |
var metadataGroups = [AVTimedMetadataGroup]() |
// Iterate over the defined chapters, building an AVTimedMetadataGroup for each |
for chapter in chapters { |
metadataGroups.append(makeTimedMetadataGroup(for: chapter)) |
} |
return [AVNavigationMarkersGroup(title: nil, timedNavigationMarkers: metadataGroups)] |
} |
private func makeTimedMetadataGroup(for chapter: [String: Any]) -> AVTimedMetadataGroup { |
var metadata = [AVMetadataItem]() |
// Create chapter title item |
let title = chapter["title"] as! String |
let titleItem = makeMetadataItem(AVMetadataCommonIdentifierTitle, value: title) |
metadata.append(titleItem) |
let imageName = chapter["imageName"] as! String |
if let image = UIImage(named: imageName), let pngData = UIImagePNGRepresentation(image) { |
// Create chapter thumbnail item |
let imageItem = makeMetadataItem(AVMetadataCommonIdentifierArtwork, value: pngData) |
metadata.append(imageItem) |
} |
// Create CMTimeRange |
let timescale: Int32 = 600 |
let cmStartTime = CMTimeMakeWithSeconds(chapter["start"] as! TimeInterval, timescale) |
let cmEndTime = CMTimeMakeWithSeconds(chapter["end"] as! TimeInterval, timescale) |
let timeRange = CMTimeRangeFromTimeToTime(cmStartTime, cmEndTime) |
return AVTimedMetadataGroup(items: metadata, timeRange: timeRange) |
} |
private func makeMetadataItem(_ identifier: String, |
value: Any) -> AVMetadataItem { |
let item = AVMutableMetadataItem() |
item.identifier = identifier |
item.value = value as? NSCopying & NSObjectProtocol |
item.extendedLanguageTag = "und" |
return item.copy() as! AVMetadataItem |
} |
Working with Interstitial Content (tvOS)
Media playback apps often present additional content such as legal text, content warnings, or advertisements alongside their main media content. The best solution to present this kind of content is to use HTTP Live Streaming support for serving stitched playlists separated with EXT-X-DISCONTINUITY tags (see Example Playlist Files for use with HTTP Live Streaming). Stitched playlists let you combine multiple media playlists together into a single, unified playlist that is delivered to the client as a single stream. This provides a smooth playback experience to users without any breaks or stutters in the action when the interstitial content is presented.
AVKit in tvOS makes it easy to work with interstitial content delivered as part of a stitched playlist. You define the time ranges in your presentation that contain interstitial content and as they are traversed during playback, you can receive callbacks when they begin and end, giving you the opportunity to enforce business rules or capture analytics.
AVPlayerItem in tvOS adds an interstitialTimeRanges property that can be set with an array of AVInterstitialTimeRange objects, each defining a CMTimeRange marking the interstitial time range in your media’s timeline. The following code example shows how you can create interstitial time ranges:
func setupPlayback() { |
... |
playerItem.interstitialTimeRanges = makeInterstitialTimeRanges() |
... |
} |
private func makeInterstitialTimeRanges() -> [AVInterstitialTimeRange] { |
// 10 second time range at beginning of video (Content Warning) |
let timeRange1 = CMTimeRange(start: kCMTimeZero, |
duration: CMTime(value: 10, timescale: 1)) |
// 1 minute time range at 10:00 (Advertisements) |
let timeRange2 = CMTimeRange(start: CMTime(value: 600, timescale: 1), |
duration: CMTime(value: 60, timescale: 1)) |
// Return array of AVInterstitialTimeRange objects |
return [ |
AVInterstitialTimeRange(timeRange: timeRange1), |
AVInterstitialTimeRange(timeRange: timeRange2) |
] |
} |
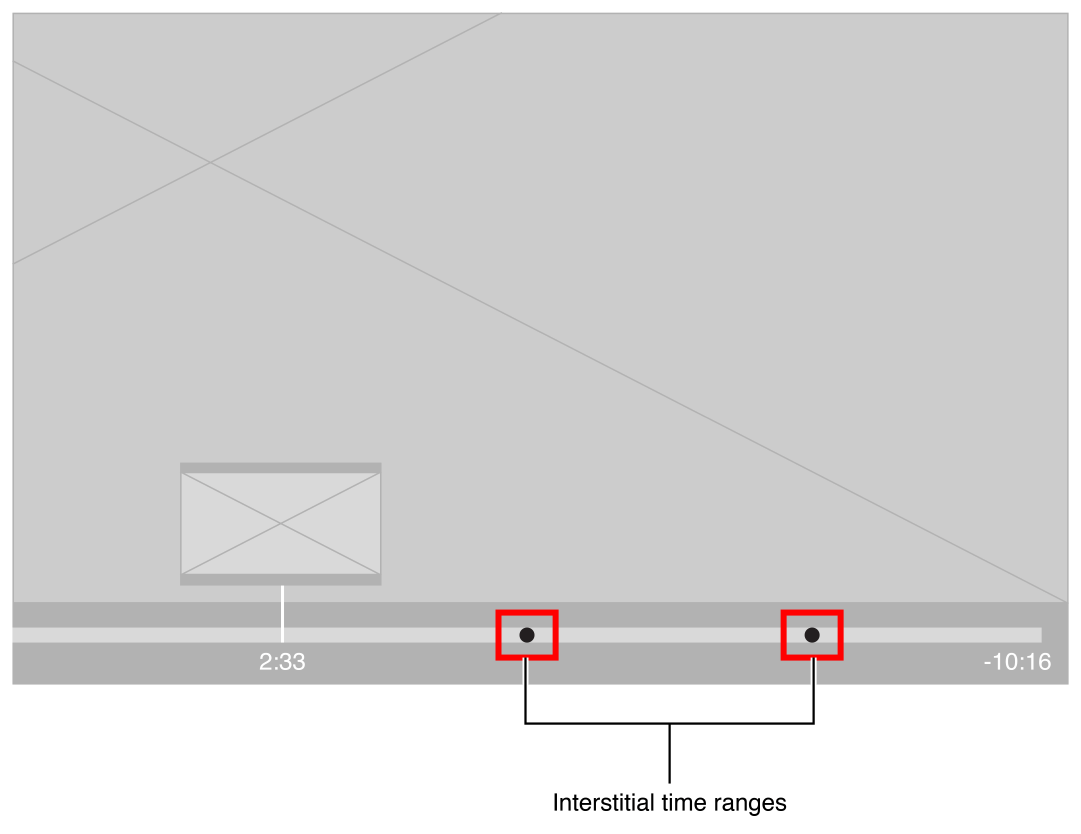
When interstitial time ranges are defined, AVPlayerViewController updates its user interface in two important ways (see Figure 4-7). First, any interstitial times ranges are represented as small dots on the player’s timeline. This makes it easy for users to understand where they are between interstitial breaks and helps orient them to where they are in your program. Second, the interstitial time ranges are collapsed from the player’s interface. The current time and duration presented represent only your main content, providing a better sense of the timing of the main program.
By adopting the AVPlayerViewControllerDelegate protocol, you can be notified as interstitial time ranges are traversed, which is useful to help you enforce business rules. For instance, a common requirement when presenting advertisements is to prevent users from skipping past them. You can use the requiresLinearPlayback property of AVPlayerViewController to control whether users can navigate through the content using the Siri Remote. During playback, this property is normally set to false, but when presenting an advertisement, you can set it to true to prevent user navigation as shown in the following example:
public func playerViewController(_ playerViewController: AVPlayerViewController, |
willPresent interstitial: AVInterstitialTimeRange) { |
playerViewController.requiresLinearPlayback = true |
} |
public func playerViewController(_ playerViewController: AVPlayerViewController, |
didPresent interstitial: AVInterstitialTimeRange) { |
playerViewController.requiresLinearPlayback = false |
} |
If your app presents interstitial content, you may also want to prevent users from skipping past ads or legal text. You can implement this functionality by implementing the playerViewController:timeToSeekAfterUserNavigatedFromTime:toTime: delegate method. This method is called whenever a user performs a seek operation using the Siri Remote, which happens either by swiping left or right on the remote touch pad or by navigating chapter markers in the Info panel. The following provides a simple example of how you might implement this method to prevent users from skipping past advertisements:
public func playerViewController(_ playerViewController: AVPlayerViewController, timeToSeekAfterUserNavigatedFrom oldTime: CMTime, to targetTime: CMTime) -> CMTime { |
// Only evaluate if the user performed a forward seek |
guard !canSkipInterstitials && oldTime < targetTime else { |
return targetTime |
} |
// Define time range of the user's seek operation |
let seekRange = CMTimeRange(start: oldTime, end: targetTime) |
// Iterate over the defined interstitial time ranges... |
for interstitialRange in playerItem.interstitialTimeRanges { |
// If the current interstitial is contained within the user's |
// seek range, return the interstitial's start time |
if seekRange.containsTimeRange(interstitialRange.timeRange) { |
return interstitialRange.timeRange.start |
} |
} |
// No match, return the target time |
return targetTime |
} |
For any forward seeks, the example code ensures that the user can’t skip past an ad break. It attempts to find an interstitial time range existing within the time range of the user’s seek request. If an interstitial time range is found, the code returns its start time, forcing playback to begin at the start of the advertisement.
Presenting Content Proposals (tvOS)
Media apps presenting serialized content, such as a TV show, often display a preview of the next episode in the series when you finish watching the current one. This preview usually includes artwork and information describing the proposed content along with UI to either watch the next episode or return to the main menu. Implementing this feature in earlier versions of tvOS was often challenging, but starting with tvOS 10, it’s easy to add this capability to your app using AVKit content proposals.
You create a content proposal using the AVContentProposal class. This class models the data about the proposed content, such as its title, preview image, metadata, and content URL, and the time at which to present the proposal. You create and configure an instance of AVContentProposal as shown below:
func makeProposal() -> AVContentProposal { |
// Present 10 seconds prior to the end of current presentation |
let time = currentAsset.duration - CMTime(value: 10, timescale: 1) |
let title = "My Show: Episode 2" |
let image = UIImage(named: "ms_ep2")! |
let proposal = AVContentProposal(contentTimeForTransition: time, title: title, previewImage: image) |
// Set custom metadata |
proposal.metadata = [ |
makeMetadataItem(identifier: AVMetadataCommonIdentifierDescription, value: "Episode 2 Description"), |
makeMetadataItem(identifier: AVMetadataIdentifieriTunesMetadataContentRating, value: "TV-14"), |
makeMetadataItem(identifier: AVMetadataIdentifierQuickTimeMetadataGenre, value: "Comedy") |
] |
// Set content URL |
proposal.url = // The upcoming asset's URL |
return proposal |
} |
private func makeMetadataItem(_ identifier: String, value: Any) -> AVMetadataItem { |
let item = AVMutableMetadataItem() |
item.identifier = identifier |
item.value = value as? NSCopying & NSObjectProtocol |
item.extendedLanguageTag = "und" |
return item.copy() as! AVMetadataItem |
} |
In addition to defining your content proposal’s data, you also need to create a user interface to present this data to the user. You create this interface by subclassing the AVKit framework’s AVContentProposalViewController class. At runtime, your subclass instance is passed a reference to the current AVContentProposal, providing you the data to present. Your interface should provide any visual and descriptive information describing the proposed content along with UI for the user to accept or reject the proposal.
When your proposal is presented, it's displayed over the currently playing full-screen video. You may want to scale this video to a smaller size so you can make more room to display the details of the proposed content. To do this, you override the view controller’s preferredPlayerViewFrame property and return the desired video frame.
override var preferredPlayerViewFrame: CGRect { |
guard let frame = playerViewController?.view.frame else { return CGRect.zero } |
// Present the current video in a 960x540 window centered at the top of the window |
return CGRect(x: frame.midX / 2.0, y: 0, width: 960, height: 540) |
} |
When the content proposal is presented, the player’s view is automatically animated to the specified CGRect.
Your presented user interface should also provide controls so the user can accept or reject the proposal. The event handlers for these actions should call the controller’s dismissContentProposalForAction:animated:completion: method, indicating the user’s choice, as shown below:
// Handle acceptance |
@IBAction func acceptContentProposal(_ sender: AnyObject) { |
dismissContentProposal(for: .accept, animated: true, completion: nil) |
} |
// Handle rejection |
@IBAction func rejectContentProposal(_ sender: AnyObject){ |
dismissContentProposal(for: .reject, animated: true, completion: nil) |
} |
To make your content proposal eligible to be presented, you need to set it as nextContentProposal of the current AVPlayerItem. The following example shows how this could be set up in a playback app that manages a queue of Video objects—a custom value type, modeling the data of an individual video in the queue. The example creates the required playback objects, creates a new AVContentProposal for the next video in the queue and sets it as the player item’s nextContentProposal as shown in the following example:
func prepareToPlay() { |
// Associate the AVPlayer with the AVPlayerViewController |
playerViewController.player = player |
playerViewController.delegate = self |
// Create a new AVPlayerItem with the current video's URL |
let playerItem = AVPlayerItem(url: currentVideo.url) |
player.replaceCurrentItem(with: playerItem) |
// Create an AVContentProposal for the next video (if it exists) |
playerItem.nextContentProposal = makeContentProposal(for: currentVideo.nextVideo) |
player.play() |
} |
func makeContentProposal(for video: Video?) -> AVContentProposal? { |
guard let video = video else { return nil } |
guard let currentAsset = player.currentItem?.asset else { return nil } |
// Start the proposal within presentationInterval of the asset's duration |
let time = currentAsset.duration - video.presentationInterval |
let title = video.title |
let image = video.image |
// Create a new content proposal with the time, title, and image |
let contentProposal = AVContentProposal(contentTimeForTransition: time, title: title, previewImage: image) |
// Set the content URL for the proposal |
contentProposal.url = video.url |
// Automatically accept the proposal 1 second from playback end time |
contentProposal.automaticAcceptanceInterval = -1.0 |
return contentProposal |
} |
With the content proposal set as the player item’s nextContentProposal, the next step is to implement the methods of the AVPlayerViewControllerDelegate protocol. You use these methods to define if and how a content proposal is presented, as well as to handle the acceptance or rejection of the proposed content.
To present your custom view controller in response to a request to present the next content proposal, implement the playerViewController:shouldPresentContentProposal: method. In this method, you set an instance of your custom AVContentProposalViewController as the player view controller’s contentProposalViewController property, as shown below:
func playerViewController(_ playerViewController: AVPlayerViewController, shouldPresent proposal: AVContentProposal) -> Bool { |
// Set the presentation to use on the player view controller for this content proposal |
playerViewController.contentProposalViewController = NextVideoProposalViewController() |
return true |
} |
If the presented AVContentProposal provides a valid content URL, AVPlayerViewController can automatically handle its acceptance or rejection. However, if you need more control over the handling of these actions, you can implement the playerViewController:didAcceptContentProposal: and playerViewController:didRejectContentProposal: methods. For instance, the following example implements the playerViewController:didAcceptContentProposal: method to play the proposed video and create a new content proposal for the next video in the queue:
func playerViewController(_ playerViewController: AVPlayerViewController, didAccept proposal: AVContentProposal) { |
guard let player = playerViewController.player, let url = proposal.url else { return } |
guard let video = currentVideo.nextVideo else { return } |
currentVideo = video |
// Create a new player item using the content proposal's URL |
let playerItem = AVPlayerItem(url: url) |
player.replaceCurrentItem(with: playerItem) |
player.play() |
// Prepare new player item's next content proposal (if it exists) |
playerItem.nextContentProposal = makeContentProposal(for: currentVideo.nextVideo) |
} |
Implementing Trimming (macOS)
You use AVPlayerView to provide a playback experience like that of QuickTime Player in macOS. However, AVPlayerView not only provides the QuickTime playback interface, but it also provides the QuickTime media-trimming experience.
You use the beginTrimmingWithCompletionHandler: method on AVPlayerView to put the player into trimming mode (see Figure 4-8).

Before attempting to put the player into trimming mode, verify that trimming is allowed by querying the player view’s canBeginTrimming property. This property returns false if you’re playing an asset delivered over HTTP Live Streaming or if the asset is content protected. If you’re presenting a menu item to initiate trimming, a good place to perform this check is in the validateUserInterfaceItem: method of NSDocument, so that the menu item can automatically be disabled if trimming is disallowed.
override func validateUserInterfaceItem(_ item: NSValidatedUserInterfaceItem) -> Bool { |
if item.action == #selector(beginTrimming) { |
return playerView.canBeginTrimming |
} |
return super.validateUserInterfaceItem(item) |
} |
After you’ve determined the media supports trimming, you call the beginTrimmingWithCompletionHandler:. This method takes a completion block that you use to determine if the user completed the trim or canceled the operation.
@IBAction func beginTrimming(_ sender: AnyObject) { |
playerView.beginTrimming { result in |
if result == .okButton { |
// user selected Trim button (AVPlayerViewTrimResult.okButton)... |
} else { |
// user selected Cancel button (AVPlayerViewTrimResult.cancelButton)... |
} |
} |
} |
Because AVAsset is an immutable object, you may be wondering how its duration is changed when you press the Trim button. Trimming relies on a feature of AVPlayerItem to adjust the presented time range. AVPlayerItem provides the reversePlaybackEndTime and forwardPlaybackEndTime properties that set the in and out points for a piece of media. It doesn’t change the underlying asset but essentially changes your effective view of it. To save the results of the user’s trim operation, you export a new copy of the asset, trimming it to the specified times. The easiest way for you to do this is to use AVAssetExportSession, which provides a simple and performant way for you to transcode the media of an asset. You create a new export session, passing it the asset to export along with a transcoding preset to use, as shown below:
// Transcoding preset |
let preset = AVAssetExportPresetAppleM4V720pHD |
let exportSession = AVAssetExportSession(asset: playerItem.asset, presetName: preset)! |
exportSession.outputFileType = AVFileTypeAppleM4V |
exportSession.outputURL = // Output URL |
This example uses a preset to export the media as a 720p, M4V file, but AVAssetExportSession supports a wide variety of export presets. To find out what export session presets are supported for the current asset, you can use the session’s exportPresetsCompatibleWithAsset: class method, passing it the asset you want to export. This method returns an array of valid presets that you can use in your export.
To export only the content the user trimmed, you use the current player item’s reverse and forward end-time values to define a CMTimeRange to set on the export session.
// Create CMTimeRange with the trim in/out point times |
let startTime = self.playerItem.reversePlaybackEndTime |
let endTime = self.playerItem.forwardPlaybackEndTime |
let timeRange = CMTimeRangeFromTimeToTime(startTime, endTime) |
exportSession.timeRange = timeRange |
To perform the actual export operation, you call its exportAsynchronouslyWithCompletionHandler: method.
exportSession.exportAsynchronously { |
switch exportSession.status { |
case .completed: |
// Export Complete |
case .failed: |
// failed |
default: |
// handle others |
} |
} |
Copyright © 2018 Apple Inc. All Rights Reserved. Terms of Use | Privacy Policy | Updated: 2018-01-16