Animating Layer Content
The infrastructure provided by Core Animation makes it easy to create sophisticated animations of your app’s layers, and by extension to any views that own those layers. Examples include changing the size of a layer’s frame rectangle, changing its position onscreen, applying a rotation transform, or changing its opacity. With Core Animation, initiating an animation is often as simple as just changing the property but you can also create animations and set the animation parameters explicitly.
For information about creating more advanced animations, see Advanced Animation Tricks.
Animating Simple Changes to a Layer’s Properties
You can perform simple animations implicitly or explicitly depending on your needs. Implicit animations use the default timing and animation properties to perform an animation, whereas explicit animations require you to configure those properties yourself using an animation object. So implicit animations are perfect for situations where you want to make a change without a lot of code and the default timing works well for you.
Simple animations involve changing the properties of a layer and letting Core Animation animate those changes over time. Layers define many properties that affect the visible appearance of the layer. Changing one of these properties is a way to animate the appearance change. For example, changing the opacity of the layer from 1.0 to 0.0 causes the layer to fade out and become transparent.
To trigger implicit animations, all you have to do is update the properties of your layer object. When modifying layer objects in the layer tree, your changes are reflected immediately by those objects. However, the visual appearance of the layer objects does not change immediately. What happens instead is that Core Animation uses your changes as a trigger to create and schedule one or more implicit animations for execution. Thus, making a change like the one in Listing 3-1 causes Core Animation to create an animation object for you and schedule that animation to run starting in the next update cycle.
Listing 3-1 Animating a change implicitly
theLayer.opacity = 0.0; |
To make the same change explicitly using an animation object, create a CABasicAnimation object and use that object to configure the animation parameters. You can set the start and end values for the animation, change the duration, or change any other animation parameters before adding the animation to a layer. Listing 3-2 shows how to fade out a layer using an animation object. When creating the object, you specify the key path for the property you want to animate and then set your animation parameters. To execute the animation, you use the addAnimation:forKey: method to add it to the layers you want to animate.
Listing 3-2 Animating a change explicitly
CABasicAnimation* fadeAnim = [CABasicAnimation animationWithKeyPath:@"opacity"]; |
fadeAnim.fromValue = [NSNumber numberWithFloat:1.0]; |
fadeAnim.toValue = [NSNumber numberWithFloat:0.0]; |
fadeAnim.duration = 1.0; |
[theLayer addAnimation:fadeAnim forKey:@"opacity"]; |
// Change the actual data value in the layer to the final value. |
theLayer.opacity = 0.0; |
Unlike an implicit animation, which updates the layer object’s data value, an explicit animation does not modify the data in the layer tree. Explicit animations only produce the animations. At the end of the animation, Core Animation removes the animation object from the layer and redraws the layer using its current data values. If you want the changes from an explicit animation to be permanent, you must also update the layer’s property as shown in the preceding example.
Implicit and explicit animations normally begin executing after the current run loop cycle ends, and the current thread must have a run loop in order for animations to be executed. If you change multiple properties, or if you add multiple animation objects to a layer, all of those property changes are animated at the same time. For example, you can fade a layer while moving it offscreen by configuring both animations at the same time. However, you can also configure animation objects to start at a particular time. For more information about modifying animation timing, see Customizing the Timing of an Animation.
Using a Keyframe Animation to Change Layer Properties
Whereas a property-based animation changes a property from a start value to an end value, a CAKeyframeAnimation object lets you animate through a set of target values in a way that might or might not be linear. A key frame animation consists of a set of target data values and the times at which each value should be reached. In the simplest configuration, you specify both the values and times using an array. For changes to a layer’s position, you can also have the changes follow a path. The animation object takes the key frames you specify and builds the animation by interpolating from one value to the next over the given time periods.
Figure 3-1 shows a 5-second animation of a layer’s position property. The position is animated to follow a path, which was specified using a CGPathRef data type. The code for this animation is shown in Listing 3-3.
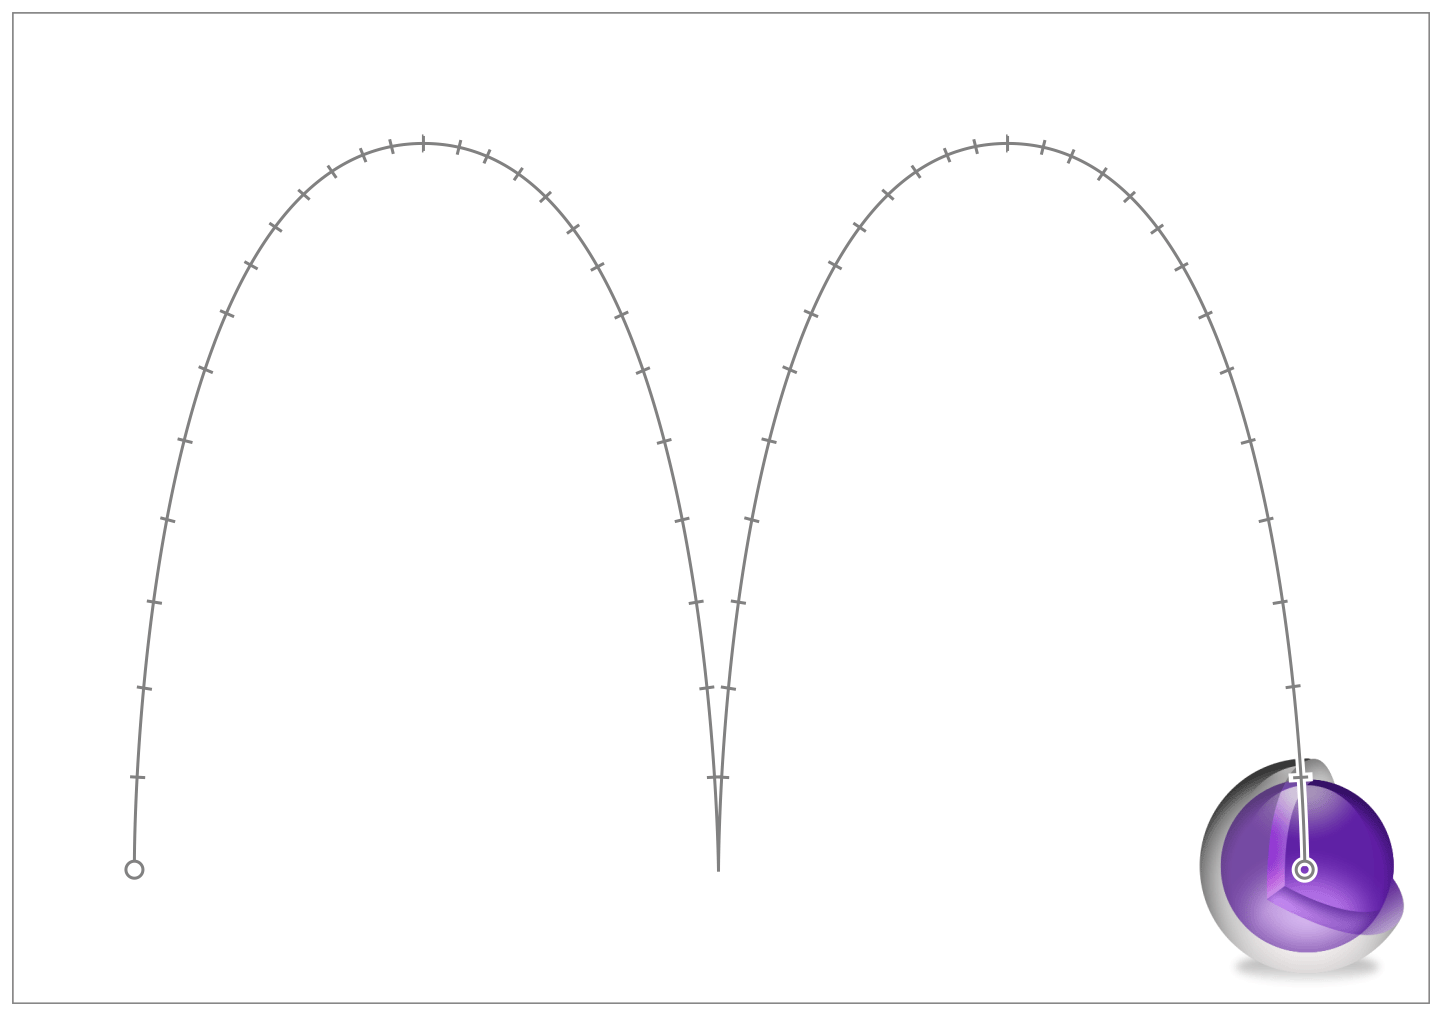
Listing 3-3 shows the code used to implement the animation in Figure 3-1. The path object in this example is used to define the position of the layer for each frame of the animation.
Listing 3-3 Creating a bounce keyframe animation
// create a CGPath that implements two arcs (a bounce) |
CGMutablePathRef thePath = CGPathCreateMutable(); |
CGPathMoveToPoint(thePath,NULL,74.0,74.0); |
CGPathAddCurveToPoint(thePath,NULL,74.0,500.0, |
320.0,500.0, |
320.0,74.0); |
CGPathAddCurveToPoint(thePath,NULL,320.0,500.0, |
566.0,500.0, |
566.0,74.0); |
CAKeyframeAnimation * theAnimation; |
// Create the animation object, specifying the position property as the key path. |
theAnimation=[CAKeyframeAnimation animationWithKeyPath:@"position"]; |
theAnimation.path=thePath; |
theAnimation.duration=5.0; |
// Add the animation to the layer. |
[theLayer addAnimation:theAnimation forKey:@"position"]; |
Specifying Keyframe Values
The key frame values are the most important part of a keyframe animation. These values define the behavior of the animation over the course of its execution. The main way to specify keyframe values is as an array of objects but for values that contain a CGPoint data type (such as the layer’s anchorPoint and position properties), you can specify a CGPathRef data type instead.
When specifying an array of values, what you put into the array depends on the data type required by the property. You can add some objects to an array directly; however, some objects must be cast to id before being added, and all scalar types or structs must be wrapped by an object. For example:
For properties that take a
CGRect(such as the bounds and frame properties), wrap each rectangle in anNSValueobject.For the layer’s transform property, wrap each
CATransform3Dmatrix in anNSValueobject. Animating this property causes the keyframe animation to apply each transform matrix to the layer in turn.For the
borderColorproperty, cast eachCGColorRefdata type to the typeidbefore adding it to the array.For properties that take a
CGFloatvalue, wrap each value in anNSNumberobject before adding it to the array.When animating the layer’s
contentsproperty, specify an array ofCGImageRefdata types.
For properties that take a CGPoint data type, you can create an array of points (wrapped in NSValue objects) or you can use a CGPathRef object to specify the path to follow. When you specify an array of points, the keyframe animation object draws a straight line between each successive point and follows that path. When you specify a CGPathRef object, the animation starts at the beginning point of the path and follows its outline, including along any curved surfaces. You can use either an open or closed path.
Specifying the Timing of a Keyframe Animation
The timing and pacing of keyframe animations is more complex than those of basic animations and there are several properties you can use to control it:
The
calculationModeproperty defines the algorithm to use in calculating the animation timing. The value of this property affects how the other timing-related properties are used.Linear and cubic animations—that is, animations where the
calculationModeproperty is set tokCAAnimationLinearorkCAAnimationCubic—use the provided timing information to generate the animation. These modes give you the maximum control over the animation timing.Paced animations—that is, animations where the
calculationModeproperty is set tokCAAnimationPacedorkCAAnimationCubicPaced—do not rely on the external timing values provided by thekeyTimesortimingFunctionsproperties. Instead, timing values are calculated implicitly to provide the animation with a constant velocity.Discrete animations—that is, animations where the
calculationModeproperty is set tokCAAnimationDiscrete—cause the animated property to jump from one keyframe value to the next without any interpolation. This calculation mode uses the values in thekeyTimesproperty but ignores thetimingFunctionsproperty
The
keyTimesproperty specifies time markers at which to apply each keyframe value. This property is used only if the calculation mode is set tokCAAnimationLinear,kCAAnimationDiscrete, orkCAAnimationCubic. It is not used for paced animations.The
timingFunctionsproperty specifies the timing curves to use for each keyframe segment. (This property replaces the inheritedtimingFunctionproperty.)
If you want to handle the animation timing yourself, use the kCAAnimationLinear or kCAAnimationCubic mode and the keyTimes and timingFunctions properties. The keyTimes defines the points in time at which to apply each keyframe value. The timing for all intermediate values is controlled by the timing functions, which allow you to apply ease-in or ease-out curves to each segment. If you do not specify any timing functions, the timing is linear.
Stopping an Explicit Animation While It Is Running
Animations normally run until they are complete, but you can stop them early if needed using one of the following techniques:
To remove a single animation object from the layer, call the layer’s
removeAnimationForKey:method to remove your animation object. This method uses the key that was passed to theaddAnimation:forKey:method to identify the animation. The key you specify must not benil.To remove all animation objects from the layer, call the layer’s
removeAllAnimationsmethod. This method removes all ongoing animations immediately and redraws the layer using its current state information.
When you remove an animation from a layer, Core Animation responds by redrawing the layer using its current values. Because the current values are usually the end values of the animation, this can cause the appearance of the layer to jump suddenly. If you want the layer’s appearance to remain where it was on the last frame of the animation, you can use the objects in the presentation tree to retrieve those final values and set them on the objects in the layer tree.
For information about pausing an animation temporarily, see Listing 5-4.
Animating Multiple Changes Together
If you want to apply multiple animations to a layer object simultaneously, you can group them together using a CAAnimationGroup object. Using a group object simplifies the management of multiple animation objects by providing a single configuration point. Timing and duration values applied to the group override those same values in the individual animation objects.
Listing 3-4 shows how you would use an animation group to perform two border-related animations at the same time and with the same duration.
Listing 3-4 Animating two animations together
// Animation 1 |
CAKeyframeAnimation* widthAnim = [CAKeyframeAnimation animationWithKeyPath:@"borderWidth"]; |
NSArray* widthValues = [NSArray arrayWithObjects:@1.0, @10.0, @5.0, @30.0, @0.5, @15.0, @2.0, @50.0, @0.0, nil]; |
widthAnim.values = widthValues; |
widthAnim.calculationMode = kCAAnimationPaced; |
// Animation 2 |
CAKeyframeAnimation* colorAnim = [CAKeyframeAnimation animationWithKeyPath:@"borderColor"]; |
NSArray* colorValues = [NSArray arrayWithObjects:(id)[UIColor greenColor].CGColor, |
(id)[UIColor redColor].CGColor, (id)[UIColor blueColor].CGColor, nil]; |
colorAnim.values = colorValues; |
colorAnim.calculationMode = kCAAnimationPaced; |
// Animation group |
CAAnimationGroup* group = [CAAnimationGroup animation]; |
group.animations = [NSArray arrayWithObjects:colorAnim, widthAnim, nil]; |
group.duration = 5.0; |
[myLayer addAnimation:group forKey:@"BorderChanges"]; |
A more advanced way to group animations together is to use a transaction object. Transactions provide more flexibility by allowing you to create nested sets of animations and assign different animation parameters for each. For information about how to use transaction objects, see Explicit Transactions Let You Change Animation Parameters.
Detecting the End of an Animation
Core Animation provides support for detecting when an animation begins or ends. These notifications are a good time to do any housekeeping tasks associated with the animation. For example, you might use a start notification to set up some related state information and use the corresponding end notification to tear down that state.
There are two different ways to be notified about the state of an animation:
Add a completion block to the current transaction using the
setCompletionBlock:method. When all of the animations in the transaction finish, the transaction executes your completion block.Assign a delegate to your
CAAnimationobject and implement theanimationDidStart:andanimationDidStop:finished:delegate methods.
If you want to chain two animations together so that one starts when the other finishes, do not use animation notifications. Instead, use the beginTime property of your animation objects to start each one at the desired time. To chain two animations together, set the start time of the second animation to the end time of the first animation. For more information about animation and timing values, see Customizing the Timing of an Animation.
How to Animate Layer-Backed Views
If a layer belongs to a layer-backed view, the recommended way to create animations is to use the view-based animation interfaces provided by UIKit or AppKit. There are ways to animate the layer directly using Core Animation interfaces but how you create those animations depends on the target platform.
Rules for Modifying Layers in iOS
Because iOS views always have an underlying layer, the UIView class itself derives most of its data from the layer object directly. As a result, changes you make to the layer are automatically reflected by the view object as well. This behavior means that you can use either the Core Animation or UIView interfaces to make your changes.
If you want to use Core Animation classes to initiate animations, you must issue all of your Core Animation calls from inside a view-based animation block. The UIView class disables layer animations by default but reenables them inside animation blocks. So any changes you make outside of an animation block are not animated. Listing 3-5 shows an example of how to change a layer’s opacity implicitly and its position explicitly. In this example, the myNewPosition variable is calculated beforehand and captured by the block. Both animations start at the same time but the opacity animation runs with the default timing while the position animation runs with the timing specified in its animation object.
Listing 3-5 Animating a layer attached to an iOS view
[UIView animateWithDuration:1.0 animations:^{ |
// Change the opacity implicitly. |
myView.layer.opacity = 0.0; |
// Change the position explicitly. |
CABasicAnimation* theAnim = [CABasicAnimation animationWithKeyPath:@"position"]; |
theAnim.fromValue = [NSValue valueWithCGPoint:myView.layer.position]; |
theAnim.toValue = [NSValue valueWithCGPoint:myNewPosition]; |
theAnim.duration = 3.0; |
[myView.layer addAnimation:theAnim forKey:@"AnimateFrame"]; |
}]; |
Rules for Modifying Layers in OS X
To animate changes to a layer-backed view in OS X, it is best to use the interfaces of the view itself. You should rarely, if ever, directly modify the layer that is attached to one of your layer-backed NSView objects. AppKit is responsible for creating and configuring those layer objects and for managing them while your app is running. Modifying the layer could cause it to get out of sync with the view object and could lead to unexpected results. For layer-backed views, your code must absolutely not modify any the following properties of the layer object:
AppKit disables implicit animations for its layer-backed views by default. The view’s animator proxy object reenables implicit animations automatically for you. If you want to animate layer properties directly, you can also programmatically reenable implicit animations by changing the allowsImplicitAnimation property of the current NSAnimationContext object to YES. Again, you should do this only for animatable properties that are not in the preceding list.
Remember to Update View Constraints as Part of Your Animation
If you are using constraint-based layout rules to manage the position of your views, you must remove any constraints that might interfere with an animation as part of configuring that animation. Constraints affect any changes you make to the position or size of a view. They also affect the relationships between the view and its child views. If you are animating changes to any of those items, you can remove the constraints, make the change, and then apply whatever new constraints are needed.
For more information on constraints and how you use them to manage the layout of your views, see Auto Layout Guide.
Copyright © 2015 Apple Inc. All Rights Reserved. Terms of Use | Privacy Policy | Updated: 2015-03-09