Creating the Subclass of NSDocument
The NSDocument subclass provides storage for the model and the ability to load and save document data. It also has any outlets and actions required for the user interface. The NSDocument object automatically creates an NSWindowController object to manage that nib file, but the NSDocument object serves as the File’s Owner proxy object for the nib file.
When you subclass NSDocument, you must override certain key methods and implement others to do at least the following things:
Read data of existing documents from files
Write document data to files
Initialize new documents
Put documents into iCloud and remove them
In particular, you must override one reading and one writing method. In the simplest case, you can override the data-based reading and writing methods, readFromData:ofType:error: and dataOfType:error:.
Reading Document Data
Opening existing documents stored in files is one of the most common operations document-based apps perform. Your override’s responsibility is to load the file data into your app’s data model.
If it works for your application, you should override the data-based reading method, readFromData:ofType:error:. Overriding that method makes your work easier because it uses the default document-reading infrastructure provided by NSDocument, which can handle multiple cases on your behalf.
How to Override the Data-Based Reading Method
You can override the readFromData:ofType:error: method to convert an NSData object containing document data into the document’s internal data structures and display that data in a document window. The document architecture calls readFromData:ofType:error:, passing in the NSData object, during its document initialization process.
Listing 4-1 shows an example implementation of the readFromData:ofType:error: document-reading method. This example assumes that the app has an NSTextView object configured with an NSTextStorage object to hold the text view’s data. The NSDocument object has a setMString: accessor method for the document’s NSAttributedString data model, declared as a property named mString.
Listing 4-1 Data-based document-reading method implementation
- (BOOL)readFromData:(NSData *)data ofType:(NSString *)typeName |
error:(NSError **)outError { |
BOOL readSuccess = NO; |
NSAttributedString *fileContents = [[NSAttributedString alloc] |
initWithData:data options:NULL documentAttributes:NULL |
error:outError]; |
if (!fileContents && outError) { |
*outError = [NSError errorWithDomain:NSCocoaErrorDomain |
code:NSFileReadUnknownError userInfo:nil]; |
} |
if (fileContents) { |
readSuccess = YES; |
[self setMString:fileContents]; |
} |
return readSuccess; |
} |
If you need to deal with the location of the file, override the URL reading and writing methods instead. If your app needs to manipulate document files that are file packages, override the file-wrapper reading and writing methods instead. For information about overriding the URL-based and file-wrapper-based reading methods, see Overriding the URL and File Package Reading Methods.
The flow of messages during document data reading is shown in Figure 6-5.
It’s Easy to Support Concurrent Document Opening
A class method of NSDocument, canConcurrentlyReadDocumentsOfType:, enables your NSDocument subclass to load documents concurrently, using background threads. This override allows concurrent reading of multiple documents and also allows the app to be responsive while reading a large document. You can override canConcurrentlyReadDocumentsOfType: to return YES to enable this capability. When you do, initWithContentsOfURL:ofType:error: executes on a background thread when opening files via the Open dialog or from the Finder.
The default implementation of this method returns NO. A subclass override should return YES only for document types whose reading code can be safely executed concurrently on non-main threads. If a document type relies on shared state information, you should return NO for that type.
Don’t Rely on Document-Property Getters in Overrides of Reading Methods
Don’t invoke fileURL, fileType, or fileModificationDate from within your overrides. During reading, which typically happens during object initialization, there is no guarantee that NSDocument properties like the file’s location or type have been set yet. Your overridden method should be able to determine everything it needs to do the reading from the passed-in parameters. During writing, your document may be asked to write its contents to a different location or using a different file type.
If your override cannot determine all of the information it needs from the passed-in parameters, consider overriding another method. For example, if you see the need to invoke fileURL from within an override of readFromData:ofType:error:, you should instead override readFromURL:ofType:error: and use the passed-in URL value.
Writing Document Data
In addition to implementing a document-reading method, you must implement a document-writing method to save your document data to disk. In the simplest case, you can override the data-based writing method, dataOfType:error:. If it works for your application, you should override dataOfType:error:. Overriding that method makes your work easier because it uses the default document-reading infrastructure provided by NSDocument. The responsibility of your override of the dataOfType:error: method is to create and return document data of a supported type, packaged as an NSData object, in preparation for writing that data to a file.
Listing 4-2 shows an example implementation of dataOfType:error:. As with the corresponding example implementation document-reading method, this example assumes that the app has an NSTextView object configured with an NSTextStorage object to hold the document’s data. The document object has an outlet property connected to the NSTextView object and named textView. The document object also has synthesized mString and setMString: accessors for the document’s NSAttributedString data model, declared as a property named mString.
Listing 4-2 Data-based document-writing method implementation
- (NSData *)dataOfType:(NSString *)typeName error:(NSError **)outError { |
NSData *data; |
[self setMString:[self.textView textStorage]]; // Synchronize data model with the text storage |
NSMutableDictionary *dict = [NSDictionary dictionaryWithObject:NSRTFTextDocumentType |
forKey:NSDocumentTypeDocumentAttribute]; |
[self.textView breakUndoCoalescing]; |
data = [self.mString dataFromRange:NSMakeRange(0, [self.mString length]) |
documentAttributes:dict error:outError]; |
if (!data && outError) { |
*outError = [NSError errorWithDomain:NSCocoaErrorDomain |
code:NSFileWriteUnknownError userInfo:nil]; |
} |
return data; |
} |
The override sends the NSTextView object a breakUndoCoalescing message when saving the text view’s contents to preserve proper tracking of unsaved changes and the document’s dirty state.
If your app needs access to document files, you can override writeToURL:ofType:error: instead. If your document data is stored in file packages, you can override fileWrapperOfType:error: instead. For information about overriding the other NSDocument writing methods, see Overriding the URL and File Package Writing Methods.
The actual flow of messages during this sequence of events is shown in detail in Figure 6-6.
Initializing a New Document
The init method of NSDocument is the designated initializer, and it is invoked by the other initializers initWithType:error: and initWithContentsOfURL:ofType:error:. If you perform initializations that must be done when creating new documents but not when opening existing documents, override initWithType:error:. If you have any initializations that apply only to documents that are opened, override initWithContentsOfURL:ofType:error:. If you have general initializations, override init. In all three cases, be sure to invoke the superclass implementation as the first action.
If you override init, make sure that your override never returns nil. Returning nil could cause a crash (in some versions of AppKit) or present a less than useful error message. If, for example, you want to prevent the creation or opening of documents under circumstances unique to your app, override a specific NSDocumentController method instead. That is, you should control this behavior directly in your app-level logic (to prevent document creation or opening in certain cases) rather than catching the situation after document initialization has already begun.
Implement awakeFromNib to initialize objects unarchived from the document’s window nib files (but not the document itself).
Moving Document Data to and from iCloud
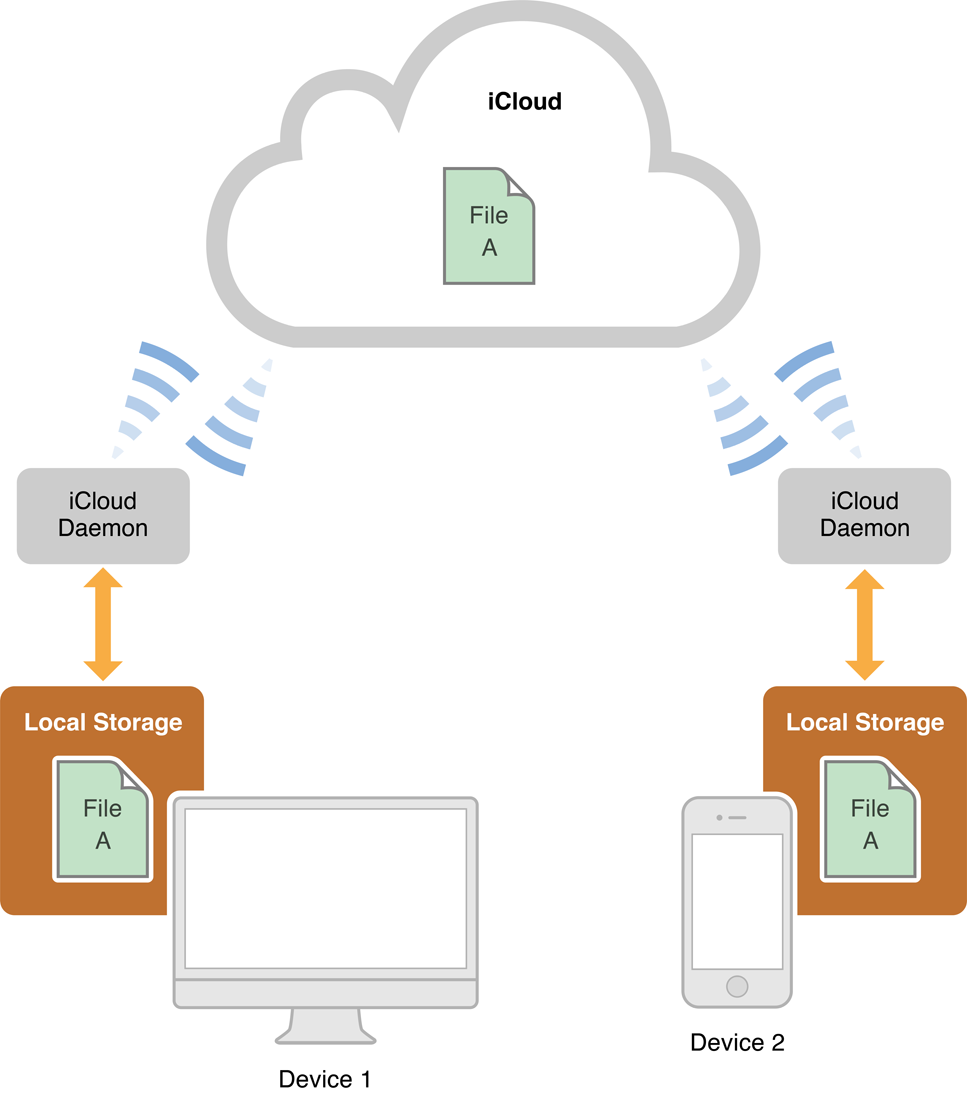
The iCloud storage technology enables you to share documents and other app data among multiple computers that run your document-based app. If you have an iOS version of your document-based app that shares the same document data formats, documents can be shared among iOS devices as well, as shown in Figure 4-1. Changes made to the file or directory on one device are stored locally and then pushed to iCloud using a local daemon. The transfer of files to and from each device is transparent to your app.
Access to iCloud is controlled using entitlements, which your app configures through Xcode. If these entitlements are not present, your app is prevented from accessing files and other data in iCloud. In particular, the container identifiers for your app must be declared in the com.apple.developer.ubiquity-container-identifiers entitlement. For information about how to configure your app’s entitlements, see Developing for the App Store and Tools Workflow Guide for Mac.
All files and directories stored in iCloud must be managed by an object that adopts the NSFilePresenter protocol, and all changes you make to those files and directories must occur through an NSFileCoordinator object. The file presenter and file coordinator prevent external sources from modifying the file at the same time and deliver relevant notifications to other file presenters. NSDocument implements the methods of the NSFilePresenter protocol and handles all of the file-related management for you. All your app must do is read and write the document data when told to do so. Be sure you override autosavesInPlace to return YES to enable file coordination in your NSDocument object.
Determining Whether iCloud Is Enabled
Early in the execution of your app, before you try to use any other iCloud interfaces, you must call the NSFileManager method URLForUbiquityContainerIdentifier: to determine whether iCloud storage is enabled. This method returns a valid URL when iCloud is enabled (and the specified container directory is available) or nil when iCloud is disabled. URLForUbiquityContainerIdentifier: also returns nil if you specify a container ID that the app isn't allowed to access or that doesn't exist. In that case, the NSFileManager object logs a message to the console to help diagnose the error.
Listing 4-3 illustrates how to determine whether iCloud is enabled for the document’s file URL, presenting an error message to the user if not, and setting the value of the document’s destination URL to that of its iCloud container otherwise (in preparation for moving the document to iCloud using the setUbiquitous:itemAtURL:destinationURL:error: method).
Listing 4-3 Determining whether iCloud is enabled
NSURL *src = [self fileURL]; |
NSURL *dest = NULL; |
NSURL *ubiquityContainerURL = [[[NSFileManager defaultManager] |
URLForUbiquityContainerIdentifier:nil] |
URLByAppendingPathComponent:@"Documents"]; |
if (ubiquityContainerURL == nil) { |
NSDictionary *dict = [NSDictionary dictionaryWithObjectsAndKeys: |
NSLocalizedString(@"iCloud does not appear to be configured.", @""), |
NSLocalizedFailureReasonErrorKey, nil]; |
NSError *error = [NSError errorWithDomain:@"Application" code:404 |
userInfo:dict]; |
[self presentError:error modalForWindow:[self windowForSheet] delegate:nil |
didPresentSelector:NULL contextInfo:NULL]; |
return; |
} |
dest = [ubiquityContainerURL URLByAppendingPathComponent: |
[src lastPathComponent]]; |
Because the message specifies nil for the container identifier parameter, URLForUbiquityContainerIdentifier: returns the first container listed in the com.apple.developer.ubiquity-container-identifiers entitlement and creates the corresponding directory if it does not yet exist. Alternatively, you could specify your app’s container identifier—a concatenation of team ID and app bundle ID, separated by a period for the app’s primary container identifier, or a different container directory. For example, you could declare a string constant for the container identifier, as in the following example, and pass the constant name with the message.
static NSString *UbiquityContainerIdentifier = @"A1B2C3D4E5.com.domainname.appname"; |
The method also appends the document’s filename to the destination URL.
Searching for Documents in iCloud
Apps should use NSMetadataQuery objects to search for items in iCloud container directories. Metadata queries return results only when iCloud storage is enabled and the corresponding container directories have been created. For information about how to create and configure metadata search queries, see File Metadata Search Programming Guide. For information about how to iterate directories using NSFileManager, see File System Programming Guide.
Moving a Document into iCloud Storage
To save a new document to the iCloud container directory, first save it locally and then call the NSFileManager method setUbiquitous:itemAtURL:destinationURL:error: to move the document file to iCloud.
Listing 4-4 shows an example implementation of a method that moves a file to iCloud storage. It assumes the source and destination URLs from Listing 4-3.
Listing 4-4 Moving a document to iCloud
dispatch_queue_t globalQueue = |
dispatch_get_global_queue(DISPATCH_QUEUE_PRIORITY_DEFAULT, 0); |
dispatch_async(globalQueue, ^(void) { |
NSFileManager *fileManager = [[NSFileManager alloc] init]; |
NSError *error = nil; |
// Move the file. |
BOOL success = [fileManager setUbiquitous:YES itemAtURL:src |
destinationURL:dest error:&error]; |
dispatch_async(dispatch_get_main_queue(), ^(void) { |
if (! success) { |
[self presentError:error modalForWindow:[self windowForSheet] |
delegate:nil didPresentSelector:NULL contextInfo:NULL]; |
} |
}); |
}); |
[self setFileURL:dest]; |
[self setFileModificationDate:nil]; |
After a document file has been moved to iCloud, as shown in Listing 4-4, reading and writing are performed by the normal NSDocument mechanisms, which automatically manage the file access coordination required by iCloud.
Removing a Document from iCloud Storage
To move a document file from an iCloud container directory, follow the same procedure described in Moving a Document into iCloud Storage, except switch the source URL (now the document file in the iCloud container directory) and the destination URL (the location of the document file in the local file system). In addition, the first parameter of the setUbiquitous:itemAtURL:destinationURL:error: method should now be NO.
For clarity in this example, the URL of the file in iCloud storage is named cloudsrc and the local URL to which the file is moved is named localdest.
dispatch_queue_t globalQueue = |
dispatch_get_global_queue(DISPATCH_QUEUE_PRIORITY_DEFAULT, 0); |
dispatch_async(globalQueue, ^(void) { |
NSFileManager *fileManager = [[NSFileManager alloc] init]; |
NSError *error = nil; |
// Move the file. |
BOOL success = [fileManager setUbiquitous:NO itemAtURL:cloudsrc |
destinationURL:localdest error:&error]; |
dispatch_async(dispatch_get_main_queue(), ^(void) { |
if (! success) { |
[self presentError:error modalForWindow:[self windowForSheet] |
delegate:nil didPresentSelector:NULL contextInfo:NULL]; |
} |
}); |
}); |
For more information about iCloud, see iCloud Design Guide.
NSDocument Handles Conflict Resolution Among Document Versions
NSDocument handles conflict resolution automatically, so you do not need to implement it yourself. If a conflict comes in while the document is open, NSDocument presents a sheet asking the user to resolve the conflict (or ignore, which marks it as resolved and accepts the automatic winner of the conflict, usually the one with the most recent modification date). Clicking Resolve invokes the Versions user interface (see Users Can Browse Document Versions) with only the conflicting versions visible. The user can choose a particular version and click Restore to make it the winner of the conflict, or just select Done to accept the automatic winner.
Even after the conflict is resolved, NSDocument always keeps the conflicting versions, and they can be accessed normally through Versions.
Optional Method Overrides
The areas described by items in the following sections require method overrides in some situations. And, of course, you must implement any methods that are special to your NSDocument subclass. More options for your NSDocument subclass are described in Alternative Design Considerations.
Window Controller Creation
NSDocument subclasses must create their window controllers. They can do this indirectly or directly. If a document has only one nib file with one window in it, the subclass can override windowNibName to return the name of the window nib file. As a consequence, the document architecture creates a default NSWindowController instance for the document, with the document as the nib file’s owner. If a document has multiple windows, or if an instance of a custom NSWindowController subclass is used, the NSDocument subclass must override makeWindowControllers to create these objects.
If your document has only one window, the project template provides a default implementation of the NSDocument method windowNibName:
- (NSString *)windowNibName { |
return @"MyDocument"; |
} |
If your document has more than one window, or if you have a custom subclass of NSWindowController, override makeWindowControllers instead. Make sure you add each created window controller to the list of such objects managed by the document using addWindowController:.
Window Nib File Loading
You can implement windowControllerWillLoadNib: and windowControllerDidLoadNib: to perform any necessary tasks related to the window before and after it is loaded from the nib file. For example, you may need to perform setup operations on user interface objects, such as setting the content of a view, after the app’s model data has been loaded. In this case, you must remember that the NSDocument data-reading methods, such as readFromData:ofType:error:, are called before the document’s user interface objects contained in its nib file are loaded. Of course, you cannot send messages to user interface objects until after the nib file loads. So, you can do such operations in windowControllerDidLoadNib:.
Here is an example:
- (void)windowControllerDidLoadNib:(NSWindowController *)windowController { |
[super windowControllerDidLoadNib:windowController]; |
[textView setAllowsUndo:YES]; |
if (fileContents != nil) { |
[textView setString:fileContents]; |
fileContents = nil; |
} |
} |
Printing and Page Layout
A document-based app can change the information it uses to define how document data is printed. This information is encapsulated in an NSPrintInfo object. If you want users to be able to print a document, you must override printOperationWithSettings:error:, possibly providing a modified NSPrintInfo object.
Modifying the Save Dialog Accessory View
By default, when NSDocument runs the Save dialog, and the document has multiple writable document types, it inserts an accessory view near the bottom of the dialog. This view contains a pop-up menu of the writable types. If you don’t want this pop-up menu, override shouldRunSavePanelWithAccessoryView to return NO. You can also override prepareSavePanel: to do any further customization of the Save dialog.
Validating Menu Items
NSDocument implements validateUserInterfaceItem: to manage the enabled state of the Revert Document and Save menu items. If you want to validate other menu items, you can override this method, but be sure to invoke the superclass implementation. For more information on menu item validation, see Application Menu and Pop-up List Programming Topics.
Copyright © 2012 Apple Inc. All Rights Reserved. Terms of Use | Privacy Policy | Updated: 2012-12-13