App Creation Process Overview
It is possible to put together a document-based app without having to write much code. You have only to create a document project, compose the human interface, complete the information property list for your document types, implement a subclass of NSDocument, and add any other custom classes or behavior required by your app.
If you intend to sell your app through the Mac App Store or use iCloud storage, you also need to create an explicit App ID, create provisioning profiles, and enable the correct entitlements for your app. These procedures are explained in App Distribution Guide.
Xcode Provides a Document-Based App Template
To expedite the development of document-based apps, Xcode provides a Cocoa Application template, which has the option to make the app document based. The template provides the following things:
A skeletal NSDocument subclass implementation. The document subclass implementation (
.m) file includes commented blocks for important methods, including aninitmethod that initializes and returnsself. This method provides a location for subclass-specific initialization. The template also includes a fully implementedwindowNibNamemethod that returns the name of the document window nib file. An override ofwindowControllerDidLoadNib:provides a place for code to be executed after the document’s window nib has finished loading. In addition, the template includes skeletal implementations of thedataOfType:error:andreadFromData:ofType:error:basic writing and reading methods; these methods throw an exception if you don’t supply a working implementation. Finally, the template includes an override of theautosavesInPlaceclass method that returnsYESto turn on automatic saving of changes to your documents.A nib file for the app’s document. This nib file is named with your
NSDocumentsubclass name with the extension.xib. The subclass ofNSDocumentis made File’s Owner of the nib file. It has an outlet namedwindowconnected to its window object, which in turn has a delegate outlet connected to the File’s Owner, as shown in Figure 2-3. The window has only one user interface object in it initially, a text field with the words "Your document contents here".The app’s menu bar nib file. The menu bar nib file, named
MainMenu.xib, contains an app menu (named with the app’s name), a File menu (with all of its associated document commands), an Edit menu (with text editing commands and Undo and Redo menu items), and Format, View, Window, and Help menus (with their own menu items representing commands). These menu items are connected to the appropriate first-responder action methods. For example, the About menu item is connected to theorderFrontStandardAboutPanel:action method that displays a standard About window.See Review Your App Menu Bar Commands for more information about the menu bar nib file provided by the Xcode app templates.
The app's information property list. The
<appName>-Info.plistfile contains placeholder values for global app keys, as well as for theCFBundleDocumentTypeskey, whose associated value is a dictionary containing key-value pairs specifying information about the document types the app works with, including theNSDocumentsubclass for each document type.
The following sections describe the process of selecting and utilizing the document-based app template.
Create the Project
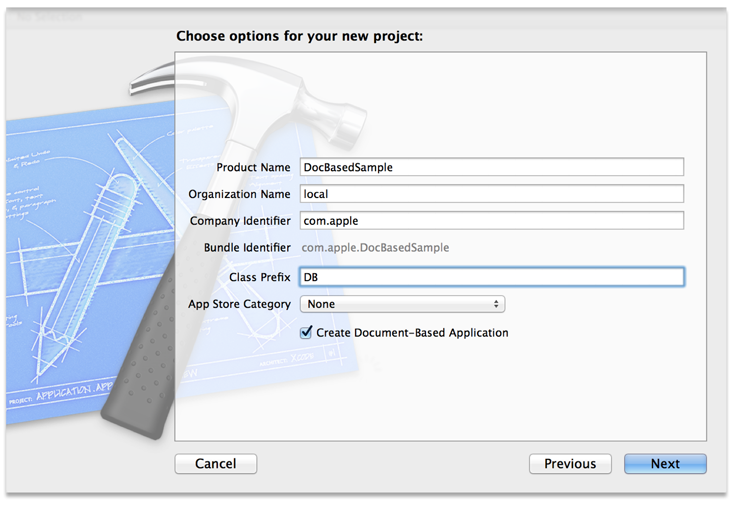
To create your project in Xcode, choose File > New > New Project. Select the Cocoa Application icon from the OS X Application choices. In the next pane, select the Create Document-Based Application option, as shown in Figure 3-1. In this pane you also name your app, give your NSDocument subclass a prefix, and specify your documents’ filename extension, in addition to other options. If you intend to use Core Data for your data model, select the Use Core Data option, which automatically inserts NSPersistentDocument as the immediate superclass of your document subclass.
The final pane of the New Project dialog enables you to place your project in the file system and create a source control repository if you wish. For more details about the Xcode project creation process, see Start a Project in Xcode Overview.
Without writing any additional code, you can compile and run the app. When you first launch the app, you see an untitled document with an empty window. The File menu commands all do something reasonable, such as bringing up a Save dialog or Open dialog. Because you have not yet defined any types or implemented loading and saving, you can't open or save anything, and the default implementations throw an exception.
Create Your Document Window User Interface
To create the user interface for your document window, in the project navigator area, click the nib file named with your NSDocument subclass name with the extension .xib. This opens the file in Interface Builder, an Xcode editor that provides a graphical interface for the creation of user interface files. You can drag user interface elements onto the document window representation from the Interface Builder Object library in the utility area. If the objects in the document window require outlets and actions, add them to your NSDocument subclass. Connect these actions and outlets via the File’s Owner icon in the list of placeholders in the Interface Builder dock. If your document objects interact with other custom objects, such as model objects that perform specialized computations, define those objects in Interface Builder and make any necessary connections to them.
Step-by-step instructions for connecting menu items to action methods in your code are given in Edit User Interfaces in Xcode Overview.
Review Your App Menu Bar Commands
Table 3-1 lists the File menu first-responder action connections that exist in the template.
File menu command | First-responder action |
|---|---|
New |
|
Open |
|
Open Recent > Clear Menu |
|
Close |
|
Save/Save a Version |
|
Revert Document |
|
Page Setup |
|
|
After a document has been saved for the first time, the Save command changes to Save a Version. In applications that have enabled autosaving in place, the Save As and Save All items in the File menu are hidden, and a Duplicate menu item is added. The template has similar ready-made connections for the Edit, Format, View, Window, and Help menus.
For your app’s custom menu items that are not already connected to action methods in objects or placeholder objects in the nib file, there are two common techniques for handling menu commands in an OS X app:
Connect the corresponding menu item to a first responder method.
Connect the menu item to a method of your custom app object or your app delegate object.
Of these two techniques, the first is more common because many menu commands act on the current document or its contents, which are part of the responder chain. The second technique is used primarily to handle commands that are global to the app, such as displaying preferences or creating a new document. In addition to implementing action methods to respond to your menu commands, you must also implement the methods of the NSMenuValidation protocol to enable the menu items for those commands.
For more information about menu validation and other menu topics, see Application Menu and Pop-up List Programming Topics.
Complete the Information Property List
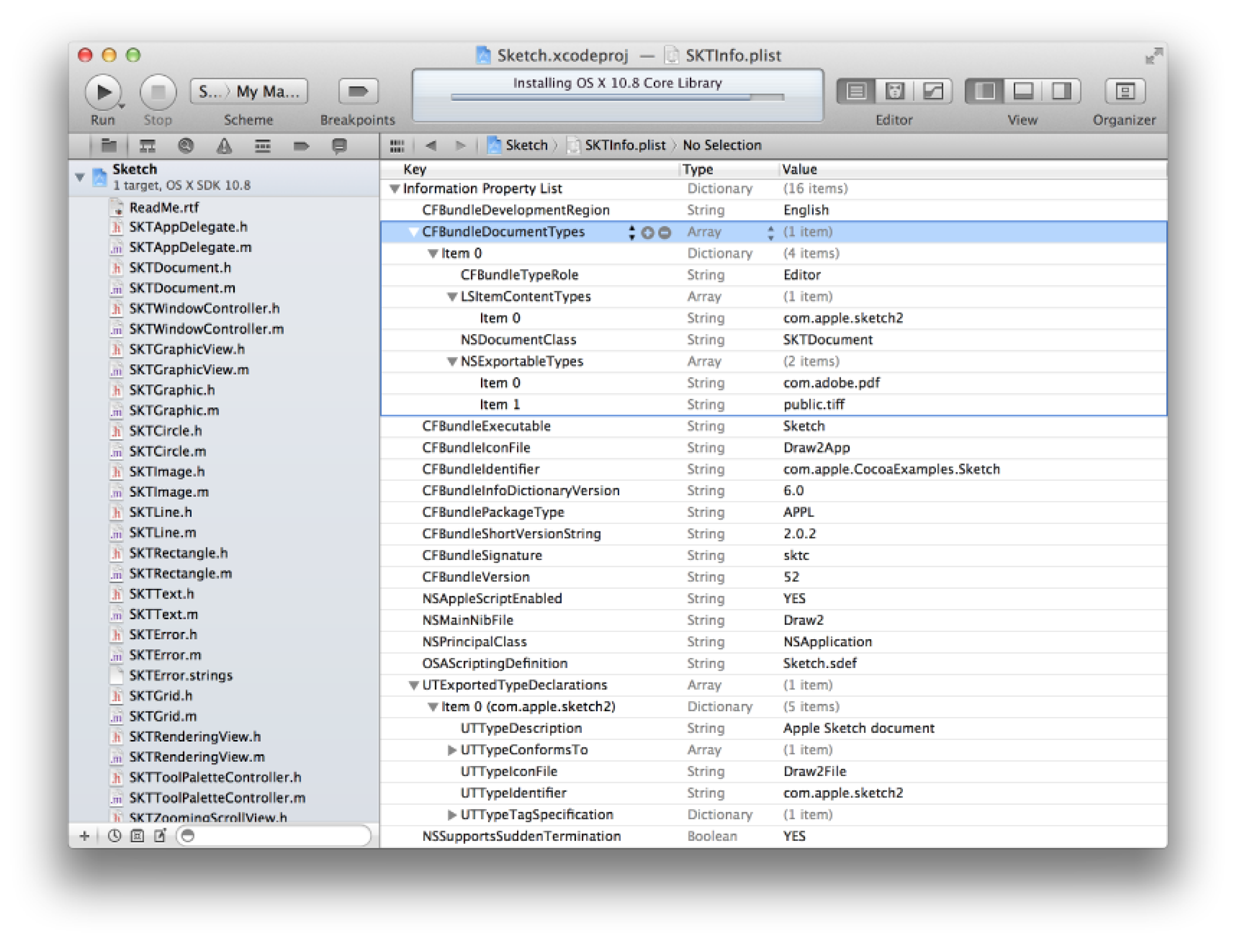
You need to configure the project’s information property list so that the app knows what kinds of documents it can handle. You specify this information in the Xcode information property list file, which is shown in Figure 3-2. The property list file is stored in the app’s bundle and named <appName>-Info.plist by default.
When the NSDocumentController object creates a new document or opens an existing document, it searches the property list for such items as the document class that handles a document type, the uniform type identifier (UTI) for the type, and whether the app can edit or only view the type. Similarly, Launch Services uses information about the icon file for the type and to know which app to launch when the user double-clicks a document file. Document type information is associated with the CFBundleDocumentTypes key as an array of dictionaries, each of which contains the key-value pairs that define the document type.
Xcode provides a property list file with every Mac app project. The property list editor appears when you select the Info.plist file in the project navigator or select the target and choose the Info pane of the project editor. In the Info pane, there’s a list of target properties. You can edit the property values and add new key-value pairs. By default, Xcode displays a user-friendly version of each key name. To see the actual key names that are in the Info.plist file, Control-click an item in the editor and choose Show Raw Keys/Values from the contextual menu that appears.
For a new document-based app, you should create a document type with a name and extension that make sense for your app. You can add more types as well, one for each of the document types your app handles. The app’s most important document type must be listed first in the list of types. This is the type that NSDocumentController uses by default when the user asks for a new document.
The most important document type value is its Uniform Type Identifier (UTI), a string that uniquely identifies the type of data contained in the document for all apps and services to rely upon. A document’s UTI corresponds to the LSItemContentTypes key in the information property list. The UTI is used as the programmatic type name by NSDocument and NSDocumentController. By using UTIs, apps avoid much of the complexity previously required to handle disparate kinds of file-type information in the system, including filename extensions, MIME types, and HFS type codes (OS types).
A document UTI can be defined by the system, as shown in System-Declared Uniform Type Identifiers in Uniform Type Identifiers Reference, or a document-based app can declare its own proprietary UTI. Such custom UTIs must also be exported to make the system aware of them, as described in Export Custom Document Type Information.
To declare a document type in Xcode, perform the following steps:
Select the project in the project navigator.
Select the target and click the Info tab.
Click the Add (+) button at the bottom right of the editor area and choose Add Document Type from the pop-up menu.
Click the triangle next to “Untitled” to disclose the property fields.
Alternatively, you can select the Info.plist file in the project navigator, click in the editor area, and choose Editor > Add Item to add document type properties directly to the property list file, as shown in Figure 3-2. Choose Editor > Show Raw Keys & Values to reveal the actual key names.
Add the properties shown in Table 3-2.
Key | Xcode field (Info.plist identifier) | Value |
|---|---|---|
| Identifier | An array of UTI strings. Typically, only one is specified per document type. The UTI string must be spelled out explicitly. |
| Class (Cocoa NSDocument Class) | A string specifying the |
| Role | A string specifying the role the app with respect to this document type. Possible values are Editor, Viewer, Shell, Quick Look Generator, or None. |
| (Exportable Type UTIs) | An array of strings specifying UTIs that define a supported file type to which this document can export its content. |
| Bundle (Document is a package or bundle) | A Boolean value specifying whether the document is distributed as a bundle. If |
| Icon (Icon File Name) | A string specifying the name of the icon resource file (extension |
| Name (Document Type Name) | A string specifying the abstract name of the document type. |
| Handler rank | A string specifying how Launch Services ranks this app among those that declare themselves editors or viewers of documents of this type. Possible values, in order of precedence, are |
For more information about these and other document type keys, see “CFBundleDocumentTypes” in Information Property List Key Reference.
Export Custom Document Type Information
If you define a custom document type with its own UTI, you must export the UTI. To declare a document type in Xcode, perform the following steps:
Select the project in the project navigator area.
Select the target and click the Info tab.
Click the Add (+) button at the bottom right of the editor area and choose Add Exported UTI from the pop-up menu.
Click the triangle next to “Untitled” to disclose the property fields.
Add the properties shown in Table 3-3.
Key | Xcode field (Info.plist identifier) | Value |
|---|---|---|
| Description | A string describing this document type. |
| Identifier | The exported document type’s UTI. |
| Icon (Icon file name) | A string specifying the name of the document type’s icon file. |
| Conforms to (Conforms to UTIs) | An array of strings representing the UTIs to which the document type conforms. |
| Extensions (Equivalent Types) | An array of strings named |
For more information about these and other exported type property keys, see Declaring New Uniform Type Identifiers in Uniform Type Identifiers Overview.
For information about document types in alternate document-based app designs, see Multiple Document Types Use Multiple NSDocument Subclasses and Additional Document Type Considerations.
Implement the NSDocument Subclass
Every document-based app that uses the document architecture must create at least one subclass of NSDocument. You must override some NSDocument methods (among several choices), and you should override several others in certain situations. Details explaining how to implement your NSDocument subclass are in Creating the Subclass of NSDocument.
Create Any Additional Custom Classes
The Cocoa document architecture, as embodied primarily in NSDocument, NSDocumentController, and NSWindowController, provides an operating framework for apps, including sophisticated document handling mechanisms. However, you must add the behaviors that differentiate your app and suit it to its particular purpose. Much customized behavior can be implemented in your NSDocument subclass, in delegate methods, custom classes added to your project, and subclasses of NSDocumentController and NSWindowController if you need to extend the capabilities of either of those classes. Generally, you should use custom classes to encapsulate the program logic of your data model and controllers, maintaining a healthy MVC separation.
For more information about app design, see Mac App Programming Guide.
Copyright © 2012 Apple Inc. All Rights Reserved. Terms of Use | Privacy Policy | Updated: 2012-12-13