Advanced Optimization Techniques
This chapter provides guidance for specialized tasks that not every app performs. If your app uses OpenGL, creates Quartz bitmaps, accesses screen pixels, or performs a handful of other less common tasks, you might need to follow the optimization advice in some of these sections.
Enable OpenGL for High-Resolution Drawing
OpenGL is a pixel-based API. The NSOpenGLView class does not provide high-resolution surfaces by default. Because adding more pixels to renderbuffers has performance implications, you must explicitly opt in to support high-resolution screens.
You can opt in to high resolution by calling the method setWantsBestResolutionOpenGLSurface: when you initialize the view, and supplying YES as an argument:
[self setWantsBestResolutionOpenGLSurface:YES]; |
If you don’t opt in, the system magnifies the rendered results.
The wantsBestResolutionOpenGLSurface property is relevant only for views to which an NSOpenGLContext object is bound. Its value does not affect the behavior of other views. For compatibility, wantsBestResolutionOpenGLSurface defaults to NO, providing a 1-pixel-per-point framebuffer regardless of the backing scale factor for the display the view occupies. Setting this property to YES for a given view causes AppKit to allocate a higher-resolution framebuffer when appropriate for the backing scale factor and target display.
To function correctly with wantsBestResolutionOpenGLSurface set to YES, a view must perform correct conversions between view units (points) and pixel units as needed. For example, the common practice of passing the width and height of [self bounds] to glViewport() will yield incorrect results at high resolution, because the parameters passed to the glViewport() function must be in pixels. As a result, you’ll get only partial instead of complete coverage of the render surface. Instead, use the backing store bounds:
[self convertRectToBacking:[self bounds]]; |
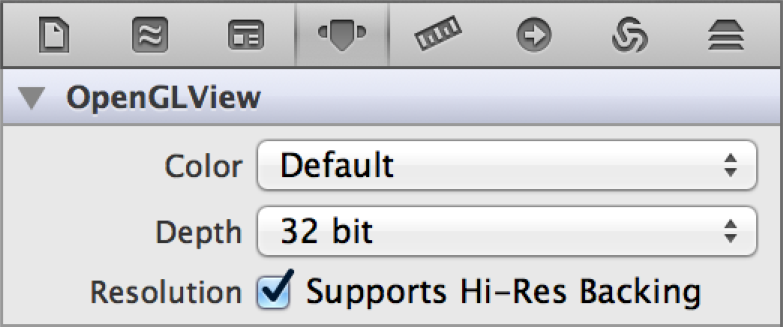
You can also opt in to high resolution by enabling the Supports Hi-Res Backing setting for the OpenGL view in Xcode, as shown in Figure 3-1.
Set Up the Viewport to Support High Resolution
The viewport dimensions are in pixels relative to the OpenGL surface. Pass the width and height to glViewPort and use 0,0 for the x and y offsets. Listing 3-1 shows how to get the view dimensions in pixels and take the backing store size into account.
Listing 3-1 Setting up the viewport for drawing
- (void)drawRect:(NSRect)rect // NSOpenGLView subclass |
{ |
// Get view dimensions in pixels |
NSRect backingBounds = [self convertRectToBacking:[self bounds]]; |
GLsizei backingPixelWidth = (GLsizei)(backingBounds.size.width), |
backingPixelHeight = (GLsizei)(backingBounds.size.height); |
// Set viewport |
glViewport(0, 0, backingPixelWidth, backingPixelHeight); |
// draw… |
} |
You don’t need to perform rendering in pixels, but you do need to be aware of the coordinate system you want to render in. For example, if you want to render in points, this code will work:
glOrtho(NSWidth(bounds), NSHeight(bounds),...) |
Adjust Model and Texture Assets
If you opt in to high-resolution drawing, you also need to adjust the model and texture assets of your app. For example, when running on a high-resolution display, you might want to choose larger models and more detailed textures to take advantage of the increased number of pixels. Conversely, on a standard-resolution display, you can continue to use smaller models and textures.
If you create and cache textures when you initialize your app, you might want to consider a strategy that accommodates changing the texture based on the resolution of the display.
Check for Calls Defined in Pixel Dimensions
These functions use pixel dimensions:
glViewport (GLint x, GLint y, GLsizei width, GLsizei height)glScissor (GLint x, GLint y, GLsizei width, GLsizei height)glReadPixels (GLint x, GLint y, GLsizei width, GLsizei height, ...)glLineWidth (GLfloat width)glRenderbufferStorage (..., GLsizei width, GLsizei height)glTexImage2D (..., GLsizei width, GLsizei height, ...)
Tune OpenGL Performance for High Resolution
Performance is an important factor when determining whether to support high-resolution content. The quadrupling of pixels that occurs when you opt in to high resolution requires more work by the fragment processor. If your app performs many per-fragment calculations, the increase in pixels might reduce its frame rate. If your app runs significantly slower at high resolution, consider the following options:
Optimize fragment shader performance. (See Tuning Your OpenGL Application in OpenGL Programming Guide for Mac.)
Choose a simpler algorithm to implement in your fragment shader. This reduces the quality of each individual pixel to allow for rendering the overall image at a higher resolution.
Use a fractional scale factor between 1.0 and 2.0. A scale factor of 1.5 provides better quality than a scale factor of 1.0, but it needs to fill fewer pixels than an image scaled to 2.0.
Multisampling antialiasing can be costly with marginal benefit at high resolution. If you are using it, you might want to reconsider.
The best solution depends on the needs of your OpenGL app; you should test more than one of these options and choose the approach that provides the best balance between performance and image quality.
Use a Layer-Backed View to Overlay Text on OpenGL Content
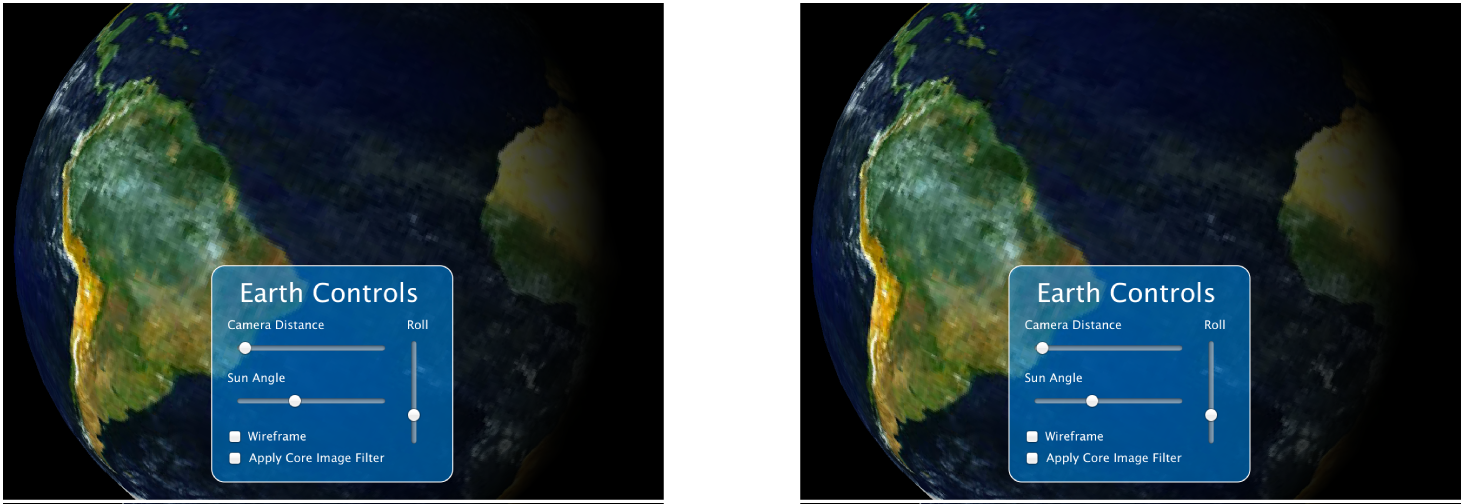
When you draw standard controls and Cocoa text to a layer-backed view, the system handles scaling the contents of that layer for you. You need to perform only a few steps to set and use the layer. Compare the controls and text in standard and high resolutions, as shown in Figure 3-2. The text looks the same on both without any additional work on your part.
Set the
wantsLayerproperty of yourNSOpenGLViewsubclass toYES.Enabling the
wantsLayerproperty of anNSOpenGLViewobject activates layer-backed rendering of the OpenGL view. Drawing a layer-backed OpenGL view proceeds mostly normally through the view’sdrawRect:method. The layer-backed rendering mode uses its ownNSOpenGLContextobject, which is distinct from theNSOpenGLContextthat the view uses for drawing in non-layer-backed mode.AppKit automatically creates this context and assigns it to the view by invoking the
setOpenGLContext:method. The view’sopenGLContextaccessor will return the layer-backed OpenGL context (rather than the non-layer-backed context) while the view is operating in layer-backed mode.Create the layer content either as a XIB file or programmatically.
Add the layer to the OpenGL view by calling the
addSublayer:method.
Use an Application Window for Fullscreen Operation
For the best user experience, if you want your app to run full screen, create a window that covers the entire screen. This approach offers two advantages:
The system provides optimized context performance.
Users will be able to see critical system dialogs above your content.
You should avoid changing the display mode of the system.
Convert the Coordinate Space When Hit Testing
Always convert window event coordinates when performing hit testing in OpenGL. The locationInWindow method of the NSEvent class returns the receiver’s location in the base coordinate system of the window. You then need to call the convertPoint:fromView: method to get the local coordinates for the OpenGL view (see Converting to and from Views).
NSPoint aPoint = [theEvent locationInWindow]; |
NSPoint localPoint = [myOpenGLView convertPoint:aPoint fromView:nil]; |
Manage Core Animation Layer Contents and Scale
Views (NSView) and layers (CALayer) can be integrated in two ways—through layer backing or layer hosting. When you configure a layer-backed view by invoking setWantsLayer: with a value of YES, the view class automatically creates a backing layer. The view caches any drawing it performs to the backing layer. When it comes to high resolution, layer-backed views are scaled automatically by the system. You don’t have any work to do to get content that looks great on high-resolution displays.
Layers hosted by views are different. A layer-hosting view is a view that contains a Core Animation layer that you intend to manipulate directly. You create a layer-hosting view by instantiating a Core Animation layer class and supplying that layer to the view’s setLayer: method. Then, invoke setWantsLayer: with a value of YES.
When using a layer-hosting view you should not rely on the view for drawing, nor should you add subviews to the layer-hosting view. The root layer (the layer set using setLayer:) should be treated as the root layer of the layer tree, and you should only use Core Animation drawing and animation methods. You still use the view for handling mouse and keyboard events, but any resulting drawing must be handled by Core Animation.
Because layers hosted by views are custom CALayer objects, you are responsible for:
Setting the initial
contentsproperty of the layerKeeping the value of the
contentsScaleproperty updatedProviding high-resolution content
To make updating the layers that you manage easier, implement layer:shouldInheritContentsScale:fromWindow:. This CALayer delegate method allows you to manage scale and contents for a hosted layer whose content is not an NSImage object (you don’t need to manage NSImage contents). For additional details, see NSLayerDelegateContentsScaleUpdating Protocol Reference.
When a resolution change occurs for a given window, the system traverses the layer trees in that window to decide what action, if any, to take for each layer. The system will query the layer’s delegate to determine whether to change the layer’s contentsScale property to the new scale (either 2.0 or 1.0).
If the delegate returns YES, it should make any corresponding changes to the layer’s properties, as required by the resolution change. For example, a layer whose contents contain a CGImage object needs to determine whether an alternate CGImage object is available for the new scale factor. If the delegate finds a suitable CGImage object, then in addition to returning YES, it should set the appropriate CGImage object as the layer’s new contents.
For layers that do not have a delegate, your app must either:
Set a suitable delegate that can handle the resolution change (the recommended approach).
Provide a means of updating the layers as needed when a resolution change notification is posted (if you prefer this approach, see Handle Dynamic Changes in Window Resolution Only When You Must).
The Core Animation compositing engine looks at each layer’s contentsScale property to determine whether its contents need to be scaled during compositing. If your app creates layers without an associated view, the contentsScale property of each new layer object is initially set to 1.0. If you subsequently draw the layer on a high-resolution display, the layer’s contents are magnified automatically, which results in a loss of detail. However, you can set the value of the layer’s contentsScale property appropriately and provide high-resolution content, as shown in Listing 3-2.
Listing 3-2 Overriding viewDidChangeBackingProperties
- (void)viewDidChangeBackingProperties |
{ |
[super viewDidChangeBackingProperties]; |
[[self layer] setContentsScale:[[self window] backingScaleFactor]]; |
// Your code to provide content |
} |
Layers with NSImage Contents Are Updated Automatically
When you set an NSImage object as the contents of a layer, the system automatically chooses the image representation most appropriate for the screen on which the layer resides. There are two situations for which you’ll need to override the automatic choice:
The layer has additional scaling due to layer bounds changes or transforms.
The
contentsGravityproperty is not one of the following:kCAContentsGravityResize,kCAContentsGravityResizeAspect, orkCAContentsGravityResizeFill.This property is set to the value
kCAGravityResizeby default, which scales the layer content to fill the layer bounds, without regard to the natural aspect ratio. Changing the gravity to a nonresizing option eliminates the automatic scaling that would otherwise occur.
For either of these cases, use these methods of the NSImage class to manage the content and scaling of the layer:
recommendedLayerContentsScale:provides the system with the optimal scaling for a layerlayerContentsForContentsScale:provides the contents for a layer at a given size
Layers with CGImage Contents Are Not Updated Automatically
OS X doesn’t handle dynamic changes for standalone layers that have CGImage contents because it doesn’t have knowledge of how layer contents were provided. As such, the system is not able to substitute resolution-appropriate alternatives, even if they are available. Your app must manage these layers and modify the layer properties as appropriate for changes between resolutions. The same is true for any standalone layers that you add to a layer-backed view tree. Unless you use NSImage objects as layer contents, your app must update the layer properties and contents when needed.
Create and Render Bitmaps to Accommodate High Resolution
Bitmap contexts are always sized using pixels, not points. When you create a bitmap context, you need to manually determine the right scale based on the destination to which the bitmap will be drawn, and create a larger buffer when appropriate. Any existing bitmap caches (glyph caches, bitmap-based art caches—possibly including caches of rasterized PDF content—or similar) might need separate caches for each resolution. Because the need for a particular resolution can come and go dynamically, the resolutions supported by the caches should be dynamic. In other words, don’t assume your cache needs to be only 1x (or needs to be only 2x) based on its first use, because a subsequent use could need a cache entry for a different resolution. For example, a user could drag a window from a standard- to high-resolution display (or vice versa) in a multiple-display system (see Resolution Can Change Dynamically). You’ll want to maintain a consistent user experience if that happens.
Listing 3-3 shows how to use AppKit to create a bitmap that’s scaled to accommodate the device’s resolution. There are many other ways to create bitmaps in Cocoa. For more information, see Creating a Bitmap in Cocoa Drawing Guide.
Regardless of how you choose to create a bitmap, there are two critical items illustrated in Listing 3-3 that you must make sure you include in your own code.
Set the width (
pixelsWide) and height (pixelsHigh) of the bitmap for the number of pixels you need. Don’t make the mistake of basing the pixel count on the view (or other object) bounds because the view’s dimensions are specified in points.Set the user size of the bitmap, which is its width and height in points. The user size communicates the dpi, which you need to correctly size the bitmap to support high resolution.
Listing 3-3 Setting up a bitmap to support high resolution
- (id)myDrawToBitmapOfWidth:(NSInteger)width |
andHeight:(NSInteger)height |
withScale:(CGFloat)scale |
{ |
NSBitmapImageRep *bmpImageRep = [[NSBitmapImageRep alloc] |
initWithBitmapDataPlanes:NULL |
pixelsWide:width * scale |
pixelsHigh:height * scale |
bitsPerSample:8 |
samplesPerPixel:4 |
hasAlpha:YES |
isPlanar:NO |
colorSpaceName:NSCalibratedRGBColorSpace |
bitmapFormat:NSAlphaFirstBitmapFormat |
bytesPerRow:0 |
bitsPerPixel:0 |
]; |
// There isn't a colorspace name constant for sRGB so retag |
// using the sRGBColorSpace method |
bmpImageRep = [bmpImageRep bitmapImageRepByRetaggingWithColorSpace: |
[NSColorSpace sRGBColorSpace]]; |
// Setting the user size communicates the dpi |
[bmpImageRep setSize:NSMakeSize(width, height)]; |
// Create a bitmap context |
NSGraphicsContext *bitmapContext = |
[NSGraphicsContext graphicsContextWithBitmapImageRep:bmpImageRep]; |
// Save the current context |
[NSGraphicsContext saveGraphicsState]; |
// Switch contexts for drawing to the bitmap |
[NSGraphicsContext setCurrentContext: |
[NSGraphicsContext graphicsContextWithBitmapImageRep:bmpImageRep]]; |
// *** Your drawing code here *** |
[NSGraphicsContext restoreGraphicsState]; |
// Send back the image rep to the requestor |
return bmpImageRep; |
} |
- (void)drawRect:(NSRect)dirtyRect |
{ |
// Bounds are in points |
NSRect bounds = [self bounds]; |
// Figure out the scale of pixels to points |
CGFloat scale = [self convertSizeToBacking:CGSizeMake(1,1)].width; |
// Supply the user size (points) |
NSBitmapImageRep *myImageRep = [self myDrawToBitmapOfWidth:bounds.size.width |
andHeight:bounds.size.height |
withScale:scale]; |
// Draw the bitmap image to the view bounds |
[myImageRep drawInRect:bounds]; |
} |
Use the Block-Based Drawing Method for Offscreen Images
If your app uses the lockFocus and unlockFocus methods of the NSImage class for offscreen drawing, consider using the method imageWithSize:flipped:drawingHandler: instead (available in OS X v10.8). If you use the lock focus methods for drawing, you can get unexpected results—either you’ll get a low resolution NSImage object that looks incorrect when drawn, or you’ll get a 2x image that has more pixels in its bitmap than you are expecting.
Using the imageWithSize:flipped:drawingHandler: method ensures you’ll get correct results under standard and high resolution. The drawing handler is a block that can be invoked whenever the image is drawn to, and on whatever thread the drawing occurs. You should make sure that any state you access within the block is done in a thread-safe manner.
The code in the block should be the same code that you would use between the lockFocus and unlockFocus methods.
Handle Dynamic Changes in Window Resolution Only When You Must
Listening for NSWindowDidChangeBackingPropertiesNotification is something only a few apps—primarily those apps that specialize in video or graphics work, and for which color matching and high-quality rendering fidelity are especially important—will need to do.
If your app must handle resolution changes manually, it should respond to the notification NSWindowDidChangeBackingPropertiesNotification when the backing store resolution of a given NSWindow object changes. If the window has a delegate that responds to the windowDidChangeBackingProperties: message, its delegate will receive the notification through that method.
Your app receives NSWindowDidChangeBackingPropertiesNotification whenever a resolution or color space change occurs. To determine which of the two changed (or both could change), use these keys:
NSBackingPropertyOldScaleFactorKey, which is anNSNumberobjectNSBackingPropertyOldColorSpaceKey, which is anNSColorSpaceobject
Listing 3-4 shows how to use the keys to obtain backing scale and color space information from the notification. In response to changes in resolution or color space, your implementation of windowDidChangeBackingProperties: will need to load or generate bitmapped image resources appropriate to the characteristics of the new window. You might also need to purge the old counterparts if they are no longer needed.
Listing 3-4 Responding to changes in window backing properties
- (void)windowDidChangeBackingProperties:(NSNotification *)notification { |
NSWindow *theWindow = (NSWindow *)[notification object]; |
NSLog(@"windowDidChangeBackingProperties: window=%@", theWindow); |
CGFloat newBackingScaleFactor = [theWindow backingScaleFactor]; |
CGFloat oldBackingScaleFactor = [[[notification userInfo] |
objectForKey:@"NSBackingPropertyOldScaleFactorKey"] |
doubleValue]; |
if (newBackingScaleFactor != oldBackingScaleFactor) { |
NSLog(@"\tThe backing scale factor changed from %.1f -> %.1f", |
oldBackingScaleFactor, newBackingScaleFactor); |
} |
NSColorSpace *newColorSpace = [theWindow colorSpace]; |
NSColorSpace *oldColorSpace = [[notification userInfo] |
objectForKey:@"NSBackingPropertyOldColorSpaceKey"]; |
if (![newColorSpace isEqual:oldColorSpace]) { |
NSLog(@"\tThe color space changed from %@ -> %@", oldColorSpace, newColorSpace); |
} |
} |
Use NSReadPixel to Access Screen Pixels
Most of the time you shouldn’t need to access pixels, but if your app performs tasks such as finding out the color of a pixel that the user is pointing to, you should use the NSReadPixel function.
Get the event that contains the pixel that the user is pointing to.
The location value will be in points relative to the view or window that has focus.
Call a conversion method to get the location of the pixel.
Lock focus on the view.
Use
NSReadPixelto get the pixel.Unlock focus on the view.
Get the color component values.
Listing 3-5 shows a complete sample pixel-reading method. For additional details, see Drawing Outside of drawRect: in View Programming Guide.
Listing 3-5 A pixel-reading method
- (void) examinePixelColor:(NSEvent *) theEvent |
{ |
NSPoint where; |
NSColor *pixelColor; |
CGFloat red, green, blue; |
where = [self convertPoint:[theEvent locationInWindow] fromView:nil]; |
// NSReadPixel pulls data out of the current focused graphics context, |
// so you must first call lockFocus. |
[self lockFocus]; |
pixelColor = NSReadPixel(where); |
// Always balance lockFocus with unlockFocus. |
[self unlockFocus]; |
red = [pixelColor redComponent]; |
green = [pixelColor greenComponent]; |
blue = [pixelColor blueComponent]; |
// Your code to do something with the color values |
} |
Adjust Font Settings to Ensure Document Compatibility
In OS X v10.8, the default value of the NSFontDefaultScreenFontSubstitutionEnabled setting is NO. This setting determines whether or not text APIs (such as NSLayoutManager, NSCell, and the NSStringDrawing categories on NSString and NSAttributedString) substitute screen fonts when calculating layout and display of text.
Although screen font substitution will no longer be the default, using screen font might still be appropriate to support:
Compatibility with documents created with previous versions of your app. The difference in glyph advancement measurements between integral and floating-point values can cause a change in text layout.
Fixed-pitch plain text style output—for example, the Plain Text mode in Text Edit.
To keep the OS X v10.7 screen font substitution behavior as the default, set the NSUserDefaults key NSFontDefaultScreenFontSubstitutionEnabled to YES.
To maintain the screen font setting on a per-document basis, specify NSUsesScreenFontsDocumentAttribute as a document attribute when you initialize an attributed string object.
Remember That Quartz Display Services Returns CGImage Objects Sized in Pixels
CGImage objects are always sized in pixels; they do not contain any metadata concerning the drawing size in points. So if you access the screen pixels to create an image using the functions CGDisplayCreateImage or CGDisplayCreateImageForRect, you’ll need to know whether the display is running in standard- or high-resolution mode to properly interpret what the pixel size means. If the display is running in high-resolution mode, the images will have a 2x backing store.
Adjust Quartz Image Patterns to Accommodate High Resolution
If you use the NSColor class to draw an image as a pattern, OS X automatically scales the image pattern appropriately for the resolution of the device. If you use Quartz to draw an image pattern, you will need to adjust your code so the pattern draws correctly for high resolution. Quartz patterns (CGPatternRef) offer control over all aspects of pattern creation such as pattern cell size and spacing between patterns. If you don’t need that level of control, consider using NSColor instead. Not only does the system take care of choosing the correctly sized image for you (as long as you supply standard- and high-resolution versions), but the code is much simpler. Compare the code in Listing 3-6 with that in Listing 3-7. Each creates the pattern as shown on the left side of Listing 3-7.
Listing 3-6 Creating a pattern with an image using the NSColor class
NSColor *myPattern = [NSColor colorWithPatternImage:[NSImage imageNamed:@"heart"]]; |
[myPattern setFill]; |
NSRectFill(myRect); |
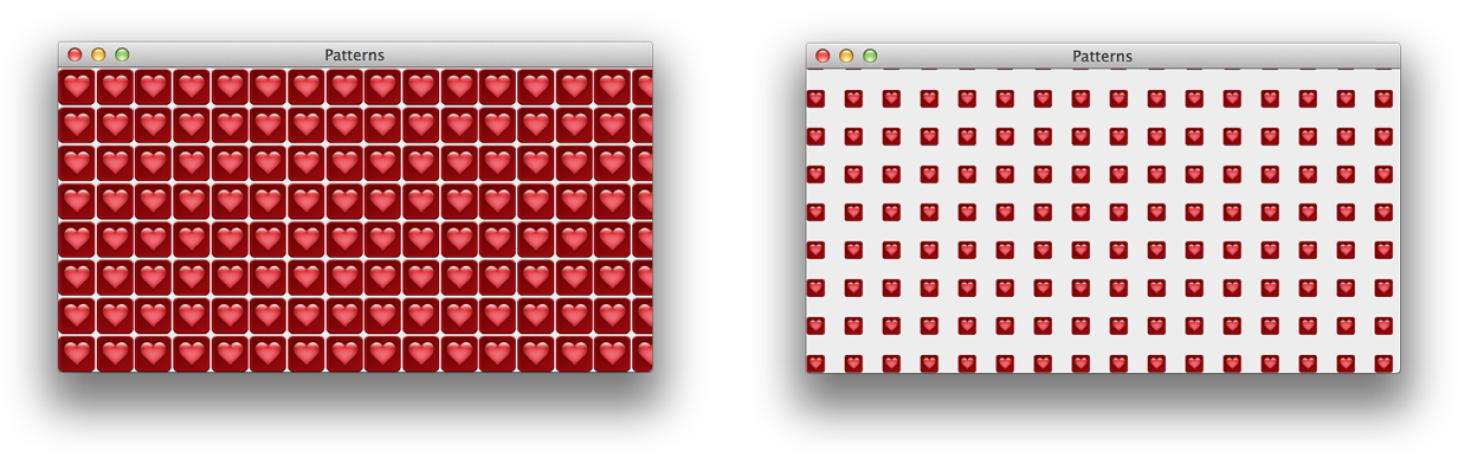
Quartz patterns are drawn in base space, which means the automatic scaling performed by the frameworks when drawing into a window or view is not applied to them. So when you use the CGPatternRef API to create a pattern using an image, you need to account for the resolution of the window into which you draw the pattern, in addition to providing standard- and high-resolution versions of the image. If you don’t scale the image pattern for high resolution, your pattern will occupy one-fourth of the space it should (as shown in Figure 3-3), which is incorrect.
Listing 3-7 shows how to create an image pattern so that it draws correctly for high resolution. The drawRect: method passes the scale to the pattern-drawing function. That function applies the scale prior to drawing the pattern. Also note that the image-drawing callback uses the imageNamed: method to load the appropriate version of the image.
Listing 3-7 Creating a pattern with an image using Quartz
@implementation PatternView |
#define PATTERN_CELL_WIDTH 32 |
#define PATTERN_CELL_HEIGHT 32 |
- (id)initWithFrame:(NSRect)frame |
{ |
self = [super initWithFrame:frame]; |
if (self) { |
// Initialization code here. |
} |
return self; |
} |
void MyDrawImage (void *info,CGContextRef myContext) |
{ |
// Provide two versions of the image—standard and @2x |
NSImage *myImage = [NSImage imageNamed:@"heart_32"]; |
[myImage drawAtPoint:NSMakePoint(0.0,0.0) |
fromRect:NSMakeRect(0.0,0.0, PATTERN_CELL_WIDTH, PATTERN_CELL_HEIGHT) |
operation:NSCompositeSourceOver |
fraction:1.0]; |
} |
void MyDrawPatternWithImage (CGContextRef myContext, CGRect rect, CGFloat scale) |
{ |
CGPatternRef pattern; |
CGColorSpaceRef patternSpace; |
CGFloat alpha = 1.0; |
static const CGPatternCallbacks callbacks = {0, &MyDrawImage, NULL}; |
patternSpace = CGColorSpaceCreatePattern (NULL); |
CGContextSetFillColorSpace (myContext, patternSpace); |
CGColorSpaceRelease (patternSpace); |
pattern = CGPatternCreate (NULL, |
CGRectMake (0, 0, PATTERN_CELL_WIDTH, |
PATTERN_CELL_HEIGHT), |
CGAffineTransformMake (1/scale, 0, 0, |
1/scale, 0, 0), |
PATTERN_CELL_WIDTH, |
PATTERN_CELL_HEIGHT, |
kCGPatternTilingConstantSpacingMinimalDistortion, |
true, |
&callbacks); |
CGContextSetFillPattern (myContext, pattern, &alpha); |
CGPatternRelease (pattern); |
CGContextFillRect (myContext, rect); |
} |
- (void)drawRect:(NSRect)dirtyRect |
{ |
NSGraphicsContext *nsctx = [NSGraphicsContext currentContext]; |
CGContextRef cgctx = (CGContextRef)[nsctx graphicsPort]; |
NSRect bounds = [self bounds]; |
NSRect backingBounds = [self convertRectToBacking:bounds]; |
CGFloat scale = backingBounds.size.width/bounds.size.width; |
// Draw the pattern into the view bounds |
MyDrawPatternWithImage(cgctx, bounds, scale); |
} |
@end |
Use the Image I/O Framework for Runtime Packaging of Icons
If your app supports editing or creating icon images, you might need to package icons programmatically using the Image I/O framework. Otherwise, you should follow the simple procedures outlined in Provide High-Resolution Versions of All App Graphics Resources for packaging icons.
Create a set of images that represent each size of the resource, supplying standard and @2x resolutions for each.
Create an image destination that is large enough to accommodate the number of images in the array:
CGImageDestinationRef destination =
CGImageDestinationCreateWithURL(myURL, kUTTypeAppleICNS,
myNumberOfImages, NULL);
where
myURLis the URL to write the data to.Create a dictionary for each image and add key-value pairs for the image dpi height and width.
The image dpi should reflect the resolution. That is, the high-resolution version should have twice the dpi as the standard-resolution version.
NSDictionary* properties = [NSDictionary dictionaryWithObjectsAndKeys:
[NSNumber numberWithUnsignedInteger:imageDPI],
kCGImagePropertyDPIHeight,
[NSNumber numberWithUnsignedInteger:imageDPI],
kCGImagePropertyDPIWidth,
nil];
Add each image and its property dictionary to the image destination.
CGImageDestinationAddImage(destination,
oneOfMyImages, (CFDictionaryRef)properties);
Finalize the image destination.
You will not be able to add any more data to the destination after performing this step.
BOOL success = CGImageDestinationFinalize(destination);
To retrieve the underlying representations from a file that contains multiple versions of an image resource, use the Image I/O framework to create an image source. Then, iterate through the image source using the function CGImageSourceCreateImageAtIndex to retrieve each image. For details, see CGImageSource Reference and Image I/O Programming Guide.
After extracting an individual image, you can draw it using one of the methods of the NSImage class.
Copyright © 2012 Apple Inc. All Rights Reserved. Terms of Use | Privacy Policy | Updated: 2012-09-19