View and Window Architecture
Views and windows present your application’s user interface and handle the interactions with that interface. UIKit and other system frameworks provide a number of views that you can use as-is with little or no modification. You can also define custom views for places where you need to present content differently than the standard views allow.
Whether you use the system views or create your own custom views, you need to understand the infrastructure provided by the UIView and UIWindow classes. These classes provide sophisticated facilities for managing the layout and presentation of views. Understanding how those facilities work is important for making sure your views behave appropriately when changes occur in your application.
View Architecture Fundamentals
Most of the things you might want to do visually are done with view objects—instances of the UIView class. A view object defines a rectangular region on the screen and handles the drawing and touch events in that region. A view can also act as a parent for other views and coordinate the placement and sizing of those views. The UIView class does most of the work in managing these relationships between views, but you can also customize the default behavior as needed.
Views work in conjunction with Core Animation layers to handle the rendering and animating of a view’s content. Every view in UIKit is backed by a layer object (usually an instance of the CALayer class), which manages the backing store for the view and handles view-related animations. Most operations you perform should be through the UIView interface. However, in situations where you need more control over the rendering or animation behavior of your view, you can perform operations through its layer instead.
To understand the relationship between views and layers, it helps to look at an example. Figure 1-1 shows the view architecture from the ViewTransitions sample application along with the relationship to the underlying Core Animation layers. The views in the application include a window (which is also a view), a generic UIView object that acts as a container view, an image view, a toolbar for displaying controls, and a bar button item (which is not a view itself but which manages a view internally). (The actual ViewTransitions sample application includes an additional image view that is used to implement transitions. For simplicity, and because that view is usually hidden, it is not included in Figure 1-1.) Every view has a corresponding layer object that can be accessed from that view’s layer property. (Because a bar button item is not a view, you cannot access its layer directly.) Behind those layer objects are Core Animation rendering objects and ultimately the hardware buffers used to manage the actual bits on the screen.
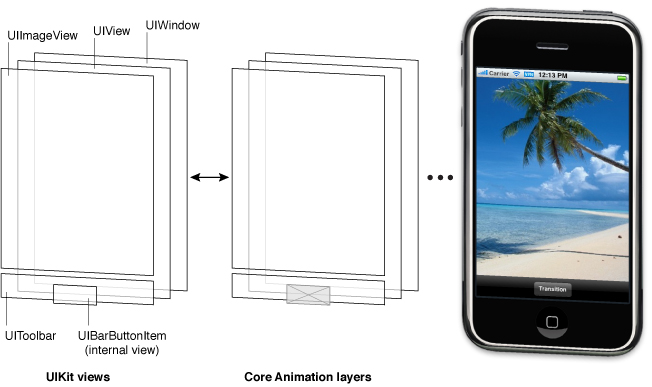
The use of Core Animation layer objects has important implications for performance. The actual drawing code of a view object is called as little as possible, and when the code is called, the results are cached by Core Animation and reused as much as possible later. Reusing already-rendered content eliminates the expensive drawing cycle usually needed to update views. Reuse of this content is especially important during animations, where the existing content can be manipulated. Such reuse is much less expensive than creating new content.
View Hierarchies and Subview Management
In addition to providing its own content, a view can act as a container for other views. When one view contains another, a parent-child relationship is created between the two views. The child view in the relationship is known as the subview and the parent view is known as the superview. The creation of this type of relationship has implications for both the visual appearance of your application and the application’s behavior.
Visually, the content of a subview obscures all or part of the content of its parent view. If the subview is totally opaque, then the area occupied by the subview completely obscures the corresponding area of the parent. If the subview is partially transparent, the content from the two views is blended together prior to being displayed on the screen. Each superview stores its subviews in an ordered array and the order in that array also affects the visibility of each subview. If two sibling subviews overlap each other, the one that was added last (or was moved to the end of the subview array) appears on top of the other.
The superview-subview relationship also impacts several view behaviors. Changing the size of a parent view has a ripple effect that can cause the size and position of any subviews to change too. When you change the size of a parent view, you can control the resizing behavior of each subview by configuring the view appropriately. Other changes that affect subviews include hiding a superview, changing a superview’s alpha (transparency), or applying a mathematical transform to a superview’s coordinate system.
The arrangement of views in a view hierarchy also determines how your application responds to events. When a touch occurs inside a specific view, the system sends an event object with the touch information directly to that view for handling. However, if the view does not handle a particular touch event, it can pass the event object along to its superview. If the superview does not handle the event, it passes the event object to its superview, and so on up the responder chain. Specific views can also pass the event object to an intervening responder object, such as a view controller. If no object handles the event, it eventually reaches the application object, which generally discards it.
For more information about how to create view hierarchies, see Creating and Managing a View Hierarchy.
The View Drawing Cycle
The UIView class uses an on-demand drawing model for presenting content. When a view first appears on the screen, the system asks it to draw its content. The system captures a snapshot of this content and uses that snapshot as the view’s visual representation. If you never change the view’s content, the view’s drawing code may never be called again. The snapshot image is reused for most operations involving the view. If you do change the content, you notify the system that the view has changed. The view then repeats the process of drawing the view and capturing a snapshot of the new results.
When the contents of your view change, you do not redraw those changes directly. Instead, you invalidate the view using either the setNeedsDisplay or setNeedsDisplayInRect: method. These methods tell the system that the contents of the view changed and need to be redrawn at the next opportunity. The system waits until the end of the current run loop before initiating any drawing operations. This delay gives you a chance to invalidate multiple views, add or remove views from your hierarchy, hide views, resize views, and reposition views all at once. All of the changes you make are then reflected at the same time.
When the time comes to render your view’s content, the actual drawing process varies depending on the view and its configuration. System views typically implement private drawing methods to render their content. Those same system views often expose interfaces that you can use to configure the view’s actual appearance. For custom UIView subclasses, you typically override the drawRect: method of your view and use that method to draw your view’s content. There are also other ways to provide a view’s content, such as setting the contents of the underlying layer directly, but overriding the drawRect: method is the most common technique.
For more information about how to draw content for custom views, see Implementing Your Drawing Code.
Content Modes
Each view has a content mode that controls how the view recycles its content in response to changes in the view’s geometry and whether it recycles its content at all. When a view is first displayed, it renders its content as usual and the results are captured in an underlying bitmap. After that, changes to the view’s geometry do not always cause the bitmap to be recreated. Instead, the value in the contentMode property determines whether the bitmap should be scaled to fit the new bounds or simply pinned to one corner or edge of the view.
The content mode of a view is applied whenever you do the following:
Change the width or height of the view’s
frameorboundsrectangles.Assign a transform that includes a scaling factor to the view’s
transformproperty.
By default, the contentMode property for most views is set to UIViewContentModeScaleToFill, which causes the view’s contents to be scaled to fit the new frame size. Figure 1-2 shows the results that occur for some content modes that are available. As you can see from the figure, not all content modes result in the view’s bounds being filled entirely, and those that do might distort the view’s content.

Content modes are good for recycling the contents of your view, but you can also set the content mode to the UIViewContentModeRedraw value when you specifically want your custom views to redraw themselves during scaling and resizing operations. Setting your view’s content mode to this value forces the system to call your view’s drawRect: method in response to geometry changes. In general, you should avoid using this value whenever possible, and you should certainly not use it with the standard system views.
For more information about the available content modes, see UIView Class Reference.
Stretchable Views
You can designate a portion of a view as stretchable so that when the size of the view changes only the content in the stretchable portion is affected. You typically use stretchable areas for buttons or other views where part of the view defines a repeatable pattern. The stretchable area you specify can allow for stretching along one or both axes of the view. Of course, when stretching a view along two axes, the edges of the view must also define a repeatable pattern to avoid any distortion. Figure 1-3 shows how this distortion manifests itself in a view. The color from each of the view’s original pixels is replicated to fill the corresponding area in the larger view.
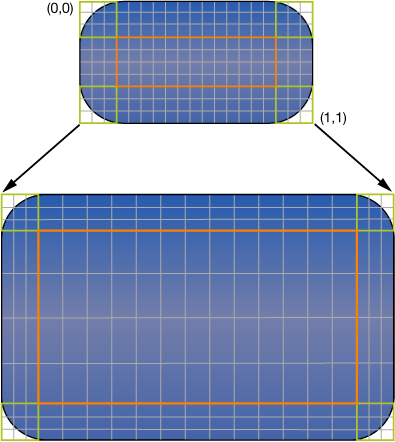
You specify the stretchable area of a view using the contentStretch property. This property accepts a rectangle whose values are normalized to the range 0.0 to 1.0. When stretching the view, the system multiplies these normalized values by the view’s current bounds and scale factor to determine which pixel or pixels need to be stretched. The use of normalized values alleviates the need for you to update the contentStretch property every time the bounds of your view change.
The view’s content mode also plays a role in determining how the view’s stretchable area is used. Stretchable areas are only used when the content mode would cause the view’s content to be scaled. This means that stretchable views are supported only with the UIViewContentModeScaleToFill, UIViewContentModeScaleAspectFit, and UIViewContentModeScaleAspectFill content modes. If you specify a content mode that pins the content to an edge or corner (and thus does not actually scale the content), the view ignores the stretchable area.
Built-In Animation Support
One of the benefits of having a layer object behind every view is that you can animate many view-related changes easily. Animations are a useful way to communicate information to the user and should always be considered during the design of your application. Many properties of the UIView class are animatable—that is, semiautomatic support exists for animating from one value to another. To perform an animation for one of these animatable properties, all you have to do is:
Tell UIKit that you want to perform an animation.
Change the value of the property.
Among the properties you can animate on a UIView object are the following:
frame—Use this to animate position and size changes for the view.bounds—Use this to animate changes to the size of the view.center—Use this to animate the position of the view.transform—Use this to rotate or scale the view.alpha—Use this to change the transparency of the view.backgroundColor—Use this to change the background color of the view.contentStretch—Use this to change how the view’s contents stretch.
One place where animations are very important is when transitioning from one set of views to another. Typically, you use a view controller to manage the animations associated with major changes between parts of your user interface. For example, for interfaces that involve navigating from higher-level to lower-level information, you typically use a navigation controller to manage the transitions between the views displaying each successive level of data. However, you can also create transitions between two sets of views using animations instead of a view controller. You might do so in places where the standard view-controller animations do not yield the results you want.
In addition to the animations you create using UIKit classes, you can also create animations using Core Animation layers. Dropping down to the layer level gives you much more control over the timing and properties of your animations.
For details about how to perform view-based animations, see Animations. For more information about creating animations using Core Animation, see Core Animation Programming Guide and Core Animation Cookbook.
View Geometry and Coordinate Systems
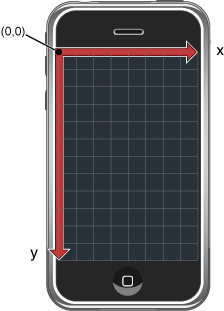
The default coordinate system in UIKit has its origin in the top-left corner and has axes that extend down and to the right from the origin point. Coordinate values are represented using floating-point numbers, which allow for precise layout and positioning of content regardless of the underlying screen resolution. Figure 1-4 shows this coordinate system relative to the screen. In addition to the screen coordinate system, windows and views define their own local coordinate systems that allow you to specify coordinates relative to the view or window origin instead of relative to the screen.
Because every view and window defines its own local coordinate system, you need to be aware of which coordinate system is in effect at any given time. Every time you draw into a view or change its geometry, you do so relative to some coordinate system. In the case of drawing, you specify coordinates relative to the view’s own coordinate system. In the case of geometry changes, you specify coordinates relative to the superview’s coordinate system. The UIWindow and UIView classes both include methods to help you convert from one coordinate system to another.
The Relationship of the Frame, Bounds, and Center Properties
A view object tracks its size and location using its frame, bounds, and center properties:
The
frameproperty contains the frame rectangle, which specifies the size and location of the view in its superview’s coordinate system.The
boundsproperty contains the bounds rectangle, which specifies the size of the view (and its content origin) in the view’s own local coordinate system.The
centerproperty contains the known center point of the view in the superview’s coordinate system.
You use the center and frame properties primarily for manipulating the geometry of the current view. For example, you use these properties when building your view hierarchy or changing the position or size of a view at runtime. If you are changing only the position of the view (and not its size), the center property is the preferred way to do so. The value in the center property is always valid, even if scaling or rotation factors have been added to the view’s transform. The same is not true for the value in the frame property, which is considered invalid if the view’s transform is not equal to the identity transform.
You use the bounds property primarily during drawing. The bounds rectangle is expressed in the view’s own local coordinate system. The default origin of this rectangle is (0, 0) and its size matches the size of the frame rectangle. Anything you draw inside this rectangle is part of the view’s visible content. If you change the origin of the bounds rectangle, anything you draw inside the new rectangle becomes part of the view’s visible content.
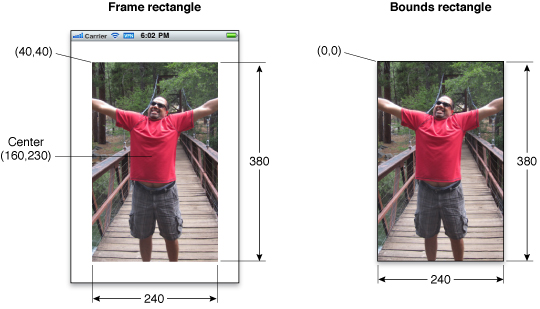
Figure 1-5 shows the relationship between the frame and bounds rectangles for an image view. In the figure, the upper-left corner of the image view is located at the point (40, 40) in its superview’s coordinate system and the size of the rectangle is 240 by 380 points. For the bounds rectangle, the origin point is (0, 0) and the size of the rectangle is similarly 240 by 380 points.
Although you can change the frame, bounds, and center properties independent of the others, changes to one property affect the others in the following ways:
When you set the
frameproperty, the size value in theboundsproperty changes to match the new size of the frame rectangle. The value in thecenterproperty similarly changes to match the new center point of the frame rectangle.When you set the
centerproperty, the origin value in theframechanges accordingly.When you set the size of the
boundsproperty, the size value in theframeproperty changes to match the new size of the bounds rectangle.
By default, a view’s frame is not clipped to its superview’s frame. Thus, any subviews that lie outside of their superview’s frame are rendered in their entirety. You can change this behavior, though, by setting the superview’s clipsToBounds property to YES. Regardless of whether or not subviews are clipped visually, touch events always respect the bounds rectangle of the target view’s superview. In other words, touch events occurring in a part of a view that lies outside of its superview’s bounds rectangle are not delivered to that view.
Coordinate System Transformations
Coordinate system transformations offer a way to alter your view (or its contents) quickly and easily. An affine transform is a mathematical matrix that specifies how points in one coordinate system map to points in a different coordinate system. You can apply affine transforms to your entire view to change the size, location, or orientation of the view relative to its superview. You can also use affine transforms in your drawing code to perform the same types of manipulations to individual pieces of rendered content. How you apply the affine transform therefore depends on context:
To modify your entire view, modify the affine transform in the
transformproperty of your view.To modify specific pieces of content in your view’s
drawRect:method, modify the affine transform associated with the active graphics context.
You typically modify the transform property of a view when you want to implement animations. For example, you could use this property to create an animation of your view rotating around its center point. You would not use this property to make permanent changes to your view, such as modifying its position or size a view within its superview’s coordinate space. For that type of change, you should modify the frame rectangle of your view instead.
In your view’s drawRect: method, you use affine transforms to position and orient the items you plan to draw. Rather than fix the position of an object at some location in your view, it is simpler to create each object relative to a fixed point, typically (0, 0), and use a transform to position the object immediately prior to drawing. That way, if the position of the object changes in your view, all you have to do is modify the transform, which is much faster and less expensive than recreating the object at its new location. You can retrieve the affine transform associated with a graphics context using the CGContextGetCTM function and you can use the related Core Graphics functions to set or modify this transform during drawing.
The current transformation matrix (CTM) is the affine transform in use at any given time. When manipulating the geometry of your entire view, the CTM is the affine transform stored in your view’s transform property. Inside your drawRect: method, the CTM is the affine transform associated with the active graphics context.
The coordinate system of each subview builds upon the coordinate systems of its ancestors. So when you modify a view’s transform property, that change affects the view and all of its subviews. However, these changes affect only the final rendering of the views on the screen. Because each view draws its content and lays out its subviews relative to its own bounds, it can ignore its superview’s transform during drawing and layout.
Figure 1-6 demonstrates how two different rotation factors combine visually when rendered. Inside the view’s drawRect: method, applying a 45 degree rotation factor to a shape causes that shape to appear rotated by 45 degrees. Applying a separate 45 degree rotation factor to the view then causes the shape to appear to be rotated by 90 degrees. The shape is still rotated by only 45 degrees relative to the view that drew it, but the view rotation makes it appear to be rotated by more.

For information about modifying your view’s transform property at runtime, see Translating, Scaling, and Rotating Views. For information about how to use transforms to position content during drawing, see Drawing and Printing Guide for iOS.
Points Versus Pixels
In iOS, all coordinate values and distances are specified using floating-point values in units referred to as points. The measurable size of a point varies from device to device and is largely irrelevant. The main thing to understand about points is that they provide a fixed frame of reference for drawing.
Table 1-1 lists the screen dimensions (measured in points) for different types of iOS-based devices in a portrait orientation. The width dimension is listed first, followed by the height dimension of the screen. As long as you design your interface to these screen sizes, your views will display correctly on the corresponding type of device.
Device | Screen dimensions (in points) |
|---|---|
iPhone and iPod touch devices with 4-inch Retina display | 320 x 568 |
Other iPhone and iPod touch devices | 320 x 480 |
iPad | 768 x 1024 |
The point-based measuring system used for each type of device defines what is known as the user coordinate space. This is the standard coordinate space you use for nearly all of your code. For example, you use points and the user coordinate space when manipulating the geometry of a view or calling Core Graphics functions to draw the contents of your view. Although coordinates in the user coordinate space sometimes map directly to the pixels on the device’s screen, you should never assume that this is the case. Instead, you should always remember the following:
One point does not necessarily correspond to one pixel on the screen.
At the device level, all coordinates you specify in your view must be converted to pixels at some point. However, the mapping of points in the user coordinate space to pixels in the device coordinate space is normally handled by the system. Both UIKit and Core Graphics use a primarily vector-based drawing model where all coordinate values are specified using points. Thus, if you draw a curve using Core Graphics, you specify the curve using the same values, regardless of the resolution of the underlying screen.
When you need to work with images or other pixel-based technologies such as OpenGL ES, iOS provides help in managing those pixels. For static image files stored as resources in your application bundle, iOS defines conventions for specifying your images at different pixel densities and for loading the image that best matches the current screen resolution. Views also provide information about the current scale factor so that you can adjust any pixel-based drawing code manually to accommodate higher-resolution screens. The techniques for dealing with pixel-based content at different screen resolutions is described in Supporting High-Resolution Screens In Views in Drawing and Printing Guide for iOS.
The Runtime Interaction Model for Views
Any time a user interacts with your user interface, or any time your own code programmatically changes something, a complex sequence of events takes place inside of UIKit to handle that interaction. At specific points during that sequence, UIKit calls out to your view classes and gives them a chance to respond on behalf of your application. Understanding these callout points is important to understanding where your views fit into the system. Figure 1-7 shows the basic sequence of events that starts with the user touching the screen and ends with the graphics system updating the screen content in response. The same sequence of events would also occur for any programmatically initiated actions.
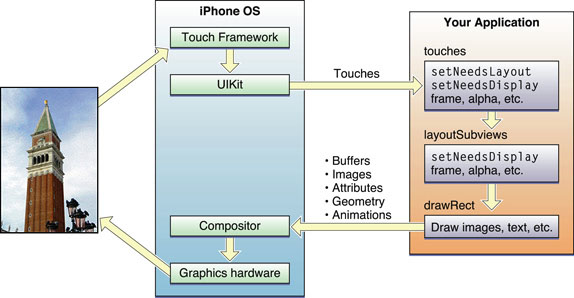
The following steps break the event sequence in Figure 1-7 down even further and explain what happens at each stage and how you might want your application to react in response.
The user touches the screen.
The hardware reports the touch event to the UIKit framework.
The UIKit framework packages the touch into a
UIEventobject and dispatches it to the appropriate view. (For a detailed explanation of how UIKit delivers events to your views, see Event Handling Guide for iOS.)The event-handling code of your view responds to the event. For example, your code might:
Change the properties (frame, bounds, alpha, and so on) of the view or its subviews.
Call the
setNeedsLayoutmethod to mark the view (or its subviews) as needing a layout update.Call the
setNeedsDisplayorsetNeedsDisplayInRect:method to mark the view (or its subviews) as needing to be redrawn.Notify a controller about changes to some piece of data.
Of course, it is up to you to decide which of these things the view should do and which methods it should call.
If the geometry of a view changed for any reason, UIKit updates its subviews according to the following rules:
If you have configured autoresizing rules for your views, UIKit adjusts each view according to those rules. For more information about how autoresizing rules work, see Handling Layout Changes Automatically Using Autoresizing Rules.
If the view implements the
layoutSubviewsmethod, UIKit calls it.You can override this method in your custom views and use it to adjust the position and size of any subviews. For example, a view that provides a large scrollable area would need to use several subviews as “tiles” rather than create one large view, which is not likely to fit in memory anyway. In its implementation of this method, the view would hide any subviews that are now offscreen or reposition them and use them to draw newly exposed content. As part of this process, the view’s layout code can also invalidate any views that need to be redrawn.
If any part of any view was marked as needing to be redrawn, UIKit asks the view to redraw itself.
For custom views that explicitly define a
drawRect:method, UIKit calls that method. Your implementation of this method should redraw the specified area of the view as quickly as possible and nothing else. Do not make additional layout changes at this point and do not make other changes to your application’s data model. The purpose of this method is to update the visual content of your view.Standard system views typically do not implement a
drawRect:method but instead manage their drawing at this time.Any updated views are composited with the rest of the application’s visible content and sent to the graphics hardware for display.
The graphics hardware transfers the rendered content to the screen.
In the preceding set of steps, the primary integration points for your own custom views are:
The event-handling methods:
The
layoutSubviewsmethodThe
drawRect:method
These are the most commonly overridden methods for views but you may not need to override all of them. If you use gesture recognizers to handle events, you do not need to override any of the event-handling methods. Similarly, if your view does not contain subviews or its size does not change, there is no reason to override the layoutSubviews method. Finally, the drawRect: method is needed only when the contents of your view can change at runtime and you are using native technologies such as UIKit or Core Graphics to do your drawing.
It is also important to remember that these are the primary integration points but not the only ones. Several methods of the UIView class are designed to be override points for subclasses. You should look at the method descriptions in UIView Class Reference to see which methods might be appropriate for you to override in your custom implementations.
Tips for Using Views Effectively
Custom views are useful for situations where you need to draw something the standard system views do not provide, but it is your responsibility to ensure that the performance of your views is good enough. UIKit does everything it can to optimize view-related behaviors and help you achieve good performance in your custom views. However, you can help UIKit in this aspect by considering the following tips.
Views Do Not Always Have a Corresponding View Controller
There is rarely a one-to-one relationship between individual views and view controllers in your application. The job of a view controller is to manage a view hierarchy, which often consists of more than one view used to implement some self-contained feature. For iPhone applications, each view hierarchy typically fills the entire screen, although for iPad applications a view hierarchy may fill only part of the screen.
As you design your application’s user interface, it is important to consider the role that view controllers will play. View controllers provide a lot of important behaviors, such as coordinating the presentation of views on the screen, coordinating the removal of those views from the screen, releasing memory in response to low-memory warnings, and rotating views in response to interface orientation changes. Circumventing these behaviors could cause your application to behave incorrectly or in unexpected ways.
For more information view controllers and their role in applications, see View Controller Programming Guide for iOS.
Minimize Custom Drawing
Although custom drawing is necessary at times, it is also something you should avoid whenever possible. The only time you should truly do any custom drawing is when the existing system view classes do not provide the appearance or capabilities that you need. Any time your content can be assembled with a combination of existing views, your best bet is to combine those view objects into a custom view hierarchy.
Take Advantage of Content Modes
Content modes minimize the amount of time spent redrawing your views. By default, views use the UIViewContentModeScaleToFill content mode, which scales the view’s existing contents to fit the view’s frame rectangle. You can change this mode as needed to adjust your content differently, but you should avoid using the UIViewContentModeRedraw content mode if you can. Regardless of which content mode is in effect, you can always force your view to redraw its contents by calling setNeedsDisplay or setNeedsDisplayInRect:.
Declare Views as Opaque Whenever Possible
UIKit uses the opaque property of each view to determine whether the view can optimize compositing operations. Setting the value of this property to YES for a custom view tells UIKit that it does not need to render any content behind your view. Less rendering can lead to increased performance for your drawing code and is generally encouraged. Of course, if you set the opaque property to YES, your view must fill its bounds rectangle completely with fully opaque content.
Adjust Your View’s Drawing Behavior When Scrolling
Scrolling can incur numerous view updates in a short amount of time. If your view’s drawing code is not tuned appropriately, scrolling performance for your view could be sluggish. Rather than trying to ensure that your view’s content is pristine at all times, consider changing your view’s behavior when a scrolling operation begins. For example, you can reduce the quality of your rendered content temporarily or change the content mode while a scroll is in progress. When scrolling stops, you can then return your view to its previous state and update the contents as needed.
Do Not Customize Controls by Embedding Subviews
Although it is technically possible to add subviews to the standard system controls—objects that inherit from UIControl—you should never customize them in this way. Controls that support customizations do so through explicit and well-documented interfaces in the control class itself. For example, the UIButton class contains methods for setting the title and background images for the button. Using the defined customization points means that your code will always work correctly. Circumventing these methods, by embedding a custom image view or label inside the button, might cause your application to behave incorrectly now or at some point in the future if the button’s implementation changes.
Copyright © 2014 Apple Inc. All Rights Reserved. Terms of Use | Privacy Policy | Updated: 2014-09-17