Core Animation Basics
Core Animation provides a general purpose system for animating views and other visual elements of your app. Core Animation is not a replacement for your app’s views. Instead, it is a technology that integrates with views to provide better performance and support for animating their content. It achieves this behavior by caching the contents of views into bitmaps that can be manipulated directly by the graphics hardware. In some cases, this caching behavior might require you to rethink how you present and manage your app’s content, but most of the time you use Core Animation without ever knowing it is there. In addition to caching view content, Core Animation also defines a way to specify arbitrary visual content, integrate that content with your views, and animate it along with everything else.
You use Core Animation to animate changes to your app’s views and visual objects. Most changes relate to modifying the properties of your visual objects. For example, you might use Core Animation to animate changes to a view’s position, size, or opacity. When you make such a change, Core Animation animates between the current value of the property and the new value you specify. You would typically not use Core Animation to replace the content of a view 60 times a second, such as in a cartoon. Instead, you use Core Animation to move a view’s content around the screen, fade that content in or out, apply arbitrary graphics transformations to the view, or change the view’s other visual attributes.
Layers Provide the Basis for Drawing and Animations
Layer objects are 2D surfaces organized in a 3D space and are at the heart of everything you do with Core Animation. Like views, layers manage information about the geometry, content, and visual attributes of their surfaces. Unlike views, layers do not define their own appearance. A layer merely manages the state information surrounding a bitmap. The bitmap itself can be the result of a view drawing itself or a fixed image that you specify. For this reason, the main layers you use in your app are considered to be model objects because they primarily manage data. This notion is important to remember because it affects the behavior of animations.
The Layer-Based Drawing Model
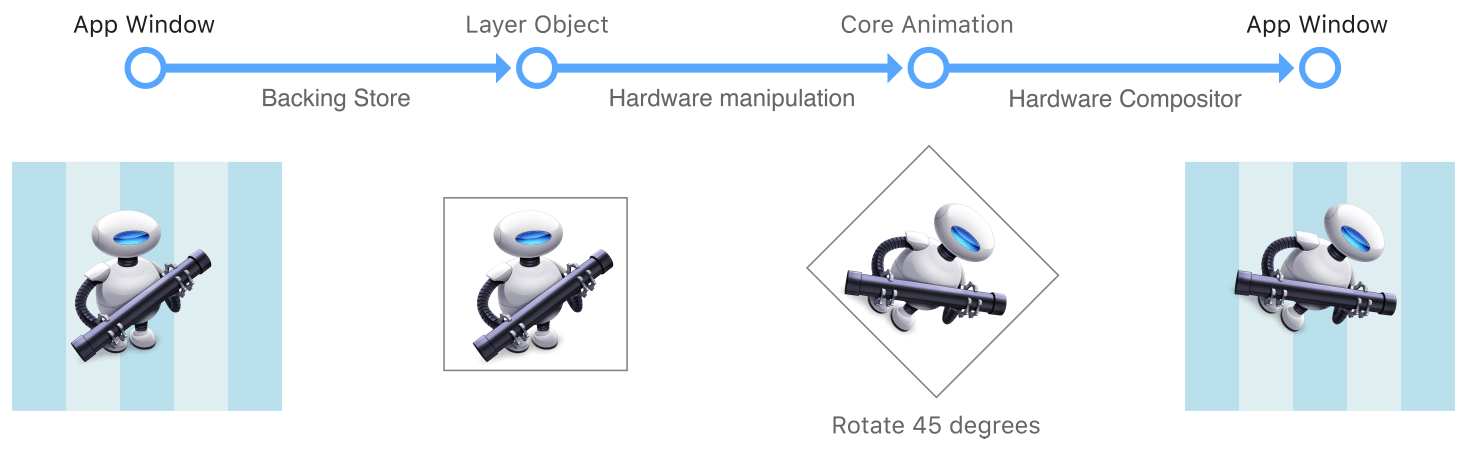
Most layers do not do any actual drawing in your app. Instead, a layer captures the content your app provides and caches it in a bitmap, which is sometimes referred to as the backing store. When you subsequently change a property of the layer, all you are doing is changing the state information associated with the layer object. When a change triggers an animation, Core Animation passes the layer’s bitmap and state information to the graphics hardware, which does the work of rendering the bitmap using the new information, as shown in Figure 1-1. Manipulating the bitmap in hardware yields much faster animations than could be done in software.
Because it manipulates a static bitmap, layer-based drawing differs significantly from more traditional view-based drawing techniques. With view-based drawing, changes to the view itself often result in a call to the view’s drawRect: method to redraw content using the new parameters. But drawing in this way is expensive because it is done using the CPU on the main thread. Core Animation avoids this expense by whenever possible by manipulating the cached bitmap in hardware to achieve the same or similar effects.
Although Core Animation uses cached content as much as possible, your app must still provide the initial content and update it from time to time. There are several ways for your app to provide a layer object with content, which are described in detail in Providing a Layer’s Contents.
Layer-Based Animations
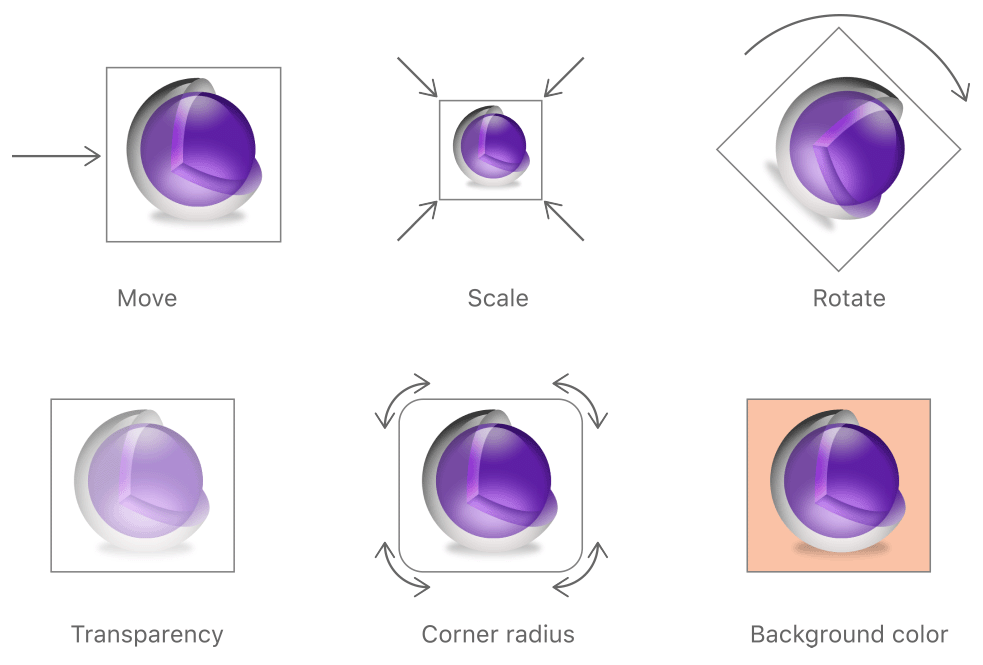
The data and state information of a layer object is decoupled from the visual presentation of that layer’s content onscreen. This decoupling gives Core Animation a way to interpose itself and animate the change from the old state values to new state values. For example, changing a layer’s position property causes Core Animation to move the layer from its current position to the newly specified position. Similar changes to other properties cause appropriate animations. Figure 1-2 illustrates a few of the types of animations you can perform on layers. For a list of layer properties that trigger animations, see Animatable Properties.
During the course of an animation, Core Animation does all of the frame-by-frame drawing for you in hardware. All you have to do is specify the start and end points of the animation and let Core Animation do the rest. You can also specify custom timing information and animation parameters as needed; however, Core Animation provides suitable default values if you do not.
For more information about how to initiate animations and configure animation parameters, see Animating Layer Content.
Layer Objects Define Their Own Geometry
One of the jobs of a layer is to manage the visual geometry for its content. The visual geometry encompasses information about the bounds of that content, its position on the screen, and whether the layer has been rotated, scaled, or transformed in any way. Like a view, a layer has frame and bounds rectangles that you can use to position the layer and its content. Layers also have other properties that views do not have, such as an anchor point, which defines the point around which manipulations occur. The way you specify some aspects of layer geometry also differs from how you specify that information for a view.
Layers Use Two Types of Coordinate Systems
Layers make use of both point-based coordinate systems and unit coordinate systems to specify the placement of content. Which coordinate system is used depends on the type of information being conveyed. Point-based coordinates are used when specifying values that map directly to screen coordinates or must be specified relative to another layer, such as for the layer’s position property. Unit coordinates are used when the value should not be tied to screen coordinates because it is relative to some other value. For example, the layer’s anchorPoint property specifies a point relative to the bounds of the layer itself, which can change.
Among the most common uses for point-based coordinates is to specify the size and position of the layer, which you do using the layer’s bounds and position properties. The bounds defines the coordinate system of the layer itself and encompasses the layer’s size on the screen. The position property defines the location of the layer relative to its parent’s coordinate system. Although layers have a frame property, that property is actually derived from the values in the bounds and position properties and is used less frequently.
The orientation of a layer’s bounds and frame rectangles always matches the default orientation of the underlying platform. Figure 1-3 shows the default orientations of the bounds rectangle on both iOS and OS X. In iOS, the origin of the bounds rectangle is in the top-left corner of the layer by default, and in OS X it is in the bottom-left corner. If you share Core Animation code between iOS and OS X versions of your app, you must take such differences into consideration.
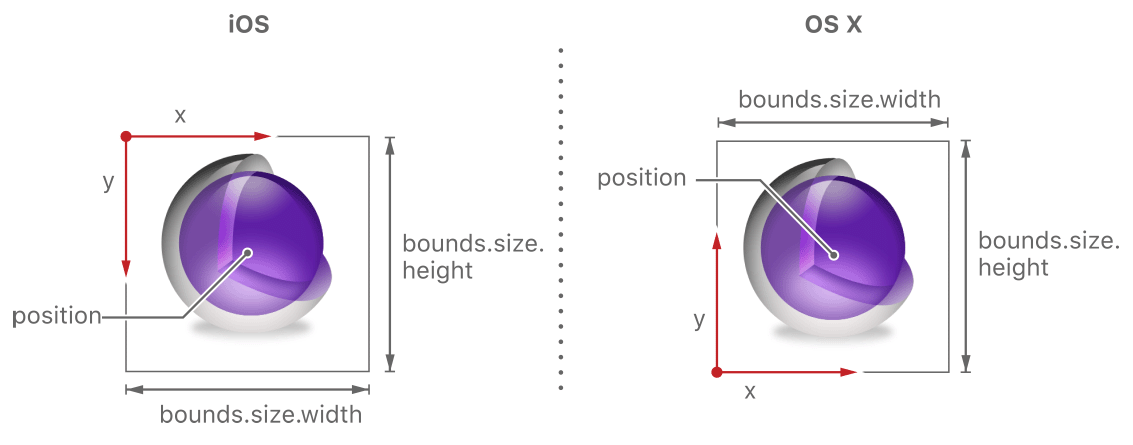
One thing to note in Figure 1-3 is that the position property is located in the middle of the layer. That property is one of several whose definition changes based on the value in the layer’s anchorPoint property. The anchor point represents the point from which certain coordinates originate and is described in more detail in Anchor Points Affect Geometric Manipulations.
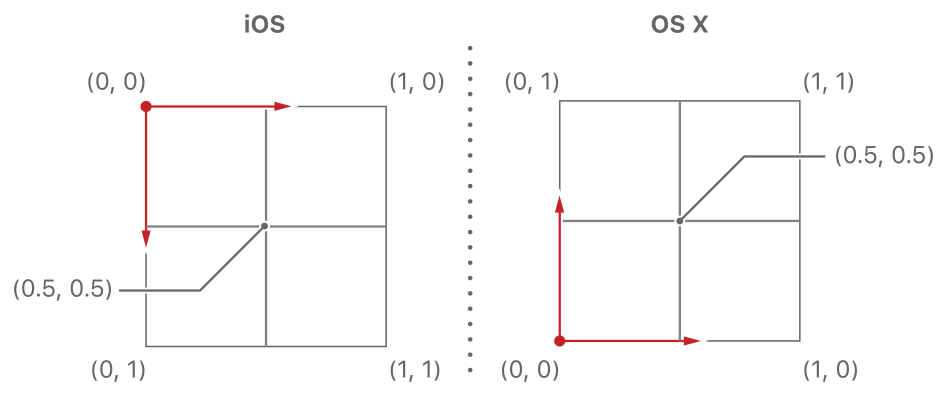
The anchor point is one of several properties that you specify using the unit coordinate system. Core Animation uses unit coordinates to represent properties whose values might change when the layer’s size changes. You can think of the unit coordinates as specifying a percentage of the total possible value. Every coordinate in the unit coordinate space has a range of 0.0 to 1.0. For example, along the x-axis, the left edge is at the coordinate 0.0 and the right edge is at the coordinate 1.0. Along the y-axis, the orientation of unit coordinate values changes depending on the platform, as shown in Figure 1-4.
All coordinate values, whether they are points or unit coordinates are specified as floating-point numbers. The use of floating-point numbers allows you to specify precise locations that might fall between normal coordinate values. The use of floating-point values is convenient, especially during printing or when drawing to a Retina display where one point might be represented by multiple pixels. Floating-point values allow you to ignore the underlying device resolution and just specify values at the precision you need.
Anchor Points Affect Geometric Manipulations
Geometry related manipulations of a layer occur relative to that layer’s anchor point, which you can access using the layer’s anchorPoint property. The impact of the anchor point is most noticeable when manipulating the position or transform properties of the layer. The position property is always specified relative to the layer’s anchor point, and any transformations you apply to the layer occur relative to the anchor point as well.
Figure 1-5 demonstrates how changing the anchor point from its default value to a different value affects the position property of a layer. Even though the layer has not moved within its parents’ bounds, moving the anchor point from the center of the layer to the layer’s bounds origin changes the value in the position property.
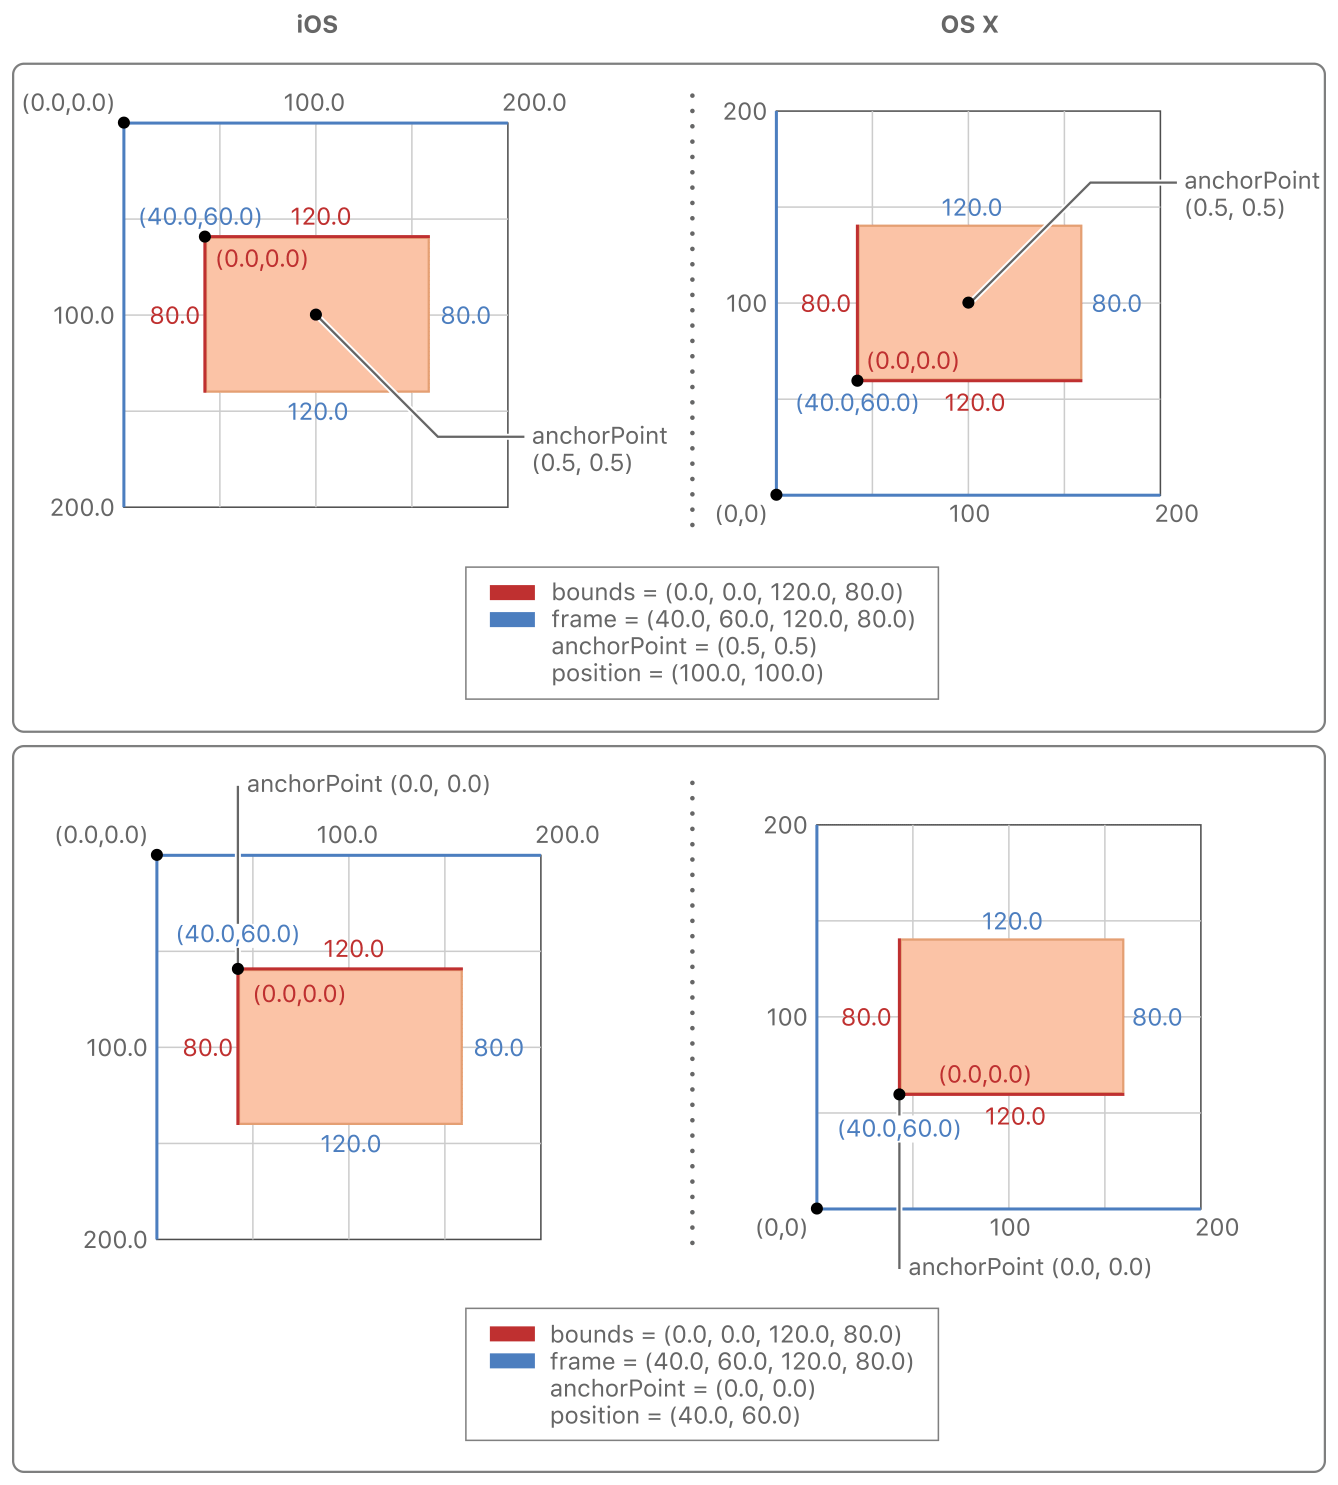
Figure 1-6 shows how changing the anchor point affects transforms applied to the layer. When you apply a rotation transform to the layer, the rotations occur around the anchor point. Because the anchor point is set to the middle of the layer by default, this normally creates the kind of rotation behavior that you would expect. However, if you change the anchor point, the results of the rotation are different.
Layers Can Be Manipulated in Three Dimensions
Every layer has two transform matrices that you can use to manipulate the layer and its contents. The transform property of CALayer specifies the transforms that you want to apply both to the layer and its embedded sublayers. Normally you use this property when you want to modify the layer itself. For example, you might use that property to scale or rotate the layer or change its position temporarily. The sublayerTransform property defines additional transformations that apply only to the sublayers and is used most commonly to add a perspective visual effect to the contents of a scene.
Transforms work by multiplying coordinate values through a matrix of numbers to get new coordinates that represent the transformed versions of the original points. Because Core Animation values can be specified in three dimensions, each coordinate point has four values that must be multiplied through a four-by-four matrix, as shown in Figure 1-7. In Core Animation, the transform in the figure is represented by the CATransform3D type. Fortunately, you do not have to modify the fields of this structure directly to perform standard transformations. Core Animation provides a comprehensive set of functions for creating scale, translation, and rotation matrices and for doing matrix comparisons. In addition to manipulating transforms using functions, Core Animation extends key-value coding support to allow you to modify a transform using key paths. For a list of key paths you can modify, see CATransform3D Key Paths.
Figure 1-8 shows the matrix configurations for some of the more common transformations you can make. Multiplying any coordinate by the identity transform returns the exact same coordinate. For other transformations, how the coordinate is modified depends entirely on which matrix components you change. For example, to translate along the x-axis only, you would supply a nonzero value for the tx component of the translation matrix and leave the ty and tz values to 0. For rotations, you would provide the appropriate sine and cosine values of the target rotation angle.
For information about the functions you use to create and manipulate transforms, see Core Animation Function Reference.
Layer Trees Reflect Different Aspects of the Animation State
An app using Core Animation has three sets of layer objects. Each set of layer objects has a different role in making the content of your app appear onscreen:
Objects in the model layer tree (or simply “layer tree”) are the ones your app interacts with the most. The objects in this tree are the model objects that store the target values for any animations. Whenever you change the property of a layer, you use one of these objects.
Objects in the presentation tree contain the in-flight values for any running animations. Whereas the layer tree objects contain the target values for an animation, the objects in the presentation tree reflect the current values as they appear onscreen. You should never modify the objects in this tree. Instead, you use these objects to read current animation values, perhaps to create a new animation starting at those values.
Objects in the render tree perform the actual animations and are private to Core Animation.
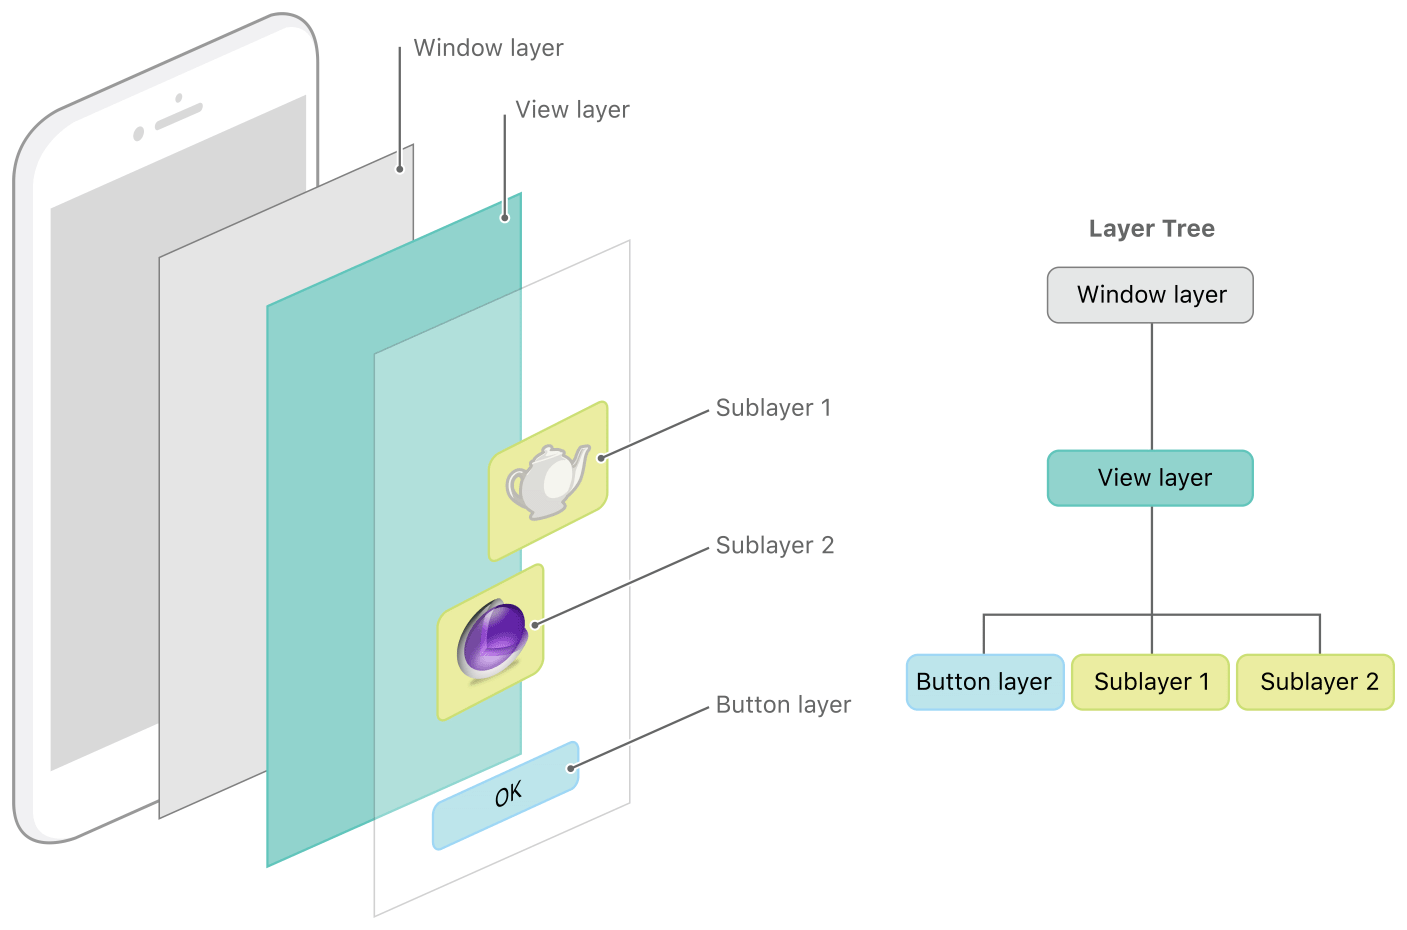
Each set of layer objects is organized into a hierarchical structure like the views in your app. In fact, for an app that enables layers for all of its views, the initial structure of each tree matches the structure of the view hierarchy exactly. However, an app can add additional layer objects—that is, layers not associated with a view—into the layer hierarchy as needed. You might do this in situations to optimize your app’s performance for content that does not require all the overhead of a view. Figure 1-9 shows the breakdown of layers found in a simple iOS app. The window in the example contains a content view, which itself contains a button view and two standalone layer objects. Each view has a corresponding layer object that forms part of the layer hierarchy.
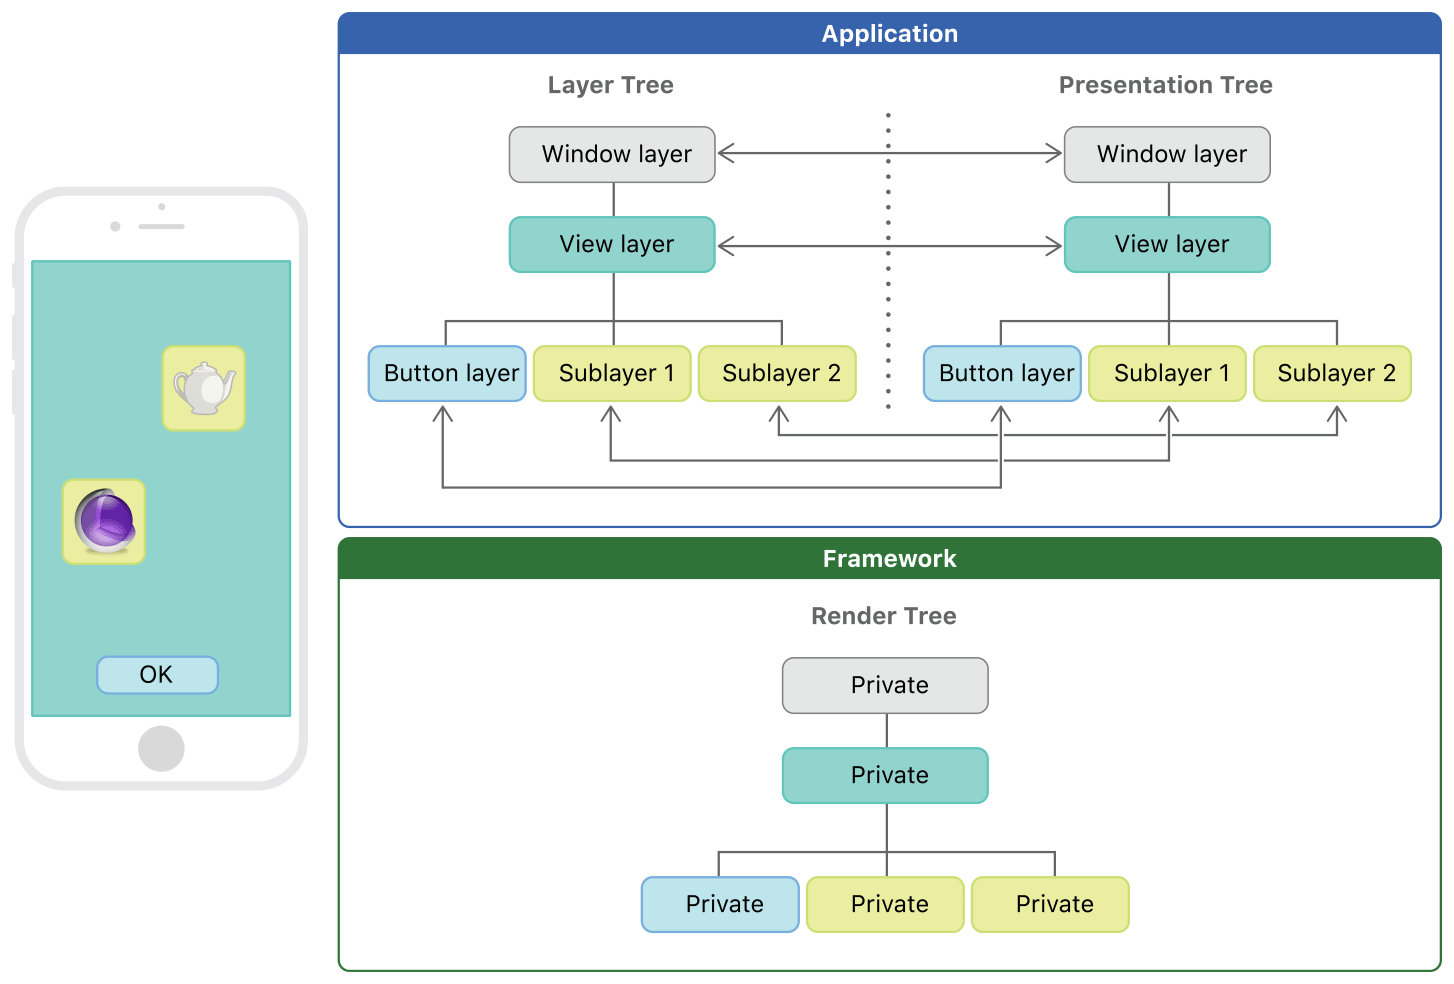
For every object in the layer tree, there is a matching object in the presentation and render trees, as shown in Figure 1-10. As was previously mentioned, apps primarily work with objects in the layer tree but may at times access objects in the presentation tree. Specifically, accessing the presentationLayer property of an object in the layer tree returns the corresponding object in the presentation tree. You might want to access that object to read the current value of a property that is in the middle of an animation.
The Relationship Between Layers and Views
Layers are not a replacement for your app’s views—that is, you cannot create a visual interface based solely on layer objects. Layers provide infrastructure for your views. Specifically, layers make it easier and more efficient to draw and animate the contents of views and maintain high frame rates while doing so. However, there are many things that layers do not do. Layers do not handle events, draw content, participate in the responder chain, or do many other things. For this reason, every app must still have one or more views to handle those kinds of interactions.
In iOS, every view is backed by a corresponding layer object but in OS X you must decide which views should have layers. In OS X v10.8 and later, it probably makes sense to add layers to all of your views. However, you are not required to do so and can still disable layers in cases where the overhead is unwarranted and unneeded. Layers do increase your app’s memory overhead somewhat but their benefits often outweigh the disadvantage, so it is always best to test the performance of your app before disabling layer support.
When you enable layer support for a view, you create what is referred to as a layer-backed view. In a layer-backed view, the system is responsible for creating the underlying layer object and for keeping that layer in sync with the view. All iOS views are layer-backed and most views in OS X are as well. However, in OS X, you can also create a layer-hosting view, which is a view where you supply the layer object yourself. For a layer-hosting view, AppKit takes a hands off approach with managing the layer and does not modify it in response to view changes.
In addition to the layers associated with your views, you can also create layer objects that do not have a corresponding view. You can embed these standalone layer objects inside of any other layer object in your app, including those that are associated with a view. You typically use standalone layer objects as part of a specific optimization path. For example, if you wanted to use the same image in multiple places, you could load the image once and associate it with multiple standalone layer objects and add those objects to the layer tree. Each layer then refers to the source image rather than trying to create its own copy of that image in memory.
For information about how to enable layer support for your app’s views, see Enabling Core Animation Support in Your App. For information on how to create a layer object hierarchy, and for tips on when you might do so, see Building a Layer Hierarchy.
Copyright © 2015 Apple Inc. All Rights Reserved. Terms of Use | Privacy Policy | Updated: 2015-03-09