Processing Images
Processing images means applying filters—an image filter is a piece of software that examines an input image pixel by pixel and algorithmically applies some effect in order to create an output image. In Core Image, image processing relies on the CIFilter and CIImage classes, which describe filters and their input and output. To apply filters and display or export results, you can make use of the integration between Core Image and other system frameworks, or create your own rendering workflow with the CIContext class. This chapter covers the key concepts for working with these classes to apply filters and render results.
Overview
There are many ways to use Core Image for image processing in your app. Listing 1-1 shows a basic example and provides pointers to further explanations in this chapter.
Listing 1-1 The basics of applying a filter to an image
import CoreImage |
let context = CIContext() // 1 |
let filter = CIFilter(name: "CISepiaTone")! // 2 |
filter.setValue(0.8, forKey: kCIInputIntensityKey) |
let image = CIImage(contentsOfURL: myURL) // 3 |
filter.setValue(image, forKey: kCIInputImageKey) |
let result = filter.outputImage! // 4 |
let cgImage = context.createCGImage(result, from: result.extent) // 5 |
Here’s what the code does:
Create a
CIContextobject (with default options). You don’t always need your own Core Image context—often you can integrate with other system frameworks that manage rendering for you. Creating your own context lets you more precisely control the rendering process and the resources involved in rendering. Contexts are heavyweight objects, so if you do create one, do so as early as possible, and reuse it each time you need to process images. (See Building Your Own Workflow with a Core Image Context.)Instantiate a
CIFilterobject representing the filter to apply, and provide values for its parameters. (See Filters Describe Image Processing Effects.)Create a
CIImageobject representing the image to be processed, and provide it as the input image parameter to the filter. Reading image data from a URL is just one of many ways to create an image object. (See Images are the Input and Output of Filters.)Get a
CIImageobject representing the filter’s output. The filter has not yet executed at this point—the image object is a “recipe” specifying how to create an image with the specified filter, parameters, and input. Core Image performs this recipe only when you request rendering. (See Images are the Input and Output of Filters.)Render the output image to a Core Graphics image that you can display or save to a file. (See Building Your Own Workflow with a Core Image Context.)
Images are the Input and Output of Filters
Core Image filters process and produce Core Image images. A CIImage instance is an immutable object representing an image. These objects don’t directly represent image bitmap data—instead, a CIImage object is a “recipe” for producing an image. One recipe might call for loading an image from a file; another might represent output from a filter, or from a chain of filters. Core Image performs these recipes only when you request that an image be rendered for display or output.
To apply a filter, create one or more CIImage objects representing the images to be processed by the filter, and assign them to the input parameters of the filter (such as kCIInputImageKey). You can create a Core Image image object from nearly any source of image data, including:
URLs referencing image files to be loaded or
NSDataobjects containing image file dataQuartz2D, UIKit, or AppKit image representations (
CGImageRef,UIImage, orNSBitmapImageRepobjects)Metal, OpenGL, or OpenGL ES textures
CoreVideo image or pixel buffers (
CVImageBufferReforCVPixelBufferRef)IOSurfaceRefobjects that share image data between processesImage bitmap data in memory (a pointer to such data, or a
CIImageProviderobject that provides data on demand)
For a full list of ways to create a CIImage object, see CIImage Class Reference.
Because a CIImage object describes how to produce an image (instead of containing image data), it can also represent filter output. When you access the outputImage property of a CIFilter object, Core Image merely identifies and stores the steps needed to execute the filter. Those steps are performed only when you request that the image be rendered for display or output. You can request rendering either explicitly, using one of the CIContextrender or draw methods (see Building Your Own Workflow with a Core Image Context), or implicitly, by displaying an image using one of the many system frameworks that work with Core Image (see Integrating with Other Frameworks).
Deferring processing until rendering time makes Core Image fast and efficient. At rendering time, Core Image can see if more than one filter needs to be applied to an image. If so, it automatically concatenates multiple “recipes” and organizes them to eliminate redundant operations, so that each pixel is processed only once rather than many times.
Filters Describe Image Processing Effects
An instance of the CIFilter class is a mutable object representing an image processing effect and any parameters that control that effect’s behavior. To use a filter, you create a CIFilter object, set its input parameters, and then access its output image (see Images are the Input and Output of Filters below). Call the filterWithName: initializer to instantiate a filter object using the name of a filter known to the system (see Querying the System for Filters or Core Image Filter Reference).
Most filters have one or more input parameters that let you control how processing is done. Each input parameter has an attribute class that specifies its data type, such as NSNumber. An input parameter can optionally have other attributes, such as its default value, the allowable minimum and maximum values, the display name for the parameter, and other attributes described in CIFilter Class Reference. For example, the CIColorMonochrome filter has three input parameters—the image to process, a monochrome color, and the color intensity.
Filter parameters are defined as key-value pairs; to work with parameters, you typically use the valueForKey: and setValue:forKey: methods or other features that build upon key-value coding (such as Core Animation). The key is a constant that identifies the attribute and the value is the setting associated with the key. Core Image attribute values typically use one of the data types listed in Attribute value data types .
Data Type | Object | Description |
|---|---|---|
Strings | Text, typically for display to the user | |
Floating-point values | A scalar value, such as an intensity level or radius | |
Vectors | A set of floating-point values that can specify positions, sizes, rectangles, or untagged color component values | |
Colors | A set of color component values, tagged with a color space specifying how to interpret them | |
Images | An image; see Images are the Input and Output of Filters | |
Transforms | A coordinate transformation to apply to an image |
Chaining Filters for Complex Effects
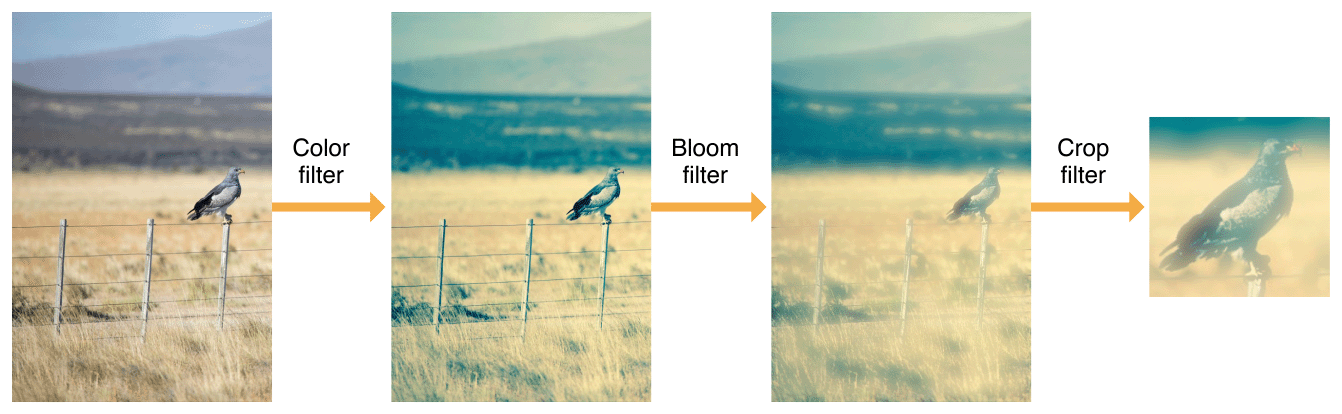
Every Core Image filter produces an output CIImage object, so you can use this object as input to another filter. For example, the sequence of filters illustrated in Figure 1-1 applies a color effect to an image, then adds a glow effect, and finally crops a section out of the result.
Core Image optimizes the application of filter chains such as this one to render results quickly and efficiently. Each CIImage object in the chain isn’t a fully rendered image, but instead merely a “recipe” for rendering. Core Image doesn’t need to execute each filter individually, wasting time and memory rendering intermediate pixel buffers that will never be seen. Instead, Core Image combines filters into a single operation, and can even reorganize filters when applying them in a different order will produce the same result more efficiently. Figure 1-2 shows a more accurate rendition of the example filter chain from Figure 1-1.
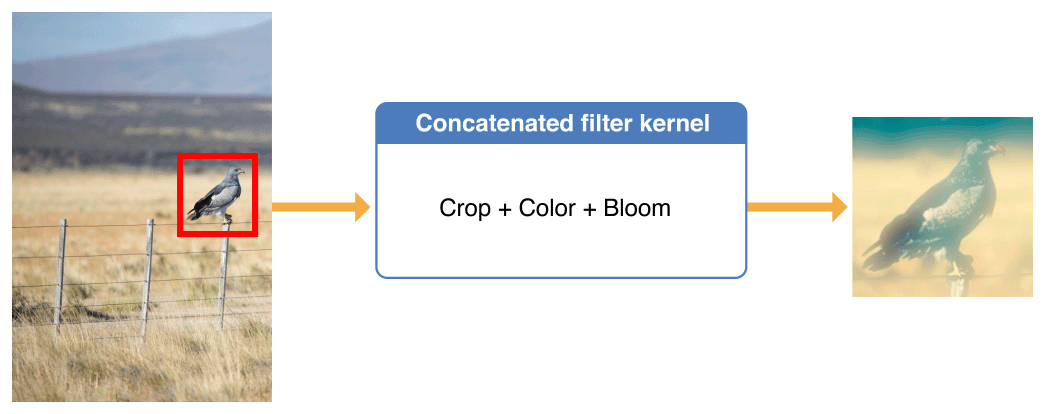
Notice that in Figure 1-2, the crop operation has moved from last to first. That filter results in large areas of the original image being cropped out of the final output. As such, there’s no need to apply the color and sharpen filters to those pixels. By performing the crop first, Core Image ensures that expensive image processing operations apply only to pixels that will be visible in final output.
Listing 1-2 shows how to set up a filter chain like that illustrated above.
Listing 1-2 Creating a filter chain
func applyFilterChain(to image: CIImage) -> CIImage { |
// The CIPhotoEffectInstant filter takes only an input image |
let colorFilter = CIFilter(name: "CIPhotoEffectProcess", withInputParameters: |
[kCIInputImageKey: image])! |
// Pass the result of the color filter into the Bloom filter |
// and set its parameters for a glowy effect. |
let bloomImage = colorFilter.outputImage!.applyingFilter("CIBloom", |
withInputParameters: [ |
kCIInputRadiusKey: 10.0, |
kCIInputIntensityKey: 1.0 |
]) |
// imageByCroppingToRect is a convenience method for |
// creating the CICrop filter and accessing its outputImage. |
let cropRect = CGRect(x: 350, y: 350, width: 150, height: 150) |
let croppedImage = bloomImage.cropping(to: cropRect) |
return croppedImage |
} |
Listing 1-2 also shows a few different convenience methods for configuring filters and accessing their results. In summary, you can use any of these methods to apply a filter, either individually or as part of a filter chain:
Create a
CIFilterinstance with thefilterWithName:initializer, set parameters using thesetValue:forKey:method (including thekCIInputImageKeyfor the image to process), and access the output image with theoutputImageproperty. (See Listing 1-1.)Create a
CIFilterinstance and set its parameters (including the input image) in one call with thefilterWithName:withInputParameters:initializer, then use the theoutputImageproperty to access output. (See thecolorFilterexample in Listing 1-2.)Apply a filter without creating a
CIFilterinstance by using theimageByApplyingFilter:withInputParameters:method to aCIImageobject. (See the bloomImage example in Listing 1-2.)For certain commonly used filter operations, such as cropping, clamping, and applying coordinate transforms, use other
CIImageinstance methods listed in Creating an Image by Modifying an Existing Image. (See the croppedImage example in Listing 1-2.)
Using Special Filter Types for More Options
Most of the built-in Core Image filters operate on a main input image (possibly with additional input images that affect processing) and create a single output image. But there are several additional types of that you can use to create interesting effects or combine with other filters to produce more complex workflows.
A compositing (or blending) filters combine two images according to a preset formula. For example:
The CISourceInCompositing filter combines images such that only the areas that are opaque in both input images are visible in the output image.
The CIMultiplyBlendMode filter multiplies pixel colors from both images, producing a darkened output image.
For the complete list of compositing filters, query the CICategoryCompositeOperation category.
A generator filters take no input images. Instead, these filters use other input parameters to create a new image from scratch. Some generators produce output that can be useful on its own, and others can be combined in filter chains to produce more interesting images. Some examples from among the built-in Core Image filters include:
Filters like CIQRCodeGenerator and CICode128BarcodeGenerator generate barcode images that encode specified input data.
Filters like CIConstantColorGenerator, CICheckerboardGenerator, and CILinearGradient generate simple procedural images from specified colors. You can combine these with other filters for interesting effects—for example, the CIRadialGradient filter can create a mask for use with the CIMaskedVariableBlur filter.
Filters like CILenticularHaloGenerator and CISunbeamsGenerator create standalone visual effects—combine these with compositing filters to add special effects to an image.
To find generator filters, query the CICategoryGenerator and CICategoryGradient categories.
A reduction filter operates on an input image, but instead of creating an output image in the traditional sense, its output describes information about the input image. For example:
The CIAreaMaximum filter outputs a single color value representing the brightest of all pixel colors in a specified area of an image.
The CIAreaHistogram filter outputs information about the numbers of pixels for each intensity value in a specified area of an image.
All Core Image filters must produce a
CIImageobject as their output, so the information produced by a reduction filter is still an image. However, you usually don’t display these images—instead, you read color values from single-pixel or single-row images, or use them as input to other filters.For the complete list of reduction filters, query the CICategoryReduction category.
A transition filter takes two input images and varies its output between them in response to an independent variable—typically, this variable is time, so you can use a transition filter to create an animation that starts with one image, ends on another, and progresses from one to the other using an interesting visual effect. Core Image provides several built-in transition filters, including:
The CIDissolveTransition filter produces a simple cross-dissolve, fading from one image to another.
The CICopyMachineTransition filter simulates a photocopy machine, swiping a bar of bright light across one image to reveal another.
For the complete list of transition filters, query the CICategoryTransition category.
Integrating with Other Frameworks
Core Image interoperates with several other technologies in iOS, macOS, and tvOS. Thanks to this tight integration, you can use Core Image to easily add visual effects to games, video, or images in your app’s user interface without needing to build complex rendering code. The following sections cover several of the common ways to use Core Image in an app and the conveniences system frameworks provide for each.
Processing Still Images in UIKit and AppKit
UIKit and AppKit provide easy ways to add Core Image processing to still images, whether those images appear in your app’s UI or are part of its workflow. For example:
A travel app might present stock photography of destinations in a list, then apply filters to those images to create a subtle background for each destination’s detail page.
A social app might apply filters to user avatar pictures to indicate mood for each post.
A photography app might allow the user to customize images with filters upon capture, or offer a Photos app extension for adding effects to pictures in the user’s Photos library (see Photo Editing in App Extension Programming Guide).
In iOS and tvOS, you can apply Core Image filters anywhere you work with UIImage objects. Listing 1-3 shows a simple method for using filters with an image view.
Listing 1-3 Applying a filter to an image view (iOS/tvOS)
class ViewController: UIViewController { |
let filter = CIFilter(name: "CISepiaTone", |
withInputParameters: [kCIInputIntensityKey: 0.5])! |
@IBOutlet var imageView: UIImageView! |
func displayFilteredImage(image: UIImage) { |
// Create a Core Image image object for the input image. |
let inputImage = CIImage(image: image)! |
// Set that image as the filter's input image parameter. |
filter.setValue(inputImage, forKey: kCIInputImageKey) |
// Get a UIImage representation of the filter's output and display it. |
imageView.image = UIImage(CIImage: filter.outputImage!) |
} |
} |
In macOS, use the initWithBitmapImageRep: method to create CIImage objects from bitmap images and the NSCIImageRep class to create images you can use anywhere NSImage objects are supported.
Processing Video with AV Foundation
The AVFoundation framework provides a number of high level utilities for working with video and audio content. Among these is the AVVideoComposition class, which you can use to combine or edit video and audio tracks into a single presentation. (For general information on compositions, see Editing in AVFoundation Programming Guide.) You can use an AVVideoComposition object to apply Core Image filters to each frame of a video during playback or export, as shown in Listing 1-4.
Listing 1-4 Applying a filter to a video composition
let filter = CIFilter(name: "CIGaussianBlur")! |
let composition = AVVideoComposition(asset: asset, applyingCIFiltersWithHandler: { request in |
// Clamp to avoid blurring transparent pixels at the image edges |
let source = request.sourceImage.clampingToExtent() |
filter.setValue(source, forKey: kCIInputImageKey) |
// Vary filter parameters based on video timing |
let seconds = CMTimeGetSeconds(request.compositionTime) |
filter.setValue(seconds * 10.0, forKey: kCIInputRadiusKey) |
// Crop the blurred output to the bounds of the original image |
let output = filter.outputImage!.cropping(to: request.sourceImage.extent) |
// Provide the filter output to the composition |
request.finish(with: output, context: nil) |
}) |
When you create a composition with the videoCompositionWithAsset:applyingCIFiltersWithHandler: initializer, you supply a handler that’s responsible for applying filters to each frame of video. AVFoundation automatically calls your handler during playback or export. In the handler, you use the provided AVAsynchronousCIImageFilteringRequest object first to retrieve the video frame to be filtered (and supplementary information such as the frame time), then to provide the filtered image for use by the composition.
To use the created video composition for playback, create an AVPlayerItem object from the same asset used as the composition’s source, then assign the composition to the player item’s videoComposition property. To export the composition to a new movie file, create an AVAssetExportSession object from the same source asset, then assign the composition to the export session’s videoComposition property.
Processing Game Content with SpriteKit and SceneKit
SpriteKit is a technology for building 2D games and other types of apps that feature highly dynamic animated content; SceneKit is for working with 3D assets, rendering and animating 3D scenes, and building 3D games. (For more information on each technology, see SpriteKit Programming Guide and SceneKit Framework Reference.) Both frameworks provide high-performance real-time rendering, with easy ways to add Core Image processing to all or part of a scene.
In SpriteKit, you can add Core Image filters using the SKEffectNode class. To see an example of this class in use, create a new Xcode project using the Game template (for iOS or tvOS), select SpriteKit as the game technology, and modify the touchesBegan:withEvent: method in the GameScene class to use the code in Listing 1-5. (For the macOS Game template, you can make similar modifications to the mouseDown: method.)
Listing 1-5 Applying filters in SpriteKit
override func touchesBegan(touches: Set<UITouch>, withEvent event: UIEvent?) { |
for touch in touches { |
let sprite = SKSpriteNode(imageNamed:"Spaceship") |
sprite.setScale(0.5) |
sprite.position = touch.location(in: self) |
sprite.run(.repeatForever(.rotate(byAngle: 1, duration:1))) |
let effect = SKEffectNode() |
effect.addChild(sprite) |
effect.shouldEnableEffects = true |
effect.filter = CIFilter(name: "CIPixellate", |
withInputParameters: [kCIInputScaleKey: 20.0]) |
self.addChild(effect) |
} |
} |
Note that the SKScene class itself is a subclass of SKEffectNode, so you can also apply a Core Image filter to an entire SpriteKit scene.
In SceneKit, the filters property of the SCNNode class can apply Core Image filters to any element of a 3D scene. To see this property in action, create a new Xcode project using the Game template (for iOS, tvOS, or macOS), select SceneKit as the game technology, and modify the viewDidLoad method in the GameViewController class to use the code in Listing 1-6.
Listing 1-6 Applying filters in SceneKit
// Find this line in the template code: |
let ship = rootNode.childNode(withName: "ship", recursively: true)! |
// Add these lines after it: |
let pixellate = CIFilter(name: "CIPixellate", |
withInputParameters: [kCIInputScaleKey: 20.0])! |
ship.filters = [ pixellate ] |
You can also animate filter parameters on a SceneKit node—for details, see the reference documentation for the filters property.
In both SpriteKit and SceneKit, you can use transitions to change a view’s scene with added visual flair. (See the presentScene:transition: method for SpriteKit and the presentScene:withTransition:incomingPointOfView:completionHandler: method for SceneKit.) Use the SKTransition class and its transitionWithCIFilter:duration: initializer to create a transition animation from any Core Image transition filter.
Processing Core Animation Layers (macOS)
In macOS, you can use the filters property to apply filters to the contents of any CALayer-backed view, and add animations that vary filter parameters over time. See Filters Add Visual Effects to OS X Views and Advanced Animation Tricks in Core Animation Programming Guide.
Building Your Own Workflow with a Core Image Context
When you apply Core Image filters using the technologies listed in the previous section, those frameworks automatically manage the underlying resources that Core Image uses to process images and render results for display. This approach both maximizes performance for those workflows and makes them easier to set up. However, in some cases it’s more prudent to manage those resources yourself using the CIContext class. By managing a Core Image context directly, you can precisely control your app’s performance characteristics or integrate Core Image with lower-level rendering technologies.
A Core Image context represents the CPU or GPU computing technology, resources, and settings needed to execute filters and produce images. Several kinds of contexts are available, so you should choose the option that best fits your app’s workflow and the other technologies you may be working with. The sections below discuss some common scenarios; for the full set of options, see CIContext Class Reference.
Rendering with an Automatic Context
If you don’t have constraints on how your app interoperates with other graphics technologies, creating a Core Image context is simple: just use the basic init or initWithOptions: initializer. When you do so, Core Image automatically manages resources internally, choosing the appropriate or best available CPU or GPU rendering technology based on the current device and any options you specify. This approach is well-suited to tasks such as rendering a processed image for output to a file (for example, with the writeJPEGRepresentationOfImage:toURL:colorSpace:options:error: method).
Take care when using this approach if you intend to render Core Image results in real time—that is, to animate changes in filter parameters, to produce an animated transition effect, or to process video or other visual content that already renders many times per second. Even though a CIContext object created with this approach can automatically render using the GPU, presenting the rendered results may involve expensive copy operations between CPU and GPU memory.
Real-Time Rendering with Metal
The Metal framework provides low-overhead access to the GPU, enabling high performance for graphics rendering and parallel compute workflows. Such workflows are integral to image processing, so Core Image builds upon Metal wherever possible. If you’re building an app that renders graphics with Metal, or if you want to leverage Metal to get real-time performance for animating filter output or filtering animated input (such as live video), use a Metal device to create your Core Image context.
Listing 1-7 and Listing 1-8 show an example of using a MetalKit view (MTKView) to render Core Image output. (Important steps are numbered in each listing and described afterward.)
Listing 1-7 Setting up a Metal view for Core Image rendering
class ViewController: UIViewController, MTKViewDelegate { // 1 |
// Metal resources |
var device: MTLDevice! |
var commandQueue: MTLCommandQueue! |
var sourceTexture: MTLTexture! // 2 |
// Core Image resources |
var context: CIContext! |
let filter = CIFilter(name: "CIGaussianBlur")! |
let colorSpace = CGColorSpaceCreateDeviceRGB() |
override func viewDidLoad() { |
super.viewDidLoad() |
device = MTLCreateSystemDefaultDevice() // 3 |
commandQueue = device.newCommandQueue() |
let view = self.view as! MTKView // 4 |
view.delegate = self |
view.device = device |
view.framebufferOnly = false |
context = CIContext(mtlDevice: device) // 5 |
// other setup |
} |
} |
This example uses a
UIViewControllersubclass for iOS or tvOS. To use with macOS, subclassNSViewControllerinstead.The
sourceTextureproperty holds a Metal texture containing the image to be processed by the filter. This example doesn’t show loading the texture’s content because there are many ways to fill a texture—for example, you could load an image file using theMTKTextureLoaderclass, or use the texture as output from an earlier rendering pass of your own.Create the Metal objects needed for rendering—a
MTLDeviceobject representing the GPU to use, and a command queue to execute render and compute commands on that GPU. (This command queue can handle both the render or compute commands encoded by Core Image and those from any additional rendering passes of your own.)Configure the MetalKit view.
Create a Core Image context that uses the same Metal device as the view. By sharing Metal resources, Core Image can process texture contents and render to the view without the performance costs of copying image data to and from separate CPU or GPU memory buffers.
CIContextobjects are expensive to create, so you do so only once and reuse it each time you process images.
MetalKit calls the drawInMTKView: method each time the view needs displaying. (By default, MetalKit may call this method as many as 60 times per second. For details, see the view’s preferredFramesPerSecond property.) Listing 1-8 shows a basic implementation of that method for rendering from a Core Image context.
Listing 1-8 Drawing with Core Image filters in a Metal view
public func draw(in view: MTKView) { |
if let currentDrawable = view.currentDrawable { // 1 |
let commandBuffer = commandQueue.commandBuffer() |
let inputImage = CIImage(mtlTexture: sourceTexture)! // 2 |
filter.setValue(inputImage, forKey: kCIInputImageKey) |
filter.setValue(20.0, forKey: kCIInputRadiusKey) |
context.render(filter.outputImage!, // 3 |
to: currentDrawable.texture, |
commandBuffer: commandBuffer, |
bounds: inputImage.extent, |
colorSpace: colorSpace) |
commandBuffer.present(currentDrawable) // 4 |
commandBuffer.commit() |
} |
} |
Obtain a Metal drawable texture to render into and a command buffer to encode rendering commands.
Configure the filter’s input parameters, including the input image sourced from a Metal texture. This example uses constant parameters, but remember that this method runs up to 60 times per second—you can use this opportunity to vary filter parameters over time to create smooth animations.
Tell the Core Image context to render the filter output into the view’s drawable texture. The bounds parameter tells Core Image what portion of the image to draw—this example uses the input image’s dimensions.
Tell Metal to display the rendered image when the command buffer finishes executing.
This example shows only the minimal code needed to render with Core Image using Metal. In a real application, you’d likely perform additional rendering passes before or after the one managed by Core Image, or render Core Image output into a secondary texture and use that texture in another rendering pass. For more information on drawing with Metal, see Metal Programming Guide.
Real-Time Rendering with OpenGL or OpenGL ES
Core Image can also use OpenGL (macOS) or OpenGL ES (iOS and tvOS) for high-performance, GPU-based rendering. Use this option if you need to support older hardware where Metal is not available, or if you want to integrate Core Image into an existing OpenGL or OpenGL ES workflow.
If you draw using OpenGL ES (in iOS or tvOS), use the
contextWithEAGLContext:options:initializer to create a Core Image context from theEAGLContextyou use for rendering.If you draw using OpenGL (in macOS), use the
contextWithCGLContext:pixelFormat:colorSpace:options:initializer create a Core Image context from the OpenGL context you use for rendering. (See the reference documentation for that method for important details on pixel formats.)
In either scenario, use the imageWithTexture:size:flipped:colorSpace: initializer to create CIImage objects from OpenGL or OpenGL ES textures. Working with image data that’s already in GPU memory improves performance by removing redundant copy operations.
To render Core Image output in OpenGL or OpenGL ES, make your GL context current and set a destination framebuffer, then call the drawImage:inRect:fromRect: method.
CPU-Based Rendering with Quartz 2D
If your app doesn’t require real-time performance and draws view content using CoreGraphics (for example, in the drawRect: method of a UIKit or AppKit view), use the contextWithCGContext:options: initializer to create a Core Image context that works directly with the Core Graphics context you’re already using for other drawing. (In macOS, use the CIContext property of the current NSGraphicsContext object instead.) For information on CoreGraphics contexts, see Quartz 2D Programming Guide.
Copyright © 2004, 2016 Apple Inc. All Rights Reserved. Terms of Use | Privacy Policy | Updated: 2016-09-13