Basic debugging using logging for Swift and Objective-C apps.
Displaying log messages in the system console while running your application is one of the oldest debugging mechanisms available. Using logging, you can generate a transcript describing the operations being performed by your application that you can review long after your application has finished running. Also, while your application is running, you can observe log messages being generated and written to the console as the events in your app they describe are taking place. As a developer, you are in complete control of the text and information displayed in the console by NSLog. Logging can reveal even the toughest to find problems in an app.
This document talks about practical considerations about the NSLog function and the DEBUG preprocessor macro that are helpful for debugging.
Logging in Swift
Swift provides a default debugging textual representation that you can use for printing any type. The print(_:) or debugPrint(_:) functions can be used to log output from your app to the console for any data type. As shown in Figure 1, the debugPrint(_:) function will sometimes display additional information and the dump(_:) function will use the object's mirror to print information to standard output.
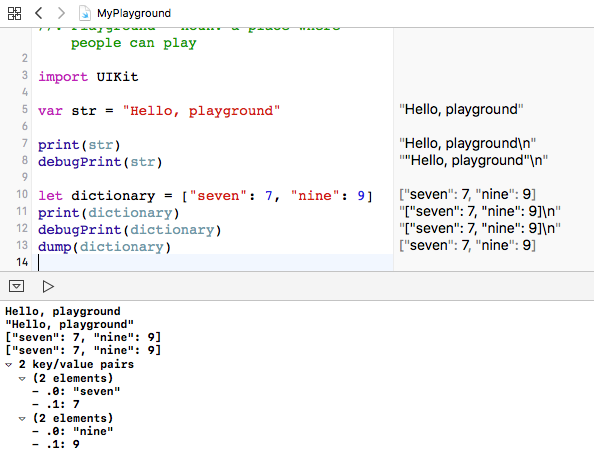
For more information about the debugPrint(_:) function, see Standard Swift Library API Reference: debugPrint(_:separator:terminator:to:).
To override the default representation used for logging your custom data types using the the debugPrint(_:) function, you can make your custom data types conform to the CustomDebugStringConvertible protocol. For more information about the CustomDebugStringConvertible protocol, see Standard Swift Library API Reference: CustomDebugStringConvertible.
The remainder of this document discuses the NSLog function, however many of the same strategies discussed apply to apps written using the Swift language.
NSLog examples
Here is an example of what a call to NSLog looks like:
NSString *message = @"test message"; |
NSLog( @"Here is a test message: '%@'", message ); |
and, for the above statement, the console output would appear as follows:
Here is a test message: 'test message' |
It's really just that simple! And, at this point in this document, you now have enough information to start using NSLog to debug your app. But, you should continue to read on: the remainder of this document adds additional details that you can use to empower yourself to use logging more effectively in your projects.
This document is appropriate for all iOS and macOS developers. It assumes the reader is using Xcode, is acquainted with the Objective-C language, and understands the basics of using the C language preprocessor.
Where to find NSLog's output
The Foundation framework's NSLog function is available in every version of iOS and macOS. As such, you can rely on it being available for your debugging purposes on any Apple platform where your app will run. NSLog outputs messages to the Apple System Log facility or to the Console app (usually prefixed with the time and the process id). Many of the system frameworks use NSLog for logging exceptions and errors, but there is no requirement to restrict its usage to those purposes. It is also perfectly acceptable to use NSLog for outputting variable values, parameters, function results, stack traces, and other information so you can see what is happening in your code at runtime.
Console output can appear in a number of places including (but not limited to) Xcode and the Console app. For more information about finding the console output from your app's calls to NSLog, please see Technical Q&A QA1747: Debugging Deployed iOS Apps.
How to call NSLog
The Foundation framework's NSLog function operates just like the standard C library printf function, the big difference being that the format string is specified as a "NSString *" typed value instead of a C-style string.
Simple example
Here is an example showing how to call NSLog:
NSString *outputData = @"The quick brown fox jumps over a lazy dog!"; |
NSLog( @"text: %@", outputData ); |
/* Comment: |
@"text: %@" - is the printf style formatting template for output (an NSString *) |
outputData - refers to to the text we wish to display (also an NSString *) |
*/ |
And, here is how the output will appear:
text: The quick brown fox jumps over a lazy dog! |
Advanced details
The definition for the NSLog function appears as follows:
void NSLog(NSString *format, ...); |
Note the first parameter is a formatting string and it can contain special substitution tokens that imply additional arguments are expected after that. If care and attention is not taken to ensure that the contents of the format string match up with the remaining arguments, your app may crash (or, at the very least, it will output unusable data to the console).
Like the printf function, NSLog uses substitution tokens; however, there is one additional substitution token available in Objective-C, %@, used to indicate that its corresponding parameter should be an Objective-C object.
In addition to the %@ substitution token, all of the regular printf style substitution tokens are available for your use. For more information about the substitution tokens used by NSLog see the "String Format Specifiers" section of the "String Programming Guide".
Good things to include in your logs
Logging allows you to create a transcript describing the operation of your application that you can later analyze at your leisure. As such, you want to include as much useful information in your logs as possible so that it is easier for you to really see what is happening as your app runs. Here are some items that are commonly included in logs with some explanation:
Logic and branching
Adding logging statements inside of the logic of your code will help you understand which parts are being executed and which branches in your logic are being utilized. It is often useful to add many NSLog statements to especially complex sequences of code so you can better understand the flow of execution at runtime.
Unique and easy to find text patterns
In every log statement, it is useful to include some unique and easy to find text pattern so if you do identify a problem in that log statement you can easily search through your source files and find its location.
Variable and property values
Printing variable and property values at key places during the execution of your app will allow you to verify that those values are within acceptable bounds. Printing error messages in your logs that explicitly tell you when values are out of range will help you recognize these cases.
In addition to the %@ substitution token, all of the regular printf style substitution tokens can be used in the formatting string. This will allow you to display many different kinds of values. For more information about the substitution tokens that can be used with NSLog see the "String Format Specifiers" section of the "String Programming Guide".
double myNumber = 7.7; |
NSLog(@"number: %@", @(myNumber)); |
Will print:
number: 7.7 |
This technique works with all numeric types that the compiler is aware of (signed or unsigned integer or floating point numbers of any size - 8, 16, 32 or 64 bits), and will perform any necessary type coercions for you without generating any compiler warnings.
Who is being called?
In analyzing the operation of your application, it may be critical for you to know the sequence in which calls are being made to functions or methods in your application. In these cases, it is a really good idea to add an NSLog statement near the beginning of your method and function definitions that simply prints out the name of the function:
- (void)pressButton:(id)sender |
{ |
NSLog( @"calling: %s", __PRETTY_FUNCTION__ ); |
.... |
Here, the pre-defined compile time variable __PRETTY_FUNCTION__ (a C style string) is used to print the name of the function being called. This technique is especially useful when you are analyzing code using lots of delegates and you would like to understand the sequence in which calls are being made to your delegate's methods.
The above will print the following in the console:
calling: -[MyObjectClassName pressButton:] |
Log a backtrace of your stack!
When examining crash logs, a stack backtrace is invaluable for figuring out the chain of events that led to any particular circumstance. When using NSLog for debugging, you can retrieve a copy of the current stack backtrace at any time by calling NSThread's -callStackSymbols class method. The backtrace is returned as an NSArray of strings and you can use NSLog together with the %@ substitution token to output the backtrace to the console:
NSLog(@"%@", [NSThread callStackSymbols]); |
And, here is an example of what the output of the above statement looks like:
2014-04-30 18:44:30.075 AVCustomEdit[52779:60b] ( |
0 AVCustomEdit 0x0000efa6 -[APLSimpleEditor buildCompositionObjectsForPlayback:] + 278 |
1 AVCustomEdit 0x0000686e -[APLViewController viewDidAppear:] + 590 |
2 UIKit 0x007a4099 -[UIViewController _setViewAppearState:isAnimating:] + 526 |
3 UIKit 0x007a4617 -[UIViewController __viewDidAppear:] + 146 |
4 UIKit 0x007a49aa -[UIViewController _executeAfterAppearanceBlock] + 63 |
5 UIKit 0x0069f0d0 ___afterCACommitHandler_block_invoke_2 + 33 |
6 UIKit 0x0069f055 _applyBlockToCFArrayCopiedToStack + 403 |
7 UIKit 0x0069ee9a _afterCACommitHandler + 568 |
8 CoreFoundation 0x029db2bf __CFRunLoopDoObservers + 399 |
9 CoreFoundation 0x029b9254 __CFRunLoopRun + 1076 |
10 CoreFoundation 0x029b89d3 CFRunLoopRunSpecific + 467 |
11 CoreFoundation 0x029b87eb CFRunLoopRunInMode + 123 |
12 GraphicsServices 0x0318b5ee GSEventRunModal + 192 |
13 GraphicsServices 0x0318b42b GSEventRun + 104 |
14 UIKit 0x00681f9b UIApplicationMain + 1225 |
15 AVCustomEdit 0x000026bd main + 141 |
16 libdyld.dylib 0x0269e701 start + 1 |
) |
The DEBUG preprocessor macro
In a nutshell, the DEBUG preprocessor macro acts like a switch that you can use to turn on or off different sections of your code. Specifically, the DEBUG macro is intended to be used to turn on and off different sections of your source code related to debugging. Xcode, by default, includes a definition for the DEBUG macro that is set to 1 for debug builds and 0 for release builds. And, you can take advantage of this to automatically include additional debugging and logging code in your debug builds.
Here is an example showing how the DEBUG macro can be used:
- (void)pressButton:(id)sender |
{ |
#if DEBUG |
NSLog(@"preparing to press button!"); |
#endif |
[self prepareForButtonPress]; |
#if DEBUG |
NSLog(@"pressing button!"); |
#endif |
[self activatePressButtonSequence:self withCompletion:^{ |
#if DEBUG |
NSLog(@"button sequence complete."); |
#endif |
[self buttonPowerDown]; |
}]; |
NSLog(@"This line has no DEBUG macro, so it gets printed in both debug and release builds!"); |
} |
The debug build (with DEBUG==1) will produce the following output in the console:
preparing to press button! |
pressing button! |
button sequence complete. |
This line has no DEBUG macro, so it gets printed in both debug and release builds! |
The release build (with DEBUG==0) will produce the following output in the console:
This line has no DEBUG macro, so it gets printed in both debug and release builds! |
The DEBUG preprocessor macro in Xcode
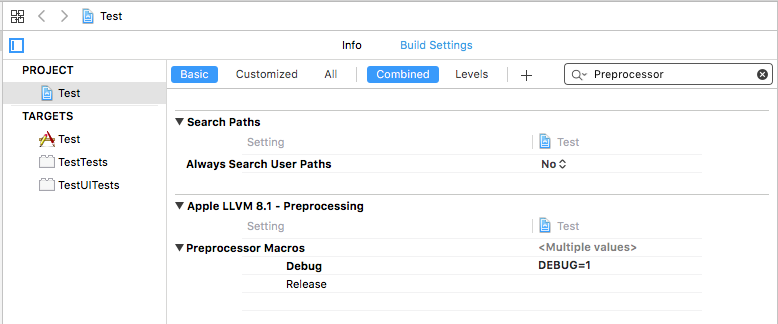
The preprocessor "DEBUG" macro is defined in all Xcode project templates for debug builds. Preprocessor macros are interpreted at compile time and the DEBUG preprocessor macro can be used to allow debug code to be run in debug builds of your project. If you aren't sure that your project has it defined, you can verify that this it is by selecting the project in Xcode and clicking on the build settings tab. Search for Preprocessing and make sure that DEBUG=1 is being defined for your debug builds (as shown bellow). If it isn't already defined in your project, you can add it. Preprocessor macros are case sensitive.
More is better, really
If you are debugging your app and you have added logging, but you continue to be eluded by the problem you are trying to find, then you haven't added enough logging. Continue adding logging to your app until you are able to retrieve enough information so you are able to understand what is happening.
NSLog is everyone's friend
Every iOS or macOS developer you will ever meet has probably encountered NSLog at one time or another. And, developers you know may have some interesting ideas about how to use it that may be helpful for you. If you have any additional questions about NSLog or need help with debugging, please ask questions in the Xcode Debugger section of the Apple Developer Forums. If you have any feedback about this document, please submit it using the Feedback tab at the bottom of the document.
Additional Resources
"String Format Specifiers" section of the "String Programming Guide"
Document Revision History
| Date | Notes |
|---|---|
| 2017-04-06 | Corrected some grammatical and spelling errors in the text. Added new information about logging in the Swift language. |
| 2017-04-05 | Corrected some grammatical and spelling errors in the text. Added new information about logging in the Swift language. |
Corrected some grammatical and spelling errors in the text. Added new information about logging in the Swift language. | |
| 2014-05-14 | New document that talks about basic debugging using the NSLog function and the "DEBUG" preprocessor macro. |
Copyright © 2017 Apple Inc. All Rights Reserved. Terms of Use | Privacy Policy | Updated: 2017-04-06