Understanding Table Views
In the most general terms, a table view is made up of rows and one or more columns that display the content of a data collection. Each row represents a single item within the data model, and each column displays a specific attribute of the model. A cell represents the content at a specific row-column intersection. The user selects rows and the app can perform the appropriate action on those rows.
Tables are made up of versatile user interface elements that can display simple lists of data or complex arrangements that combine data, functionality, and controls to provide a rich user experience. For example, the simple two-column table shown in Figure 1-1 uses one cell that displays an image and text and a second cell that displays only text.
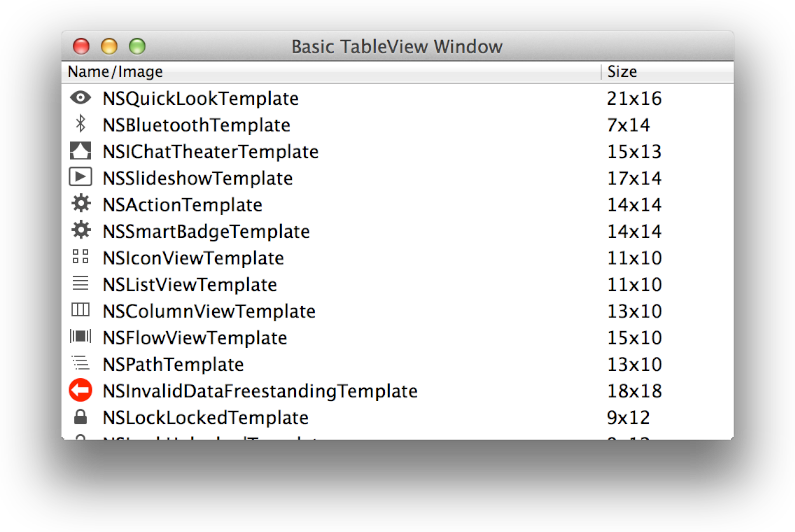
Constructing this simple table view required no subclassing to display the content; both cell views are instances of the NSTableCellView class. To create a similar table, you simply drag the stock classes from the Interface Builder Object library and set the values of the appropriate subviews. (You can examine the implementation of this table in the TableViewPlayground: Using View-Based NSTableView and NSOutlineView sample project.)
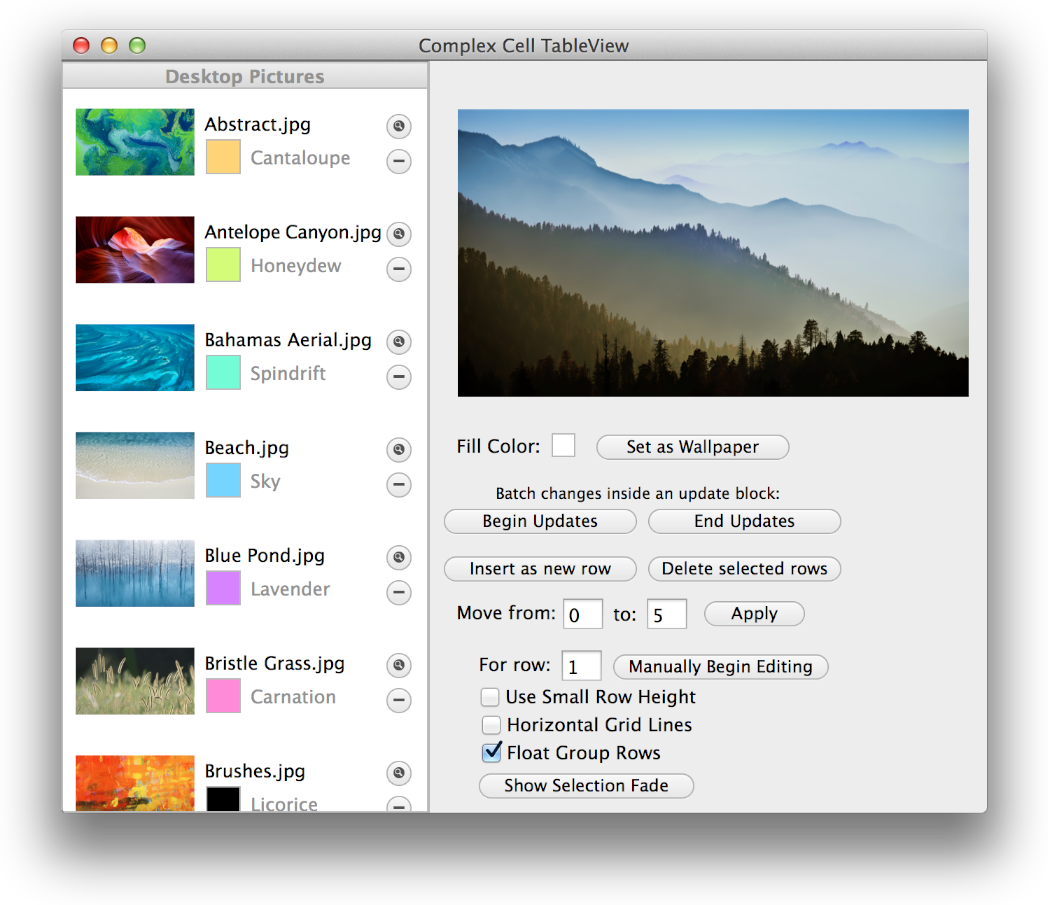
In contrast, the left area of the window shown in Figure 1-2 contains a complex table view in which each row consists of an image, some text, a custom color view, and buttons. Much, if not all, of the complex table view shown here is made using standard AppKit view objects that are arranged in a custom subclass of NSTableCellView. (The implementation of this table is also contained in the TableViewPlayground: Using View-Based NSTableView and NSOutlineView sample project.)
Most Tables Are Based on NSView
Most tables are NSView based, which means that each cell is provided by an NSView subclass, often by NSTableCellView (or a subclass). Some tables are NSCell based, which means that each table cell is based on a subclass of NSCell. For the most part, NSCell-based tables are used to support legacy code; if you’re creating a new app, you want to use NSView-based tables. In this document, a table is assumed to be NSView based unless specified otherwise.
Using NSView objects as cells allows table views to enable rich design time opportunities. By default, an NSTableCellView object includes an image view and a text field. To build a table view in Interface Builder, you create a cell for each column by dragging an NSTableCellView instance from the Object library and dropping it into the appropriate table column. You then configure each cell, called a prototype cell, with text, images, or other attributes. At runtime, the data source loads a prototype cell for each cell in the row and displays the data according to your configuration. Using Interface Builder, it’s easy to modify the cell’s subviews, and to move, resize, and hide cells. And when you use NSTableCellView instances in a table, VoiceOver automatically speaks the contents of the text field.
You can subclass NSTableCellView to add additional subviews and behaviors, and you can use Interface Builder to modify a cell’s design and layout. Whether you use the standard NSTableCellView class or a custom subclass, an app retrieves a cell view at runtime and populates it with data, either programmatically or using Cocoa bindings. Because tables reuse cell views when possible, cell views can be varied and complex without negatively impacting memory usage.
View classes support animation within their content, so it’s straightforward to animate content within NSTableCellView instances. For example, the TableViewPlayground: Using View-Based NSTableView and NSOutlineView sample project uses NSProgressIndicator instances to display content that’s loaded lazily.
Tables support animation of cells as they are moved, inserted, and deleted. Various animation modes are provided and they can be grouped to allow changes to happen in batches as you make changes within the table view and corresponding changes in the model data.
Tables Consist of Several Classes That Work Together
Table views are made up of the following classes:
This class declares methods that allow you to configure the appearance of the table view—for example, specifying the default height of rows or providing column headers that are used to describe the data within a column. Other methods give you access to the currently selected row as well as to specific rows or cells. You can call other table view methods to manage selections, scroll the table view, and insert or delete rows and sections.
The column class is responsible for managing the horizontal position and the width of the cells of the table. Columns can be configured to allow resizing, re-ordering, and content sorting, with the state (optionally) stored with the app. Each table column has an identifier associated with it, which is key when finding columns and retrieving cells. Identifiers are discussed in more detail in Columns and Cells Have Identifiers That Make It Easy to Find Them.
The header view class is responsible for the cell that does its actual work, the
NSTableHeaderCell. The header cell is responsible for drawing the column name—if it’s visible—as well as the header content itself, optional sort indicators, drawing highlighting, and more.These two classes aren’t part of the table view—nor are they required—but virtually all table views are displayed using the classes that make up the scroll view mechanism.
NSView-based table views rely heavily on two additional classes (NSTableRowView and NSTableCellView) and their subclasses. Figure 1-3 shows how these components come together to create a table view.
NSView-based table view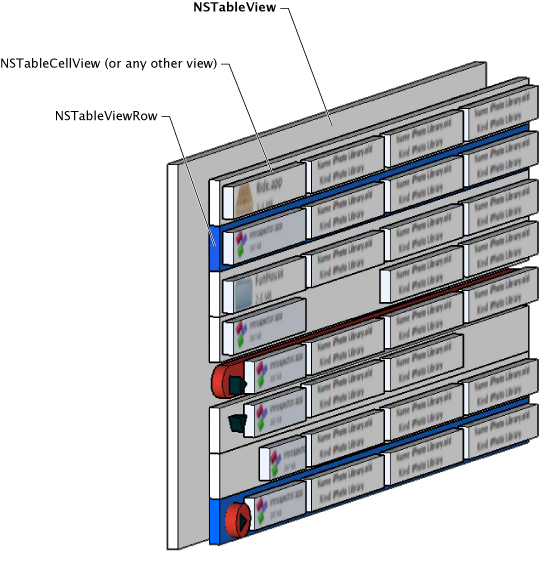
The blue rows shown in Figure 1-3 are highlighted as if selected by the user. The red rows are rows that have been subclassed to draw in their background in a custom manner. Empty or missing cells are shown in the table and are allowed within table views.
A table view consists of a collection of multiple NSTableRowView instances, one for each visible row. The frame rectangle of the row view is the full width of the table view and the height of the row, taking into account the intercellSpacing. Row views are responsible for drawing selection, drag and drop feedback, highlighting, column dividers, and any additional custom indicators that may be required, including a custom background. Each NSTableRowView has a collection of subviews that contain each table column cell.
You can use the delegate method tableView:rowViewForRow: to customize row views. You typically use Interface Builder to design and lay out NSTableRowView prototype rows within the table. As with prototype cells, prototype rows are retrieved programmatically at runtime. Implementation of NSTableRowView subclasses is entirely optional.
Each NSTableCellView instance is inserted as a subview of an NSTableRowView instance, which represents the entire row. The default NSTableCellView class has Interface Builder outlets for a text field and an image view. VoiceOver automatically speaks the contents of the text field, giving your app basic accessibility capabilities without effort on your part.
Apps typically create subclasses of NSTableCellView to add additional properties; optionally, you can use custom NSView instances to create new cells. Figure 1-4 shows the components of the default NSTableCellView object.
NSTableCellView components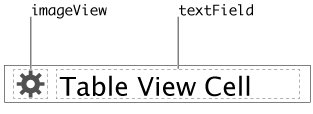
A Table View Needs a Data Source and Should Have a Delegate
Following the Model-View-Controller design pattern, an NSTableView object must have a data source. To control the display of data, a table view should have a delegate.
The data source class (NSTableViewDataSource) mediates between the table view and the table view’s model data. The data source is responsible for implementing the support that provides the model data in a pasteboard format that allows both copying of data and dragging of rows. (Note that to support the drag and drop of single rows to the Finder, your model object must be compliant with the NSPasteboardWriting protocol.) The data source is also responsible for determining whether incoming drag actions are valid and how they should be handled.
The delegate class (NSTableViewDelegate Protocol) allows you to customize a table view’s behavior without requiring you to subclass the table view. It supports table column management and type-to-select functionality, and lets you specify whether specific rows should allow selection, among other behaviors.
The data source and the delegate are often (but not necessarily) the same object.
The data source object must adopt the NSTableViewDataSource protocol, and the delegate object must adopt the NSTableViewDelegate Protocol. When programmatically populating a table view, there are methods that must be implemented in both the data source and the delegate (to learn more about this, see Populating a Table View Programmatically).
To enable editing of table view cells, use the target-action methodology in order to edit the content.
The responsibilities of both the delegate and data source classes differ when Cocoa bindings are used for populating tables—for more information, see Populating a Table View Using Cocoa Bindings. (If you’re using an NSCell-based table, the responsibilities of the data source and delegate objects are somewhat different; to learn more, see Working with NSCell-Based Table Views.)
Columns and Cells Have Identifiers That Make It Easy to Find Them
Every column in a table view has an associated identifier string that is set in the Identity inspector of the Xcode Interface Builder editor. This string is a convenient and versatile way of referring to and retrieving individual columns in a table view.
Apps typically use context-based names for the identifier of a table column, such as Artist or Name, so that the columns can be easily retrieved and identified by other aspects of the app. For example, if your app allows the showing and hiding of table columns, it can easily identify the column that must be shown or hidden by using the identifier and the NSTableView class’s tableColumnWithIdentifier: method. Using column identifiers is important because if the columns get reordered, a column’s index in the tableColumns array also changes.
Column identifiers relate a table column to a view instance that the column displays. When the NSTableView delegate method tableView:viewForTableColumn:row: attempts to locate the cell for the table column, it uses the column’s identifier to locate the cell. If you set identifiers manually, you must ensure that the column and cell view identifiers stay in sync if you change either one. If the identifier values get out of sync, a table that relies on bindings for its data won’t work. If you plan to use bindings, it’s recommended that you use the Automatic setting for the identifier values.
If your table view doesn’t require complex table column management, such as retrieving individual table columns or showing and hiding columns, you can take advantage of the Automatic function of the Identifier. By default, the Identifier field is set to Automatic. When you accept the Automatic setting, Interface Builder creates a unique identifier for the table column and ensures that the cell view instance within that table column has the same identifier. Further, it keeps these identifiers in sync, relieving you of that responsibility.
Table Views Reuse Rows to Increase Speed and Efficiency
Table views create and maintain a queue of used cell views that allow for the efficient reuse of previously created cells. A cell view is considered to be in use if it:
Is currently visible
Is the currently selected cell (even if it isn’t currently visible)
Has editing in progress, for example, a text field the user is editing
Views that don’t fit the in-use criteria are inserted into the reuse queue.
Because table view cells are instantiated from within the NSTableView instance in the Interface Builder editor, each cell is treated specially, as if it were its own nib. Each cell view has an owner. By default, a cell view’s owner is the table view’s default owner, which is usually the table’s delegate.
When a new view for a specific ID is required, the table uses the process shown in Figure 1-5 to find and return the requested view.
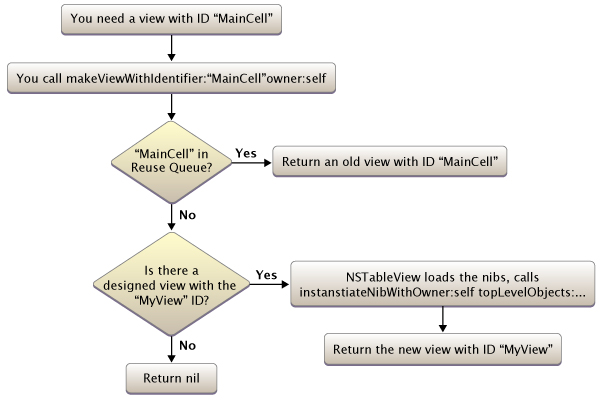
By using the reuse queue, the table view is able to use memory effectively as well as increase the speed with which cell views are retrieved.
Copyright © 2014 Apple Inc. All Rights Reserved. Terms of Use | Privacy Policy | Updated: 2014-07-15