Retired Document
Important: The use of iCloud with Core Data has been deprecated and is no longer being supported.
Using the SQLite Store with iCloud
Core Data’s iCloud integration combines SQLite-type persistent store access with iCloud storage. Follow the implementation strategy in this chapter to create a robust, high-performance iCloud-enabled app. Using these guidelines and sample code, you will learn how to:
Enable iCloud support
Persist managed objects to iCloud
Understand content change and availability events
Seed initial data
Remove duplicate records
Enabling iCloud Support
To begin using iCloud in your app, you must first enable iCloud support for your app in the cloud and in your project. This effectively links the two together. After enabling iCloud support you can begin using your app’s ubiquity container, an app sandbox in the cloud. You perform two tasks to add iCloud to a new Core Data app:
Create an App ID on the Developer Portal.
Create an app ID on the iOS Dev Center at developer.apple.com. Apps that use iCloud cannot use wildcard identifiers. Set your project to code-sign using the App ID you just created.
Enable iCloud in Xcode.
Navigate to your app’s target in the project settings in Xcode, and select the capabilities pane. Click the switch next to iCloud, as shown in Figure 1-1. Xcode configures your App ID in the developer portal and adds entitlements to your app. These entitlements give your app permission to access its ubiquity container(s). By default, Xcode creates one ubiquity container identifier using your App ID.
Figure 1-1 Enabling iCloud capability 
Adding an iCloud-Enabled Persistent Store to Core Data
After you enable iCloud, your app can begin persisting documents and data to your ubiquity container. When you create a SQLite-type Core Data persistent store with iCloud support enabled, Core Data uses the ubiquity container to persist model objects to iCloud. Therefore, you must create an iCloud-enabled persistent store to start using iCloud. See Migrating User Data to iCloud for additional tasks that must be performed when enabling iCloud in an existing Core Data app.
As you would for a typical Core Data app, add an NSSQLiteStoreType type store to your persistent store coordinator. You pass the following key-value pair in the options dictionary to enable iCloud.
NSPersistentStoreUbiquitousContentNameKeyAn
NSStringobject with a name used to identify the store:
NSURL *documentsDirectory = [[[NSFileManager defaultManager] URLsForDirectory:NSDocumentDirectory inDomains:NSUserDomainMask] lastObject]; |
NSURL *storeURL = [documentsDirectory URLByAppendingPathComponent:@"CoreData.sqlite"]; |
NSError *error = nil; |
NSPersistentStoreCoordinator *coordinator = [[NSPersistentStoreCoordinator alloc] initWithManagedObjectModel:<# your managed object model #>]; |
NSDictionary *storeOptions = |
@{NSPersistentStoreUbiquitousContentNameKey: @"MyAppCloudStore"}; |
NSPersistentStore *store = [coordinator addPersistentStoreWithType:NSSQLiteStoreType |
configuration:nil |
URL:storeURL |
options:storeOptions |
error:&error]; |
NSURL *finaliCloudURL = [store URL]; |
For a description of additional options that may be specified, see NSPersistentStoreCoordinator Class Reference.
Checkpoint
At this point, your app can create an iCloud-enabled Core Data persistent store. You’ve enabled iCloud in Xcode, created a ubiquitous content name, and added an iCloud-enabled persistent store with that name to your persistent store coordinator.
Setup: Create a Core Data stack and add a persistent store with the ubiquitous content name option.
Test: Run the app on a device. If Core Data successfully created and configured an iCloud-enabled persistent store, the framework logs a message containing “Using local storage: 1,” and, later, another message containing “Using local storage: 0”.
Reacting to iCloud Events
iCloud notifies the Core Data framework when changes occur to the data inside your app’s ubiquity container or to the availability of the container itself. After receiving messages from iCloud, Core Data translates these generic state changes into events that make sense in the context of your Core Data stack and that correspond to actionable steps you take to keep your app’s user interface up to date. Core Data tells your app about these events using notifications.
Before you implement your responses to iCloud events, it’s useful to keep some general guidelines in mind.
Pass the relevant persistent store coordinator as the object to filter the notifications your handlers receive. Otherwise, your app could receive notifications from other persistent store coordinators.
Deregister for notifications when your view controller is no longer onscreen.
Dispatch onto the queue on which your context lives or use the
performBlock:API. Notifications may not be posted on the same thread as your managed object context.Dispatch onto the main thread when you update your user interface.
It is especially important to test an iCloud-enabled iOS app on an actual device. iOS Simulator doesn’t accurately simulate the use of iCloud under real-world conditions. For more information about testing your app and fixing problems, see Troubleshooting.
Core Data Configures Your Persistent Store
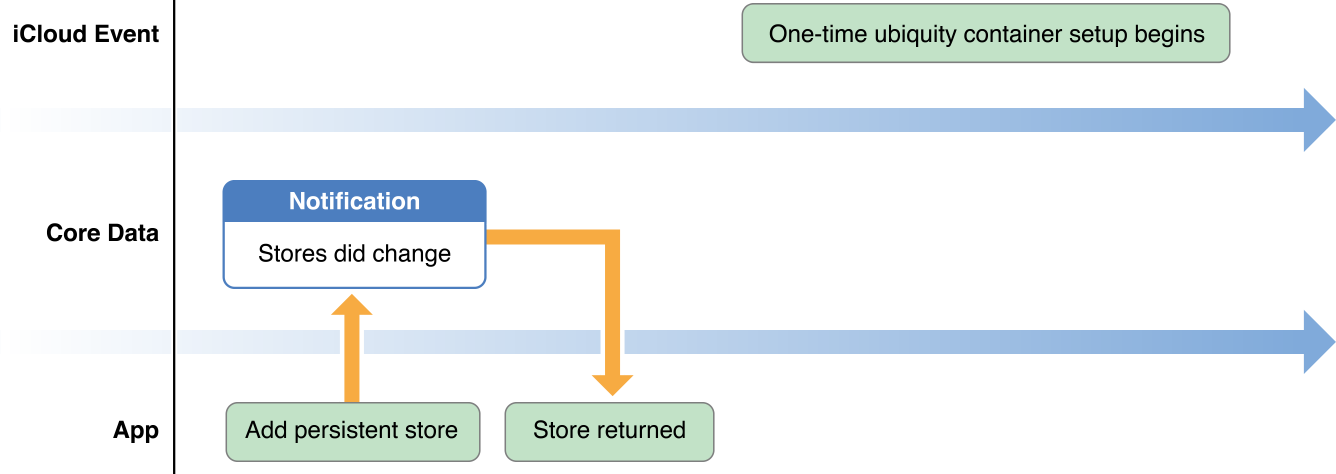
The first iCloud event happens after you add an iCloud-enabled persistent store to your persistent store coordinator. Core Data returns your persistent store from the method invocation and immediately posts an NSPersistentStoreCoordinatorStoresDidChangeNotification notification to let your app know that the persistent store has been configured for use. This notification’s user info dictionary contains the created NSPersistentStore object. In Figure 1-2, your app adds an iCloud-enabled persistent store, which causes Core Data to post a notification and begin container setup. In the handler for the notification, the persistent store is also available in the notification’s user info dictionary.
Checkpoint
At this checkpoint you have configured Core Data to tell your app when an iCloud-enabled persistent store is ready for use. After adding a new iCloud-enabled persistent store in the previous section, you created a notification handler to respond to NSPersistentStoreCoordinatorStoresDidChangeNotification notifications.
Setup: Add an NSLog statement inside of your stores-did-change notification handler.
Test: Completely remove your app from your device and then click the run button in Xcode to reinstall your app and reopen it. If Core Data successfully created and configured an iCloud-enabled persistent store, the framework invokes your notification handler and your NSLog statement will print to the console in Xcode.
iCloud Performs a One-Time Setup
When a user launches your iCloud-enabled app for the first time, Core Data and the system work together to create your app’s ubiquity container. Ubiquity container initialization is a long-running operation that relies on network connectivity with the iCloud service. Because of this, the Core Data framework provides you with a temporary local persistent store that you use while the work is performed in the background. On subsequent app launches, the ubiquity container is already initialized and Core Data is associated with the iCloud-enabled persistent store.
Reacting to One-Time Setup
After the one-time setup is complete, Core Data migrates records from the temporary local persistent store to the iCloud-enabled store. When Core Data finishes moving all of your data, the temporary local store and the contents of your managed object context(s) are invalid. To prepare you for this event, Core Data posts two notifications after it finishes moving your data: one just before it swaps out the stores and invalidates your data, and another right after.
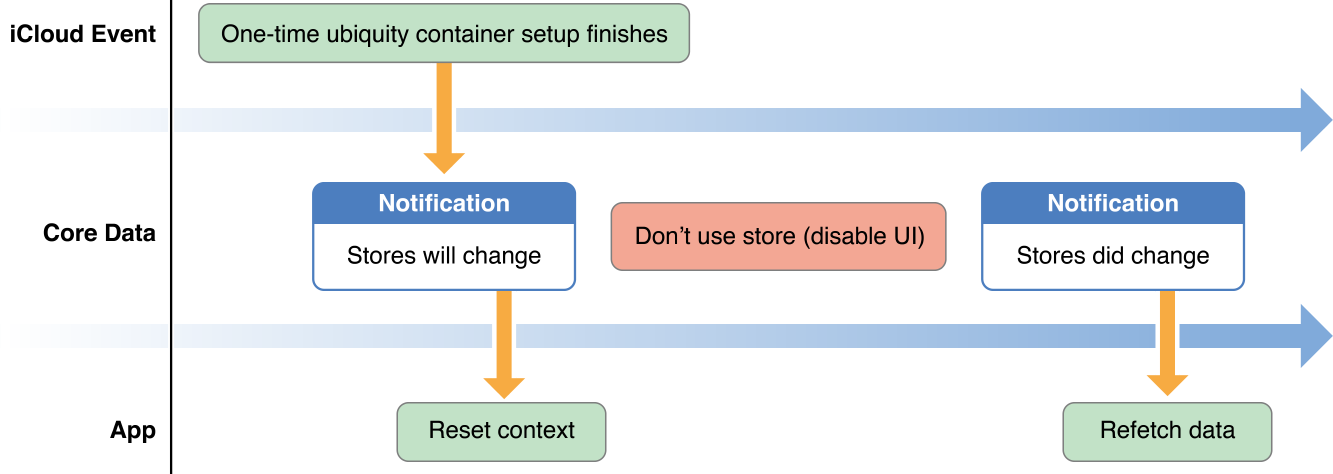
As illustrated in Figure 1-3, when setup finishes, Core Data posts an NSPersistentStoreCoordinatorStoresWillChangeNotification notification. In your notification handler, you reset your managed object context and drop any references to existing managed objects. As soon as your handler finishes executing, these objects are no longer valid. You must also prevent any interaction with the temporary local store while Core Data transitions to the iCloud-enabled store. Disabling your user interface is the simplest way to do this in a UI-driven app and is in most cases invisible to the user. This is because the time between the will-change notification and the did-change notification is extremely short.
[[NSNotificationCenter defaultCenter] |
addObserverForName:NSPersistentStoreCoordinatorStoresWillChangeNotification |
object:self.managedObjectContext.persistentStoreCoordinator |
queue:[NSOperationQueue mainQueue] |
usingBlock:^(NSNotification *note) { |
[self.managedObjectContext performBlock:^{ |
[self.managedObjectContext reset]; |
}]; |
// drop any managed object references |
// disable user interface with setEnabled: or an overlay |
}]; |
Core Data finishes swapping out the temporary local store with the iCloud-enabled store and posts an NSPersistentStoreCoordinatorStoresDidChangeNotification notification. The notification’s user info dictionary contains the iCloud-enabled store as the object associated with the NSAddedPersistentStoresKey key. In this notification’s handler, you reenable your user interface and refetch.
Checkpoint
At this point, your notification handlers disable, enable, and refresh your user interface when one-time setup is finished. You’ve registered for NSPersistentStoreCoordinatorStoresWillChangeNotification notifications, where you disable your user interface. You’ve also registered for NSPersistentStoreCoordinatorStoresDidChangeNotification notifications, where you reenable your app’s user interface and refetch your data.
Setup: On your iOS device, begin with airplane mode enabled. If you’re creating a Mac app, disable every network interface instead. Completely remove your app from your device as well.
Test: Run your app and create a few records. Disable airplane mode or reenable a network interface and wait for Core Data to print “Using local storage: 0” to the console in Xcode. Core Data invokes your notification handlers and your records disappear. In the next section you’ll learn how to persist in-memory changes.
Persisting In-Memory Changes
If your managed object context has changes that have not been committed to the temporary store, save those changes so that Core Data will migrate them to the iCloud-enabled persistent store. Your notification handler behaves slightly differently: Rather than immediately resetting your managed object context, you check for changes in your managed object context and invoke save:. Otherwise, you follow the same process as described in the previous section, resetting your context and disabling your user interface.
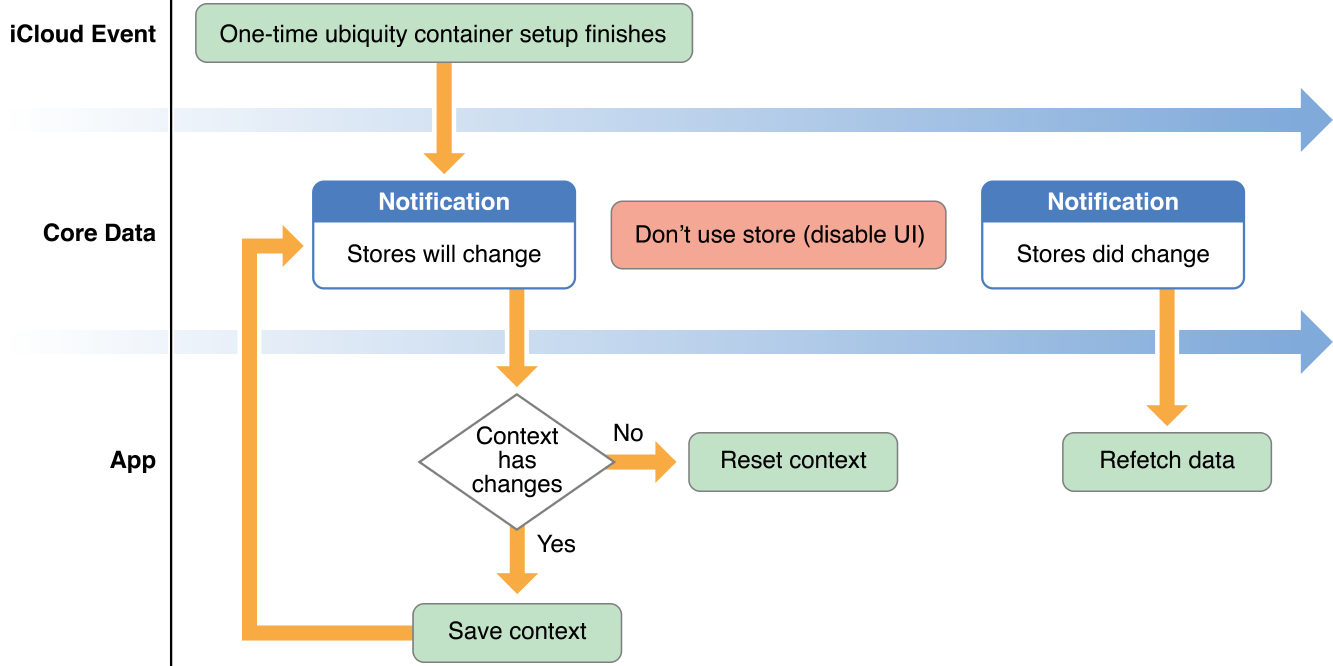
After saving your managed object context, Core Data posts another NSPersistentStoreCoordinatorStoresWillChangeNotification notification. Core Data continues to post this notification until you no longer invoke save: on your managed object context and instead reset it. This loop is illustrated above in Figure 1-4 and implemented below.
[[NSNotificationCenter defaultCenter] |
addObserverForName:NSPersistentStoreCoordinatorStoresWillChangeNotification |
object:self.managedObjectContext.persistentStoreCoordinator |
queue:[NSOperationQueue mainQueue] |
usingBlock:^(NSNotification *note) { |
// disable user interface with setEnabled: or an overlay |
[self.managedObjectContext performBlock:^{ |
if ([self.managedObjectContext hasChanges]) { |
NSError *saveError; |
if (![self.managedObjectContext save:&saveError]) { |
NSLog(@"Save error: %@", saveError); |
} |
} else { |
// drop any managed object references |
[self.managedObjectContext reset]; |
} |
}]; |
}]; |
Checkpoint
When one-time setup is finished, your app’s notification handlers disable, enable, and refresh your user interface. You’ve registered for the NSPersistentStoreCoordinatorStoresWillChangeNotification and NSPersistentStoreCoordinatorStoresDidChangeNotification notifications to handle the transition between the temporary local store and the iCloud-enabled persistent store after first-time ubiquity container setup finishes.
Setup: Begin with airplane mode enabled on your iOS device, or all network interfaces disabled on your Mac. Completely remove your app from your device as well.
Test: Run your app and create a few records. Disable airplane mode or reenable a network interface. Then wait for Core Data to print “Using local storage: 0” to the console in Xcode. Core Data invokes your notification handlers, and your records persist after your notification handler executes a new fetch request.
Core Data Posts Content Changes from iCloud
Core Data imports changes persisted to iCloud from other peers after first-time setup and while your app is running. Core Data represents this event as shown in Figure 1-5.

When the ubiquity container receives changes from iCloud, Core Data posts an NSPersistentStoreDidImportUbiquitousContentChangesNotification notification. This notification’s userInfo dictionary is structured similarly to that of an NSManagedObjectContextDidSaveNotification notification except for that it contains NSManagedObjectID instances rather than NSManagedObject instances. Therefore you can merge in changes from other peers in the same way that you merge changes from other managed object contexts. Call mergeChangesFromContextDidSaveNotification: on your managed object context, passing in the notification object posted by Core Data.
[[NSNotificationCenter defaultCenter] |
addObserverForName:NSPersistentStoreDidImportUbiquitousContentChangesNotification |
object:self.managedObjectContext.persistentStoreCoordinator |
queue:[NSOperationQueue mainQueue] |
usingBlock:^(NSNotification *note) { |
[self.managedObjectContext performBlock:^{ |
[self.managedObjectContext mergeChangesFromContextDidSaveNotification:note]; |
}]; |
}]; |
Core Data will also post one or more of these notifications after creating or rebuilding a persistent store and when the framework imports existing records from iCloud. See Core Data Helps You with Account Transitions for more information.
Checkpoint
At this checkpoint, your app’s change notification handler merges changes from other peers into your managed object context. You’ve registered for the NSPersistentStoreDidImportUbiquitousContentChangesNotification notification, where you decide which data refreshing strategy to use—in-memory merging or data refetching.
Setup: Install your app on two devices.
Test: Run your app on both devices, and create a few distinct records on each. Wait for Core Data to print “Using local storage: 0” to the console in Xcode. Content change notifications typically follow soon after, and each device adds the other’s records.
Core Data Helps You with Account Transitions
Account transitions can impact all of your app’s data. A transition occurs for all of the following four events: the initial import from iCloud has completed, the iCloud account associated with the device changes, iCloud is disabled, or the user deletes your app’s data.
Reacting to Account Transitions
When the system informs Core Data of an account transition while your app is running, Core Data works with your app to prepare for the event. Figure 1-6 shows the timeline of an account transition event.
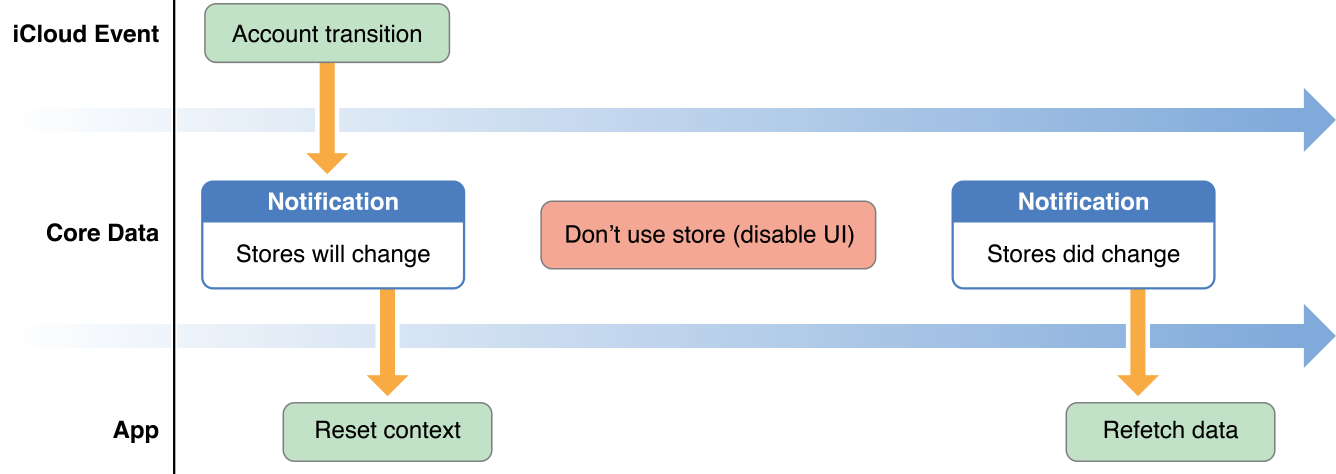
Just as during one-time setup, Core Data posts an NSPersistentStoreCoordinatorStoresWillChangeNotification notification, informing you that an account transition is in progress. In addition to the added and removed persistent stores, the notification’s userInfo dictionary also contains a transition type. The transition type, associated with the NSPersistentStoreUbiquitousTransitionTypeKey key, is an NSNumber object mapped to a key in the NSPersistentStoreUbiquitousTransitionType enum. You can use this information to find out why a transition is happening.
In your notification handler, you reset your managed object context and drop any references to existing managed objects. As soon as your handler finishes executing, these objects are no longer valid. You must also prevent any interaction with the iCloud-enabled store while Core Data finishes transitioning. In a UI-driven app, disabling your user interface is the simplest way to do this. When the current iCloud account is removed, Core Data saves your store to an account-specific archive. If the user signs into the same account again in the future, Core Data unarchives the data and resumes uploading.
Persisting In-Memory Changes
As it behaved in first-time setup, Core Data gives your app a chance to save data that wasn’t persisted by the time the notification was posted. Again, because iOS deletes old stores associated with iCloud accounts that are no longer active on the device, your changes may never be saved or sent to the cloud.

In contrast with how it behaved in one-time setup, Core Data gives your app only one chance to save; it won’t post another NSPersistentStoreCoordinatorStoresWillChangeNotification notification. As illustrated in Figure 1-7 above, saving your managed object context does not cause a loop.
Checkpoint
At this point, your app’s two store change notification handlers gracefully transition your app between persistent stores as an iCloud account is added or removed. You’ve modified your existing notification handlers to check the NSPersistentStoreUbiquitousTransitionType and respond accordingly.
Setup: Install your app on a device with iCloud enabled.
Test: Run your app on both devices, and create a few distinct records. Wait for Core Data to print “Using local storage: 0” to the console in Xcode. Then change iCloud accounts—your app’s data should disappear, and your persistent store should be rebuilt with the new iCloud account’s data.
Seeding Initial Data
If your app is packaged with a prebuilt database or if a previous version of your app did not persist to iCloud, your persistent store coordinator can create an iCloud-enabled persistent store and migrate the records in a single step. To learn when to store seeded data in iCloud, see Store Only Essential Data in iCloud.
After creating your persistent store coordinator and adding your existing persistent store, follow the same steps in Adding an iCloud-Enabled Persistent Store to Core Data, replacing the call to addPersistentStoreWithType:configuration:URL:options:error: with a call to migratePersistentStore:toURL:options:withType:error:. Pass in your existing persistent store as the first argument in the method. Migrating a persistent store is a synchronous task, unlike adding an iCloud-enabled persistent store. You dispatch migration onto a background queue and then update your user interface after migration is complete.
Finally, mark seeding as complete using iCloud key-value storage so that other peers do not seed the same data. See Designing for Key-Value Data in iCloud in iCloud Design Guide for more about using iCloud key-value storage.
NSURL *documentsDirectory = [[[NSFileManager defaultManager] URLsForDirectory:NSDocumentDirectory inDomains:NSUserDomainMask] lastObject]; |
NSURL *storeURL = [documentsDirectory URLByAppendingPathComponent:@"CoreData.sqlite"]; |
NSError *error = nil; |
NSPersistentStoreCoordinator *coord = [[NSPersistentStoreCoordinator alloc] initWithManagedObjectModel:<# your managed object model #>]; |
NSUbiquitousKeyValueStore *kvStore = [NSUbiquitousKeyValueStore defaultStore]; |
if (![kvStore boolForKey:@"SEEDED_DATA"]) { |
NSURL *seedStoreURL = <# path to your seed store #> |
NSError *seedStoreError; |
NSDictionary *seedStoreOptions = @{NSReadOnlyPersistentStoreOption: @YES}; |
NSPersistentStore *seedStore = |
[coord addPersistentStoreWithType:<#seed store type#> |
configuration:nil |
URL:seedStoreURL |
options:seedStoreOptions |
error:&seedStoreError]; |
NSDictionary *iCloudOptions = |
@{NSPersistentStoreUbiquitousContentNameKey: @"MyAppCloudStore"}; |
NSOperationQueue *queue = [[NSOperationQueue alloc] init]; |
[queue addOperationWithBlock:^{ |
NSPersistentStore *iCloudStore = |
[coord migratePersistentStore:seedStore |
toURL:storeURL |
options:iCloudOptions |
withType:NSSQLiteStoreType |
error:&error]; |
NSURL *finaliCloudURL = [iCloudStore URL]; |
[kvStore setBool:YES forKey:@"SEEDED_DATA"]; |
NSOperationQueue *mainQueue = [NSOperationQueue mainQueue]; |
[mainQueue addOperationWithBlock:^{ |
// Update your user interface |
}]; |
}); |
} else { |
// Add persistent store normally |
} |
Detecting and Removing Duplicate Records
When a user interacts with your app on multiple devices, your app can end up having two or more of the same managed objects. To solve this problem, the steps that follow explain how to detect and remove duplicate objects. Deduplication is the process of finding and deleting these duplicates. There are several common situations in which your app should perform deduplication:
Your app seeded initial data.
Your users frequently create the same records on multiple peers.
Your app was updated from a version without iCloud support, and you've migrated existing data.
For example, a user stores recipes in a recipe app on two peers. Because the first version of the app did not support iCloud, the user created the same recipes on both devices. The user upgrades the app on both peers to version two, which now supports iCloud integration. After migrating the user’s recipes to iCloud, both devices have duplicate recipes.
In each of these situations, the tasks you complete are the same:
Choose a property or a hash of multiple properties to use as a unique ID for each record.
NSString *uniquePropertyKey = <# property to use as a unique ID #>
NSExpression *countExpression = [NSExpression expressionWithFormat:@"count:(%@)", uniquePropertyKey];
NSExpressionDescription *countExpressionDescription = [[NSExpressionDescription alloc] init];
[countExpressionDescription setName:@"count"];
[countExpressionDescription setExpression:countExpression];
[countExpressionDescription setExpressionResultType:NSInteger64AttributeType];
NSManagedObjectContext *context = <# your managed object context #>
NSEntityDescription *entity = [NSEntityDescription entityForName:@"<# your entity #>" inManagedObjectContext:context];
NSAttributeDescription *uniqueAttribute = [[entity attributesByName] objectForKey:uniquePropertyKey];
Fetch the number of times each unique value appears in the store.
The context returns an array of dictionaries, each containing a unique value and the number of times that value appeared in the store.
NSFetchRequest *fetchRequest = [NSFetchRequest fetchRequestWithEntityName:@"<# your entity #>"];
[fetchRequest setPropertiesToFetch:@[uniqueAttribute, countExpression]];
[fetchRequest setPropertiesToGroupBy:@[uniqueAttribute]];
[fetchRequest setResultType:NSDictionaryResultType];
NSArray *fetchedDictionaries = <# execute a fetch request against your store #>
Filter out unique values that have no duplicates.
NSMutableArray *valuesWithDupes = [NSMutableArray array];
for (NSDictionary *dict in fetchedDictionaries) {NSNumber *count = dict[@"count"];
if ([count integerValue] > 1) {[valuesWithDupes addObject:dict[@"<# property used as the unique ID #>"]];
}
}
Use a predicate to fetch all of the records with duplicates.
Use a sort descriptor to properly order the results for the winner algorithm in the next step.
NSFetchRequest *dupeFetchRequest = [NSFetchRequest fetchRequestWithEntityName:@"<# your entity #>"];
[dupeFetchRequest setIncludesPendingChanges:NO];
NSPredicate *predicate = [NSPredicate predicateWithFormat:@"<# property used as the unique ID #> IN (%@)", valuesWithDupes];
[dupeFetchRequest setPredicate:predicate];
Choose the winner.
After retrieving all of the duplicates, your app decides which ones to keep. This decision must be deterministic, meaning that every peer should always choose the same winner. Among other methods, your app could store a created or last-changed timestamp for each record and then decide based on that.
MyClass *prevObject;
for (MyClass *duplicate in dupes) {if (prevObject) {if ([duplicate.uniqueProperty isEqualToString:prevObject.uniqueProperty]) {if ([duplicate.createdTimestamp compare:prevObject.createdTimestamp] == NSOrderedAscending) {[context deleteObject:duplicate];
} else {[context deleteObject:prevObject];
prevObject = duplicate;
}
} else {prevObject = duplicate;
}
} else {prevObject = duplicate;
}
}
Remember to set a batch size on the fetch and whenever you reach the end of a batch, save the context.
Checkpoint
At this point, your app can deterministically remove duplicate records.
Setup: Open the previous non-iCloud-enabled version of your app on two devices.
Test: Create several of the same records on both devices. Update to the most recent version of the app on both devices. After both devices have migrated their stores to iCloud (see Migrating User Data to iCloud for more about migration), deduplication has been run, and both devices have communicated these changes to iCloud, check to make sure that there are no duplicate or missing records.
Performing Schema Migrations
During development of your app and between versions, you may change the Core Data model that defines your entities. You can use a process called schema migration to migrate your app’s existing data to use the new model. When you use the SQLite store with iCloud, the store supports only lightweight migration. (For more about lightweight migration, see Lightweight Migration in Core Data Model Versioning and Data Migration Programming Guide.) Because iCloud-enabled Core Data apps cannot persist changes between different versions of your app that use use different schemas, your app will catch up and previously too-new versions will merge in the older version’s changes only after it has been updated to the same version.
NSURL *documentsDirectory = [[[NSFileManager defaultManager] URLsForDirectory:NSDocumentDirectory inDomains:NSUserDomainMask] lastObject]; |
NSURL *storeURL = [documentsDirectory URLByAppendingPathComponent:@"CoreData.sqlite"]; |
NSError *error = nil; |
NSPersistentStoreCoordinator *coordinator = [[NSPersistentStoreCoordinator alloc] initWithManagedObjectModel:<# your managed object model #>]; |
NSDictionary *storeOptions = @{NSPersistentStoreUbiquitousContentNameKey: @"MyAppCloudStore", |
NSMigratePersistentStoresAutomaticallyOption: @YES, |
NSInferMappingModelAutomaticallyOption: @YES}; |
NSPersistentStore *store = [coordinator addPersistentStoreWithType:NSSQLiteStoreType |
configuration:nil |
URL:storeURL |
options:storeOptions |
error:&error]; |
NSURL *finaliCloudURL = [store URL]; |
Checkpoint
At this point, your app can smoothly perform schema migrations with an iCloud-enabled persistent store.
Setup: Create a second version of your app with an updated schema that’s compatible with lightweight migration.
Test: Install the first version of the app on a device. Perform actions that create records, and set attributes that are different in the second version of your schema. Use a second device running the same app version to verify that the records have been persisted to iCloud. Then install and run the updated version of the app on your device. Verify that the records have migrated correctly.
Removing an iCloud-enabled Persistent Store
While developing your app (and occasionally in real-world usage), you might need to temporarily or permanently remove your iCloud-enabled persistent store. There are three kinds of store removal: The first, rebuilding from iCloud, deletes the local store and recreates it from data in iCloud. The second, disabling iCloud persistence, tells Core Data to stop persisting the local data to iCloud and does not delete any data. Finally, starting over wipes your app’s data from your devices and from iCloud, and is by far the most destructive.
Rebuilding from iCloud
To remove local data and start fresh with the existing records in iCloud, pass the NSPersistentStoreRebuildFromUbiquitousContentOption option with a value of @YES when you add your iCloud-enabled persistent store to the persistent store coordinator. Include any iCloud options you usually include.
Disabling iCloud Persistence
To stop your store from persisting to iCloud, you don’t simply omit the NSPersistentStoreUbiquitousContentNameKey option when you add your persistent store. To completely remove ubiquitous metadata and disable iCloud persistence, instead migrate your store to a new location and pass the NSPersistentStoreRemoveUbiquitousMetadataOption option with a value of @YES in your call to migratePersistentStore:toURL:options:withType:error:.
Starting Over
To remove your store permanently from iCloud and every peer (including the current device), invoke the removeUbiquitousContentAndPersistentStoreAtURL:options:error: class method on the NSPersistentStoreCoordinator class. This method is synchronous, relies on network reachability, and is potentially long-running. You must not use your persistent store until the method returns. At that point, Core Data transitions to an empty store.
Copyright © 2017 Apple Inc. All Rights Reserved. Terms of Use | Privacy Policy | Updated: 2017-06-06