

Getting Oriented
Multitasking enhancements in iOS 9 give users more ways to enjoy iPad and more ways to use your app.
Slide Over provides a user-invoked overlay view on the right side of the screen (or on the left side in a right-to-left language version of iOS) that lets a user pick a secondary app to view and interact with.
Split View displays two side-by-side apps, letting the user view, resize, and interact with both of them.
Picture in Picture lets a user play video in a moveable, resizable window that floats over the apps onscreen.
To jump right in with the minimal steps to adopt the iOS 9 multitasking enhancements, skip ahead to Slide Over and Split View Quick Start and Picture in Picture Quick Start.
In Slide Over, the full-screen app is called the primary app and the selected Slide Over app is called the secondary app. In Split View (in a left-to-right language version of iOS), the left-side app is primary and the right-side app is secondary.
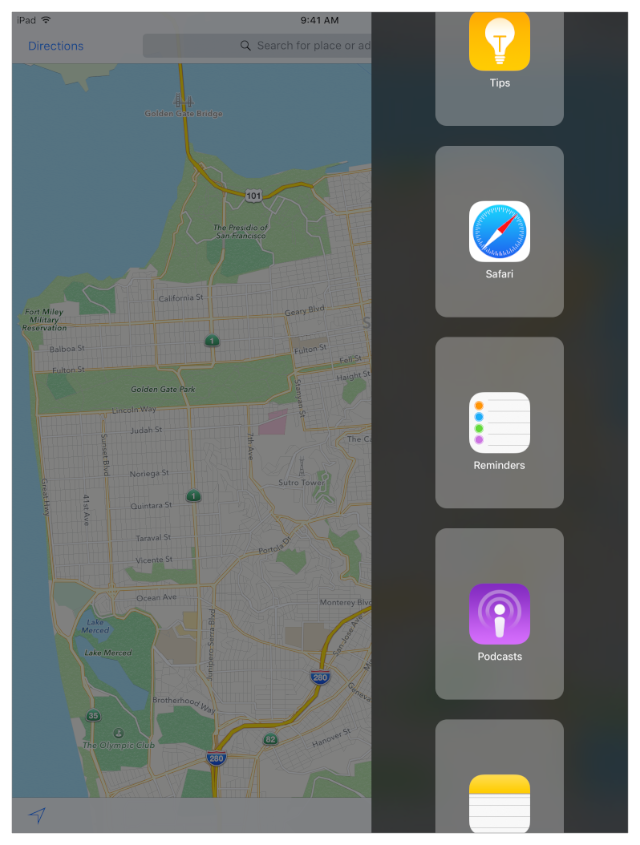
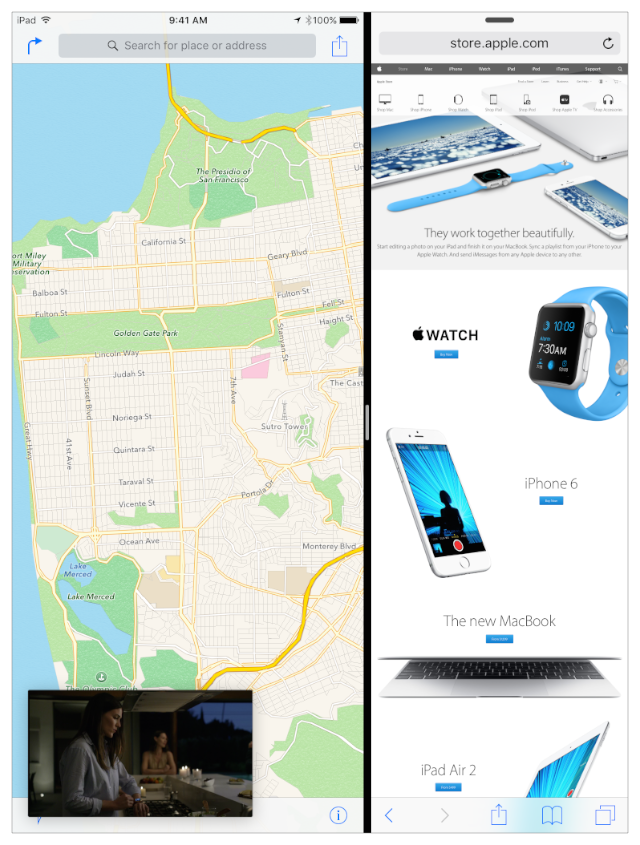
With a swipe from the right edge of the screen, a user invokes Slide Over to pick a secondary app.
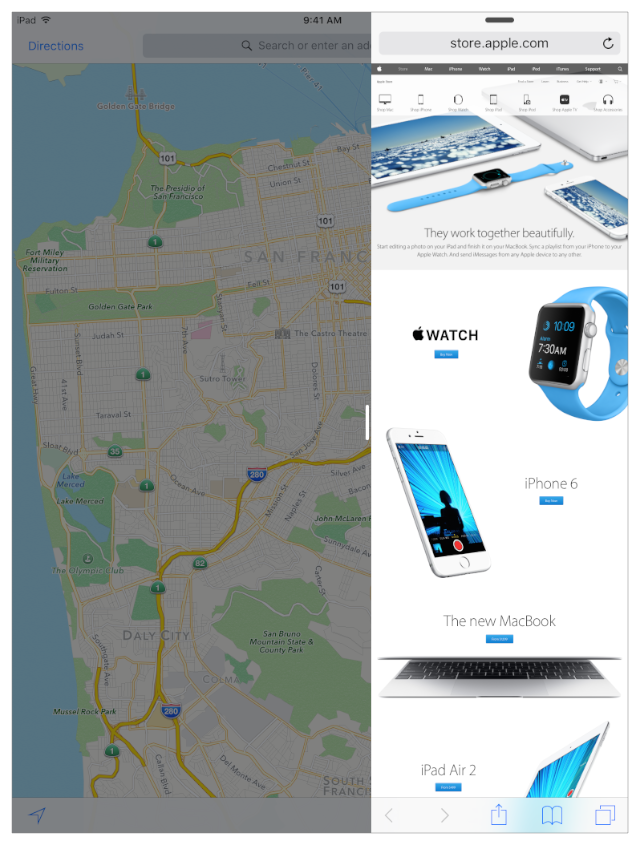
Here the user tapped on Safari from the Slide Over area. Safari opens, and adapts to the compact width of its window by displaying its content as it does on iPhone.
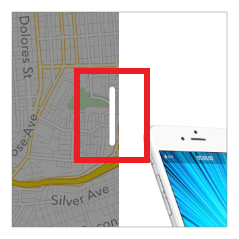
There is now a control just outside the Slide Over area and near center screen, as you see outlined in this detail.
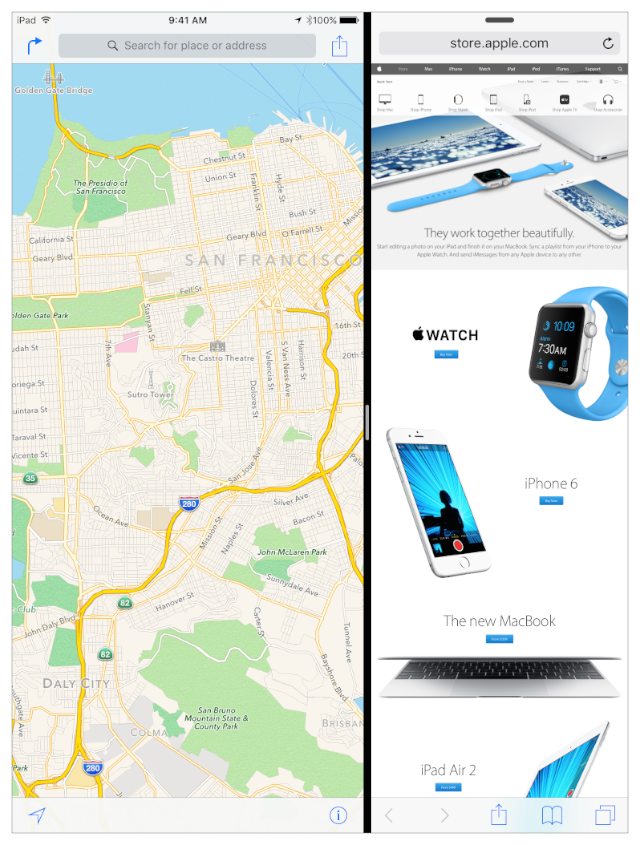
When the user taps that button, the screen enters Split View and the divider appears, as shown here. Maps, the primary app, resizes to the compact width of its portrait orientation window.
If the user then drags the divider all the way to the left to dismiss the primary app (this action is not shown here), the secondary app becomes primary and gains some additional capabilities, as described in Slide Over and Split View Quick Start.
Picture in Picture (sometimes called PiP) lets a user view a floating video window, potentially from a third app.
Both apps in Split View are running in the foreground. The app that provided the video, if it isn’t the primary or secondary app, is running in the background.
Despite all these new ways for users to interact with your app, participating in iOS 9 multitasking is straightforward when you’ve adopted Apple’s best-practice recommendations for iOS 8. And starting in Xcode 7, each iOS app template is preconfigured to support Slide Over and Split View.
Every iOS App Now Participates in Multitasking
Every iOS app—even one that opts out of using multitasking features—needs to operate as a good citizen in iOS 9.
From a development perspective, the biggest change is about resource management.
Now, even full-screen apps don’t have exclusive use of screen real estate, the CPU, memory, or other resources. For example, a user can:
Add a Picture in Picture window that plays over whatever else is onscreen (including a full-screen app), while the app that owns the video continues to run in the background. PiP from another app can increase the memory pressure on your app, and reduce the time-per-frame available for your app.
Employ Slide Over to use a secondary app. While it is visible, the secondary app runs in the foreground, again potentially increasing your memory pressure and reducing your available time per frame.
Invoke a keyboard from a secondary app in Slide Over, thereby obscuring a portion of the primary app. Every iOS 9 developer, even one who makes a full-screen app that never uses a keyboard, might want to respond to the keyboard appearance notifications as described in UIWindow Class Reference.
Even full-screen apps don’t have exclusive use of screen real estate, the CPU, memory, or other resources.
To participate effectively in this environment, an iOS 9 developer must carefully tune resource usage. If an app consumes too much time, screen updates can fall below 60 frames per second. Under memory pressure, the system terminates the app consuming the most memory.
For more on how to approach managing your resources in iOS 9, see A Multitasking Mindset.
Characterize Your App and Scope Your Work
Consider the characteristics of your app to determine which multitasking enhancements you want to adopt and the work you need to do.
Adopt Slide Over and Split View unless you have a specific reason not to. From a customer’s perspective, an iOS 9 app that doesn’t adopt Slide Over and Split View feels out of place.
Consider opting out only if your app falls into one of these narrow categories:
Camera-centric apps, where using the entire screen for preview and capturing a moment quickly is your primary feature
Full-device apps, such as games that use iPad sensors as part of their core gameplay
Otherwise, Apple, and your customers, expect you to adopt Slide Over and Split View. To learn how, read Slide Over and Split View Quick Start.
To opt out of being eligible to participate in Slide Over and Split View, add the UIRequiresFullScreen key to your Xcode project’s Info.plist file and apply the Boolean value YEStrue.
Adopt PiP if your app’s primary role is playback of medium-to-long duration video content.
You should support Picture in Picture when there is value to a user for a video to play while the user interacts with other parts of your app, or with other apps. To get up and running with PiP, read Picture in Picture Quick Start.
Opt out of PiP for in-game transition scenes, first-launch sequences, and similar content. You can opt out of PiP for a given video as follows:
For the
AVPlayerViewControllerclass, set theallowsPictureInPicturePlaybackproperty value toNOfalse.For the
AVPlayerLayerclass, do not instantiate anAVPictureInPictureControllerwith your player layer object.For the
WKWebViewclass, set itsallowsPictureInPictureMediaPlaybackproperty toNOfalse.
If your app plays HTTP Live Streaming (HLS) video, optimize playback using metadata. Optimize your app’s performance for various video window sizes, and minimize battery drain, by responding to stream-variant metadata tags. Content delivery networks (CDNs) you work with should likewise provide multiple stream variants and annotate each variant with an appropriate resolution tag. For more information, see HTTP Live Streaming Overview.
If your app shows content on a second physical screen when connected, test transitions. In particular, test the use case of transitioning from secondary app to primary app. (Do this by opening your app as a secondary app, then moving the divider all the way to the screen edge to dismiss the primary app.) Only the primary app is eligible to work with a second physical screen, so a transition from secondary to primary app is a new scenario in which your app can receive a UIScreenDidConnectNotification notification. Ensure that your app helps users understand what’s happening here, as content can move, perhaps surprisingly, to the second screen.
Development Environment
Xcode 7 supports adopting multitasking enhancements on iPad.
Use the new features in Xcode 7, Simulator, and Instruments:
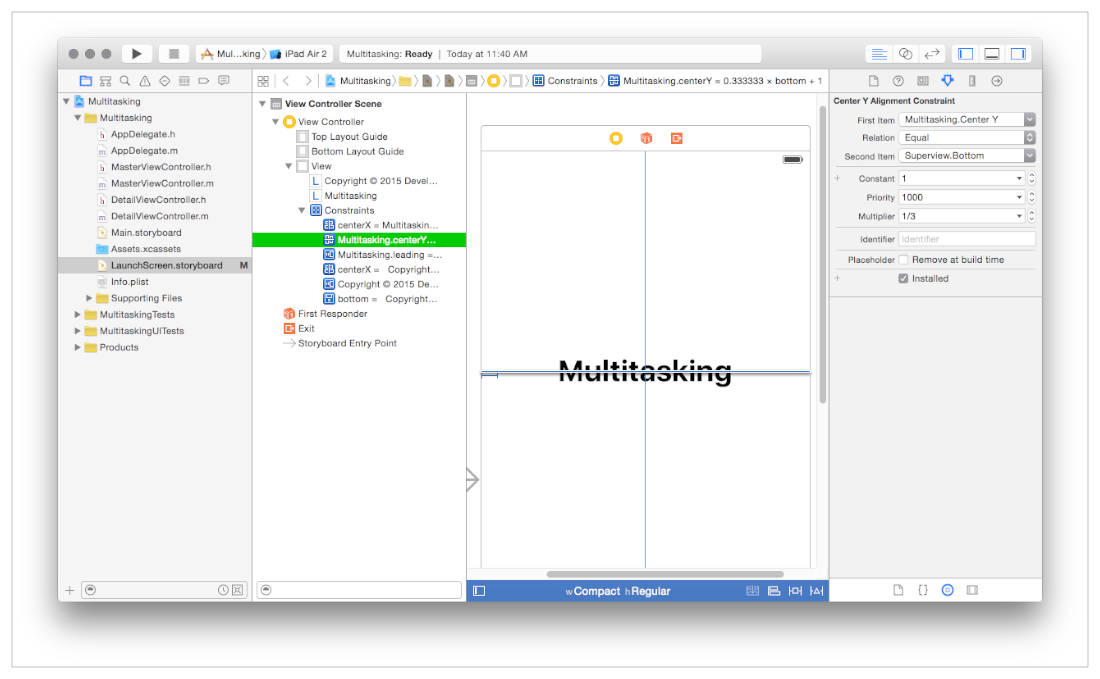
Each iOS app template in Xcode 7 is preconfigured to support Slide Over and Split View, including, for example, a
LaunchScreen.storyboardfile and a preconfiguredInfo.plistfile. See Xcode Overview.Storyboards in Interface Builder make it easy to work with Auto Layout constraints. See Auto Layout Guide, Auto Layout Help, and Storyboard Help.
The Interface Builder Preview assistant lets you instantly see how your layouts adapt to the size class variations in Slide Over and Split View scenarios. See Size Classes Design Help and Previewing Your Layout for Different Localizations, iOS Devices, and iOS Versions.
Simulator in Xcode 7 lets you invoke Slide Over and Split View by using the same gestures you do on a device. You can use Simulator to test all aspects of your Slide Over and Split View layout behavior, and to test Picture in Picture. However, Simulator does not emulate the memory, CPU, GPU, disk I/O, or other resource characteristics of an iOS device. For guidance on using Simulator, see Simulator User Guide.
The Allocations, Time Profiler, and Leaks profiling templates in Instruments offer insight into your app’s behavior and resource usage. See Instruments User Guide and Instruments Help.
Xcode 7 provides a visual interface for comprehensive support of asset catalogs. Using asset catalogs for your visual resources, such as image sets and app icons, is important for optimizing your app’s memory footprint. See Asset Catalog Help. You can also work with asset catalogs programmatically, as described in UIImageAsset Class Reference.
To test memory, CPU, GPU, and all hardware-related behavior, test your app on the hardware you want to support. To test your app on a device, you must be a member of the iOS Developer Program. See Managing Accounts in App Distribution Guide.
The following iPad models support multitasking enhancements in iOS 9.
Device |
Slide Over |
Picture in Picture |
Split View |
|---|---|---|---|
|
iPad mini 2 |
|
|
|
|
iPad mini 3 |
|
|
|
|
iPad mini 4 |
|
|
|
|
iPad Air |
|
|
|
|
iPad Air 2 |
|
|
|
|
iPad Pro |
|
|
|
A Multitasking Mindset
To succeed on iPad in iOS 9, your app must behave as a good device-resource citizen—toward its neighboring apps as well as toward the system.
When your app runs in the foreground, another app might be running beside it, and a Picture in Picture window could be playing, with its owning app running in the background.
Before iOS 9, you could write your app to use any available CPU, GPU, memory, I/O, and hardware resources and maintain a great experience. In iOS 9, this changes. It’s critical for every app to use resources efficiently so a user’s iPad experience is fluid and responsive.
For best user experience, the system tightly manages resource usage and terminates apps that are using more than their fair share.
The bulk of your work in adopting multitasking enhancements on iPad might well be in adopting best practices for resource management. As a first pass:
Test your app in Instruments to ensure it is not leaking memory, growing its memory consumption in an unbounded fashion, or blocking the main thread. Read Instruments User Guide and Instruments Help.
Employ app state transition delegate methods, when your app moves to the background, to discard unneeded view controllers and views, assets, and data caches. Read Strategies for Handling App State Transitions in App Programming Guide for iOS.
Test your app on each supported device side-by-side with a resource-intensive app, such as Maps set to Satellite view and performing a flyover animation. Do this with your app as a primary app and as a secondary app, ensuring in both cases that your app and Maps remain responsive.
In iOS 9, it’s no longer appropriate to think in terms of device idiom or interface orientation. Your app can find itself in either a compact or regular horizontal size class on iPad, with size changes independent of interface orientation. Instead, employ trait collections and size classes (see UITraitCollection Class Reference), and adopt the UIContentContainer and UITraitEnvironment protocols, as described in Slide Over and Split View Quick Start.
Likewise, in iOS 9 it’s no longer appropriate to employ the screen’s bounds to gauge your app’s visible area. Instead, obtain the value of your app’s window’s bounds property (which the UIWindow class inherits from the UIView class.)
Although Auto Layout is not required to provide a best-of-class iOS 9 app, it makes doing so easier. Auto Layout provides performance benefits and helps you align with Apple best practices described in iOS Human Interface Guidelines. Simply put, Auto Layout helps you get visual content in the right places and helps future-proof your app as iOS evolves. Read Auto Layout Guide and Auto Layout Help.
You can adopt Auto Layout iteratively, one layout at a time. At a minimum, your required LaunchScreen.storyboard file must employ Auto Layout. Throughout your app, use storyboards to help your views adapt to changing size classes as a user opens and uses your app in different contexts. Read Storyboard Help.
Copyright © 2018 Apple Inc. All rights reserved. Terms of Use | Privacy Policy | Updated: 2016-03-01