Building a Layer Hierarchy
Most of the time, the best way to use layers in your app is to use them in conjunction with a view object. However, there are times when you might need to enhance your view hierarchy by adding additional layer objects to it. You might use use layers when doing so offers better performance or lets you implement a feature that would be difficult to do with views alone. In those situations, you need to know how to manage the layer hierarchies you create.
Arranging Layers into a Layer Hierarchy
Layer hierarchies are similar in many ways to view hierarchies. You embed one layer inside another to create a parent-child relationship between the layer being embedded (known as the sublayer) and the parent layer (known as the superlayer). This parent-child relationship affects various aspects of the sublayer. For example, its content sits above the content of its parent, its position is specified relative to the coordinate system of its parent, and it is affected by any transforms applied to the parent.
Adding, Inserting, and Removing Sublayers
Every layer object has methods for adding, inserting, and removing sublayers. Table 4-1 summarizes these methods and their behavior.
Behavior | Methods | Description |
|---|---|---|
Adding layers | Adds a new sublayer object to the current layer. The sublayer is added to the end of the layer’s list of sublayers. This causes the sublayer to appear on top of any siblings with the same value in their | |
Inserting layers | Inserts the sublayer into the sublayer hierarchy at the specified index or at a position relative to another sublayer. When inserting above or below another sublayer, you are only specifying the sublayer’s position in the | |
Removing layers | Removes the sublayer from its parent layer. | |
Exchanging layers | Exchanges one sublayer for another. If the sublayer you are inserting is already in another layer hierarchy, it is removed from that hierarchy first. |
You use the preceding methods when working with layer objects you created yourself. You would not use these methods to arrange layers that belong to layer-backed views. However, a layer-backed view can act as the parent for standalone layers you create yourself.
Positioning and Sizing Sublayers
When adding and inserting sublayers, you must set the size and position of the sublayer before it appears onscreen. You can modify the size and position of a sublayer after adding it to your layer hierarchy but should get in the habit of setting those values when you create the layer.
You set the size of a sublayer using the bounds property and set its position within its superlayer using the position property. The origin of the bounds rectangle is almost always (0, 0) and the size is whatever size you want for the layer specified in points. The value in the position property is interpreted relative to the layer’s anchor point, which is located in the center of the layer by default. If you do not assign values to these properties, Core Animation sets the initial width and height of the layer to 0 and sets the position to (0, 0).
myLayer.bounds = CGRectMake(0, 0, 100, 100); |
myLayer.position = CGPointMake(200, 200); |
How Layer Hierarchies Affect Animations
Some superlayer properties can affect the behavior of any animations applied to its child layers. One such property is the speed property, which is a multiplier for the speed of the animation. The value of this property is set to 1.0 by default but changing it to 2.0 causes animations to run at twice their original speed and thereby finish in half the time. This property affects not only the layer for which it is set but also for that layer’s sublayers. Such changes are multiplicative too. If both a sublayer and its superlayer have a speed of 2.0, animations on the sublayer run at four times their original speed.
Most other layer changes affect any contained sublayers in predictable ways. For example, applying a rotation transform to a layer rotates that layer and all of its sublayers. Similarly, changing a layer’s opacity changes the opacity of its sublayers. Changes to the size of a layer follow the rules for layout that are described in Adjusting the Layout of Your Layer Hierarchies.
Adjusting the Layout of Your Layer Hierarchies
Core Animation supports several options for adjusting the size and position of sublayers in response to changes to their superlayer. In iOS, the pervasive use of layer-backed views makes the creation of layer hierarchies less important; only manual layout updates are supported. For OS X, several other options are available that make it easier to manage your layer hierarchies.
Layer-level layout is only relevant if you are building layer hierarchies using standalone layer objects you created. If your app’s layers are all associated with views, use the view-based layout support to update the size and position of your views in response to changes.
Using Constraints to Manage Your Layer Hierarchies in OS X
Constraints let you specify the position and size of a layer using a set of detailed relationships between the layer and its superlayer or sibling layers. Defining constraints requires the following steps:
Create one or more
CAConstraintobjects. Use those objects to define the constraint parameters.Add your constraint objects to the layer whose attributes they modify.
Retrieve the shared
CAConstraintLayoutManagerobject and assign to the immediate superlayer.
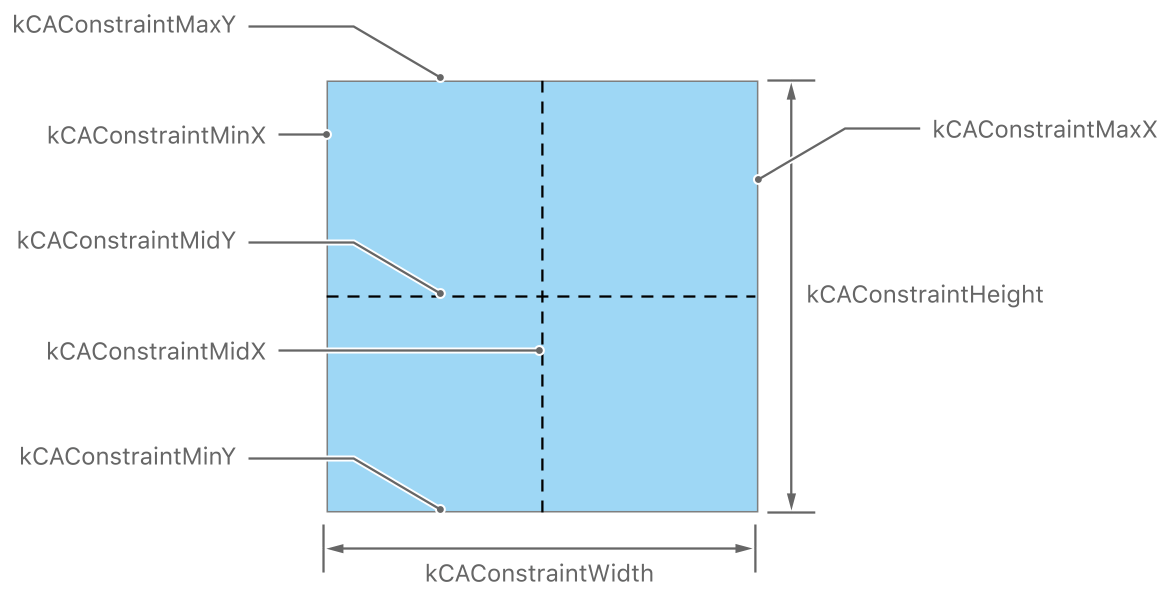
Figure 4-1 shows the attributes that you can use to define a constraint and the aspect of the layer that they impact. You can use constraints to change the position the layer based on the position of its edges of midpoints relative to another layer. You can also use them to change the size of the layer. The changes you make can be proportional to the superlayer or relative to another layer. You can even add a scaling factor or constant to the resulting change. This extra flexibility makes it possible to control a layer’s size and position very precisely using a simple set of rules.
Each constraint object encapsulates one geometry relationship between two layers along the same axis. A maximum of two constraint objects may be assigned to each axis and it is those two constraints that determine which attribute is changeable. For example, if you specify constraints for the left and right edge of the layer, the size of the layer changes. If you specify constraints for the left edge and width of the layer, the location of the layer’s right edge changes. If you specify a single constraint for one of the layer’s edges, Core Animation creates an implicit constraint that keeps the size of the layer fixed in the given dimension.
When creating constraints, you must always specify three pieces of information:
The aspect of the layer that you want to constrain
The layer to use as a reference
The aspect of the reference layer to use in the comparison
Listing 4-1 shows a simple constraint that pins the vertical midpoint of a layer to the vertical midpoint of its superlayer. When referring to the superlayer, use the string superlayer. This string is a special name reserved for referring to the superlayer. Using it eliminates needing to have a pointer to the layer or know the layer’s name. It also allows you to change the superlayer and have the constraint apply automatically to the new parent. (When creating constraints relative to sibling layers, you must identify the sibling layer using its name property.)
Listing 4-1 Defining a simple constraint
[myLayer addConstraint:[CAConstraint constraintWithAttribute:kCAConstraintMidY |
relativeTo:@"superlayer" |
attribute:kCAConstraintMidY]]; |
To apply constraints at runtime, you must attach the shared CAConstraintLayoutManager object to the immediate superlayer. Each layer is responsible for managing the layout of its sublayers. Assigning the layout manager to the parent tells Core Animation to apply the constraints defined by its children. The layout manager object applies the constraints automatically. After assigning it to the parent layer, you do not have to tell it to update the layout.
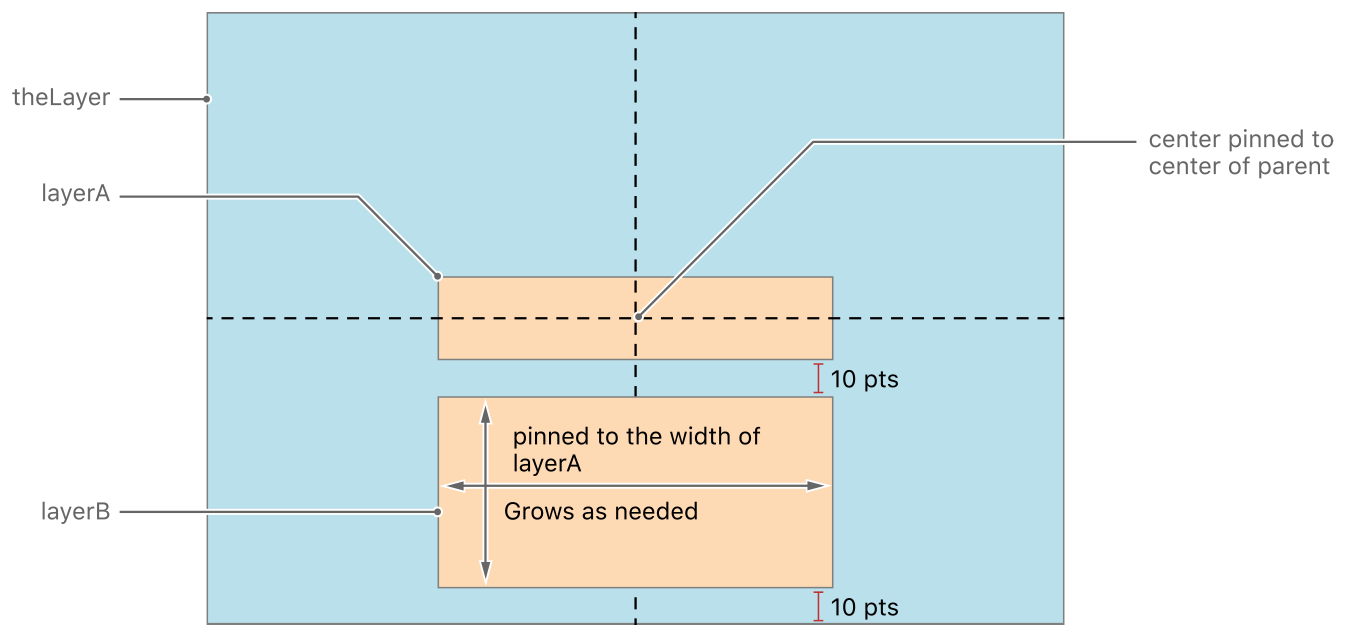
To see how constraints work in a more specific scenario, consider Figure 4-2. In this example, the design requires that the width and height of layerA remain unchanged and that layerA remain centered inside its superlayer. In addition, the width of layerB must match that of layerA, the top edge of layerB must remain 10 points below the bottom edge of layerA, and the bottom edge of layerB must remain 10 points above the bottom edge of the superlayer. Listing 4-2 shows the code that you would use to create the sublayers and constraints for this example.
Listing 4-2 Setting up constraints for your layers
// Create and set a constraint layout manager for the parent layer. |
theLayer.layoutManager=[CAConstraintLayoutManager layoutManager]; |
// Create the first sublayer. |
CALayer *layerA = [CALayer layer]; |
layerA.name = @"layerA"; |
layerA.bounds = CGRectMake(0.0,0.0,100.0,25.0); |
layerA.borderWidth = 2.0; |
// Keep layerA centered by pinning its midpoint to its parent's midpoint. |
[layerA addConstraint:[CAConstraint constraintWithAttribute:kCAConstraintMidY |
relativeTo:@"superlayer" |
attribute:kCAConstraintMidY]]; |
[layerA addConstraint:[CAConstraint constraintWithAttribute:kCAConstraintMidX |
relativeTo:@"superlayer" |
attribute:kCAConstraintMidX]]; |
[theLayer addSublayer:layerA]; |
// Create the second sublayer |
CALayer *layerB = [CALayer layer]; |
layerB.name = @"layerB"; |
layerB.borderWidth = 2.0; |
// Make the width of layerB match the width of layerA. |
[layerB addConstraint:[CAConstraint constraintWithAttribute:kCAConstraintWidth |
relativeTo:@"layerA" |
attribute:kCAConstraintWidth]]; |
// Make the horizontal midpoint of layerB match that of layerA |
[layerB addConstraint:[CAConstraint constraintWithAttribute:kCAConstraintMidX |
relativeTo:@"layerA" |
attribute:kCAConstraintMidX]]; |
// Position the top edge of layerB 10 points from the bottom edge of layerA. |
[layerB addConstraint:[CAConstraint constraintWithAttribute:kCAConstraintMaxY |
relativeTo:@"layerA" |
attribute:kCAConstraintMinY |
offset:-10.0]]; |
// Position the bottom edge of layerB 10 points |
// from the bottom edge of the parent layer. |
[layerB addConstraint:[CAConstraint constraintWithAttribute:kCAConstraintMinY |
relativeTo:@"superlayer" |
attribute:kCAConstraintMinY |
offset:+10.0]]; |
[theLayer addSublayer:layerB]; |
One interesting thing to note about Listing 4-2 is that the code never sets the size of layerB explicitly. Because of the defined constraints, the width and height of layerB are set automatically every time the layout is updated. Therefore, setting the size using the bounds rectangle is unnecessary.
Setting Up Autoresizing Rules for Your OS X Layer Hierarchies
Autoresizing rules are another way of adjusting the size and position of a layer in OS X. With autoresizing rules, you designate whether the edges of your layer should remain at a fixed or variable distance from the corresponding edges of the superlayer. You can similarly designate whether the width or height of your layer is fixed or variable. The relationships are always between the layer and its superlayer. You cannot use autoresizing rules to specify relationships between sibling layers.
To set up the autosizing rules for a layer, you must assign the appropriate constants to the autoresizingMask property of the layer. By default, layers are configured to have a fixed width and height. During layout, the precise size and position of the layer is computed for you automatically by Core Animation and involve a complex set of calculations based on many factors. Core Animation applies the autoresizing behaviors before it asks your delegate to do any manual layout updates, so you can use the delegate to tweak the results of the autoresizing layout as needed.
Manually Laying Out Your Layer Hierarchies
On iOS and OS X, you can handle layout manually by implementing the layoutSublayersOfLayer: method on the delegate object of the superlayer. You use that method to adjust the size and position of any sublayers currently embedded inside the layer. When doing manual layout updates, it is up to you to perform the necessary calculations to position each sublayer.
If you are implementing a custom layer subclass, your subclass can override the layoutSublayers method and use that method (instead of a delegate) to handle any layout tasks. You should only override this method in cases where you need complete control over the positioning of sublayers inside your custom layer class. Replacing the default implementation prevents Core Animation from applying constraints or autoresizing rules on OS X.
Sublayers and Clipping
Unlike views, a superlayer does not automatically clip the contents of sublayers that lie outside its bounds rectangle. Instead, the superlayer allows its sublayers to be displayed in their entirety by default. However, you can reenable clipping by setting the masksToBounds property of the layer to YES.
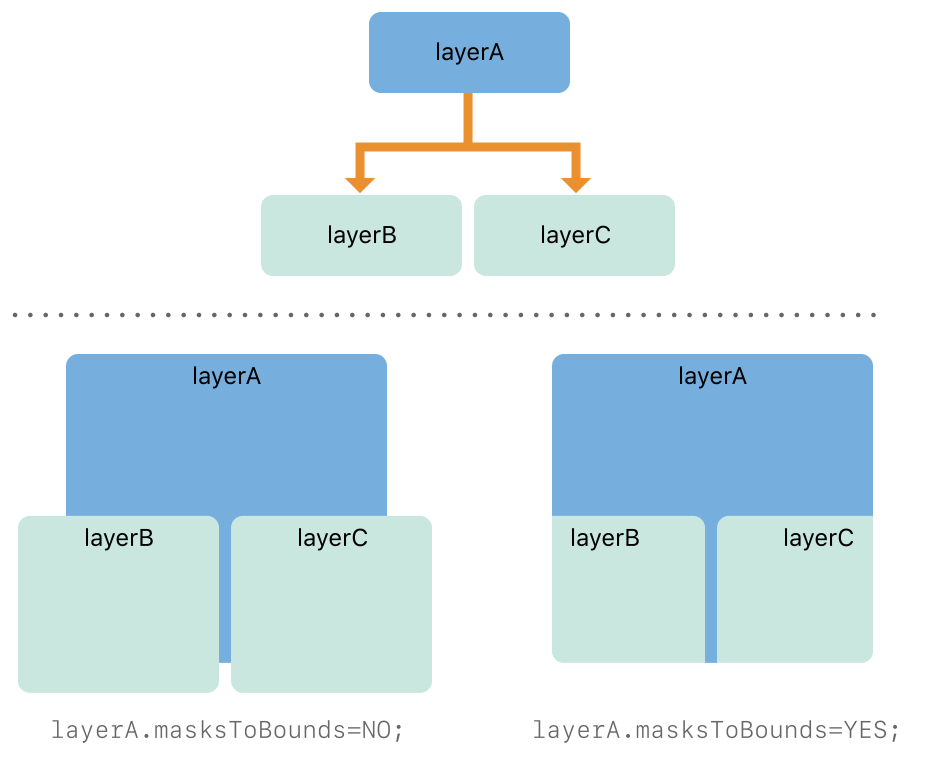
The shape of a layer’s clipping mask includes the layer’s corner radius, if one is specified. Figure 4-3 shows a layer that demonstrates how the masksToBounds property affects a layer with rounded corners. When the property is set to NO, sublayers are displayed in their entirety, even if they extend beyond the bounds of their parent layer. Changing the property to YES causes their content to be clipped.
Converting Coordinate Values Between Layers
Occasionally, you might need to convert a coordinate value in one layer to a coordinate value at the same screen location in a different layer. The CALayer class provides a set of simple conversion routines that you can use for this purpose:
In addition to converting point and rectangle values, you can also convert time values between layers using the convertTime:fromLayer: and convertTime:toLayer: methods. Each layer defines its own local time space and uses that time space to synchronize the beginning and ending of animations with the rest of the system. These time spaces are synchronized by default; however, if you change the animation speed for one set of layers, the time space for those layers changes accordingly. You can use the time conversion methods to to account for any such factors and ensure that the timing of both layers is synchronized.
Copyright © 2015 Apple Inc. All Rights Reserved. Terms of Use | Privacy Policy | Updated: 2015-03-09