Retired Document
Important: This document may not represent best practices for current development. Links to downloads and other resources may no longer be valid.
Xcode Preferences
Another simple way in which you can customize your work environment in Xcode is through Xcode’s preferences. Xcode provides preferences that let you enable and disable features, customize the behavior of operations in Xcode, and provide default values for project and file-level settings.
To open the Xcode Preferences window, choose Xcode > Preferences. The Xcode Preferences window contains options for controlling many different parts of the Xcode application. This chapter describes each of the preference panes in Xcode Preferences and the options that they contain.
You can open the preference pane for a particular group by clicking its icon. Note that any changes you make in a preference pane do not take effect until you click OK or Apply.
General Preferences
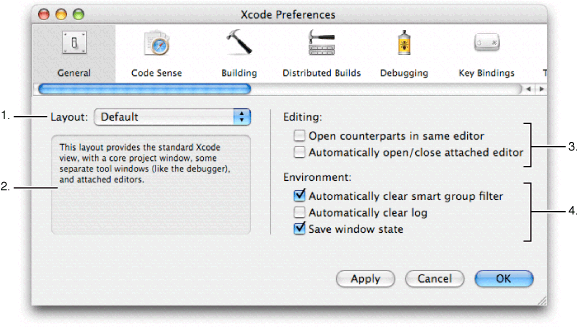
The General pane of the Xcode Preferences window lets you control general environment settings for the Xcode application, such as your project window configuration and windowing preferences. Figure 39-1 shows the General pane of Xcode Preferences.
Here is what the pane contains:
Layout menu. This menu lets you choose the project window configuration for all open projects. See Project Window Layouts for a description of the available layouts.
Layout description. This gives you a brief explanation of the layout selected in the Layout menu.
Editing options. These options control Xcode’s windowing policy for editor windows. See The Xcode Editor Interface to learn more about Xcode’s editor. The options are:
“Open counterparts in same editor” controls how Xcode displays files when jumping to a related header or source file, or to a related symbol definition or declaration. If this option is selected, Xcode always opens file and symbol counterparts in the current editor window; otherwise, it opens the a separate editor to display the counterpart. By default, this option is disabled. See Opening Header Files and Other Related Files describes how to jump to a file’s or symbol’s counterpart.
“Automatically open/close attached editor” controls when Xcode shows or hides the editor pane attached to the project, Build Results, Project Find, or Debugger windows. If this option is selected, Xcode will automatically show the attached editor for a window when you select an editable item. By default, this item is disabled. See Using the Attached Editor for more information on attached editors.
Environment options. These control general user interface settings across many different Xcode windows. These are:
“Automatically clear smart group filter” controls whether Xcode clears the contents of the Search field in the toolbar when you select a different item in the Groups & Files list. If this option is selected, Xcode clears the contents of the Search field when you change the currently selected smart group. Otherwise, the contents of the Search field are preserved. This option is enabled by default. See Searching and Sorting in the Detail View for more information on Search field.
“Automatically clear log” controls whether Xcode clears the contents of the run and console logs between sessions. If this option is selected, Xcode automatically clears the contents of the Run Log and Console Log windows each time you relaunch an executable in Xcode. Otherwise, information from the current session is appended to the existing log. This option is disabled by default.
“Save window state” controls whether Xcode saves the state of the windows in a project across sessions. If this option is selected, Xcode saves the state of a project’s open windows when you close the project and restores those windows when you next open the project. Otherwise, Xcode does not save the state of a project’s windows; reopening a project opens only the project window. By default, this option is enabled.
Code Sense Preferences
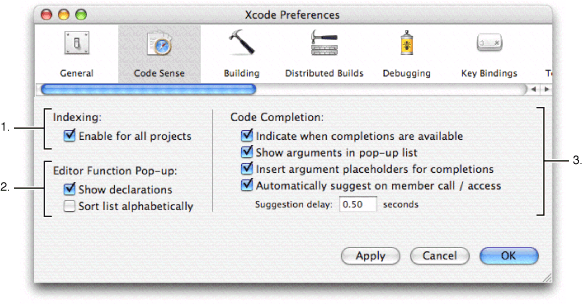
The Code Sense pane of the Xcode Preferences window contains options for controlling project indexing and Xcode’s interface for code completion. Figure 39-2 shows the Code Sense pane of Xcode Preferences.
Here is what the pane contains:
Indexing. The “Enable for all projects” option lets you turn indexing on and off for all projects. If this option is selected, Xcode generates a symbolic index for each project that you open. Xcode uses the information in this index to provide features such as code completion, symbol definition searching, and more.
Disabling this option turns indexing off for all projects and discards any existing project index. Features that rely on this index, such as the Project Symbols smart group, will not work. This option is enabled by default. See Code Sense for more information.
Editor Function Pop-up. These options let you control the information and appearance of the function pop-up menu that appears in the navigation bar of Xcode’s editor. The function pop-up is described further in The Function Pop-up Menu. These options are:
“Show declarations” controls whether Xcode shows function and method declarations in the function pop-up menu. If this is selected, the function pop-up menu shows both declarations and definitions; otherwise it displays only definitions. This option is enabled by default.
“Sort list alphabetically” controls how Xcode sorts the contents of the function pop-up menu. If this option is selected, the items in the menu appear in alphabetical order. Otherwise, they are sorted in the order in which they appear in the file. This option is disabled by default.
Code Completion. These options control Xcode’s code completion interface. Code completion, described in Code Completion, suggests matches for symbol names and keywords as you type. The options are:
“Indicate when completions are available” controls whether Xcode shows you when it has suggestions for completing the current text. If this option is selected, Xcode underlines the text you have entered in the editor when there are suggestions for matching symbol names or keywords. Otherwise, Xcode does not underline the text, although completion suggestions are still available to you, as described in Using Code Completion. This option is enabled by default.
“Show arguments in pop-up list” controls whether Xcode displays arguments for functions and methods in the completion list. When this option is selected, Xcode displays the return type and arguments for functions and methods in the list of completion suggestions. Otherwise, Xcode shows only the symbol name. This option is on by default.
“Insert argument placeholders for completions” controls whether Xcode inserts the arguments to a function or method when you insert a completion suggestion. If this option is enabled, inserting a function or method using code completion also inserts placeholders for arguments. Otherwise, Xcode only inserts the symbol name. This option is on by default.
“Automatically suggest on member call / access” controls whether Xcode automatically shows completion suggestions when accessing class members. When this option is enabled, Xcode automatically displays the completion list in the context of a method call or field access. Otherwise, you must bring up the completion list yourself, as described in Using Code Completion. This option is off by default.
“Suggestion delay” specifies the amount of time, in seconds, after you stop typing, before Xcode automatically displays the completion list. This delay only applies if “Automatically suggest on member call / access” is enabled. By default, this delay is set to half a second; to change it, type the new value in the field.
Building Preferences
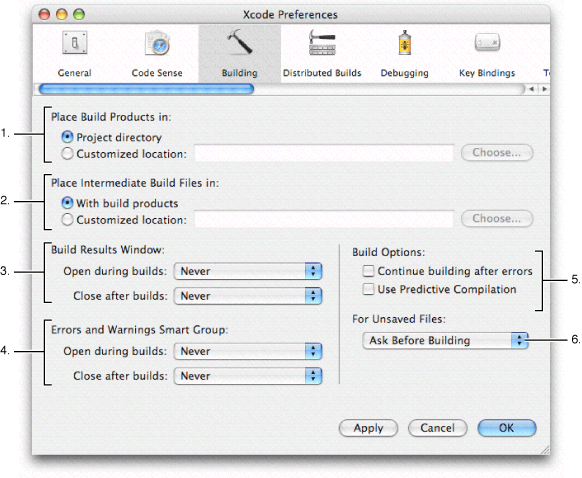
The Building pane of the Xcode Preferences window contains options for setting default build locations and controlling the display of the Build Results window. Figure 39-3 shows the Building pane of Xcode Preferences.
Here is what the pane contains:
Place Build Products In. This setting controls the location at which Xcode places the output generated when you build a target—such as an application, tool, and so forth—for all new projects that you create. The default value for this option is “Project directory”; for all development builds of a target, Xcode places the product that is generated in the build folder in your project directory.
To specify a different folder for build products, select “Customized location”; Xcode places build products in the folder specified in the associated text field. You can type the path to that folder in the field or click Choose to locate the folder using the standard navigation dialog.
You can also override this setting for individual projects. For information on build locations in Xcode, see Build Locations.
Place Intermediate Files In. This setting controls the location at which Xcode places the intermediate files generated by the Xcode build system when you build a target—such as object (
.o) files—for all new projects that you create. The default value for this option is “With build products”; for all builds of a target, Xcode places the intermediate files that are generated in the location specified for build products. This is the location indicated by the “Place Build Products In” option, described above, either in the Building preferences or at the project level.To specify a different folder for build products, select “Customized location”; Xcode places intermediate files in the folder specified in the associated text field. You can type the path to that folder in the field or click Choose to locate the folder using the standard navigation dialog.
You can also override this setting for individual projects. For information on build locations in Xcode, see Build Locations.
Build Results Window. These pop-up menus control when Xcode opens the Build Results window or pane. These menus are:
Open during builds. This menu lets you specify when (or whether) Xcode automatically opens the Build Results window or pane when you build a target. By default, the value of this option is “Never” and Xcode does not automatically open the Build Results window.
Close after builds. This menu lets you specify when (or whether) Xcode automatically closes the Build Results window or pane after a build completes. By default, the value of this option is “Never” and Xcode does not automatically close the Build Results window.
These menus, and their possible values, are described further in Specifying When Detailed Build Results are Shown.
Error and Warnings Smart Group. These pop-up menus control when Xcode selects the Errors and Warnings smart group in the Groups & Files list and discloses its contents before bringing the project window to the front. These menus are:
Open during builds. This menu lets you specify when (or whether) Xcode automatically shows the contents of the Errors and Warnings smart group when you build a target. By default, the value of this option is “Never” and Xcode does not automatically open the Errors and Warnings smart group.
Close after builds. This menu lets you specify when (or whether) Xcode automatically shows the contents of the Errors and Warnings smart group after a build completes. By default, the value of this option is “Never” and Xcode does not automatically close the Errors and Warnings smart group.
These menus, and their possible values, are described further in Viewing Errors and Warnings.
Build Options. These options let you choose how Xcode reacts to build errors and whether Xcode tries to speed up the build process by using Predictive Compilation. The options are:
“Continue building after errors” controls what Xcode does when it encounters a build error. If this option is selected, Xcode continues trying to build the next file in the target after encountering an error. Otherwise, Xcode stops the build. By default, this option is disabled.
“Use Predictive Compilation” turns Xcode’s Predictive Compilation feature on and off. When this option is selected, Xcode tries to shorten build time by beginning to compile source files in the background, even before you initiate a build. Otherwise, Xcode does nothing until you hit Build. By default, this option is disabled. Predictive Compilation is described further in Predictive Compilation.
For Unsaved Files. This menu determines what Xcode does with files that have unsaved changes when you start a build. The options are:
Ask Before Building. If there are files containing unsaved changes when you click Build, Xcode displays a dialog asking you what to do before it starts the build. You can choose to save or discard the changes and then continue the build, or you can cancel the build operation. This is the default value for the For Unsaved Files menu.
Always Save. Xcode automatically saves all unsaved changes before it begins building.
Never Save. Xcode automatically discards all unsaved changes before it begins building.
Cancel Build. If there are files containing unsaved changes, Xcode cancels the build operation.
For more information on building in Xcode, see Building a Product.
Distributed Builds Preferences
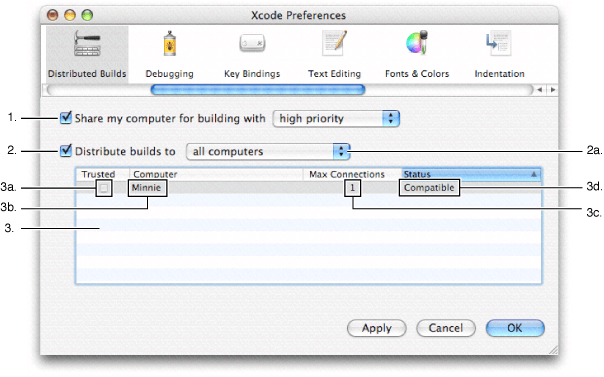
The Distributed Builds pane of the Xcode Preferences window contains options for distributing build tasks to other computers on your network. Figure 39-4 shows the Distributed Builds pane of Xcode Preferences.
Here is what the pane contains:
“Share my computer for building with.” Selecting this option makes your computer available to other computers on your local network for performing build tasks. This option is disabled by default.
If you enable this option, the pop-up menu specifies the priority assigned to build tasks that are distributed to your computer. This determines the amount of processing time allocated for that task. You can choose high, low, or medium priority. The default value is “high priority.”
“Distribute builds to.” This option turns distributed builds on and off. If this option is selected, Xcode looks for available computers on your local network and distributes build tasks to them. Otherwise, all building is done on your local computer. This option is off by default.
Table of available computers. Xcode automatically discovers computers on the local network that are available for building. This table shows all of the computers available on the current network. For each available computer, the table shows:
Whether the computer is trusted. You can restrict which computers Xcode distributes builds to, using the pop-up menu described in item 4. If you do so, you must indicate which of the available computers you “trust;” that is, which of the computers you allow Xcode to use for building. A computer is trusted if the checkbox in the Trusted column is selected.
The name of the computer. The Computer column displays the Bonjour name of the computer that is available for building.
The number of builds the computer can handle. Dual-processor machines can use both processors for building. The Max Connections columns shows the number of processors, and therefore the maximum number of connections to, the computer.
Whether the available computer is compatible. To distribute build tasks to another computer, that computer must be running the same versions of Mac OS X, GCC, and Xcode as you are running on your computer. The Status column indicates whether the computer broadcasting its services is compatible with yours
The “Distribute builds to” pop-up menu lets you restrict the computers that Xcode distributes builds to. You can choose:
All computers. Xcode distributes build tasks to any of the available computers, listed in the table. By default, Xcode distributes builds to any available computer.
Trusted computers only. Xcode distributes builds only to those computers marked “Trusted” in the table.
For more information about distributed builds in Xcode, see Distributing Builds Among Multiple Computers.
Debugging Preferences
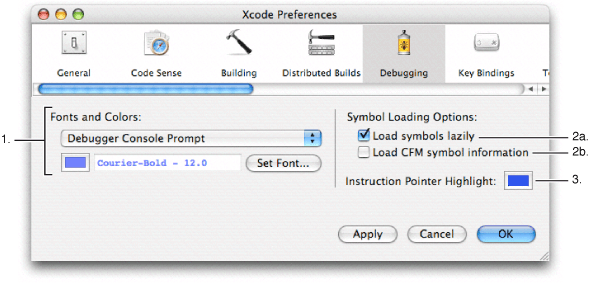
The Debugging pane of the Xcode Preferences window contains options for controlling the appearance of Xcode’s debugger window and specifying how the debugger loads debugging symbols. Figure 39-5 shows the Debugging pane of Xcode Preferences.
Here is what the pane contains:
Fonts and Colors. These options let you control the color and font used for text in the debugger console and standard I/O windows. To see or change the color or font for a text item, select it form the pop-up menu. To change the font for an item, click Set Font and choose a new font from the Fonts window. To change irs color, click the color well and choose a new color from the Colors window.
Symbol Loading Options. These options let you control which symbols Xcode’s debugger load and when. These options are:
“Load symbols lazily” controls when Xcode loads debugging symbols for an executable when you run it in Xcode’s debugger. If this option is selected, Xcode loads symbols only as they are needed. Otherwise, Xcode loads all symbols for the executable and its libraries when you launch it in the debugger. This option is enabled by default. You can further customize which symbols are loaded in the Shared Libraries window. See Shared Libraries Window for more information.
“Load CFM symbol infomration” specifies whether Xcode loads symbol information for CFM-based binaries.
Instruction Pointer Highlight. This option controls the color used to highlight the location of the instruction pointer in the debugger window when execution of the current program is stopped. To change this color, click the color well and choose the new color from the Colors window. For more information on the instruction pointer and controlling execution of your code, see Controlling Execution of Your Code
Key Bindings Preferences
The Key Bindings pane of the Xcode Preferences window lets you see and customize the list of Xcode commands and their keyboard shortcuts. Figure 39-6 shows the Key Bindings pane of Xcode Preferences.
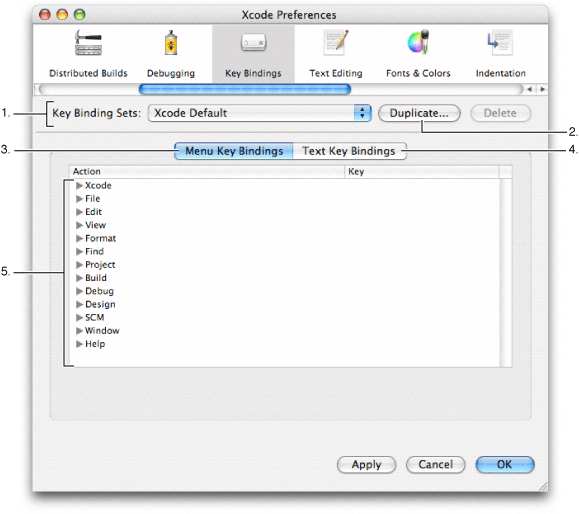
Here is what the pane contains:
Key Bindings Sets. This menu lets you choose which set of key bindings are in effect. Xcode provides four predefined sets: Xcode Default, BBEdit Compatible, Metrowerks Compatible, and MPW Compatible. You can also add your own custom sets of key bindings.
Duplicate. You cannot edit any of the built-in key bindings sets. To create your own set of custom key bindings, click this button to create a copy of the current set and edit that copy.
Menu Key Bindings. This pane lists the key bindings for menu items in Xcode.
Text Key Bindings. This pane lists the key bindings for text editing actions in Xcode’s editor.
Key bindings. The key bindings table lists all of the available key bindings in Xcode. The Action column lists the Xcode action—a menu item or text editing command—and the Key column lists the keyboard shortcut for that action. To edit the key binding for a command, double-click in the Key column and type the key combination. You can assign more than one keyboard shortcut to an action. To add additional key combinations, click the plus (+) button.
For more information on customizing key bindings, see Customizing Key Equivalents.
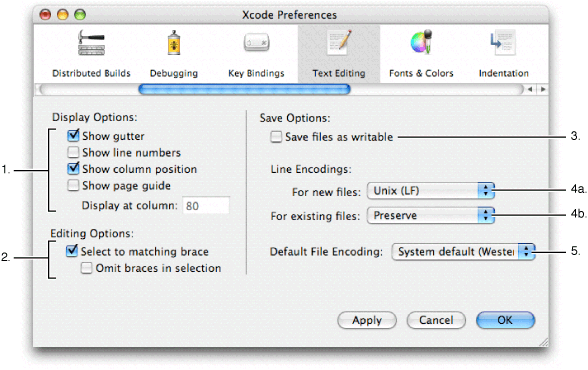
Text Editing Preferences
The Text Editing pane of the Xcode Preferences window lets you control display options for the Xcode editor, as well default settings for saving files that you edit in Xcode’s editor, such as file encoding, and so forth. Figure 39-7 shows the Text Editing pane of Xcode Preferences.
Here is what the pane contains:
Display Options. These options control the appearance of Xcode’s editor, whether it appears as a separate window or as a pane attached to another Xcode window. See Controlling the Appearance of the Code Editor to learn more about changing the appearance of Xcode’s editor. The options are:
“Show gutter” controls when Xcode displays the gutter in the editor. The Xcode gutter shows information about the current file such as the location of breakpoints, line numbers, and the location of errors or warnings. If this option is selected, Xcode always shows the gutter in all open editors; otherwise, it shows the gutter only when debugging. By default, this option is enabled. See Displaying the Editor Gutter for more information.
“Show line numbers” controls whether Xcode shows a file’s line numbers in the editor gutter. If this option is selected, Xcode shows line numbers for a file whenever the editor gutter is visible. By default, this item is disabled. See Displaying the Editor Gutter for more information
“Show column position” controls whether Xcode shows the current position of the cursor in the function pop-up of the editor. If this option is selected, Xcode shows the current position of the insertion point, as the offset from the left margin of the line. This is measured in number of characters. By default, this item is disabled. See Navigating Source Code Files for more information.
“Show page guide” controls whether Xcode displays the page guide in the editor. If this option is selected, Xcode displays a grey guide line in the editor to show you the right margin of the editor. This is just a guide, and does not actually affect the margin width in the editor. By default, this item is disabled. See Displaying a Page Guide for more information.
The “Display at column” field controls the column position at which Xcode displays the page guide discussed in the previous item. This position is specified in number of characters. To change the position at which the page guide is shown, enter a new number in the field. See Displaying a Page Guide for more information.
Editing Options. These options control Xcode’s selection behavior for source code. The options are:
“Select to matching brace” controls whether Xcode automatically selects text contained in braces when you double-click the brace. If this option is selected, double-clicking a brace, bracket, or parenthesis in a source code file automatically selects the text up to, and including, the matching brace. By default, this option is enabled. See Matching Parentheses, Braces, and Brackets.
“Omit braces in selection” controls whether Xcode includes the braces themselves in text selected by double-clicking a brace, bracket, or parenthesis. If this option is selected, double-clicking a brace, bracket, or parenthesis selects the text between the braces, but not the braces themselves. By default, this item is disabled. See Matching Parentheses, Braces, and Brackets for more information on attached editors.
Save Options. The Save Options on the right side of the Text Editing pane let you specify how Xcode stores files that you edit in the Xcode editor. The next several items in this list describe these options.
“Save files as writable” controls the permissions that Xcode uses for files that it saves. If this option is selected, Xcode adds write permission to files that you edit and save in Xcode. Otherwise, Xcode preserves permissions for files as they are on disk. Files that you create in Xcode already have write permission. This option is disabled by default. See Saving Files for a description of the available layouts.
Line Encodings. These menus control the default line endings used for files in Xcode. You can use Unix, Windows, or Mac line endings for files that you open and edit in Xcode; the type of line endings used for a file can affect which file editors and other tools can interpret the file. See Changing Line Endings for more information on line endings. The menus are:
For new files. This menu lets you choose the type of line endings used for files that Xcode creates. You can choose Unix, Mac, or Windows line endings. The default value for this setting is Unix.
For existing files. This menu lets you choose the type of line endings used for preexisting files that you open and edit in Xcode. If you choose Unix, Mac, or Windows from this menu, Xcode saves all files that you open and edit in Xcode with line endings of this type, changing them the next time it saves the file, if necessary. If you choose Preserve from this menu, Xcode uses whatever type of line endings the file already has. The default value for this setting is Preserve.
Default File Encoding. This menu lets you choose the default file encoding that Xcode uses for new files that you create in Xcode. By default, this is set to “System default;” Xcode uses the same default file encoding as the system. You can choose any of the file encoding supported by your Mac OS X system from this menu. See Choosing File Encodings for more information.
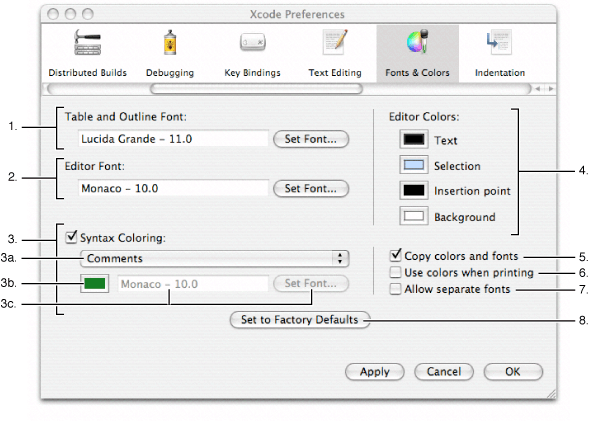
Fonts & Colors Preferences
The Fonts & Colors pane of the Xcode Preferences window controls the font used in Xcode’s user interface, and the font and font colors used for text in Xcode’s editor, including syntax coloring used to display different code elements in source code files. Figure 39-8 shows the Fonts & Colors pane of Xcode Preferences.
Here is what the pane contains:
Table and Outline Font. This option controls the font used to display text in the Groups & Files list and detail views in Xcode. The name and size of the current font is shown in the Table and Outline Font field. To change this font, click Set Font and choose a new font from the Font window. See The Project Window and its Components for more information on the Groups & Files list and the detail view.
Editor Font. This option controls the font that Xcode uses for plain text in the Xcode editor. The name and size of the current font is shown in the Editor Font field. To change this font, click Set Font and choose a new font from the Font window. You can change the color used for plain text in the editor using the Text color well, described in item 4a. See The Xcode Editor for more information on the Xcode editor.
Syntax Coloring. This option, and the options below it, control syntax coloring for code elements in source code files in Xcode’s editor. If this option is selected, Xcode uses different fonts and / or colors for each of the different code elements listed in the pop-up menu when it displays source code files in the editor. This option is enabled by default. See Setting Syntax Coloring to learn more. The options are:
The syntax coloring pop-up menu shows the various code elements that Xcode’s syntax coloring supports. To see or modify the font and font color for a particular type of code element, choose it from this menu.
The syntax coloring color well controls the font color used for the code element currently selected in the pop-up menu described in item 3a. To change this color, click the color well and choose a new color from the Colors palette.
The syntax coloring font field displays the name and size of the font used to display the code element currently selected in the pop-up menu indicated in item 3a. To change the font for the current item, click the Set Font button and choose a font in the Fonts window. All code elements use the font specified by the Editor Font option described in item 2, unless the “Allow separate fonts” option is selected, as described in item 7.
Editor Colors. These options control the colors used for various elements in Xcode’s editor. To change the color for an item, click its color well and choose a new color from the Colors window. See Controlling the Appearance of the Code Editor for a description of how to control the editor’s appearance. You can change the colors used for the following items:
Text. This option controls the color used for plain text in the editor. When syntax coloring is off, this is the font color used for all text in the editor. When syntax coloring is enabled, this is the color used for all text that does not constitute one of the code elements described in item 3a.
Selection. This option controls the color used to highlight selected text in the editor.
Insertion point. This option controls the color used for the insertion point in the editor.
Background. This option controls the color used for the background of the editor window or pane.
“Copy colors and fonts” controls whether Xcode preserves syntax coloring when copying and pasting from an editor. If this option is selected, Xcode copies color and font information to the clipboard when you copy or cut text from an Xcode editor. This option is enabled by default.
“Use colors when printing” controls whether Xcode preserves syntax coloring information when printing files from and editor. If this option is selected, Xcode prints source code files using the colors and fonts specified by the syntax coloring rules. This option is disabled by default.
“Allow separate fonts” controls whether Xcode lets you set fonts individually for the code elements used for syntax coloring, as described in item 3. If this option is selected, you can set the font for each code element separately. Otherwise, Xcode uses the font specified by the Editor Font option (described in item 2) for all text in an editor, regardless of the code element. This option does not affect the colors used for various code elements when syntax coloring is on. This option is disabled by default.
Set to Factory Defaults. This button returns all of the font and color options in the Fonts & Colors pane to their original settings.
Indentation Preferences
The Indentation pane of the Xcode Preferences window controls formatting options for files in Xcode’s editor. Figure 39-9 shows the Indentation pane of Xcode Preferences.

Here is what the pane contains:
Tabs. These options control how Xcode inserts space into files when editing files. See Setting Tab and Indent Formats for more information. These options are:
“Insert ‘tabs’ instead of spaces” controls whether Xcode inserts tab characters when you press the Tab key in the editor. If this option is selected, pressing the Tab key inserts a Tab character. Otherwise, Xcode inserts space characters. This option is enabled by default.
Tab width. This option specifies the default width, in number of characters, used to display tabs in the editor. To change the width of a tab, type a number in the text field. You can override this setting for individual files, as described in Inspecting File Attributes.
Indent width. This option specifies the default width, in number of characters, used to indent lines in the editor. To change the indentation width, type a number in the text field. You can override this setting for individual files, as described in Inspecting File Attributes.
Line Wrapping. These options control how Xcode wraps lines in files displayed in the editor. These options do not affect line breaks or other information stored with the file, simply how the file is displayed onscreen. See Wrapping Lines for more information. These options are:
“Wrap lines in editor” controls whether Xcode wraps lines in an editor. If this option is selected, Xcode wraps text to the next line when it reaches the outer edge of the text editing area onscreen. Otherwise, Xcode only moves text to the next line when a return or new line characters is inserted. This option is disabled by default.
“Indent wrapped lines by” controls how Xcode indents text that it wraps to the next line in an editor. If this number is greater than 0, Xcode indents wrapped text by the specified number of characters, as a visual indication that the text has been wrapped (as opposed to being moved to the next line by the insertion of a carriage return or new line character). This option is only available if “Wrap lines in editor is enabled.” To change the amount by which lines are indented, type a new number in the field.
Syntax-aware indenting. This option, and the options below it, control automatic formatting options for source code in Xcode editors. If this option is selected, Xcode assists you in writing source code by automatically inserting formatting information appropriate for the current context. This option is disabled by default. See Indenting Code to learn more. The options are:
Tab indents. This menu controls when pressing Tab in the editor inserts an indentation. You can choose the following:
In leading white space. Pressing Tab inserts an indentation only at the beginning of a line or following a space. If syntax-aware indenting is enabled, this is the default value for the Tab indents setting.
Never. Pressing Tab never causes an indentation.
Always. Pressing Tab always causes an indentation.
“Indent solo “{“ by” controls the amount by which a “{“ character on a line by itself is indented. If this number is greater than 0, Xcode automatically indents a left brace that appears on a line by itself (that is, a left brace that is preceded by a new line or carriage return) by the specified number of characters. The default value of this field is 0.
“Automatically insert closing “}”” controls whether Xcode automatically inserts a matching right brace when you type an opening brace. If this option is selected, typing an opening brace causes Xcode to insert a matching closing brace. If syntax-aware indenting is enabled, this option is off by default.
“Automatically indented characters.” These options control which characters trigger Xcode to automatically cause an indentation. When any of the following options is selected, typing that character in an editor causes Xcode to indent the current line or the following line. By default, each of these characters is selected (when syntax-aware indenting is enabled).
“Indent // comments” controls whether Xcode automatically indents C++-style comments. If this option is selected, Xcode automatically indents comments beginning with
//. This option is enabled by default when syntax-aware indenting is enabled.“Align consecutive //comments” controls whether Xcode automatically indents consecutive C++-style comments to the same level. This option is enabled by default when syntax-aware indenting is enabled.
File Types Preferences
The File Types pane of the Xcode Preferences window displays all of the file types recognized by Xcode and the default application for opening files of that type. Figure 39-10 shows the File Types pane of Xcode Preferences.

The file types are shown in the table in the File Types pane. This table contains the following information:
File type. The File Type column contains entries for each file type that Xcode recognizes. For example, audio.mp3.
File type categories. File type entries are organized into groups, from most general to most specific. For example, the
audio.mp3andaudio.aifffile types belong to the “audio” group, which belongs to the “file” group. In this way, you can control the default editor used for an entire class of files. To see the file types in a group, click the disclosure triangle next to that group.Preferred Editor. The pop-up menu in this column lets you choose the preferred editor for a file type. You can choose:
Open With Finder. This opens files and folders of this type with the application chosen for it in the Finder.
External Editor. This lets you choose a specific application to use for opening files and folders of this type.
Default. This opens files and folders of this type in the default editor assigned to it by Xcode. For file types that Xcode can open and display, this is usually the Xcode editor. For example, the default preferred editor for the
text.rtffile type is Default (RTF File); Xcode opens files of this type in its own editor and interprets them as RTF files.
For file types that Xcode’s editor can display, this menu also contains items for choosing how the Xcode editor interprets them. For example, Xcode’s editor usually interprets and displays
text.sdeffiles as AppleScript dictionaries. However, you can choose Plain Text File from the Preferred Editor menu to force Xcode to display files of this type as plain text files in the editor.
For more information on choosing how to open and display files in Xcode, see Using an External Editor. To learn how to override a file’s type, see Overriding a File’s Type.
Opening Quickly Preferences
The Opening Quickly pane of the Xcode Preferences window contains the list of directories that Xcode uses to find files with the Open Quickly command. Figure 39-11 shows the Opening Quickly pane of Xcode Preferences.
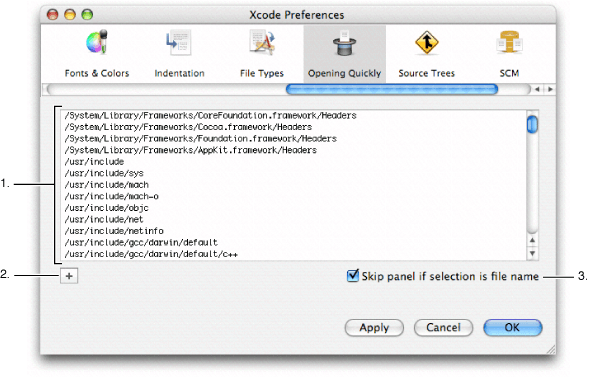
Here is what the pane contains:
The list of directories that Xcode uses to find and open files, one directory per line. Paths to a number of common directories—such as
System/Library/Frameworks—are already included in this list by default. Open Quickly searches the directories in the order in which they appear in this list.The plus (+) button. Click this button to add a directory to this list by navigating to it with the Open File dialog. You can also add a file or directory to the list by dragging it from the Finder.
Skip panel if selection is file name. This option controls the behavior of the Open Quickly feature when you select a file name in an editor and choose File > Open Quickly. If this option is enabled, Xcode skips the Open Quickly dialog and searches for the selected file name. Otherwise, Xcode displays the Open Quickly dialog, and uses the selected filename to fill out the Path field. This option is enabled by default.
For more information on using the Open Quickly command, see Opening Files by Name or Path.
Source Trees Preferences
The Source Trees pane of the Xcode Preferences window lets you define source trees for all projects that you open. A source tree defines a common access path or output location for the files used or generated by your project. Figure 39-12 shows the Source Trees pane of Xcode Preferences.

Here is what the pane contains:
Source trees table. This table lists all of the source trees that you have defined. The columns are as follows:
Setting Name is the name used to identify the source tree. This name must be the same for all users accessing items with the source tree.
Display Name is the name that Xcode uses to display the source tree in the user interface. This can be any string you like.
Path is the path to the root directory of the source tree on your local filesystem.
Plus (+) button. This button adds a new source tree entry to the table. You must add a new entry before you can edit it. In addition to using this button to add an entry, you can also drag a folder from the Finder to the source trees table.
Minus (-) button. This button deletes the selected source tree from the table.
Any source tree in this table is available to any of your projects. To learn more about source trees, see Source Trees.
SCM Preferences
The SCM preferences pane contains options that let you control how Xcode performs version control and file comparison operations. Figure 39-13 shows the SCM pane of Xcode Preferences.
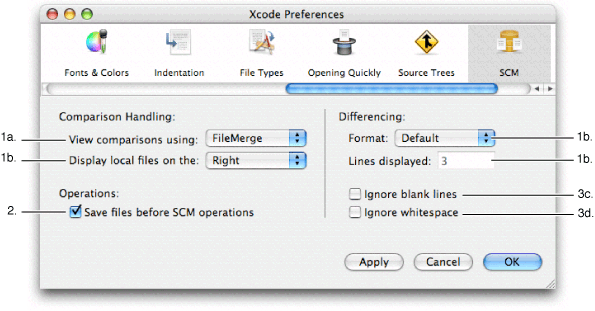
Here is what the pane contains:
Comparison Handling options. These options control how Xcode compares files using the Compare With command, described in The Compare Command. These options are:
View comparisons using. This menu lets you choose the application used to compare files.
The “Display local files on the” menu lets you choose the side of the screen on which you want the local version of the file to appear when comparing file versions.
Operations. The “Save files before SCM operations” option specifies whether Xcode automatically saves changed files before performing any version control operations. This option is on by default.
Differencing options. These options control how Xcode performs file comparisons using the
diffcommand. These options are:Format. This menu lets you choose the format in which output from the diff command is displayed. For a list of the possible formats, see Specifying Comparison and Differencing Options.
Lines displayed specifies the number of lines of context displayed around each difference.
Ignore blank lines indicates whether blank lines are skipped when differencing files.
Ignore whitespace tells Xcode whether to ignore whitespace when differencing files.
Documentation Preferences
The Documentation pane of the Xcode Preferences window controls options for viewing and updating technical documentation with Xcode’s documentation window. Figure 39-14 shows the Documentation pane of Xcode Preferences.
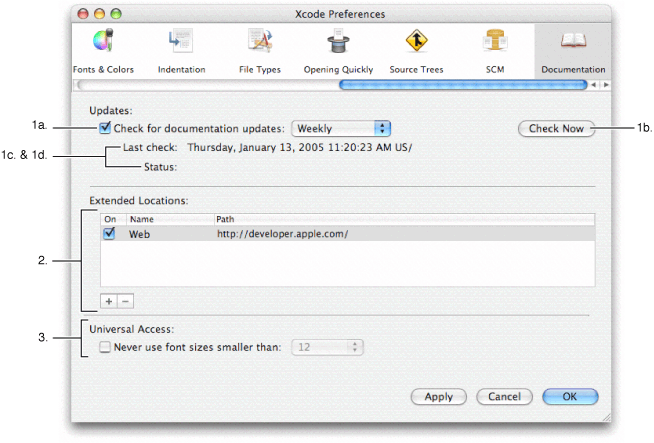
Here is what the pane contains:
Updates. These options control how Xcode checks for updates to the installed developer documentation. These options are:
Check for documentation updates. This option determines whether Xcode automatically checks for updated documentation. If this option is selected, Xcode automatically performs a periodic check for the presence of an updated documentation package on Apple’s developer website. Otherwise, Xcode checks only when you tell it to. This option is enabled by default.
The pop-up menu specifies how often Xcode checks for updates. You can have Xcode check once every day, week, or month. By default, Xcode is set to check on a weekly basis.
Check Now. This button lets you manually check for available updates. Clicking this button causes Xcode to perform the check immediately.
Last check. This displays the date and time at which Xcode last successfully performed a check for updated documentation.
Status. This displays the status of the last check.
For more information on obtaining documentation updates, see Obtaining Documentation Updates.
Extended Locations. This table lets you specify alternate locations for Xcode to use to locate documentation. To add an entry to this table, you can click the plus (+) button or drag a directory from the Finder. Xcode searches for documentation in these locations from top to bottom. For each location that you add, the Extended Locations table shows the following:
On. This column shows whether or not the current location is actively being used by Xcode when it looks for documentation. A location is being used if the checkbox in this column is selected. Otherwise, Xcode skips the location when it looks for documentation. When you add a new location, it is on by default.
Name. This column contains the display name for the location. This name has no effect on how Xcode looks for documentation; it is there to help you identify the location.
Path. This column contains the full path to the folder containing documentation.
For more information on using extended documentation locations, see Extended Documentation Locations.
Universal Access. These options control how Xcode displays documentation in its documentation window. The “Never use font sizes smaller than” option specifies whether Xcode enforces a minimum font size for HTML pages that it displays in the documentation window. When this option is selected, Xcode uses the minimum font size—specified in the pop-up menu—to display all text that uses a smaller font size. This option is disabled by default.
Copyright © 2004, 2006 Apple Computer, Inc. All Rights Reserved. Terms of Use | Privacy Policy | Updated: 2006-11-07