Retired Document
Important: This document may not represent best practices for current development. Links to downloads and other resources may no longer be valid.
Building a Product
To translate the source files and the instructions
in a target into a product, you must build that target. You can
build from the Xcode application or from the command-line, using xcodebuild. Building
from the application provides detailed feedback about the progress
of the build operation and integration with the Xcode user interface.
For example, when you build from the Xcode application, you can
easily jump from an error message to its location in a source file,
make the fix and try the build again. Building from the command
line lets you easily automate builds of a large number of targets
across multiple projects.
This chapter describes how to initiate a build from the Xcode application or from the command line; describes build locations in Xcode and shows you how to create a shared build folder; and shows you how to view build status, errors, and warnings in Xcode.
Build Locations
When Xcode builds a target, it generates intermediate files, such as object files, as well as the product defined by the target. As you build software with Xcode, you need to know where Xcode places the output of a build. For example, suppose you have an application in one project that depends on a library created by a second project. When building the application, Xcode must be able to locate the library to link it into the application.
By default, Xcode places both the build products and the intermediate files that it generates in the build folder inside of your project directory. If the software you are developing is contained in a single project, this default location is probably fine. However, if you have many interdependent targets—particularly if these targets are divided across multiple projects—you’ll need a shared build folder to ensure that Xcode can automatically find and use the product created by each of those targets.
Xcode lets you control where the results of a build are placed. In the Building pane of the Xcode Preferences window, you can specify where Xcode should put build products—that is, the products of a build—for all projects that you create. You can override this location on a per-project basis. Therefore, a useful approach is to set your Building preferences to support your most common behavior, then change that behavior in a particular project when you need a different behavior.
For example, if you are developing a group of related applications, libraries, plug-ins, and so on, you might set a shared build location in Xcode Preferences. Then the output of each project will end up in the same location, and can be accessed when building the other projects (such as the previously-mentioned application that needs to link to a separately-built library).
Xcode also supports the concept of an installation location, which is supported by the Deployment Location and Installation Path build settings. If you’re building a Deployment build and you turn on the Deployment Location build setting and you supply a path for the Installation Path build setting, the built product is placed at the specified location.
Changing the Default Build Location for All Projects
When you first start up Xcode as a new user, Xcode asks you to specify the directories in which it places the files generated by the build system, both intermediate files and built products. This default build location is used for all new projects that you create.
If you don’t supply a build location, Xcode sets the path
to the build folder to /, indicating a relative
path in the project directory. Xcode creates a build folder in the
project directory and places any build products in this build folder;
by default, it also places intermediate files in a subdirectory
of the build folder.
You can change the default build location used for projects that you create in the Building pane of the Xcode Preferences window. To open this pane, choose Xcode > Preferences and click Building. Figure 27-1 shows the Building pane of the Xcode Preferences window.
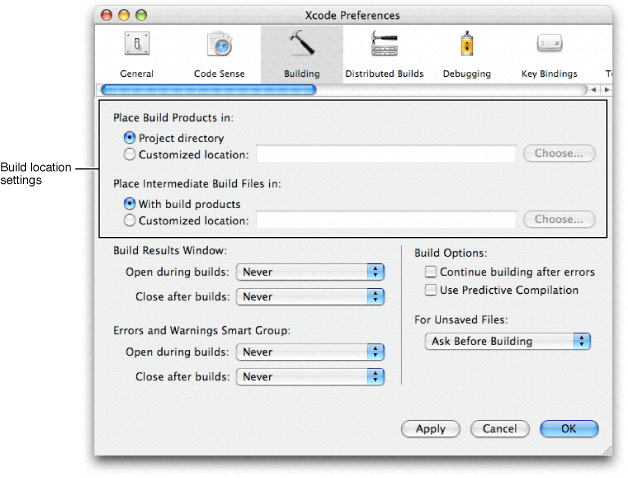
To specify the default location for build products, use the “Place Build Products in” options. These are:
Project directory. Xcode places build products in the
buildfolder inside of the project directory. This option is set in Xcode by default.Customized location. Xcode places build products in the folder identified in this field. Type the full path to the folder, or click Choose and navigate to the folder you want to use.
Choose this option to create a shared build folder into which Xcode places the build products of all of your projects. When Xcode builds a target, it looks first in the project’s build location for any files it depends upon. For example, given an application target that links against a library built by a target in different project, using a shared build folder, Xcode automatically finds the most recently built version of the library and links against it when it builds the application. Without a shared build folder, you must manually add the library’s build folder into the application’s library search path.
People who use the same project can set their own build folders. This means that every person on a team can have their own shared build folder.
To set the default location used for the intermediate files—such as object files—generated by Xcode during a build, use the “Place Intermediate Build Files in” options. Choose one of the following:
With build products. Xcode places the intermediate build files at the same location as the build products, whether this is in the project directory or in a separate folder that you have specified. This option is set in Xcode by default.
Customized location. Xcode places intermediate files in the folder identified in this field. Type the full path to the folder, or click Choose and navigate to the folder you want to use.
Overriding the Default Build Location for a Project
Each time you create a new project, Xcode sets the build location for that project to the default build location specified in the Building pane of the Xcode Preferences window. You can, however, override this default build location on a per-project basis. This lets you choose a default build location that works best for most of your projects, and specify another location for the build results of individual projects as needed.
You can override the build location used for an individual project in the General pane of the project inspector. To override the default location for a project’s build products, use the options under “Place Build Products In.” These are:
Default build products location. Xcode uses the default location for build products, specified in Xcode Preferences. This option is set by default for each project you create.
Custom location. Xcode places the build products for the project in the folder specified in this field. Type the full path to the folder in the text field, or click Choose and navigate to the desired location.
To override the default location for a project’s intermediate build files, use the options under “Place Intermediate Build Files In.” These are:
Default intermediates location. Xcode uses the default location for intermediate build files, as specified in Xcode Preferences. This option is set by default for each project you create.
Build products location. Xcode places intermediate build files with the build products, whether this is the default location specified in Xcode Preferences or a separate location specified for the individual project.
Custom location. Xcode places the intermediate build files for the project in the folder specified in this field. Type the full path to the folder in the text field, or click Choose and select the folder in the resulting dialog.
Building From the Xcode Application
You can perform all of the common build operations directly in the Xcode application. Building in the Xcode application, you can view build system output, see error and warning messages, and jump to the location of an error or warning in source files, all in a single window.
You can perform a full build of the active target and any targets on which it depends, compile a single file, or view the preprocessor output for a file. You can also remove the build products and intermediate files generated by the build system for a target.
Setting the Active Target and Build Style
When you build from the Xcode application, Xcode uses the current, or active, target to determine which product to create. Xcode also applies any build settings defined by the active build style to the target and its dependencies.
Before you start a build, make sure that the target you want to build is the active target. To make a target active, you can choose it from the Active Target pop-up menu or from the Project > Set Active Target menu.
To make a build style active, choose it from the Active Build Style pop-up menu in the Build Results window, or choose it from the Project > Set Active Build Style menu.
To learn more about configuring a target, see Targets; to learn how to configure a build style, see Editing Build Styles.
Initiating a Full Build
When it does a full build of a target, the build system performs all of the tasks specified by the build phases in that target, and in all targets that it depends on. After the initial build of the target, Xcode performs only those actions necessary to update changed files during subsequent builds. For example, if the only change to the target since the last time it was built was a minor edit to a single source code file, Xcode recompiles that file and relinks the object files to create the finished product.
There are several different ways you can initiate a build:
To build the active target’s product, choose Build > Build or click the Build button.
To build the active target’s product and run it if the build succeeds, choose Build > Build and Run, or click the Build and Run button.
To build the active target’s product and start the debugger if the build succeeds, choose Build > Build and Debug, or click the Build and Debug button.
You may encounter errors or warnings when building your target; see Viewing Errors and Warnings for information on how to find and fix build errors.
If your product does not build properly and there are no error messages, make sure your files have correct dates. Files with invalid dates (before 1970) won’t compile correctly.
Viewing Preprocessor Output
You can see the preprocessor output for a C, C++, or Objective-C source file in the active target. To do so, select that file and choose Build > Preprocess.
You can see a list of all #define directives
in effect for a file by adding the flag -dM to
the Other C Flags (OTHER_C_FLAGS) build setting in your target.
Instead of the normal preprocessor output, Xcode shows all of the
macros defined during the execution of the preprocessor (including
predefined macros) when you choose Build > Preprocess. For more
information on the C preprocessor, see GNU C Preprocessor.
Compiling a Single File
A full build can take a long time if you have a large project. You can compile a single file to ensure that it builds correctly without having to rebuild the entire target. To compile a single file
Open the file in an editor window or select the file in the Groups & Files list.
Choose Build > Compile or type Command-K. You can also Control-click in the editor or on the file in the Groups & Files list to bring up a contextual menu. Choose Compile from this menu to build the file.
The file must be part of the active target. Note that if you are trying to compile a file that is open in an editor, the editor must have focus for the Compile menu item to be available.
Cleaning a Target
As you learned in Initiating a Full Build, after the initial build of a target, Xcode performs only those actions required to update changed files during subsequent builds. You can, however, force Xcode to do a full rebuild of the target by cleaning that target and rebuilding.
When you clean a target, Xcode removes all of the product files, as well as any object files (.o files) or other intermediate files created during the build process. The next time you build, every file in every build phase is processed according to the action associated with that phase.
To clean only the active target, choose Build > Clean or click the Clean button. To clean all targets in your project, choose Build > Clean All Targets or click the Clean All button.
Viewing Build Status
During a build, you want to see how that build is progressing. Especially for long build operations, it is useful to know the status of that operation. When you build from the Xcode application, Xcode displays the build status in the project window status bar. The status bar message lets you know the operation currently being performed, as in the figure below. It also displays the name of the target and build style used for the build. When the build is complete, Xcode displays the result of the build—whether the build succeeded or failed and whether there were any errors or warnings—on the right side of the status bar.

You can click the build message in the status bar to see more detailed information about the build in the Build Results window. You can also click the progress indicator in the status bar during the course of the build to open the Activity Viewer, as described in Viewing the Progress of Operations in Xcode.
In addition, Xcode displays a progress indicator which shows the status of the build in its dock icon. If an error or warning occurs, Xcode indicates the number of errors or warnings with a red badge on the dock icon.
Viewing Detailed Build Results
The Build Results window lets you see a more detailed account of the progress of a build. It shows each step of the build process, as well as the full output of the build system, and can take you directly to the source of any errors or warnings. To open the Build Results window choose Build > Build Results or click the build result message—”Failed,” “Succeeded” and so on—on the right side of the project window status bar. Figure 27-3 shows the Build Results window.
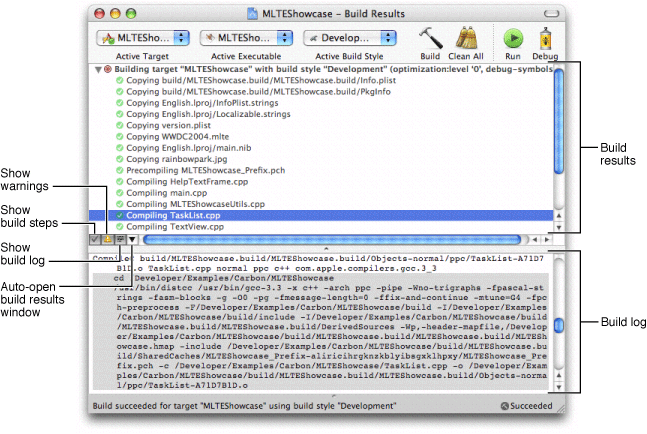
Here’s what you see in the Build Results window:
Toolbar. The toolbar of the Build Results window contains buttons that let you perform common build-related tasks, such as building, cleaning a target, and running or debugging the built product. By default, they also contain pop-up menus to let you change the active target, active executable, and active build style.
Status Bar. The status bar displays the current status of the build. It contains the same build information as the status bar of the project window.
Build results. This pane shows status output from the Xcode build system. You can control what information is shown here with the view options described below.
View options. The buttons below the build results pane let you control how to view detailed build results. These options are as follows:
The build steps button, indicated by a checkmark icon, determines whether each of the individual build steps is shown as part of the detailed build results. Select this option to display each of the individual steps used to build the product, such as compiling and copying files. Otherwise, Xcode shows only those build steps that produce warnings or errors.
The show warnings button, indicated by a warning icon, controls whether Xcode shows warning messages in the detailed build results. If this option is selected, Xcode displays both error and warning messages; otherwise, Xcode shows only error messages.
The build log button, indicated by an icon showing console text, opens and closes the build log, described below. Select this option to reveal the build log; deselect it to close the build log.
The arrow button brings up a menu that lets you choose when to display detailed build results. You can have Xcode automatically show and hide the Build Results window in the course of a build. To specify when detailed build results are shown, choose an item under “Temporarily Open During [project name] Builds.” To specify when detailed build results are hidden, choose an item under “Temporarily Hide After [project name] Builds.” These options are described further in Specifying When Detailed Build Results are Shown.
Choosing an item from this menu affects only the current project. Changes made here do not persist across Xcode sessions. To set the default behavior of the Build Results window for all projects choose Open Global Build Preferences to open Xcode Preferences.
Build log. The build log displays all of the commands used to build your target and the outputs of those commands, including compiler invocations. For example, you can see the flags passed to the compiler in this log. You can show and hide the build log using the build log button. When you select a build step in the top pane of the build window, Xcode selects the corresponding command in the build log.
Editor. The Build Results window includes an attached editor. Selecting an error or warning message in the build results pane opens the file to the line containing the error or warning in the editor.
Specifying When Detailed Build Results are Shown
Having to open and close the Build Results window can get repetitive if you do it every time you build. If you know you always want to see the detailed build results when building, you can have Xcode automatically open the Build Results window when you start a build. Likewise, you can have Xcode automatically close the Build Results window when the build is complete. Xcode provides preferences to control the default behavior of the Build Results window. By default, Xcode does not automatically open or close the Build Results window when building.
To change Xcode’s default behavior for showing and hiding detailed build results for all projects, choose Xcode > Preferences and click Building. Under “Build Results Window,” use the following menus:
To control when the Build Results window is shown, use the “Open during builds” menu
To control when the Build Results window is hidden, use the “Close after builds” menu.
You can temporarily override this default behavior for an individual project using the pop-up menu in the Build Results window, as described in Viewing Detailed Build Results.
Choose one of the following options to control when the Build Results window is shown:
Never. Xcode does not automatically open the Build Results window. This is the default value of this setting.
Always. Xcode always automatically opens the Build Results window when a build starts.
On Errors. Xcode automatically opens the Build Results window only if an error is encountered during the build.
On Errors or Warnings. Xcode automatically opens the Build Results window when an error or warning occurs.
Choose one of the following options to control when the Build Results window is hidden:
Never. Once opened, the Build Results window stays open until you close it or the project. This is the default value for this setting.
Always. Xcode automatically closes the Build Results window immediately after the build stops, whether the build was successful or not.
On Success. Xcode automatically closes the Build Results window when the build successfully completes and the product is built.
On No Errors. Xcode automatically closes the Build Results window after the build is complete only if there are no errors.
On No Errors or Warnings. Xcode automatically closes the Build Results window after the build is complete only if there are no errors or warnings.
Viewing Errors and Warnings
The Xcode application lets you easily see any errors or warnings generated during a build. You can view errors and warnings directly in the project window with the Errors and Warnings smart group, or you can view them in the Build Results window. You can also jump directly from the error or warning message to the location of errors or warnings in source files. This lets you quickly fix the problem and try the build again.
Viewing Errors and Warnings in the Project Window
If you prefer to keep the project window in front of you while you are working, Xcode lets you view errors and warnings directly in the project window. You can view errors and warnings in the Errors and Warnings smart group in the Groups & Files list, as shown below. Before you build your project, the Errors and Warnings group is empty; it is populated as errors and warnings occur during the build.
To view errors and warnings, you can:
Click the disclosure triangle next to the Errors and Warnings smart group. This displays the list of files in which errors or warnings occurred. To see the errors and warning messages for a particular file, select that file.
Select the Errors and Warnings smart group in the Groups & Files list. This displays all errors and warnings generated during the last build attempt in the detail view.
Click the error or warning icon that appears on the right of the project window or editor window status bar. This opens the Build Results window and selects the first error or warning in the build steps pane and in the build log.
You can also specify that Xcode automatically open the Errors and Warnings smart group in the Groups & Files view when an error or warning occurs during a build, as described later in this section.
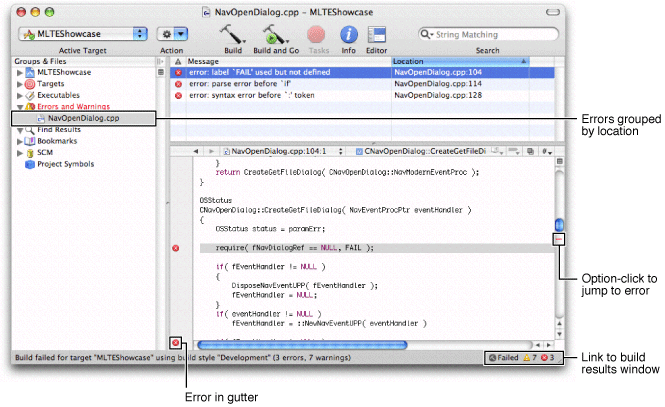
When you select the Error and Warnings group or any of its members in the Groups & Files list, the detail view to the right displays the error and warning messages and the location at which each occurred. The icon next to each item in the detail view identifies it as an error or a warning.
Similar to the Build Results window, you can have Xcode automatically show and hide the contents of the Errors and Warnings smart group. To control when Xcode hides and shows the contents of the Errors and Warnings smart group, choose Xcode > Preferences, click Building, and use the menus under “Errors and Warnings Smart Group.”
The “Open during builds” menu lets you choose when Xcode automatically selects the Errors and Warnings smart group and discloses its contents in the Groups & Files list. It provides the following options:
Never. Xcode does not automatically open the Errors and Warnings smart group, even if an error or warning occurs during a build. This is the default.
Always. Xcode always automatically opens the Errors and Warnings smart group when a build starts.
On Errors. Xcode automatically opens the Errors and Warnings group only if an error is encountered in the build.
On Errors and Warnings. Xcode automatically opens the Errors and Warnings group if an error or warning occurs during the build.
The “Close after builds” menu gives you the following options for controlling when Xcode hides the Errors and Warnings group:
Never. Once opened, the Errors and Warnings group stays open until you close it. This is the default.
Always. Xcode automatically closes the Errors and Warnings group immediately after the build stops.
On Success. Xcode automatically closes the Errors and Warnings group when the build is successfully completed and the product is built.
On No Errors. If there are no errors, Xcode automatically closes the Errors and Warnings group after the build is complete.
On No Warnings. If there are no errors or warnings, Xcode automatically closes the Errors and Warnings group after the build is complete.
Viewing Errors and Warnings in the Build Results Window
The Build Results window also displays all the warnings and errors that occur as Xcode builds your target. The example below shows an error in the Build Results window.
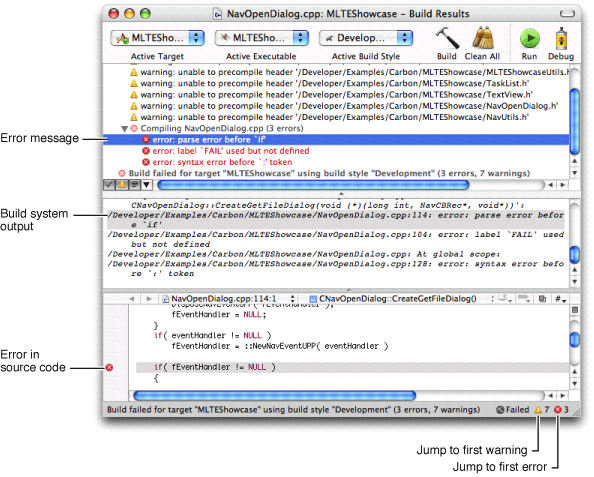
To navigate through warning and error messages even when the Build Results window is hidden, choose Build > Next Build Warning or Error (Command–equals-sign) and Build > Previous Build Warning or Error (Command–plus-sign). This highlights the next error or warning in the Build Results window. It does not, however, bring the Build Results window forward if it is hidden. If you are working in an editor window, choosing Build > Next / Previous Build Warning or Error highlights the line at which the error or warning occurred, opening the related file if it is not already open.
You can easily copy error and warning messages, so you can include them in email messages or other documents. To copy error and warning messages, select the messages and drag them to another document.
Viewing Source Code for an Error or Warning
From either the project window or the Build Results window, you can jump directly to the source code associated with an error or warning. In the project window, select the error or warning in the detail view; in the Build Results window, select the error or warning in the build steps pane. If the option to automatically disclose the attached editor is enabled, Xcode reveals the editor in the project or Build Results window and opens the source file to the location of the problem. Otherwise, you can double-click the error or warning to open the file in a separate editor window.
Xcode also displays error and warning icons in the gutter of the editor, next to the lines at which the errors and warnings occurred. This allows you to easily spot the errors and warnings in a file, either from the attached editor in the project or Build Results windows, or from a dedicated editor window. Marks in the scrollbar of an editor let you quickly scroll to the location of an error or warning; you can Option-click on a mark to jump to that location. If you pause with the mouse above an error or warning in the status bar, the detail view, or the gutter, Xcode displays a tooltip with the full text of the error message.
Controlling Errors and Warnings
You can choose what Xcode does when it first encounters an error while building a project. To choose whether Xcode stops building when it encounters an errors or continues to compile the next file in the target, choose Xcode > Preferences and click Building. Use the “Continue building after errors” checkbox in the Build Options.
Building From the Command Line
In addition to building your product from within the Xcode
application, you can use xcodebuild to
build a target from the command line. Building from the command
line gives you additional flexibility compared to building from
within the Xcode application that may be useful in certain circumstances.
For example, using the xcodebuild tool,
you can create a script that automatically builds your product at
a specific time or build targets from multiple projects at the same
time.
The xcodebuild tool
reads your .xcode project
bundle and uses the target information it finds there to build a
product. However, there are differences between building within Xcode and
building from the command line:
When you build within Xcode, it uses the active target and build style. When you build from the command line,
xcodebuilduses the first target in the project’s target list and no build style, unless you specify a target or build style with a command-line option.If you run
xcodebuildas the root user, the preferences you set in the Xcode Preferences window are not used. Preferences are stored per user, and there are no preferences stored for the root user (unless you logged in as root and used Xcode at some point).
To build a target using xcodebuild,
use the cd command to
change to your project’s directory and enter the xcodebuild command
with any command-line options you wish to specify. The project’s
directory contains your project’s .xcode bundle.
For example, if your project is in ~me/Projects/MyProj,
enter cd ~me/Projects/MyProj.
You can use xcodebuild to
build a product suited for deployment and install the product in its
final destination path. To do that, use the xcodebuild tool
with the install option,
which places the product in the distribution root specified by the
DSTROOT, Installation Path (INSTALL_PATH), and Deployment Location
(DEPLOYMENT_LOCATION) build settings. For example, to install a
framework in /Library/Frameworks,
configure the build settings as shown in Table 27-1.
Build setting name |
Value |
|---|---|
DSTROOT |
|
INSTALL_PATH |
|
DEPLOYMENT_LOCATION |
|
The DSTROOT build setting can be set only in the xcodebuild command-line
specification:
% sudo xcodebuild install -buildstyle Deployment DSTROOT=/ INSTALL_PATH=/Library/Frameworks DEPLOYMENT_LOCATION=YES |
See the xcodebuild man
page for information on the available options and command usage. For
details on framework placement, see Mac OS X Frameworks.
Copyright © 2004, 2006 Apple Computer, Inc. All Rights Reserved. Terms of Use | Privacy Policy | Updated: 2006-11-07