Retired Document
Important: This document may not represent best practices for current development. Links to downloads and other resources may no longer be valid.
The Project Window
The project window is where you do most of your work in Xcode. The project window displays and organizes your source files, targets, and executables. It allows you to access and edit all of the pieces of your project. To work effectively in Xcode, you need to recognize the parts of the project window and understand how to use them to navigate your project’s contents.
Of course, everyone has their own way of organizing their workspace. To help you be as efficient and productive as possible, Xcode provides several different project window configurations or layouts. A project window layout specifies a particular project window configuration, as well as ancillary task-specific windows.
This chapter introduces the basic project window components and describes the available project window layouts. It also introduces other important Xcode windows and provides tips on effectively using the Xcode interface to locate information on project items.
The Project Window and its Components
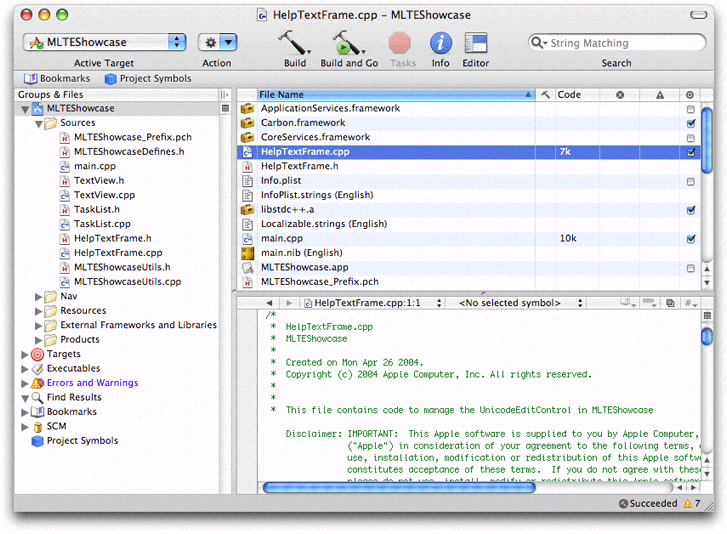
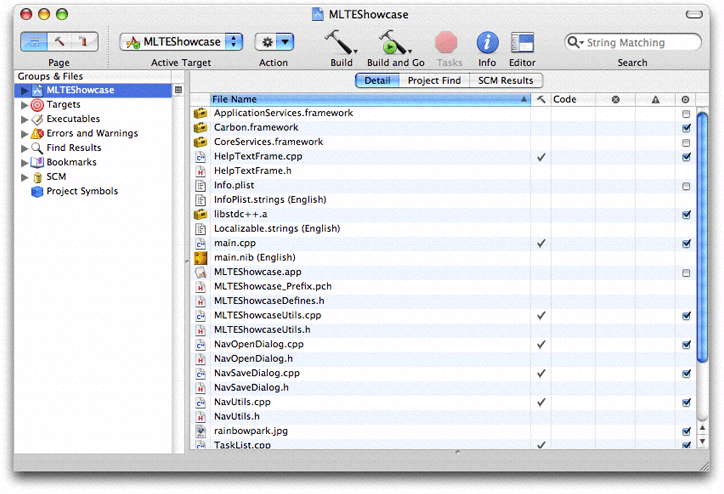
When you first launch Xcode as a new user, Xcode displays the default project window configuration, shown here.
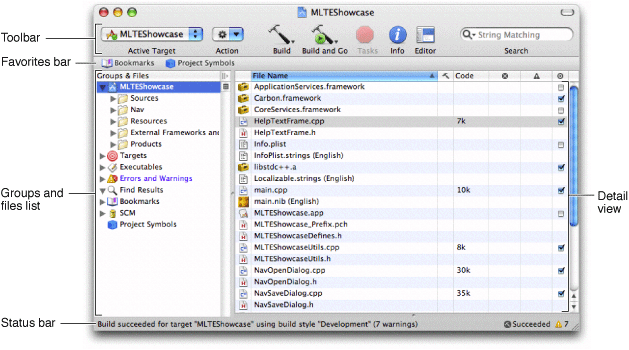
The project window contains the following key tools for navigating your project:
The Groups & Files list provides an outline view of your project contents. You can move files and folders around and organize your project contents in this list. The current selection in the Groups & Files list controls the contents displayed in the detail view.
The detail view shows the item or items selected in the Groups & Files list. You can browse your project’s contents in the detail view, search them using the Search field, or sort them according to column. The detail view helps you rapidly find and access your project’s contents.
The toolbar provides quick access to the most common Xcode commands.
The status bar displays status messages for the project. During an operation—such as building or indexing—Xcode displays a progress indicator in the status bar to show the progress of the current task.
The Favorites bar optionally lets you store and quickly return to commonly accessed locations in your project. The Favorites bar is described in The Favorites Bar.
The project window can also contain an attached editor that lets you edit files directly in the project window. You can navigate through the views in a window, including the attached editor, by pressing the Tab key. To take the focus away from the editor, press Control-Tab.
The exact configuration of the project window depends on the current layout; nonetheless, each layout uses these components help you view and access project items. For a description of each of the available project window layouts, see Project Window Layouts.
The Groups & Files List
The Groups & Files list provides an outline view of your project’s contents. The contents of your project—files, folders, targets, executables, and other project information—are organized into groups. A group lets you collect related files or information together. The Groups & Files list gives you a hierarchical view of these groups.
Using the Groups & Files list, you can:
View your project’s contents, organized hierarchically. You can have as much or as little of your project’s contents as you want visible at once.
Create additional Groups & Files list views to focus on multiple groups at once.
Drag files, folders, groups, and other project items to rearrange and organize them.
Rename files, folders, and other project items. To do so, Option-click the item and type the new name; or Control-click and choose Rename from the menu.
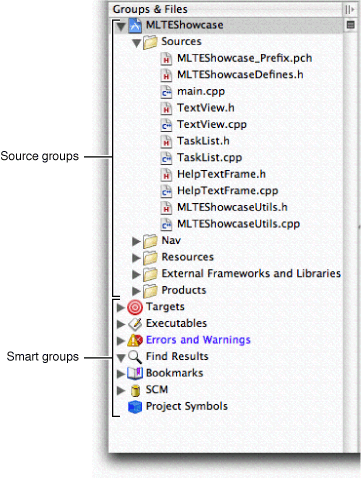
Groups in Xcode
Xcode supports two types of groups; you can view and edit groups of either type in the Groups & Files list:
Source groups organize your project’s source files, including implementation files, resources, frameworks, headers, and other files. A source group, indicated by a yellow folder icon, can contain any number of files and other source groups. Source groups help you organize the files in your project into more manageable chunks. The project group, represented by the project icon at the top of the Groups & Files list, is a source group that contains all of the files, frameworks, and libraries included in your project.
Smart groups collect files or information that match a certain rule or pattern. Xcode provides several built-in smart groups:
The Targets group contains all of the targets in your project. As mentioned earlier, a target contains the instructions for creating a single software product. Targets are described in more detail in Targets.
The Executables group contains all of the executables defined in your project.
The Errors and Warnings smart group lists the errors and warnings generated when you build. This group is described further in Viewing Errors and Warnings.
The Find Results smart group contains the results of any searches you perform in your project. Each search creates a new entry in this group. For more information on the Find Results group, see Viewing Search Results.
The Bookmarks smart group lists those commonly accessed locations—files or specific locations within a file—that you have saved in order to return to them easily. For more information on the Bookmarks smart group, see Saving Commonly Accessed Locations as Bookmarks.
The SCM smart group lists all of the files that have source control information. This group is described further in Viewing File Status.
The Project Symbols smart group lists all of the symbols defined in your project. This group is described further in Viewing the Symbols in Your Project.
Xcode also lets you create your own smart groups and define your own rules for what they contain; these smart groups are indicated with a purple folder icon. For more information on using smart groups and source groups to organize your project contents, see Organizing Files.
Hiding and Showing Groups
Xcode provides a number of smart groups to help you organize and find information; however, you may not need all of those smart groups all of the time. You can customize the display of the current Groups & Files list to show only those smart groups that you currently need. You can rearrange or delete any of the smart groups that appear in a Groups & Files list view, including those that Xcode supplies.
To rearrange a smart group, drag it to its new position in the Groups & Files list. To hide a smart group in the current Groups & Files list, select it and press Delete or choose Edit > Delete. To view the smart group again, choose it from the View > Show menu, as described in the next section.
Xcode also provides contextual menu items to show and hide smart groups in the Groups & Files list. Control-click in the Groups & Files list to show the contextual menu and choose the smart group from the Preferences menu. If the smart group is currently visible, choosing it from this menu hides the smart group. Otherwise, it shows the smart group in the Groups & Files list. A checkmark next to the smart group’s name in the Preferences menu indicates that the smart group is currently visible. You can show and hide Xcode’s built-in smart groups, as well as any smart groups that you have defined for your projects.
Viewing the Contents of a Group
You have a couple of options for viewing the contents of a group in the Groups & Files list. If you prefer the outline view, you can disclose the group’s contents directly in the Groups & Files list. You can also select one or more groups to view their contents in a simple, searchable list in the detail view, described in The Detail View.
To view the contents of a group in the Groups & Files list you can:
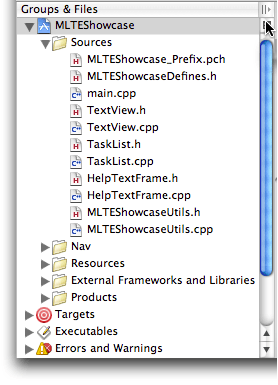
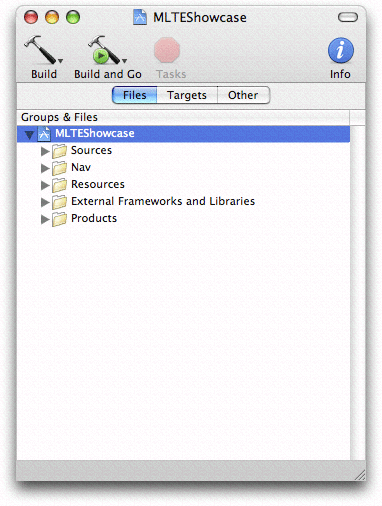
Double-click the group to expand its contents in the outline view, shown below. Double-clicking the group a second time closes the group.
Click the disclosure triangle next to the group to show its contents in the outline view.
Choose any of Xcode’s built-in smart groups from the View > Show menu to disclose that group’s contents in the outline view. Xcode also selects the group and displays its contents in the detail view. Choosing View > Show > All Files discloses the contents of the project group. You can use the Vie w > Show menu to display a smart group, even if you had previously deleted from the current Groups & Files list.
Select the group to show the contents of the group, and of any other groups it contains, in the detail view.
You can sort the contents of a source group in the Groups & Files list by choosing an item from the View > Sort menu. You can sort by name or by file types. Xcode sorts the contents of the currently selected group.
The Groups & Files list can display additional information for files in the list. You can view status for files under version control or see whether a file is included in the active target. To see this information in the Groups & Files list, choose View > Groups & Files Columns > SCM or View > Groups & Files Columns > Target Membership, respectively.
To view more information on any item in the Groups & Files list, select that item. Xcode displays additional information about that item in the associated detail view, if one is open.
Splitting the Groups & Files View
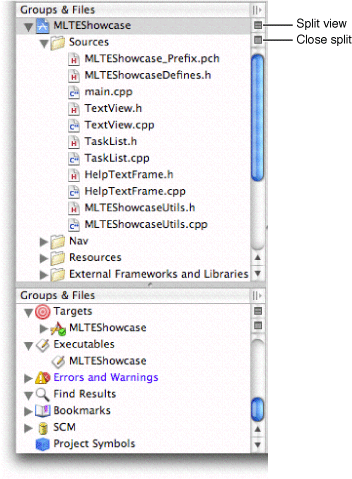
In large projects, the Groups & Files list can get quite long, making it difficult to move items around. You can split the Groups & Files view by clicking the icon in the scrollbar next to the Groups & Files list, as shown here. You can also split a view by choosing View > Split 'Files' Vertically or typing Command–double-quote. Xcode splits the view that currently has focus.
Each view can display a different location, making it easy to keep commonly accessed groups handy or to move items between groups. You can drag the resize control between the Groups & Files views to repartition the space between them as you see fit. Each view has its own split-view button; you can split each of these views, creating as many split-views as you need. After you create a split, a new button appears below the split-view button; to close a split Groups & Files view, click this second button. You can also close a split view by choosing View > Close Split 'Files'.
By default, Xcode splits the view vertically. However, you can also split a view horizontally. To split a view horizontally, hold down the Option key while clicking the split-view button or choosing View > Split 'Files' Horizontally. You can also type Option–Command–double-quote.
The Detail View
As you learned, the Groups & Files view lets you see the contents of your project in an organized outline. In contrast, the detail view shows you items in a flat list. You can quickly search and sort the items in this list, gaining rapid access to important information in your project.
You control the scope of the information shown in the detail view with your selection in the Groups & Files list. If the selected item is a group, the detail view displays information for all of the members of that group and of any sub-groups that it contains. You can select multiple items in the Groups & Files list; the detail view displays all of the selected items and their members. This applies to both contiguous selections and to selections of items that are not adjacent.
The Information Displayed in the Detail View
The type of information displayed in the detail view varies, depending on the item selected in the Groups & Files list. For example, if you select a group of source files in the Groups & Files list, the detail view displays each of the files in that group, along with information about those files, such as the file’s build status or code size. However, build status and code size make no sense for errors and warnings, so when you select the Errors and Warnings group, you see a list of error and warning messages and the locations at which they occurred.
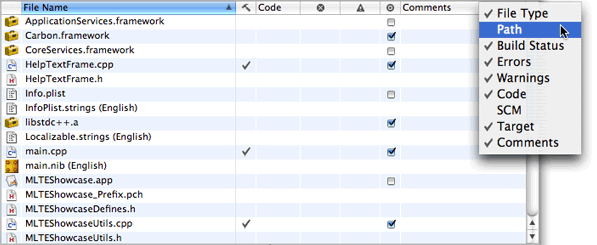
You can choose what information Xcode shows in the detail view by choosing which columns are visible. To make a column visible, choose it from the View > Detail View Columns menu. You can also Control-click any of the column headings; Xcode brings up a menu like the one shown below, which allows you to choose which columns are visible.
You can display the columns of the detail view in any order. To reorder the columns, drag the heading of any column to its new position.
You can use the menu items View > Previous Detail and View > Next Detail, or their keyboard shortcuts, to move the selection up or down in the detail view. To disclose the currently selected detail in the Groups & Files list, choose View > Reveal in Group Tree. For example, if the current selection in the detail view is an individual source file, Xcode selects that file in the Groups & Files list, disclosing the contents of any source groups that the file belongs to, as necessary.
To rename an item in the detail view, Option-click the item and type the new name; or Control-click the item and choose Rename from the menu.
Searching and Sorting in the Detail View
With the detail view you have a couple of ways to find and view information. You can sort the contents of the detail view according to the information in any of the visible categories simply by clicking on the column heading for that category. For example, to sort by file name, click the File Name heading.
Using the search field in the toolbar, you can quickly search the contents of the detail view. As you type, Xcode filters the contents of the detail view, displaying only those items that have matching text in at least one of the columns.
The Search field supports several different types of search; you can choose the search type from the pop-up menu in the Search field. Xcode supports the following searches:
String Matching. Xcode determines a match using simple string comparison, filtering out items that do not match the string in the Search field. This is the default type of search for the Search field. It is also the fastest.
Regular Expression. Xcode uses the regular expression in the Search field to find matching items. For example, to find all C implementation and header files in a source group, enter
\.(c|h)$Wildcard Pattern. Xcode uses the wildcard pattern in the Search field to find items that contain the specified characters anywhere in any of the visible columns. For example, enter *View*.h to find all header files with “View” in their name.
For example, in a large list of source files, you can find all of the files with the word “dialog” in their title by choosing a String Matching search and typing “dialog” in the Search field, as shown here.
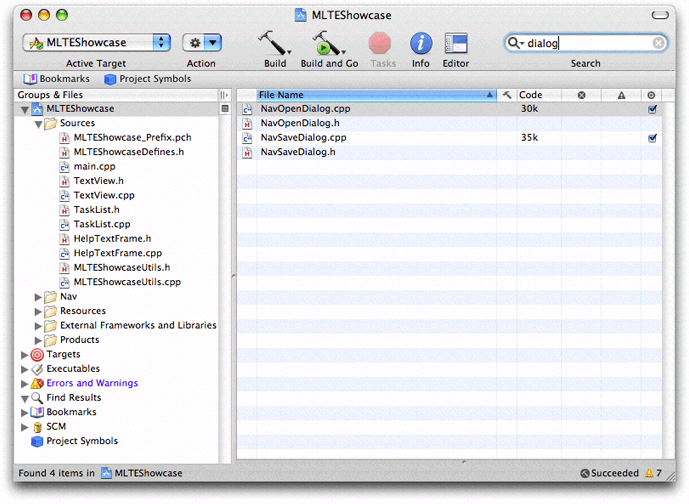
As you type, the status bar displays the scope of the search—the current selection in the Groups & Files list—and the number of items found. Pressing the “Home” key or choosing the project item (indicated by the project icon) from the search field’s pop-up menu changes the focus of the search field to the whole project.
By default, Xcode clears the Search field when you select a different smart group in the Groups & Files list. To tell Xcode to preserve the contents of the Search field, open the General pane of Xcode Preferences and disable the “Automatically clear smart group filter” option in the Environment options.
The Project Window Toolbar
The project window toolbar gives you quick access to the most common Xcode commands. The project window toolbar for the Default layout contains the following items:

Active Target pop-up menu. The target menu lists the active target, which is the target that is used whenever you build the project. You can change the active target using this menu.
The Action button. The Action button lets you perform common operations on the currently selected item in the project window. The actions available from this button are those appropriate for the selected item; they are the same actions available in the contextual menu that appears when you Control-click the selected item. For example, when the current selection is a file, available operations include opening the file in a separate editor, performing version control operations, and grouping files.
The Build buttons. The Build buttons initiate common build actions, such as building, cleaning, and running. The triangle at the bottom of the Build buttons indicates that there are multiple actions associated with them. A single click on one of these buttons performs the action represented by the button’s icon. If you press and hold the mouse button over one of these buttons, you get a pull down menu of all of the actions associated with the button. You can initiate any of these actions by selecting it.
Tasks button. The Tasks button allows you to stop any operation that is currently in progress in your project. The badge in the lower right corner of the Tasks button indicates the operation that is stopped when you click the button. If more than one operation is in progress, the Tasks button lets you select the one you want to stop. For example, if you have both a build and a search running, you can stop either operation by pressing and holding the Tasks button. Xcode displays a pop-up list of the tasks currently in operation; choose a task to stop it.
Editor button. The Editor button shows and hides the code editor in the project window. Using this editor, you can view and edit files directly in the project window. You can also view the source associated with an error or warning or with a search result. The editing features of Xcode are described further in Editing Source Files.
Info button. The Info button brings up an Info window, allowing you to examine and edit groups, files, targets, and other items in your project. See Inspector and Info Windows for more information on inspecting items in your project.
The Search field. The Search field allows you to search the items currently displayed in the detail view. As you type, Xcode filters the list of items in the detail view to include only those items with matching content in one of the visible columns. See The Detail View for more information on using the Search field to find items in the detail view.
You can customize the project window’s toolbar by choosing View > Customize Toolbar. Drag one or more toolbar items to or from the toolbar to get the set that is most useful to you.
The Project Window Status Bar
The project window status bar lets you view the progress of the current operation in Xcode. It gives you feedback during potentially lengthy tasks, such as building, as well as displaying the results of those tasks. In particular, the status bar lets you quickly access important information about project operations. From the status bar, you can:
Click the progress indicator during an operation to open a more detailed account of the currently running operations in the Activity Viewer window, described in Viewing the Progress of Operations in Xcode.
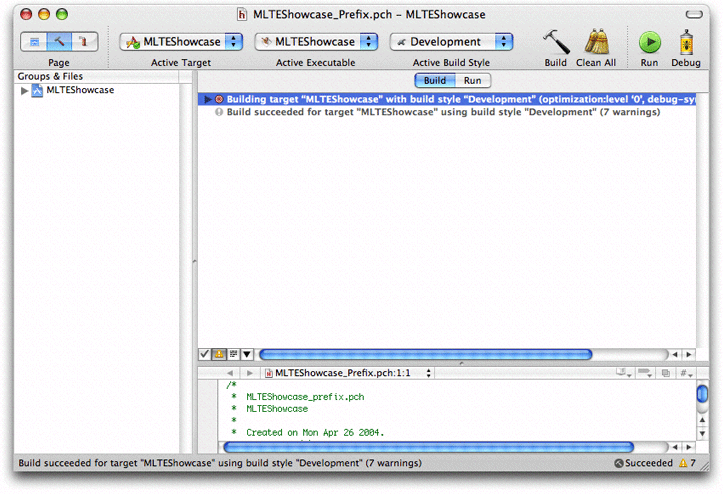
Click the build result message, or error or warning icon, to open the Build Results window and view build system commands and output. For more information on the ways in which Xcode displays the status of build operations, see Viewing Build Status.
Project Window Layouts
There are many factors affecting the optimal workspace arrangement for you. How much screen real estate do you have? What do you spend most of your time working on? How many projects do you normally have open at once?
Configuring your development environment to allow you to be as productive as possible is critical. Whatever your preferred workflow, Xcode provides several different project window layouts for you to choose from. Xcode defines the following layouts:
Default. This configuration provides the traditional Xcode project window experience, described in the previous section. This is Xcode’s default layout, combining outline and detail views to let you quickly navigate your project.
Condensed. This layout provides a smaller, simpler project window with an outline view of your project contents and separate windows for common development tasks, such as debugging and building.
All-in-One. This layout provides a single project window that lets you perform all of the tasks typical of software development—such as debugging, viewing build results, searching, and so forth—within a single window.
This section describes each project window layout and the differences between them.
The Default Layout
Xcode’s default layout provides the project window described in The Project Window and its Components. As mentioned there, the default project window contains:
The Groups & Files list gives you an outline view of your project contents, as described in The Groups & Files List.
The detail view shows a flat list of the items selected in the Groups & Files list, as described in The Detail View. In the Default layout, you can hide the detail view by collapsing the project window. To collapse the detail view, double-click the button above the split-view control in the Groups & Files list. Double-clicking the button a second time shows the detail view again.
In addition, you can customize the toolbar shown for the project window in each of these states, both collapsed and uncollapsed. To do so, collapse or expand the project window to the appropriate state and customize the toolbar in the usual way, described in The Project Window Toolbar. Xcode stores the contents of the toolbar for each state separately.
An optional attached editor. In the Default layout, you can choose to view and edit all files within the project window, using the attached editor. Or, you can choose to have Xcode use a separate editor window, and use only the Groups & Files list and the detail view in the project window.
Although you can accomplish most of your daily development tasks in the project window, Xcode also provides a number of other task-specific windows that let you focus on a particular part of the development process. Table 4-1 shows the separate windows available in the Default layout.
Window |
Use to |
|---|---|
Build Results |
View the build system output generated when you build a target. To open, choose Build > Build Results or Window > Tools > Build Results. See Viewing Build Status. |
Debugger |
Debug your program; you can control execution of your code, view threads, stack frames and variables, and so forth. To open, choose Debug > Debugger or Window > Tools > Debugger. See The Debugger Window. |
SCM |
View the status of only those files under version control. To open, choose SCM > SCM or Window > Tools > SCM. See Viewing File Status. |
Project Find |
Search for text, symbol definitions, and regular expressions in your project. To open, choose Find > Find in Project or Window > Tools > Project Find. See Searching in a Project. |
Debugger Console |
Interact with the debugger on the command line and see debugger commands and output. To open, choose Debug > Console Log or Window > Tools > Debugger Console. |
Run Log |
View information or messages logged by your program when running in Xcode. To open, choose Debug > Run Log or Window > Tools > Run Log. |
Class Browser |
View the class hierarchy of your project and browse classes and class members. To open, choose Project > Class Browser or Window > Tools > Class Browser. See Viewing Your Class Hierarchy. |
Breakpoints |
View and edit all breakpoints set in your project. To open, choose Debug > Breakpoints or Window > Tools > Breakpoints. |
Bookmarks |
View your project’s bookmarked locations in a dedicated window. To open, choose Window > Tools > Bookmarks or double-click the Bookmarks smart group. |
The Condensed Layout
The Condensed layout provides a smaller, more compact version of the project window. In this configuration, the project window contains several views, each showing a different subset of the items in your project in the Groups & Files list. You can switch between these outline views using the tabs at the top of the project window.
The condensed project window contains:
The Files pane shows your project and all of the source groups and files in your project.
The Targets pane shows the targets and executables defined in your project.
The Other pane shows all of the remaining smart groups. This includes the standard smart groups defined by Xcode, as well as any smart groups you have added to the project.
You can show any of the built-in smart groups, opening the appropriate pane if necessary, by choosing an item from the View > Show menu.
The toolbar of the Condensed project window layout is also simpler than that of the other available layouts. By default, the condensed project window toolbar contains only the Build buttons, Tasks button, and Info button. These buttons are described in The Project Window Toolbar.
The Condensed layout provides the same additional windows as the Default layout, listed in Table 4-1. The Condensed layout also includes the following additional windows:
Window |
Use to |
|---|---|
Editor |
Edit project files. Although each of the available layouts let you open files in a separate editor window, the condensed project window is the only one that does not include an attached editor; when you open a file from the project window, Xcode opens a new editor window. |
Detail |
View and search your project’s contents in a simple list. The Condensed layout does not include a detail view in the project window; you can open a separate Detail window that includes a Groups & Files list on the left side of the window and a detail view on the right side. The Groups & Files list is tabbed to allow you to see different parts of your project. To open choose View > Detail or Window > Tools > Detail. |
The All-In-One Layout
The All-In-One project window layout provides a single project window in which you can perform all of the tasks necessary for software development. In this project window, you can edit files, view project items in an outline view or detail view, view build system output, run and debug your executable, search and more. The project window of the all-in-one configuration provides three different views, or pages. To switch between pages, use the Page control in the project window toolbar, shown in Figure 4-10. The available pages are:
Project. This page lets you perform general project management tasks, such as searching, sorting and viewing SCM status. To open the project page, click the project icon.
Build. This page lets you view build results and the run log. To open the build page, click the hammer icon.
Debug. This page includes an integrated debugger view, similar to the standalone debugger window available with the other layouts. To open the debug page, click the spray can icon. For a description of the debugger interface, see The Debugger Window.
In addition to using the Page control, choosing any of the menu items for opening other Xcode windows will, in the All-In-One layout, open the appropriate page to the correct pane. For example, choosing Build > Build Results opens the Build page and selects the Build pane.
Each page of the All-In-One layout has a different project window toolbar, that contains items specific to the development tasks performed in that page.
The Project Page
The project page, shown here, lets you perform typical project management tasks. You can view the contents of your project in outline view, search for project items in the detail view, perform a project-wide find, and view status for the files under version control in your project.
The project page contains a Groups & Files list, which shows all of the contents of your project in outline view; an attached editor, which lets you edit source files right in the project window; and a tabbed view, which lets you switch between several panes, each of which provides an interface for a common project management task. These panes are:
The Detail pane includes a detail view, which lets you view additional information about project items selected in the Group & Files list or quickly filter project items. The detail view is described in The Detail View.
The Project Find pane lets you perform project-wide searches and view search results. The interface is the same as that provided by the Project Find window in other layouts. See Searching in a Project.
The SCM Results pane opens a dedicated view displaying only those project items under version control and their status. It is similar to what you see in the SCM window with other layouts. See Viewing File Status.
The default toolbar for the project page of the All-In-One layout is the same as that of the Default project window, described in The Project Window Toolbar, with the addition of the Page control.
The Build Page
The build page, shown here, provides an interface for common build tasks. It lets you see the progress of your build, view errors and warnings, and see the run log.
The build page contains an attached editor, that lets you view source code and jump to the location of any build errors; a Groups & Files list that shows your project contents in an outline; and tabs that let you switch between:
The Build pane displays the commands used to build your project and the output of the build system. This is the same information as that in the Build Results window available with the other layouts. See Viewing Build Status.
The Run pane displays any information logged by your program while running in Xcode.
If the outline view is not visible in the build page, you can open it by dragging or double-clicking the splitter at the far left side of the window, or by choosing an item from the View > Show menu.
The default toolbar of the build page contains items that give you easy access to commands you commonly use when building and running.
Other Windows in the All-In-One Layout
The All-In-One layout is designed to let you perform all development tasks in the project window; it does, however, include a few additional windows, listed in Table 4-3. These windows let you view content already available from the project window in a separate window, should you choose to do so.
Window |
Use to |
|---|---|
Class Browser |
View the class hierarchy of your project and browse classes and class members. To open, choose Project > Class Browser or Window > Tools > Class Browser. See Viewing Your Class Hierarchy. |
Breakpoints |
View and edit all breakpoints set in your project. To open, choose Debug > Breakpoints or Window > Tools > Breakpoints. |
Bookmarks |
View your project’s bookmarked locations in a dedicated window. To open, choose Window > Tools > Bookmarks or double-click the Bookmarks smart group. |
Run Log |
View the contents of the run log, available in the Run pane of the build page, in a separate window. To open, choose Window > Tools > Run Log. |
Project Find |
Perform a project-wide search and view search results in a separate window. This window shows the same information as the Project Find pane of the project page. To open, choose Window > Tools > Project Find. |
SCM |
View the status of files under version control in your project. This window contains the same information as the SCM pane of the project page. To open, choose Window > Tools > SCM. |
Changing the Project Window Layout
You can change the current project window layout in the General pane of Xcode Preferences. From the Layout menu, choose the Default, Condensed, or All-In-One layouts. Selecting a layout from this menu shows a brief description of the layout below the menu. Note that you cannot change the project window layout when any projects are open; you must first close all open projects. The project window layout is a user-specific setting; it applies to all projects that you open.
Saving Changes to the Current Layout
Xcode’s available project window layouts give you the flexibility to choose the configuration that best suits your preferred workflow. You can further customize your work environment by saving the changes that you make to the windows in an open project and applying them to all projects using that layout.
For example, the project window of the condensed layout shows three different outline views, each of them focused on a different subset of a project’s groups. By default, the Files view shows only the project group, which contains all files and folders in the project. The Other view shows all smart groups. If you want access to both your project files and your bookmarked locations in the same view, you could add the Bookmarks smart group to the Files view by choosing View > Show > Bookmarks.
To save this change, and have the Bookmarks smart group appear in the Files pane for all projects using the Condensed layout, choose Window > Defaults.
In the dialog that Xcode displays, click Make Layout Default to save your changes to the current layout. Clicking Restore to Factory Default discards all of your changes—both current changes and those you’ve previously saved—to the current layout. Xcode restores the original configuration settings for the layout.
You can save changes to:
Window size and position.
Visibility of views—whether they are hidden or revealed—in a window.
Contents and visibility of outline views.
The default set of toolbar items.
If the “Save window state” option in the General pane of Xcode Preferences is enabled, Xcode saves the state of the open windows for each project when you close that project. However, when you choose Window > Defaults, you save configuration changes that apply to all projects when you open them using the modified layout.
Viewing Additional Information on Project Items and Operations
Knowing how to use Xcode’s user interface to find and view project items and information is essential to working efficiently in Xcode. Xcode gives you a number of different ways to find and access project contents. In previous sections, you’ve learned how to use the Groups & Files list to see an organized outline view of your project and how to use the detail view to quickly filter project contents. Using these tools, you can view as wide or as narrow a cross-section of your project as you choose. However, these tools aren’t as useful when you wish to view or modify individual items in your project. For this, Xcode provides inspector and Info windows.
In previous chapters you also learned how the project window status bar lets you view the progress and results of operations in Xcode. However, the amount of information visible in the status bar is limited and it reflects only operations in the current project. To let you view a more detailed account of all operations in Xcode, Xcode provides the Activity Viewer window.
This section describes the Info and inspector windows, as well as the Activity Viewer and shows you how to use them to obtain additional information on project items and Xcode operations.
Inspector and Info Windows
Xcode includes two special types of windows that you will use frequently to view and modify items that appear in your project window. These are the Info window and the inspector window. The Info and inspector windows allow you to examine the components of your project in detail and make changes to them. You can inspect any item that is selected in the project window or is open in the active editor window. Xcode provides inspectors for the following project items:
File and folder references
User-defined smart groups
Localized file variants
Targets
Executables
Build phases
The project itself
The type of information displayed in the inspector and Info windows changes, depending on the type of item you are inspecting. For example, here is the Info window for a target:
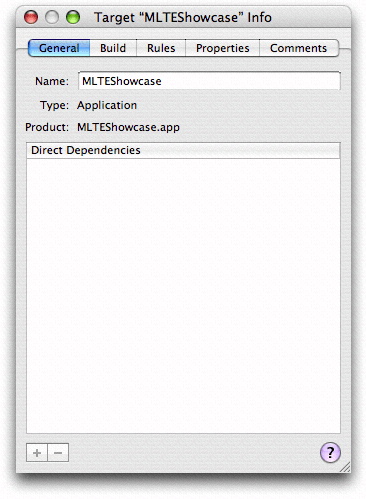
For any particular item in your project, the Info window and inspector window both display the same information. However, the two windows behave differently. The Info window continues to display information about the item that was selected in the project window when you opened it, regardless of the current selection. You can have multiple Info windows open at any time, each describing a different component of your project, and that information will continue to be visible until you close those windows. To open an Info window, choose File > Get Info, click the Info button in the project window toolbar, or double-click the item to inspect.
The inspector window tracks the current selection in the project window. As you select different files, targets, and groups in the project window, the inspector window changes to show information about that item. To open an inspector window, hold down the Option key and choose File > Show Inspector or click the Inspector button. The Inspector button is not in the project window toolbar by default; to add it to the toolbar, choose View > Customize Toolbar.
Specific inspector and Info windows are described in more detail later in this document, when the objects that they modify—files, targets, projects, groups, and so forth—are discussed. In general, however, if you are at a loss as to how to make a change to a basic project component, try inspecting it. Throughout this document, wherever an inspector window is used, remember that you can also use an Info window, and vice versa.
Viewing the Progress of Operations in Xcode
The Activity Viewer window lets you watch the operations currently in progress in Xcode. While the Tasks button in the project window toolbar lets you control the progress of tasks in the current project, the Activity Viewer lets you see the progress of all Xcode operations across all open projects. The Activity Viewer provides a single, persistent window which you can leave open to monitor the progress of all running tasks. To open the Activity Window, shown here, choose Window > Activity Viewer or click the progress indicator in the project window status bar.
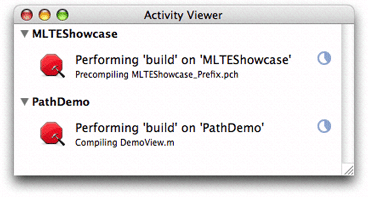
The operations in the Activity Viewer are grouped by project; you can show or hide the operations specific to any project by clicking the disclosure triangle next to the project name. To stop any of the tasks shown in the Activity Viewer, simply click the Stop sign icon next to that task. You can cancel the most recently initiated operation in the active project by choosing Project > Stop <task name> or typing Command—period.
Copyright © 2004, 2006 Apple Computer, Inc. All Rights Reserved. Terms of Use | Privacy Policy | Updated: 2006-11-07