Retired Document
Important: This document may not represent best practices for current development. Links to downloads and other resources may no longer be valid.
Running in Xcode’s Debugger
While running your program can expose bugs
in its operation, it does not help you pinpoint the source of the
problem in your source code. For that, you need to run your program
in the debugger. The purpose of a debugger is to allow you to pause
the execution of your program, examine its contents, and locate
and fix problems in your code. Xcode’s debugger provides a graphical
user interface to gdb for
debugging C, C++, Objective-C, and Objective-C++ programs; and communicates
directly with the Java virtual machine to debug Java programs.
This chapter describes how to run your program in the debugger in Xcode; this includes configuring debugger options for an executable and enabling debugging facilities, as well as launching your program in the debugger and viewing debug output.
Generating Debugging Information
Before you can take advantage of Xcode’s source-level debugger, the compiler must collect information for the debugger. To generate debugging symbols for a product, enable the Generate Debug Symbols (GCC_GENERATE_DEBUGGING_SYMBOLS) build setting and build the product. This setting is enabled by default in the Development build style provided by Xcode. If you use this build style as the active build style when you build your target, the compiler generates the necessary debugging information.
To view the build settings set in the Development build style:
In the project window select the project and bring up the inspector window.
Click Styles to bring up the Styles pane.
Choose Development from the Build Style pop-up menu at the top of the pane. You should see the Generate Debug Symbols setting in the table of build settings. Make sure that this setting is turned on; if it is, a checkmark appears in the Value column for this setting. Otherwise, turn on the setting by clicking the checkbox in the Value column.
You can use the Active Build Style pop-up menu to change the active build style. This menu is available by default in the toolbar of the Build Results window; otherwise, you can add it to the toolbar of other project windows by choosing View > Customize Toolbar and dragging the Active Build Style menu into the toolbar. For more information on build styles, see Build Styles.
Configuring Your Executable for Debugging
When you start your program in the debugger, Xcode launches it with the command-line arguments, environment variables, and other settings specified in the executable environment. The executable environment also contains a number of debugger-specific options that control which debugger Xcode uses, as well as how Xcode launches and communicates with the program. These options are set in the Debugging pane of the executable inspector, shown in Figure 32-1.
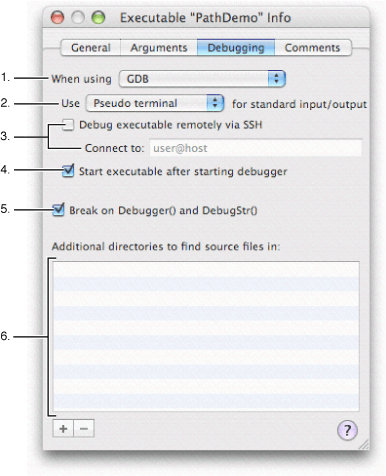
Here is what the Debugging pane contains:
When using. This pop-up menu lets you choose the debugger used when you debug the executable. The next several options below this menu pertain only to the selected debugger.
Use [device] for standard input/output. This pop-up menu lets you specify how standard input and output are handled when debugging the executable. By default, Xcode uses a pseudo terminal device to display
stdinandstdoutin the Standard I/O Log window, described in Debugging a Command-Line Program. You can also choose System Console from this menu to have Xcode redirect your program’s output to the system console (console.log).Options for remote debugging. The “Debug executable remotely via SSH” option lets you set up the executable for remote debugging using GDB in the Xcode debugger window. The “Connect to” field specifies the host machine on which the executable is run. See Remote Debugging in Xcode.
Start executable after starting debugger. This option lets you control whether Xcode starts the executable running immediately after loading it in the debugger. If this option is enabled, Xcode loads the executable in the debugger but does not start it until you press “Restart.” This allows you to perform operations in the debugger—such as setting breakpoints—before the executable runs.
Break on Debugger() and DebugStr(). This option tells Xcode to set the USERBREAK environment variable, which suspends execution of your program on calls to the Core Services framework debugging functions
DebuggerorDebugStr.Additional directories to find source files in. This table lets you specify additional folders in which Xcode can look for source files corresponding to the symbol information in the executable code. To add a directory, click the plus-sign button and type the path to the directory in the Source Directory field. You can also drag folders to the table from the Finder; Xcode will insert the path to the folder. To remove a directory, select it in the table and click the minus-sign button.
Starting Your Program in the Debugger
You can start a debugging session using the buttons available in the toolbar of most Xcode windows, or using the menu items in the Build and Debug menus. To build a development version of the active target’s product and start the debugger if the build succeeds, choose Build > Build and Debug, or click the Build and Debug button. To load an executable that has already been built, choose Debug > Debug Executable or click the Debug button.
When you start a debugging session, Xcode uses the active executable for the current project to determine which executable file to load. It loads that program in the debugger, sets any environment variables specified by the executable environment, and starts the program, passing any specified command-line arguments. You can debug only one executable in a project at a time. You can, however, have multiple projects open at once, each with its own instance of the debugger. In this way, you can debug multiple executables at a time. If, for example, you have a project that builds both client and server executables, you can debug them both at once by creating an empty project and adding a custom executable that points to the client or server product. You can then run the client executable under the debugger from one project and the server executable from the other. Creating a Custom Executable Environment describes how to create a custom environment.
To choose which debugger is used, edit the debugging settings for the executable, as described in Configuring Your Executable for Debugging.
The Debugger Window
Xcode automatically opens the Debugger window, if necessary, when you start a debug session. You can also display the debugger window at any time by choosing Debug > Debugger. Figure 32-2 shows the Debugger window.

Here’s what the debugger window contains:
Toolbar buttons for stepping through code and displaying related windows.
The Build and Debug and the Debug buttons load the project’s active executable in the debugger. When a debugging session is active, the Terminate button is available; this button stops the active debugging session.
The Fix button compiles a single file fix and modifies your executable to run the changed code without stopping the current debugging session. For more information on how to use this feature, see Using Fix and Continue.
The Pause, Continue, and Restart buttons control execution of the program.
The Step Into, Step Over, and Step Out buttons step through lines of code.
The Breakpoints button opens the breakpoints window, which allows you to create and view breakpoints, described further in Breakpoints.
The Console button opens the debugger console.
The status bar displays the current status of the debugging session. For example, in the window shown above, Xcode indicates that GDB has just finished loading symbols for a single shared library.
The Thread view on the upper-left side of the debugger window displays the call stack of the current thread. The pop-up menu above this view lets you select different threads to view when debugging a multi-threaded application.
The Variables view on the upper-right side of the debugger window shows the variables defined in the current scope and their values. This section also shows the current state of all processor registers when the disassembly view is enabled (see Viewing Disassembled Code and Processor Registers for more information).
The editor displays the source code you are debugging. When execution of your program is paused, the debugger indicates the line at which execution is paused by displaying the PC indicator, which appears as a red arrow. The line of code is also highlighted. You can change the color used to highlight the currently executing statement by choosing Xcode > Preferences, selecting Debugging, and choosing a new color from the Instruction Pointer Highlighting color well.
You can change the layout of the debugger window by choosing Debug > Toggle Debugger Layout. In this alternate layout, the Variables view is on the left side of the debugger window, under the Thread view, and the editor is on the right side of the window.
Troubleshooting
If the Build and Debug button is not available, try the following:
Build the selected target.
Associate an executable with the selected target. See Executable Environments.
If the debugger does not display source for a file, try the following:
Make sure you have the source. Apple’s frameworks and many third-party libraries don’t include source code.
Make sure debugging is enabled for the target.
If the file is in your project’s Groups & Files list, make sure its name is not in red, which means it can’t be found.
If the file is not in the Groups & Files list and your target might need to process it, add the file to the project. See Adding Files, Frameworks, and Folders to a Project.
If the file is for a library or framework that was built for you, do one of the following:
Place the source in the same location used by the person who built the library or framework. When someone builds a debuggable binary, the compiler stores the paths of its source files in the binary.
Add the file’s directory to the source directories list. In the project window, select the executable and open an Info window. Click Debugging and enter the file’s directory in the table titled “Additional directories to find source files in.”
Lazy Symbol Loading
Lazy symbol loading reduces the initial memory footprint for
debugging large applications by reading debugging symbols only when
they are needed. When the “Load symbols lazily” option is enabled—as
it is by default in Xcode’s Debugger Preferences pane—the gdb debugger
reads a minimal amount of symbol information to support symbolic
breakpoints and calling functions in the debugger console. To set
a file and line breakpoint Xcode gives hints to gdb about
the symbols needed to set the breakpoint. When a stack trace is
generated, gdb automatically
reads the full debugging symbols as needed, providing line number
and file information to Xcode. When lazy symbol loading is disabled,
Xcode reads the full debugging symbols when the debugger starts
up.
The Console Window
Xcode’s graphical interface for GDB, the GNU debugger, and for the Java debugger lets you perform most necessary debugging tasks. You may, however, encounter situations—such as working with watchpoints in GDB—that require you to interact directly with the debugger on the command line. Using the Console Log in Xcode, you can:
View the commands that Xcode sends to
gdbor the Java command-line debugger.Send commands directly to
gdbor the Java command-line debugger.View the debugger output for those commands.
See debugging messages printed to stderr by your program or by system frameworks.
To open the Console Log, click the Console button in the toolbar
of Xcode’s Debugger window or choose Debug > Console Log. To
enter commands, click in the console window and type at the gdb
or JavaBug prompt. To get help with GDB and Java debugging commands,
enter help at the console.
To learn more about command-line debugging with GDB, see Debugging
With GDB in Tools Compilers & Debuggers Documentation.
To make the Console Log easily readable, Xcode lets you choose the text colors and fonts used in the console window. You can use different fonts and colors for the text you type in the console, the text the debugger writes to the console, and the debug console’s prompt. To change the colors used for text in the Console window, choose Xcode > Preferences, click Debugging, and use the Fonts and Colors options. See Debugging Preferences for more information.
Debugging a Command-Line Program
If you are debugging a command-line program that requires
input from stdin, you
must use the Standard I/O Log to communicate with your program when
it is running in the debugger. To open the Standard I/O Log window,
choose Debug > Standard I/O Log. This window is only available
when your program is running under the debugger.
Xcode and Mac OS X Debugging
Many of the subsystems in Mac OS X include debugging facilities that you can use to help you in your debugging tasks. You can use most of these debugging facilities along with Xcode. Many debugging facilities are enabled or disabled by setting an environment variable; you can modify the executable environment to set these environment variables from Xcode. Xcode also includes several options for enabling specific debugging options, such as libgmalloc (Guard Malloc), loading debug library variants, and stopping on Core Services debugging functions (described in Stopping on Core Services Debugging Functions). For more on the many debugging facilities available in Mac OS X, see TN2124: Mac OS X Debugging Magic.
Using Debug Variants of System Libraries
Many Mac OS X system frameworks include debug versions, in
addition to the production version. These library variants are identified
by their _debug suffix. Debug variants of the system frameworks
usually include debugging symbols, extra assertions, and often extra
debugging facilities. You can modify the executable environment
to have Xcode use the debug variants for libraries that your program
loads. To use the debug variant of a library, open the inspector
for the executable environment that you use to run your program.
In the General pane, choose “debug” from the menu “Use [suffix]
suffix when loading frameworks.”
Using Guard Malloc in Xcode
Xcode also integrates Guard Malloc (libgmalloc) into the debugger interface. Guard Malloc helps you debug memory problems by causing your program to crash on memory access errors. Because Guard Malloc causes your program to crash, you should use Guard Malloc with the debugger. When a memory access error occurs and your program crashes, you can look at the stack trace, determine exactly where the error occurred, and quickly jump to the location of the problem.
To enable debugging with Guard Malloc from Xcode, choose Debug
> Enable Guard Malloc, before starting the debugging session.
You can also use Guard Malloc with gdb from the command line, by
setting the DYLD_INSERT_LIBRARIES environment variable, as described
in the man page for libgmalloc.
Guard Malloc has a number of additional options available.
You can take advantage of these by setting the appropriate environment
variables on the executable. In the inspector window for the executable,
open the Arguments pane and add the environment variables to the
environment variables table at the bottom of the window. See the
man page for libgmalloc for
additional details and information.
Copyright © 2004, 2006 Apple Computer, Inc. All Rights Reserved. Terms of Use | Privacy Policy | Updated: 2006-11-07