 Table of Contents
  Previous Section
Flattened Attributes
A flattened attribute is a special kind of attribute that you effectively add from one entity to another by traversing a relationship. When you form a to-one relationship between two tables (such as MovieRole and Talent), you can add attributes from the destination entity to the source entity-for example, you can add a lastName attribute to MovieRole to identify the actor who played a particular role. This is called "flattening" an attribute. Flattening an attribute is equivalent to creating a joined column; it allows you to create objects that extend across tables.
When Should You Use Flattened Attributes?
Flattening attributes is just one way to conceptually "add" an attribute from one entity to another. A generally better approach is to traverse the object graph directly through relationships. Both WebObjects Builder and Interface Builder make this easy by supporting the notion of key paths. You can also access the values in other objects programmatically through relationship references, as described in the chapter "Designing Enterprise Objects" in the book Enterprise Objects Framework Developer's Guide.The difference between flattening attributes and traversing the object graph (either programmatically or by using key paths) is that the values of flattened attributes are tied to the database rather than the object graph. If an enterprise object in the object graph changes (for example, because a user changed a value in another part of the application), a flattened attribute can quickly get out of sync. For example, suppose that you flatten a deptName attribute into an Employee object. If a user then changes the employee's department reference to a different department or changes the name of the department itself, the flattened attribute won't reflect the change until the changes in the object graph are committed to the database and the data is refetched. However, if you're using key paths in this scenario, a user of your application sees changes to data as soon as they happen in the object graph. This ensures that your application's view of the data remains internally consistent.
Therefore, you should only use flattened attributes in the following cases:
- If you want to combine multiple tables joined by a one-to-one relationship to form a logical unit. For example, you might have employee data that's spread across multiple tables such as Address, Benefits, and so on. If you have no need to access these tables individually (that is, if you'd never need to create an Address object since the address data is always subsumed in Employee), then it makes sense to flatten attributes from those entities into Employee.
- If your application is read-only.
- If you're using vertical inheritance mapping (as described in Enterprise Objects Framework Developer's Guide's chapter "Advanced Enterprise Object Modeling").
Flattening an Attribute
To flatten an attribute, the relationship you traverse must be a to-one relationship.To flatten an attribute:
- In the browser mode of the Model Editor, select the relationship that gives you access to the attribute you want to add to your entity (you don't have to use browser mode, it just makes it easier to see the results of the operation).
- Select the attribute you want to add (lastName), and choose Property
 Flatten Property.
- Examine the derived attribute (talent_lastName) in the Attribute Inspector.
- Edit the Name text field to simplify the attribute name (for example, to "lastName").
- Select the flattened attribute along with another "native" attribute for verification purposes.
- View the attributes in the Data Browser as shown in Figure 32
For example, to add the name of an actor to MovieRole, you can traverse a talent relationship (which represents MovieRole's relationship to Talent) and add the actor's last name (lastName) to MovieRole as a flattened attribute. This is a contrived example, because in this case it would be better to use a key path than to flatten an attribute.
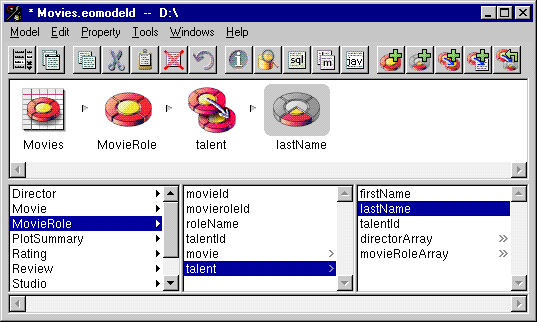
Figure 30. Adding a Flattened Attribute
Alternatively, you can use the  button in the toolbar.
The derived attribute (in this example, talent_lastName) appears in the list of properties for MovieRole. The format of the name reflects the traversal path: the attribute lastName is added to MovieRole by traversing the talent relationship.
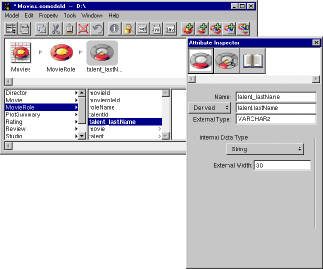
Figure 31. Examining a Flattened Attribute in the Attribute Inspector
In the Attribute Inspector, the pop-up list to the left of the Definition field identifies the attribute as "Derived".
The Definition field (the second text field from the top of the Attribute Inspector) must accurately reflect the attribute's external name and the table in which it resides. For example, if you edit its text to be "Name" and change its mode to "Column," it no longer maps to an existing attribute. In other words, only edit this field if you are sure you can predict the outcome.
To display this flattened attribute, use the Data Browser.
To select multiple, non-contiguous attributes in the Model Editor on Windows NT, hold down the Control key while you click on each attribute. On Rhapsody, use the Shift key.
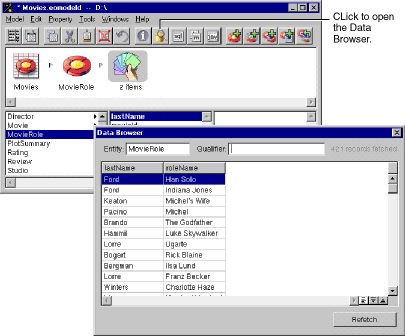
Figure 32. Using the Data Browser to Check Your Model
Table of Contents  Next Section