Retired Document
Important: This document may not represent best practices for current development. Links to downloads and other resources may no longer be valid. For information on media playback, see Media Playback Programming Guide.
Using Audio
iOS offers a rich set of tools for working with sound in your application. These tools are arranged into frameworks according to the features they provide, as follows:
Use the Media Player framework to play songs, audio books, or audio podcasts from a user’s iPod library. For details, see Media Player Framework Reference, iPod Library Access Programming Guide, and the AddMusic sample code project.
Use the AV Foundation framework to play and record audio using a simple Objective-C interface. For details, see AV Foundation Framework Reference and the avTouch sample code project.
Use the Audio Toolbox framework to play audio with synchronization capabilities, access packets of incoming audio, parse audio streams, convert audio formats, and record audio with access to individual packets. For details, see Audio Toolbox Framework Reference and the SpeakHere sample code project.
Use the Audio Unit framework to connect to and use audio processing plug-ins. For details, see Audio Unit Hosting Guide for iOS.
Use the OpenAL framework to provide positional audio playback in games and other applications. iOS supports OpenAL 1.1. For information on OpenAL, see the OpenAL website, OpenAL FAQ for iPhone OS, and the oalTouch sample code project.
To allow your code to use the features of an audio framework, add that framework to your Xcode project, link against it in any relevant targets, and add an appropriate #import statement near the top of relevant source files. For example, to provide access to the AV Foundation framework in a source file, add a #import <AVFoundation/AVFoundation.h> statement near the top of the file. For detailed information on how to add frameworks to your project, see Files in Projects in Xcode Project Management Guide.
This section on sound provides a quick introduction to implementing iOS audio features, as listed here:
To play songs, audio podcasts, and audio books from a user’s iPod library, see Playing Audio Items with iPod Library Access.
To play and record audio in the fewest lines of code, use the AV Foundation framework. See Playing Sounds Easily with the AVAudioPlayer Class and Recording with the AVAudioRecorder Class.
To provide full-featured audio playback including stereo positioning, level control, and simultaneous sounds, use OpenAL. See Playing Sounds with Positioning Using OpenAL.
To provide lowest latency audio, especially when doing simultaneous input and output (such as for a VoIP application), use the I/O unit or the Voice Processing I/O unit. See Audio Unit Support in iOS.
To play sounds with the highest degree of control, including support for synchronization, use Audio Queue Services. See Playing Sounds with Control Using Audio Queue Services. Audio Queue Services also supports recording and provides access to incoming audio packets, as described in Recording with Audio Queue Services.
To parse audio streamed from a network connection, use Audio File Stream Services. See Parsing Streamed Audio.
To play user-interface sound effects, or to invoke vibration on devices that provide that feature, use System Sound Services. See Playing UI Sound Effects or Invoking Vibration Using System Sound Services.
Be sure to read the next section, The Basics: Audio Codecs, Supported Audio Formats, and Audio Sessions, for critical information on how audio works in iOS. Also read Best Practices for iOS Audio, which offers guidelines and lists the audio and file formats to use for best performance and best user experience.
When you’re ready to dig deeper, the iOS Dev Center contains guides, reference books, sample code, and more. For in-depth explanations of audio development in iOS, see Core Audio Overview, Audio Session Programming Guide, Audio Queue Services Programming Guide, Audio Unit Hosting Guide for iOS, and iPod Library Access Programming Guide.
The Basics: Audio Codecs, Supported Audio Formats, and Audio Sessions
To get oriented toward iOS audio development, it’s important to understand a few critical things about the hardware and software architecture of iOS devices—described in this section.
iOS Hardware and Software Audio Codecs
To ensure optimum performance and quality, you need to pick the right audio format and audio codec type. Starting in iOS 3.0, most audio formats can use software-based encoding (for recording) and decoding (for playback). Software codecs support simultaneous playback of multiple sounds, but may entail significant CPU overhead.
Hardware-assisted decoding provides excellent performance—but does not support simultaneous playback of multiple sounds. If you need to maximize video frame rate in your application, minimize the CPU impact of your audio playback by using uncompressed audio or the IMA4 format, or use hardware-assisted decoding of your compressed audio assets.
For best-practice advice on picking an audio format, see Preferred Audio Formats in iOS.
Table 1-1 describes the playback audio codecs available on iOS devices.
Audio decoder/playback format | Hardware-assisted decoding | Software-based decoding |
|---|---|---|
AAC (MPEG-4 Advanced Audio Coding) | Yes | Yes, starting in iOS 3.0 |
ALAC (Apple Lossless) | Yes | Yes, starting in iOS 3.0 |
HE-AAC (MPEG-4 High Efficiency AAC) | Yes | - |
iLBC (internet Low Bitrate Codec, another format for speech) | - | Yes |
IMA4 (IMA/ADPCM) | - | Yes |
Linear PCM (uncompressed, linear pulse-code modulation) | - | Yes |
MP3 (MPEG-1 audio layer 3) | Yes | Yes, starting in iOS 3.0 |
µ-law and a-law | - | Yes |
When using hardware-assisted decoding, the device can play only a single instance of one of the supported formats at a time. For example, if you are playing a stereo MP3 sound using the hardware codec, a second simultaneous MP3 sound will use software decoding. Similarly, you cannot simultaneously play an AAC and an ALAC sound using hardware. If the iPod application is playing an AAC or MP3 sound in the background, it has claimed the hardware codec; your application then plays AAC, ALAC, and MP3 audio using software decoding.
To play multiple sounds with best performance, or to efficiently play sounds while the iPod is playing in the background, use linear PCM (uncompressed) or IMA4 (compressed) audio.
To learn how to check at runtime which hardware and software codecs are available on a device, read the discussion for the kAudioFormatProperty_HardwareCodecCapabilities constant in Audio Format Services Reference and read Technical Q&A QA1663, “Determining the availability of the AAC hardware encoder at runtime.”
To summarize how iOS supports audio formats for single or multiple playback:
Linear PCM and IMA4 (IMA/ADPCM) You can play multiple linear PCM or IMA4 sounds simultaneously in iOS without incurring CPU resource problems. The same is true for the iLBC speech-quality format, and for the µ-law and a-law compressed formats. When using compressed formats, check the sound quality to ensure it meets your needs.
AAC, HE-AAC, MP3, and ALAC (Apple Lossless) Playback for AAC, HE-AAC, MP3, and ALAC sounds can use efficient hardware-assisted decoding on iOS devices, but these codecs all share a single hardware path. The device can play only a single instance of one of these formats at a time using hardware-assisted decoding.
The single hardware path for AAC, HE-AAC, MP3, and ALAC playback has implications for “play along” style applications, such as a virtual piano. If the user is playing a song in one of these three formats in the iPod application, then your application—to play along over that audio—will employ software decoding.
Table 1-2 describes the recording audio codecs available on iOS devices.
Audio encoder/recording format | Hardware-assisted encoding | Software-based encoding |
|---|---|---|
AAC (MPEG-4 Advanced Audio Coding) | Yes, starting in iOS 3.1 for iPhone 3GS and iPod touch (2nd generation) Yes, starting in iOS 3.2 for iPad | Yes, starting in iOS 4.0 for iPhone 3GS and iPod touch (2nd generation) |
ALAC (Apple Lossless) | - | Yes |
iLBC (internet Low Bitrate Codec, for speech) | - | Yes |
IMA4 (IMA/ADPCM) | - | Yes |
Linear PCM (uncompressed, linear pulse-code modulation) | - | Yes |
µ-law and a-law | - | Yes |
Audio Sessions
The iOS audio session APIs let you define your application’s general audio behavior and design it to work well within the larger audio context of the device it’s running on. These APIs are described in Audio Session Services Reference and AVAudioSession Class Reference. Using these APIs, you can specify such behaviors as:
Whether or not your audio should be silenced by the Silent switch (on iPhone, this is called the Ring/Silent switch)
Whether or not your audio should stop upon screen lock
Whether other audio, such as from the iPod, should continue playing or be silenced when your audio starts
The audio session APIs also let you respond to user actions, such as the plugging in or unplugging of headsets, and to events that use the device’s sound hardware, such as Clock and Calendar alarms and incoming phone calls.
The audio session APIs provide three programmatic features, described in Table 1-3.
Audio session feature | Description |
|---|---|
Setting categories | A category is a key that identifies a set of audio behaviors for your application. By setting a category, you indicate your audio intentions to iOS, such as whether your audio should continue when the screen locks. There are six categories, described in Responding to Interruptions. You can fine-tune the behavior of some categories, as explained in Use Modes to Specialize the Category. |
Handling interruptions and route changes | Your audio session posts messages when your audio is interrupted, when an interruption ends, and when the hardware audio route changes. These messages let you respond gracefully to changes in the larger audio environment—such as an interruption due to an incoming phone call. For details, see Handling Audio Hardware Route Changes and Audio Guidelines By App Type. |
Optimizing for hardware characteristics | You can query the audio session to discover characteristics of the device your application is running on, such as hardware sample rate, number of hardware channels, and whether audio input is available. For details, see Optimizing for Device Hardware. |
There are two interfaces for working with the audio session:
A streamlined, objective-C interface that gives you access to the core audio session features and is described in AVAudioSession Class Reference and AVAudioSessionDelegate Protocol Reference.
A C-based interface that provides comprehensive access to all basic and advanced audio session features and is described in Audio Session Services Reference.
You can mix and match audio session code from AV Foundation and Audio Session Services—the interfaces are completely compatible.
An audio session comes with some default behavior that you can use to get started in development. However, except for certain special cases, the default behavior is unsuitable for a shipping application that uses audio.
For example, when using the default audio session, audio in your application stops when the Auto-Lock period times out and the screen locks. If you want to ensure that playback continues with the screen locked, include the following lines in your application’s initialization code:
NSError *setCategoryErr = nil; |
NSError *activationErr = nil; |
[[AVAudioSession sharedInstance] |
setCategory: AVAudioSessionCategoryPlayback |
error: &setCategoryErr]; |
[[AVAudioSession sharedInstance] |
setActive: YES |
error: &activationErr]; |
The AVAudioSessionCategoryPlayback category ensures that playback continues when the screen locks. Activating the audio session puts the specified category into effect.
How you handle the interruption caused by an incoming phone call or Clock or Calendar alarm depends on the audio technology you are using, as shown in Table 1-4.
Audio technology | How interruptions work |
|---|---|
AV Foundation framework | The If you want to save and restore playback position between application launches, save playback position on interruption as well as on application quit. |
Audio Queue Services, I/O audio unit | These technologies put your application in control of handling interruptions. You are responsible for saving playback or recording position and reactivating your audio session after interruption ends. Implement the |
OpenAL | When using OpenAL for playback, implement the |
System Sound Services | Sounds played using System Sound Services go silent when an interruption starts. They can automatically be used again if the interruption ends. Applications cannot influence the interruption behavior for sounds that use this playback technology. |
Every iOS application—with rare exception—should actively manage its audio session. For a complete explanation of how to do this, read Audio Session Programming Guide. To ensure that your application conforms to Apple recommendations for audio session behavior, read Soundin iOS Human Interface Guidelines.
Playing Audio
This section introduces you to playing sounds in iOS using iPod library access, System Sound Services, Audio Queue Services, the AV Foundation framework, and OpenAL.
Playing Audio Items with iPod Library Access
Starting in iOS 3.0, iPod library access lets your application play a user’s songs, audio books, and audio podcasts. The API design makes basic playback very simple while also supporting advanced searching and playback control.
As shown in Figure 1-1, your application has two ways to retrieve media items. The media item picker, shown on the left, is an easy-to-use, pre-packaged view controller that behaves like the built-in iPod application’s music selection interface. For many applications, this is sufficient. If the picker doesn’t provide the specialized access control you want, the media query interface will. It supports predicate-based specification of items from the iPod library.
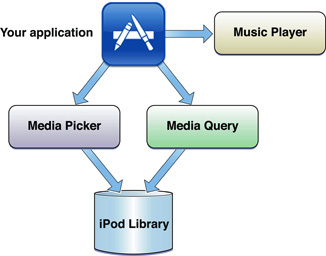
As depicted in the figure to the right of your application, you then play the retrieved media items using the music player provided by this API.
For a complete explanation of how to add media item playback to your application, see iPod Library Access Programming Guide. For a code example, see the AddMusic sample code project.
Playing UI Sound Effects or Invoking Vibration Using System Sound Services
To play user-interface sound effects (such as button clicks), or to invoke vibration on devices that support it, use System Sound Services. This compact interface is described in System Sound Services Reference. You can find sample code in the Audio UI Sounds (SysSound) sample in the iOS Dev Center.
The AudioServicesPlaySystemSound function lets you very simply play short sound files. The simplicity carries with it a few restrictions. Your sound files must be:
No longer than 30 seconds in duration
In linear PCM or IMA4 (IMA/ADPCM) format
Packaged in a
.caf,.aif, or.wavfile
In addition, when you use the AudioServicesPlaySystemSound function:
Sounds play at the current system audio volume, with no programmatic volume control available
Sounds play immediately
Looping and stereo positioning are unavailable
Simultaneous playback is unavailable: You can play only one sound at a time
The similar AudioServicesPlayAlertSound function plays a short sound as an alert. If a user has configured their device to vibrate in Ring Settings, calling this function invokes vibration in addition to playing the sound file.
To play a sound with the AudioServicesPlaySystemSound or AudioServicesPlayAlertSound function, first create a sound ID object, as shown in Listing 1-1.
Listing 1-1 Creating a sound ID object
// Get the main bundle for the app |
CFBundleRef mainBundle = CFBundleGetMainBundle (); |
// Get the URL to the sound file to play. The file in this case |
// is "tap.aif" |
soundFileURLRef = CFBundleCopyResourceURL ( |
mainBundle, |
CFSTR ("tap"), |
CFSTR ("aif"), |
NULL |
); |
// Create a system sound object representing the sound file |
AudioServicesCreateSystemSoundID ( |
soundFileURLRef, |
&soundFileObject |
); |
Then play the sound, as shown in Listing 1-2.
Listing 1-2 Playing a system sound
- (IBAction) playSystemSound { |
AudioServicesPlaySystemSound (self.soundFileObject); |
} |
In typical use, which includes playing a sound occasionally or repeatedly, retain the sound ID object until your application quits. If you know that you will use a sound only once—for example, in the case of a startup sound—you can destroy the sound ID object immediately after playing the sound, freeing memory.
Applications running on iOS devices that support vibration can trigger that feature using System Sound Services. You specify the vibrate option with the kSystemSoundID_Vibrate identifier. To trigger it, use the AudioServicesPlaySystemSound function, as shown in Listing 1-3.
Listing 1-3 Triggering vibration
#import <AudioToolbox/AudioToolbox.h> |
#import <UIKit/UIKit.h> |
- (void) vibratePhone { |
AudioServicesPlaySystemSound (kSystemSoundID_Vibrate); |
} |
If your application is running on an iPod touch, this code does nothing.
Playing Sounds Easily with the AVAudioPlayer Class
The AVAudioPlayer class provides a simple Objective-C interface for playing sounds. If your application does not require stereo positioning or precise synchronization, and if you are not playing audio captured from a network stream, Apple recommends that you use this class for playback.
Using an audio player you can:
Play sounds of any duration
Play sounds from files or memory buffers
Loop sounds
Play multiple sounds simultaneously (although not with precise synchronization)
Control relative playback level for each sound you are playing
Seek to a particular point in a sound file, which supports application features such as fast forward and rewind
Obtain audio power data that you can use for audio level metering
The AVAudioPlayer class lets you play sound in any audio format available in iOS, as described in Table 1-1. For a complete description of this class’s interface, see AVAudioPlayer Class Reference.
To configure an audio player:
Assign a sound file to the audio player.
Prepare the audio player for playback, which acquires the hardware resources it needs.
Designate an audio player delegate object, which handles interruptions as well as the playback-completed event.
The code in Listing 1-4 illustrates these steps. It would typically go into an initialization method of the controller class for your application. (In production code, you’d include appropriate error handling.)
Listing 1-4 Configuring an AVAudioPlayer object
// in the corresponding .h file: |
// @property (nonatomic, retain) AVAudioPlayer *player; |
// in the .m file: |
@synthesize player; // the player object |
NSString *soundFilePath = |
[[NSBundle mainBundle] pathForResource: @"sound" |
ofType: @"wav"]; |
NSURL *fileURL = [[NSURL alloc] initFileURLWithPath: soundFilePath]; |
AVAudioPlayer *newPlayer = |
[[AVAudioPlayer alloc] initWithContentsOfURL: fileURL |
error: nil]; |
[fileURL release]; |
self.player = newPlayer; |
[newPlayer release]; |
[player prepareToPlay]; |
[player setDelegate: self]; |
The delegate (which can be your controller object) handles interruptions and updates the user interface when a sound has finished playing. The delegate methods for the AVAudioPlayer class are described in AVAudioPlayerDelegate Protocol Reference. Listing 1-5 shows a simple implementation of one delegate method. This code updates the title of a Play/Pause toggle button when a sound has finished playing.
Listing 1-5 Implementing an AVAudioPlayer delegate method
- (void) audioPlayerDidFinishPlaying: (AVAudioPlayer *) player |
successfully: (BOOL) completed { |
if (completed == YES) { |
[self.button setTitle: @"Play" forState: UIControlStateNormal]; |
} |
} |
To play, pause, or stop an AVAudioPlayer object, call one of its playback control methods. You can test whether or not playback is in progress by using the playing property. Listing 1-6 shows a basic play/pause toggle method that controls playback and updates the title of a UIButton object.
Listing 1-6 Controlling an AVAudioPlayer object
- (IBAction) playOrPause: (id) sender { |
// if already playing, then pause |
if (self.player.playing) { |
[self.button setTitle: @"Play" forState: UIControlStateHighlighted]; |
[self.button setTitle: @"Play" forState: UIControlStateNormal]; |
[self.player pause]; |
// if stopped or paused, start playing |
} else { |
[self.button setTitle: @"Pause" forState: UIControlStateHighlighted]; |
[self.button setTitle: @"Pause" forState: UIControlStateNormal]; |
[self.player play]; |
} |
} |
The AVAudioPlayer class uses the Objective-C declared properties feature for managing information about a sound—such as the playback point within the sound’s timeline, and for accessing playback options—such as volume and looping. For example, you can set the playback volume for an audio player as shown here:
[self.player setVolume: 1.0]; // available range is 0.0 through 1.0 |
For more information on the AVAudioPlayer class, see AVAudioPlayer Class Reference.
Playing Sounds with Control Using Audio Queue Services
Audio Queue Services adds playback capabilities beyond those available with the AVAudioPlayer class. Using Audio Queue Services for playback lets you:
Precisely schedule when a sound plays, allowing synchronization
Precisely control volume on a buffer-by-buffer basis
Play audio that you have captured from a stream using Audio File Stream Services
Audio Queue Services lets you play sound in any audio format available in iOS, as described in Table 1-1. You can also use this technology for recording, as explained in Recording Audio.
For detailed information on using this technology, see Audio Queue Services Programming Guide and Audio Queue Services Reference. For sample code, see the SpeakHere sample.
Creating an Audio Queue Object
To create an audio queue object for playback, perform these three steps:
Create a data structure to manage information needed by the audio queue, such as the audio format for the data you want to play.
Define a callback function for managing audio queue buffers. The callback uses Audio File Services to read the file you want to play. (In iOS 2.1 and later, you can also use Extended Audio File Services to read the file.)
Instantiate the playback audio queue using the
AudioQueueNewOutputfunction.
Listing 1-7 illustrates these steps using ANSI C. (In production code, you’d include appropriate error handling.) The SpeakHere sample project shows these same steps in the context of a C++ program.
Listing 1-7 Creating an audio queue object
static const int kNumberBuffers = 3; |
// Create a data structure to manage information needed by the audio queue |
struct myAQStruct { |
AudioFileID mAudioFile; |
CAStreamBasicDescription mDataFormat; |
AudioQueueRef mQueue; |
AudioQueueBufferRef mBuffers[kNumberBuffers]; |
SInt64 mCurrentPacket; |
UInt32 mNumPacketsToRead; |
AudioStreamPacketDescription *mPacketDescs; |
bool mDone; |
}; |
// Define a playback audio queue callback function |
static void AQTestBufferCallback( |
void *inUserData, |
AudioQueueRef inAQ, |
AudioQueueBufferRef inCompleteAQBuffer |
) { |
myAQStruct *myInfo = (myAQStruct *)inUserData; |
if (myInfo->mDone) return; |
UInt32 numBytes; |
UInt32 nPackets = myInfo->mNumPacketsToRead; |
AudioFileReadPackets ( |
myInfo->mAudioFile, |
false, |
&numBytes, |
myInfo->mPacketDescs, |
myInfo->mCurrentPacket, |
&nPackets, |
inCompleteAQBuffer->mAudioData |
); |
if (nPackets > 0) { |
inCompleteAQBuffer->mAudioDataByteSize = numBytes; |
AudioQueueEnqueueBuffer ( |
inAQ, |
inCompleteAQBuffer, |
(myInfo->mPacketDescs ? nPackets : 0), |
myInfo->mPacketDescs |
); |
myInfo->mCurrentPacket += nPackets; |
} else { |
AudioQueueStop ( |
myInfo->mQueue, |
false |
); |
myInfo->mDone = true; |
} |
} |
// Instantiate an audio queue object |
AudioQueueNewOutput ( |
&myInfo.mDataFormat, |
AQTestBufferCallback, |
&myInfo, |
CFRunLoopGetCurrent(), |
kCFRunLoopCommonModes, |
0, |
&myInfo.mQueue |
); |
Controlling the Playback Level
Audio queue objects give you two ways to control playback level.
To set playback level directly, use the AudioQueueSetParameter function with the kAudioQueueParam_Volume parameter, as shown in Listing 1-8. Level change takes effect immediately.
Listing 1-8 Setting the playback level directly
Float32 volume = 1; // linear scale, range from 0.0 through 1.0 |
AudioQueueSetParameter ( |
myAQstruct.audioQueueObject, |
kAudioQueueParam_Volume, |
volume |
); |
You can also set playback level for an audio queue buffer by using the AudioQueueEnqueueBufferWithParameters function. This lets you assign audio queue settings that are, in effect, carried by an audio queue buffer as you enqueue it. Such changes take effect when the buffer begins playing.
In both cases, level changes for an audio queue remain in effect until you change them again.
Indicating Playback Level
You can obtain the current playback level from an audio queue object by:
Enabling metering for the audio queue object by setting its
kAudioQueueProperty_EnableLevelMeteringproperty totrueQuerying the audio queue object’s
kAudioQueueProperty_CurrentLevelMeterproperty
The value of this property is an array of AudioQueueLevelMeterState structures, one per channel. Listing 1-9 shows this structure:
Listing 1-9 The AudioQueueLevelMeterState structure
typedef struct AudioQueueLevelMeterState { |
Float32 mAveragePower; |
Float32 mPeakPower; |
}; AudioQueueLevelMeterState; |
Playing Multiple Sounds Simultaneously
To play multiple sounds simultaneously, create one playback audio queue object for each sound. For each audio queue, schedule the first buffer of audio to start at the same time using the AudioQueueEnqueueBufferWithParameters function.
Starting in iOS 3.0, nearly all supported audio formats can be used for simultaneous playback—namely, all those that can be played using software decoding, as described in Table 1-1. For the most processor-efficient multiple playback, use linear PCM (uncompressed) or IMA4 (compressed) audio.
Playing Sounds with Positioning Using OpenAL
The open-sourced OpenAL audio API, available in iOS in the OpenAL framework, provides an interface optimized for positioning sounds in a stereo field during playback. Playing, positioning, and moving sounds works just as it does on other platforms. OpenAL also lets you mix sounds. OpenAL uses the I/O unit for playback, resulting in the lowest latency.
For all of these reasons, OpenAL is your best choice for playing sounds in game applications on iOS-based devices. However, OpenAL is also a good choice for general iOS application audio playback needs.
OpenAL 1.1 support in iOS is built on top of Core Audio. For more information, see OpenAL FAQ for iPhone OS. For sample code, see oalTouch.
Recording Audio
iOS supports audio recording using the AVAudioRecorder class and Audio Queue Services. These interfaces do the work of connecting to the audio hardware, managing memory, and employing codecs as needed. You can record audio in any of the formats listed in Table 1-2.
Recording takes place at a system-defined input level in iOS. The system takes input from the audio source that the user has chosen—the built-in microphone or, if connected, the headset microphone or other input source.
Recording with the AVAudioRecorder Class
The easiest way to record sound in iOS is with the AVAudioRecorder class, described in AVAudioRecorder Class Reference. This class provides a highly-streamlined, Objective-C interface that makes it easy to provide sophisticated features like pausing/resuming recording and handling audio interruptions. At the same time, you retain complete control over recording format.
To prepare for recording using an audio recorder:
Specify a sound file URL.
Set up the audio session.
Configure the audio recorder’s initial state.
Application launch is a good time to do this part of the setup, as shown in Listing 1-10. Variables such as soundFileURL and recording in this example are declared in the class interface. (In production code, you would include appropriate error handling.)
Listing 1-10 Setting up the audio session and the sound file URL
- (void) viewDidLoad { |
[super viewDidLoad]; |
NSString *tempDir = NSTemporaryDirectory (); |
NSString *soundFilePath = |
[tempDir stringByAppendingString: @"sound.caf"]; |
NSURL *newURL = [[NSURL alloc] initFileURLWithPath: soundFilePath]; |
self.soundFileURL = newURL; |
[newURL release]; |
AVAudioSession *audioSession = [AVAudioSession sharedInstance]; |
audioSession.delegate = self; |
[audioSession setActive: YES error: nil]; |
recording = NO; |
playing = NO; |
} |
To handle interruptions and the completion of recording, add the AVAudioSessionDelegate and AVAudioRecorderDelegate protocol names to the interface declaration for your implementation. If your application also does playback, also adopt the AVAudioPlayerDelegate Protocol Reference protocol.
To implement a record method, you can use code such as that shown in Listing 1-11. (In production code, you would include appropriate error handling.)
Listing 1-11 A record/stop method using the AVAudioRecorder class
- (IBAction) recordOrStop: (id) sender { |
if (recording) { |
[soundRecorder stop]; |
recording = NO; |
self.soundRecorder = nil; |
[recordOrStopButton setTitle: @"Record" forState: |
UIControlStateNormal]; |
[recordOrStopButton setTitle: @"Record" forState: |
UIControlStateHighlighted]; |
[[AVAudioSession sharedInstance] setActive: NO error: nil]; |
} else { |
[[AVAudioSession sharedInstance] |
setCategory: AVAudioSessionCategoryRecord |
error: nil]; |
NSDictionary *recordSettings = |
[[NSDictionary alloc] initWithObjectsAndKeys: |
[NSNumber numberWithFloat: 44100.0], AVSampleRateKey, |
[NSNumber numberWithInt: kAudioFormatAppleLossless], AVFormatIDKey, |
[NSNumber numberWithInt: 1], AVNumberOfChannelsKey, |
[NSNumber numberWithInt: AVAudioQualityMax], |
AVEncoderAudioQualityKey, |
nil]; |
AVAudioRecorder *newRecorder = |
[[AVAudioRecorder alloc] initWithURL: soundFileURL |
settings: recordSettings |
error: nil]; |
[recordSettings release]; |
self.soundRecorder = newRecorder; |
[newRecorder release]; |
soundRecorder.delegate = self; |
[soundRecorder prepareToRecord]; |
[soundRecorder record]; |
[recordOrStopButton setTitle: @"Stop" forState: UIControlStateNormal]; |
[recordOrStopButton setTitle: @"Stop" forState: UIControlStateHighlighted]; |
recording = YES; |
} |
} |
For more information on the AVAudioRecorder class, see AVAudioRecorder Class Reference.
Recording with Audio Queue Services
To set up for recording with audio with Audio Queue Services, your application instantiates a recording audio queue object and provides a callback function. The callback stores incoming audio data in memory for immediate use or writes it to a file for long-term storage.
Just as with playback, you can obtain the current recording audio level from an audio queue object by querying its kAudioQueueProperty_CurrentLevelMeter property, as described in Indicating Playback Level.
For detailed examples of how to use Audio Queue Services to record audio, see Recording Audio in Audio Queue Services Programming Guide. For sample code, see the SpeakHere sample.
Parsing Streamed Audio
To play streamed audio content, such as from a network connection, use Audio File Stream Services in concert with Audio Queue Services. Audio File Stream Services parses audio packets and metadata from common audio file container formats in a network bitstream. You can also use it to parse packets and metadata from on-disk files.
In iOS, you can parse the same audio file and bitstream formats that you can in Mac OS X, as follows:
MPEG-1 Audio Layer 3, used for .mp3 files
MPEG-2 ADTS, used for the .aac audio data format
AIFC
AIFF
CAF
MPEG-4, used for .m4a, .mp4, and .3gp files
NeXT
WAVE
Having retrieved audio packets, you can play back the recovered sound in any of the formats supported in iOS, as listed in Table 1-1.
For best performance, network streaming applications should use data from Wi-Fi connections. iOS lets you determine which networks are reachable and available through its System Configuration framework and its SCNetworkReachabilityRef opaque type, described in SCNetworkReachability Reference. For sample code, see the Reachability sample in the iOS Dev Center.
To connect to a network stream, use interfaces from Core Foundation, such as the one described in CFHTTPMessage Reference. Parse the network packets to recover audio packets using Audio File Stream Services. Then buffer the audio packets and send them to a playback audio queue object.
Audio File Stream Services relies on interfaces from Audio File Services, such as the AudioFramePacketTranslation structure and the AudioFilePacketTableInfo structure. These are described in Audio File Services Reference.
For more information on using streams, refer to Audio File Stream Services Reference.
Audio Unit Support in iOS
iOS provides a set of audio processing plug-ins, known as audio units, that you can use in any application. The interfaces in the Audio Unit framework let you open, connect, and use these audio units.
To use the features of the Audio Unit framework, add the Audio Toolbox framework to your Xcode project and link against it in any relevant targets. Then add a #import <AudioToolbox/AudioToolbox.h> statement near the top of relevant source files. For detailed information on how to add frameworks to your project, see Files in Projects in Xcode Project Management Guide.
Table 1-5 lists the audio units provided in iOS.
Audio unit | Description |
|---|---|
iPod Equalizer unit | The iPod EQ unit, of type |
3D Mixer unit | The 3D Mixer unit, of type |
Multichannel Mixer unit | The Multichannel Mixer unit, of type |
Remote I/O unit | The Remote I/O unit, of type |
Voice Processing I/O unit | The Voice Processing I/O unit, of type |
Generic Output unit | The Generic Output unit, of type |
Converter unit | The Converter unit, of type |
For more information on using system audio units, see Audio Unit Hosting Guide for iOS. For reference documentation, see Audio Unit Framework Reference and Audio Unit Processing Graph Services Reference. The iOS Dev Center provides two sample-code projects that demonstrate use of system audio units: aurioTouch and iPhoneMultichannelMixerTest.
Best Practices for iOS Audio
This section lists some important tips for using audio in iOS and describes the best audio data formats for various uses.
Tips for Using Audio
Table 1-6 lists some important tips to keep in mind when using audio in iOS.
Tip | Action |
|---|---|
Use compressed audio appropriately | For AAC, MP3, and ALAC (Apple Lossless) audio, decoding can take place using hardware-assisted codecs. While efficient, this is limited to one audio stream at a time. If you need to play multiple sounds simultaneously, store those sounds using the IMA4 (compressed) or linear PCM (uncompressed) format. |
Convert to the data format and file format you need | The |
Evaluate audio memory issues | When playing sound with Audio Queue Services, you write a callback that sends short segments of audio data to audio queue buffers. In some cases, loading an entire sound file to memory for playback, which minimizes disk access, is best. In other cases, loading just enough data at a time to keep the buffers full is best. Test and evaluate which strategy works best for your application. |
Reduce audio file sizes by limiting sample rates, bit depths, and channels | Sample rate and the number of bits per sample have a direct impact on the size of your audio files. If you need to play many such sounds, or long-duration sounds, consider reducing these values to reduce the memory footprint of the audio data. For example, rather than use 44.1 kHz sampling rate for sound effects, you could use a 32 kHz (or possibly lower) sample rate and still provide reasonable quality. Using monophonic (single-channel) audio instead of stereo (two channel) reduces file size. For each sound asset, consider whether mono could suit your needs. |
Pick the appropriate technology | Use OpenAL when you want a convenient, high-level interface for positioning sounds in a stereo field or when you need low latency playback. To parse audio packets from a file or a network stream, use Audio File Stream Services. For simple playback of single or multiple sounds, use the |
Code for low latency | For the lowest possible playback latency, use OpenAL or use the I/O unit directly. |
Preferred Audio Formats in iOS
For uncompressed (highest quality) audio, use 16-bit, little endian, linear PCM audio data packaged in a CAF file. You can convert an audio file to this format in Mac OS X using the afconvert command-line tool, as shown here:
/usr/bin/afconvert -f caff -d LEI16 {INPUT} {OUTPUT} |
The afconvert tool lets you convert to a wide range of audio data formats and file types. See the afconvert man page, and enter afconvert -h at a shell prompt, for more information.
For compressed audio when playing one sound at a time, and when you don’t need to play audio simultaneously with the iPod application, use the AAC format packaged in a CAF or m4a file.
For less memory usage when you need to play multiple sounds simultaneously, use IMA4 (IMA/ADPCM) compression. This reduces file size but entails minimal CPU impact during decompression. As with linear PCM data, package IMA4 data in a CAF file.
Copyright © 2015 Apple Inc. All Rights Reserved. Terms of Use | Privacy Policy | Updated: 2015-03-09