Supporting IPv6 DNS64/NAT64 Networks
With IPv4 address pool exhaustion imminent, enterprise and cellular providers are increasingly deploying IPv6 DNS64 and NAT64 networks. A DNS64/NAT64 network is an IPv6-only network that continues to provide access to IPv4 content through translation. Depending on the nature of your app, the transition has different implications:
If you’re writing a client-side app using high-level networking APIs such as
NSURLSessionand the CFNetwork frameworks and you connect by name, you should not need to change anything for your app to work with IPv6 addresses. If you aren’t connecting by name, you probably should be. See Avoid Resolving DNS Names Before Connecting to a Host to learn how. For information on CFNetwork, see CFNetwork Framework Reference.If you’re writing a server-side app or other low-level networking app, you need to make sure your socket code works correctly with both IPv4 and IPv6 addresses. Refer to RFC4038: Application Aspects of IPv6 Transition.
What’s Driving IPv6 Adoption
Major network service providers, including major cellular carriers in the the United States, are actively promoting and deploying IPv6. This is due to a variety of factors.
IPv4 Address Depletion
For decades, the world has known that IPv4 addresses would eventually be depleted. Technologies such as Classless Inter-Domain Routing (CIDR) and network address translation (NAT) helped delay the inevitable. However, on January 31, 2011, the top-level pool of Internet Assigned Numbers Authority (IANA) IPv4 addresses was officially exhausted. The American Registry for Internet Numbers (ARIN) is projected to run out of IPv4 addresses in the summer of 2015—a countdown is available here.
IPv6 More Efficient than IPv4
Aside from solving for the IPv4 depletion problem, IPv6 is more efficient than IPv4. For example, IPv6:
Avoids the need for network address translation (NAT)
Provides faster routing through the network by using simplified headers
Prevents network fragmentation
Avoids broadcasting for neighbor address resolution
4G Deployment
The fourth generation of mobile telecommunication technology (4G) is based on packet switching only. Due to the limited supply of IPv4 addresses, IPv6 support is required in order for 4G deployment to be scalable.
Multimedia Service Compatibility
IP Multimedia Core Network Subsystem (IMS) allows services such as multimedia SMS messaging and Voice over LTE (VoLTE) to be delivered over IP. The IMS used by some service providers is compatible with IPv6 only.
Cost
Service providers incur additional operational and administrative costs by continuing to support the legacy IPv4 network while the industry continues migrating to IPv6.
DNS64/NAT64 Transitional Workflow
To help slow the depletion of IPv4 addresses, NAT was implemented in many IPv4 networks. Although this solution worked temporarily, it proved costly and fragile. Today, as more clients are using IPv6, providers must now support both IPv4 and IPv6. This is a costly endeavor.
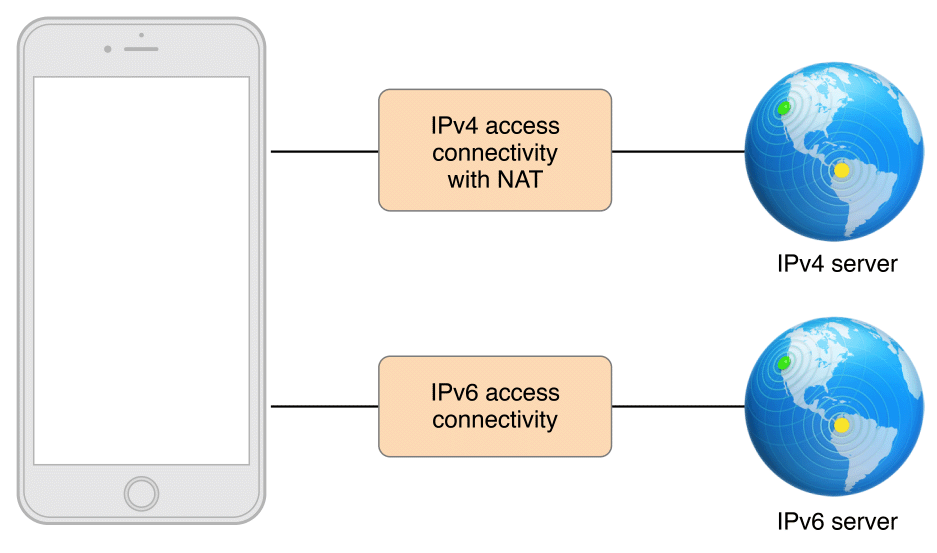
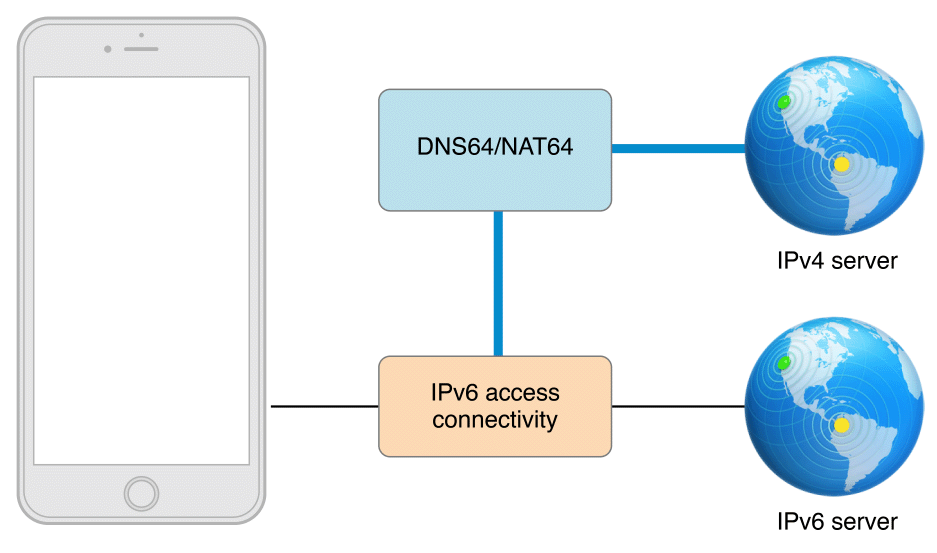
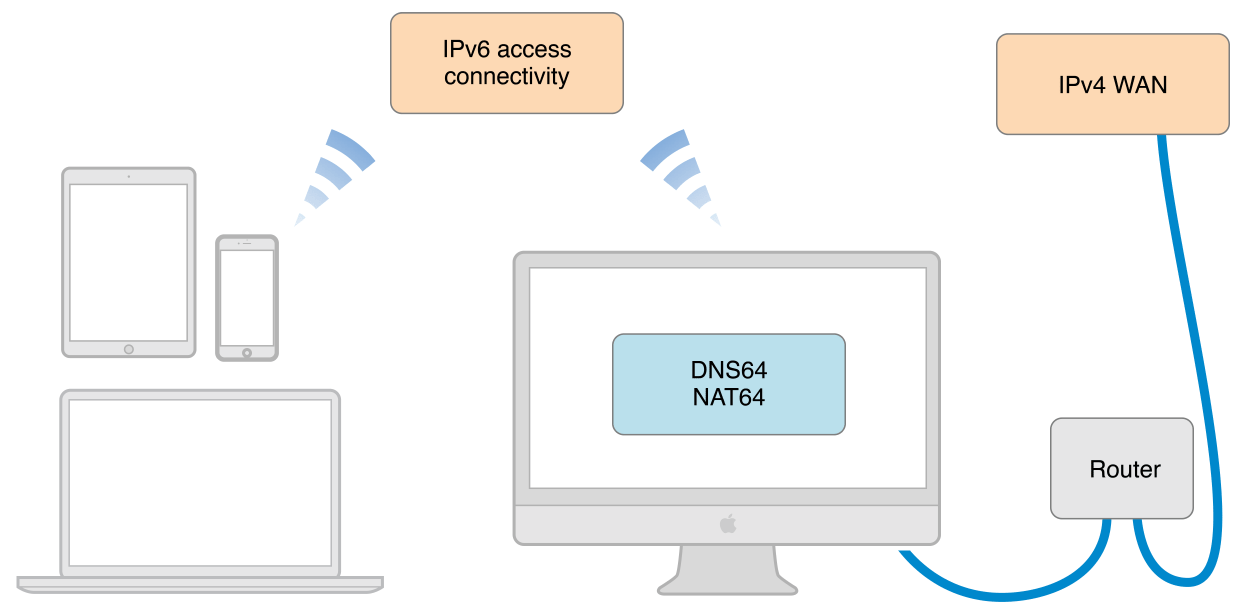
Ideally, providers want to drop support for the IPv4 network. However, doing so prevents clients from accessing IPv4 servers, which represent a significant portion of the Internet. To solve this problem, most major network providers are implementing a DNS64/NAT64 transitional workflow. This is an IPv6-only network that continues to provide access to IPv4 content through translation.
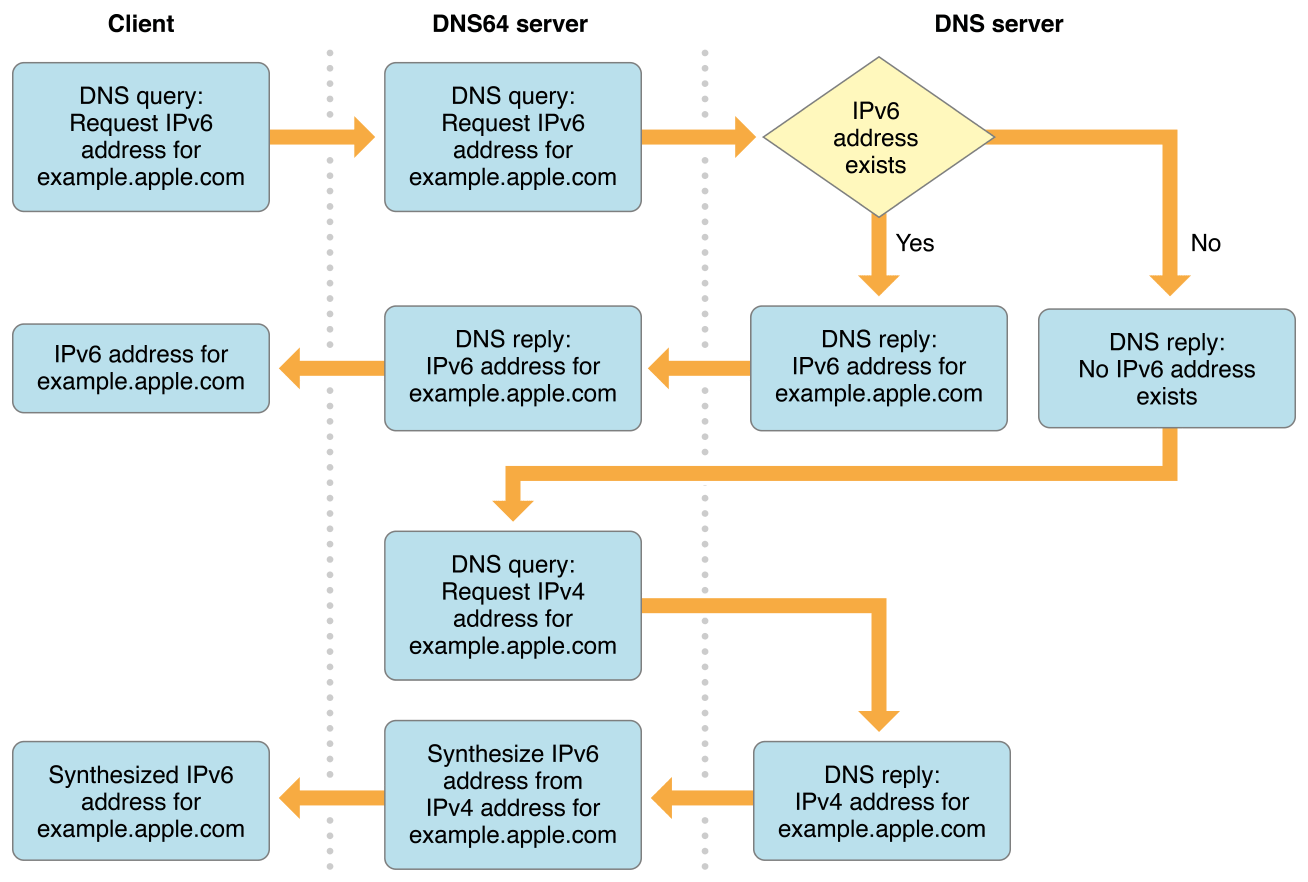
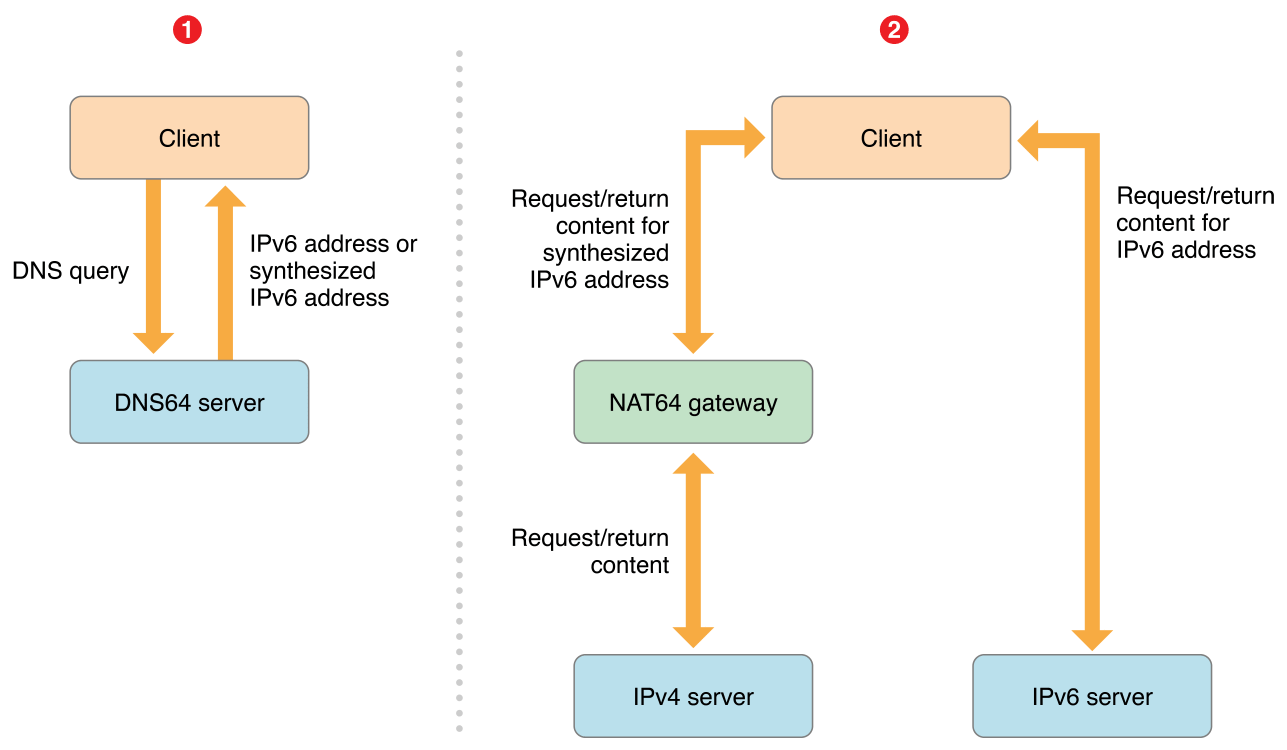
In this type of workflow, the client sends DNS queries to a DNS64 server, which requests IPv6 addresses from the DNS server. When an IPv6 address is found, it’s passed back to the client immediately. However, when an IPv6 address isn’t found, the DNS64 server requests an IPv4 address instead. The DNS64 server then synthesizes an IPv6 address by prefixing the IPv4 address, and passes that back to the client. In this regard, the client always receives an IPv6-ready address. See Figure 10-3.
When the client sends a request to a server, any IPv6 packets destined for synthesized addresses are automatically routed by the network through a NAT64 gateway. The gateway performs the IPv6-to-IPv4 address and protocol translation for the request. It also performs the IPv4 to IPv6 translation for the response from the server. See Figure 10-4.
IPv6 and App Store Requirements
Compatibility with IPv6 DNS64/NAT64 networks will be an App Store submission requirement, so it is essential that apps ensure compatibility. The good news is that the majority of apps are already IPv6-compatible. For these apps, it’s still important to regularly test your app to watch for regressions. Apps that aren’t IPv6-compatible may encounter problems when operating on DNS64/NAT64 networks. Fortunately, it’s usually fairly simple to resolve these issues, as discussed throughout this chapter.
Common Barriers to Supporting IPv6
Several situations can prevent an app from supporting IPv6. The sections that follow describe how to resolve these problems.
IP address literals embedded in protocols. Many communications protocols, such as Session Initiation Protocol (SIP), File Transfer Protocol (FTP), WebSockets, and Peer-to-Peer Protocol (P2PP), include IP address literals in protocol messages. For example, the
FTPparameter commandsDATA PORTandPASSIVEexchange information that includes IP address literals. Similarly, IP address literals may appear in the values of SIP header fields, such asTo,From,Contact,Record-Route, andVia. See Use High-Level Networking Frameworks and Don’t Use IP Address Literals.IP address literals embedded in configuration files. Configuration files often include IP address literals. See Don’t Use IP Address Literals.
Network preflighting. Many apps attempt to proactively check for an Internet connection or an active Wi-Fi connection by passing IP address literals to network reachability APIs. See Connect Without Preflight.
Using low-level networking APIs. Some apps work directly with sockets and other raw network APIs such as
gethostbyname,gethostbyname2, andinet_aton. These APIs are prone to misuse or they only support IPv4—for example, resolving hostnames for theAF_INETaddress family, rather than theAF_UNSPECaddress family. See Use High-Level Networking Frameworks.Using small address family storage containers. Some apps and networking libraries use address storage containers—such as
uint32_t,in_addr, andsockaddr_in—that are 32 bits or smaller. See Use Appropriately Sized Storage Containers.
Ensuring IPv6 DNS64/NAT64 Compatibility
Adhere to the following guidelines to ensure IPv6 DNS64/NAT64 compatibility in your app.
Use High-Level Networking Frameworks
Apps requiring networking can be built upon high-level networking frameworks or low-level POSIX socket APIs. In most cases, the high-level frameworks are sufficient. They are capable, easy to use, and less prone to common pitfalls than the low-level APIs.

WebKit. This framework provides a set of classes for displaying web content in windows, and implements browser features such as following links, managing a back-forward list, and managing a history of pages recently visited. WebKit simplifies the complicated process of loading webpages—that is, asynchronously requesting web content from an HTTP server where the response may arrive incrementally, in random order, or partially due to network errors. For more information, see WebKit Framework Reference.
Cocoa URL loading system. This system is the easiest way to send and receive data over the network without providing an explicit IP address. Data is sent and received using one of several classes—such as
NSURLSession,NSURLRequest, andNSURLConnection—that work withNSURLobjects.NSURLobjects let your app manipulate URLs and the resources they reference. Create anNSURLobject by calling theinitWithString:method and passing it a URL specifier. Call thecheckResourceIsReachableAndReturnError:method of theNSURLclass to check the reachability of a host. For more information, see URL Loading System Programming Guide.CFNetwork. This Core Services framework provides a library of abstractions for network protocols, which makes it easy to perform a variety of network tasks such as working with BSD sockets, resolving DNS hosts, and working with HTTP/HTTPS. To target a host without an explicit IP address, call the
CFHostCreateWithNamemethod. To open a pair of TCP sockets to the host, call theCFStreamCreatePairWithSocketToCFHostmethod. For more information, see CFNetwork Concepts in CFNetwork Programming Guide.
If you do require the low-level socket APIs, follow the guidelines in RFC4038: Application Aspects of IPv6 Transition.
Don’t Use IP Address Literals
Make sure you aren’t passing IPv4 address literals in dot notation to APIs such as getaddrinfo and SCNetworkReachabilityCreateWithName. Instead, use high-level network frameworks and address-agnostic versions of APIs, such as getaddrinfo and getnameinfo, and pass them hostnames or fully qualified domain names (FQDNs). See getaddrinfo(3) Mac OS X Developer Tools Manual Page and getnameinfo(3) Mac OS X Developer Tools Manual Page.
Connect Without Preflight
The Reachability APIs (see SCNetworkReachability Reference) are intended for diagnostic purposes after identifying a connectivity issue. Many apps incorrectly use these APIs to proactively check for an Internet connection by calling the SCNetworkReachabilityCreateWithAddress method and passing it an IPv4 address of 0.0.0.0, which indicates that there is a router on the network. However, the presence of a router doesn’t guarantee that an Internet connection exists. In general, avoid preflighting network reachability. Just try to make a connection and gracefully handle failures. If you must check for network availability, avoid calling the SCNetworkReachabilityCreateWithAddress method. Call the SCNetworkReachabilityCreateWithName method and pass it a hostname instead.
Some apps also pass the SCNetworkReachabilityCreateWithAddress method an IPv4 address of 169.254.0.0, a self-assigned link-local address, to check for an active Wi-Fi connection. To check for Wi-Fi or cellular connectivity, look for the network reachability flag kSCNetworkReachabilityFlagsIsWWAN instead.
Use Appropriately Sized Storage Containers
Use address storage containers, such as sockaddr_storage, that are large enough to store IPv6 addresses.
Check Source Code for IPv6 DNS64/NAT64 Incompatibilities
Check for and eliminate IPv4-specific APIs, such as:
inet_addr()inet_aton()inet_lnaof()inet_makeaddr()inet_netof()inet_network()inet_ntoa()inet_ntoa_r()bindresvport()getipv4sourcefilter()setipv4sourcefilter()
If your code handles IPv4 types, make sure the IPv6 equivalents are handled too.
IPv4 | IPv6 |
|---|---|
|
|
|
|
|
|
|
|
|
|
Use System APIs to Synthesize IPv6 Addresses
If your app needs to connect to an IPv4-only server without a DNS hostname, use getaddrinfo to resolve the IPv4 address literal. If the current network interface doesn’t support IPv4, but supports IPv6, NAT64, and DNS64, performing this task will result in a synthesized IPv6 address.
Listing 10-1 shows how to resolve an IPv4 literal using getaddrinfo. Assuming you have an IPv4 address stored in memory as four bytes (such as {192, 0, 2, 1}), this example code converts it to a string (such as "192.0.2.1"), uses getaddrinfo to synthesize an IPv6 address (such as a struct sockaddr_in6 containing the IPv6 address "64:ff9b::192.0.2.1") and tries to connect to that IPv6 address.
Listing 10-1 Using getaddrinfo to resolve an IPv4 address literal
#include <sys/socket.h> |
#include <netdb.h> |
#include <arpa/inet.h> |
#include <err.h> |
uint8_t ipv4[4] = {192, 0, 2, 1}; |
struct addrinfo hints, *res, *res0; |
int error, s; |
const char *cause = NULL; |
char ipv4_str_buf[INET_ADDRSTRLEN] = { 0 }; |
const char *ipv4_str = inet_ntop(AF_INET, &ipv4, ipv4_str_buf, sizeof(ipv4_str_buf)); |
memset(&hints, 0, sizeof(hints)); |
hints.ai_family = PF_UNSPEC; |
hints.ai_socktype = SOCK_STREAM; |
hints.ai_flags = AI_DEFAULT; |
error = getaddrinfo(ipv4_str, "http", &hints, &res0); |
if (error) { |
errx(1, "%s", gai_strerror(error)); |
/*NOTREACHED*/ |
} |
s = -1; |
for (res = res0; res; res = res->ai_next) { |
s = socket(res->ai_family, res->ai_socktype, |
res->ai_protocol); |
if (s < 0) { |
cause = "socket"; |
continue; |
} |
if (connect(s, res->ai_addr, res->ai_addrlen) < 0) { |
cause = "connect"; |
close(s); |
s = -1; |
continue; |
} |
break; /* okay we got one */ |
} |
if (s < 0) { |
err(1, "%s", cause); |
/*NOTREACHED*/ |
} |
freeaddrinfo(res0); |
Test for IPv6 DNS64/NAT64 Compatibility Regularly
The easiest way to test your app for IPv6 DNS64/NAT64 compatibility—which is the type of network most cellular carriers are deploying—is to set up a local IPv6 DNS64/NAT64 network with your Mac. You can then connect to this network from your other devices for testing purposes. See Figure 10-6.
To set up a local IPv6 Wi-Fi network using your Mac
Make sure your Mac is connected to the Internet, but not through Wi-Fi.
Launch System Preferences from your Dock, LaunchPad, or the Apple menu.
Press the Option key and click Sharing. Don’t release the Option key yet.
Figure 10-7 Opening Sharing preferences 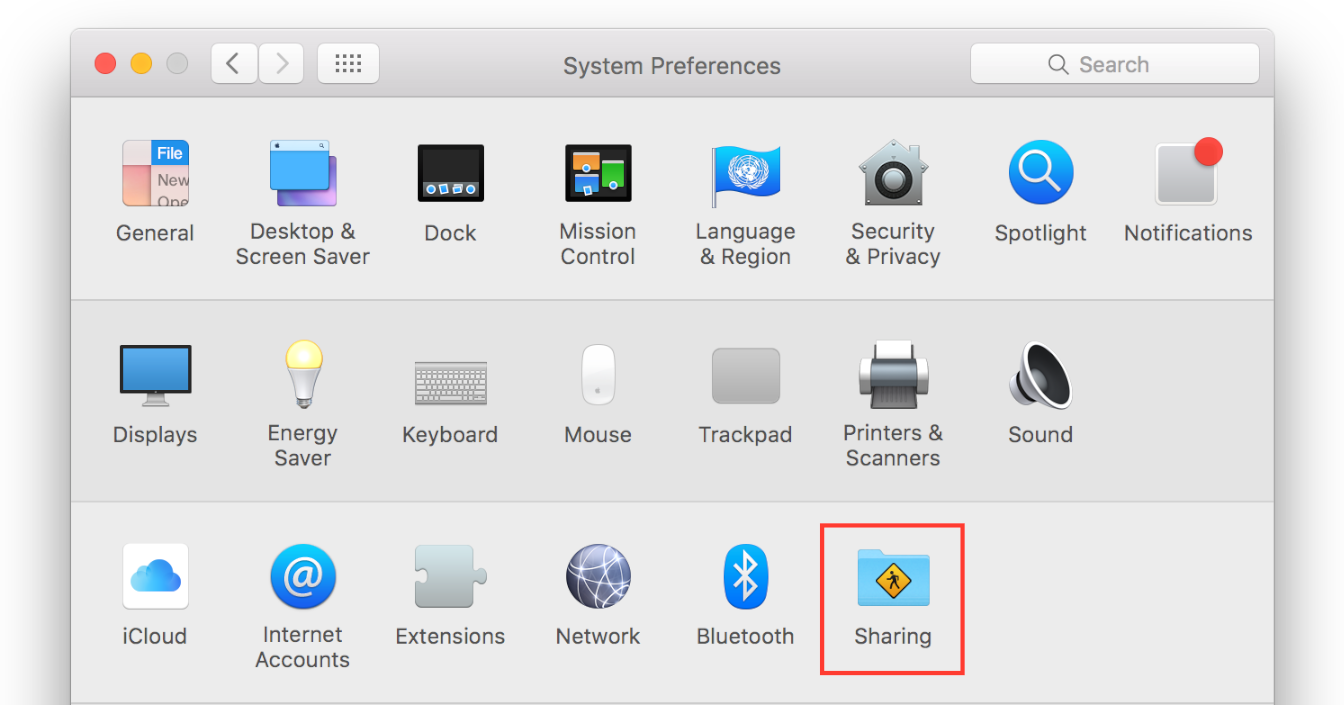
Select Internet Sharing in the list of sharing services.
Figure 10-8 Configuring Internet sharing 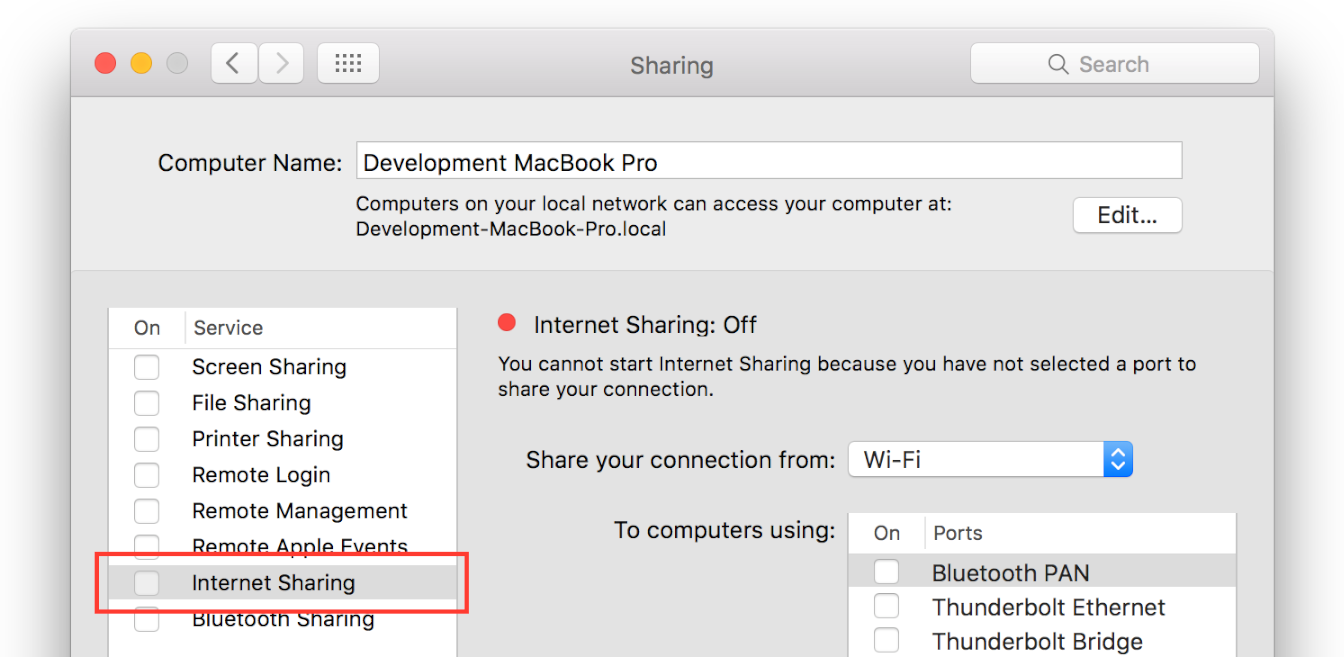
Release the Option key.
Select the Create NAT64 Network checkbox.
Figure 10-9 Enabling a local IPv6 NAT64 network 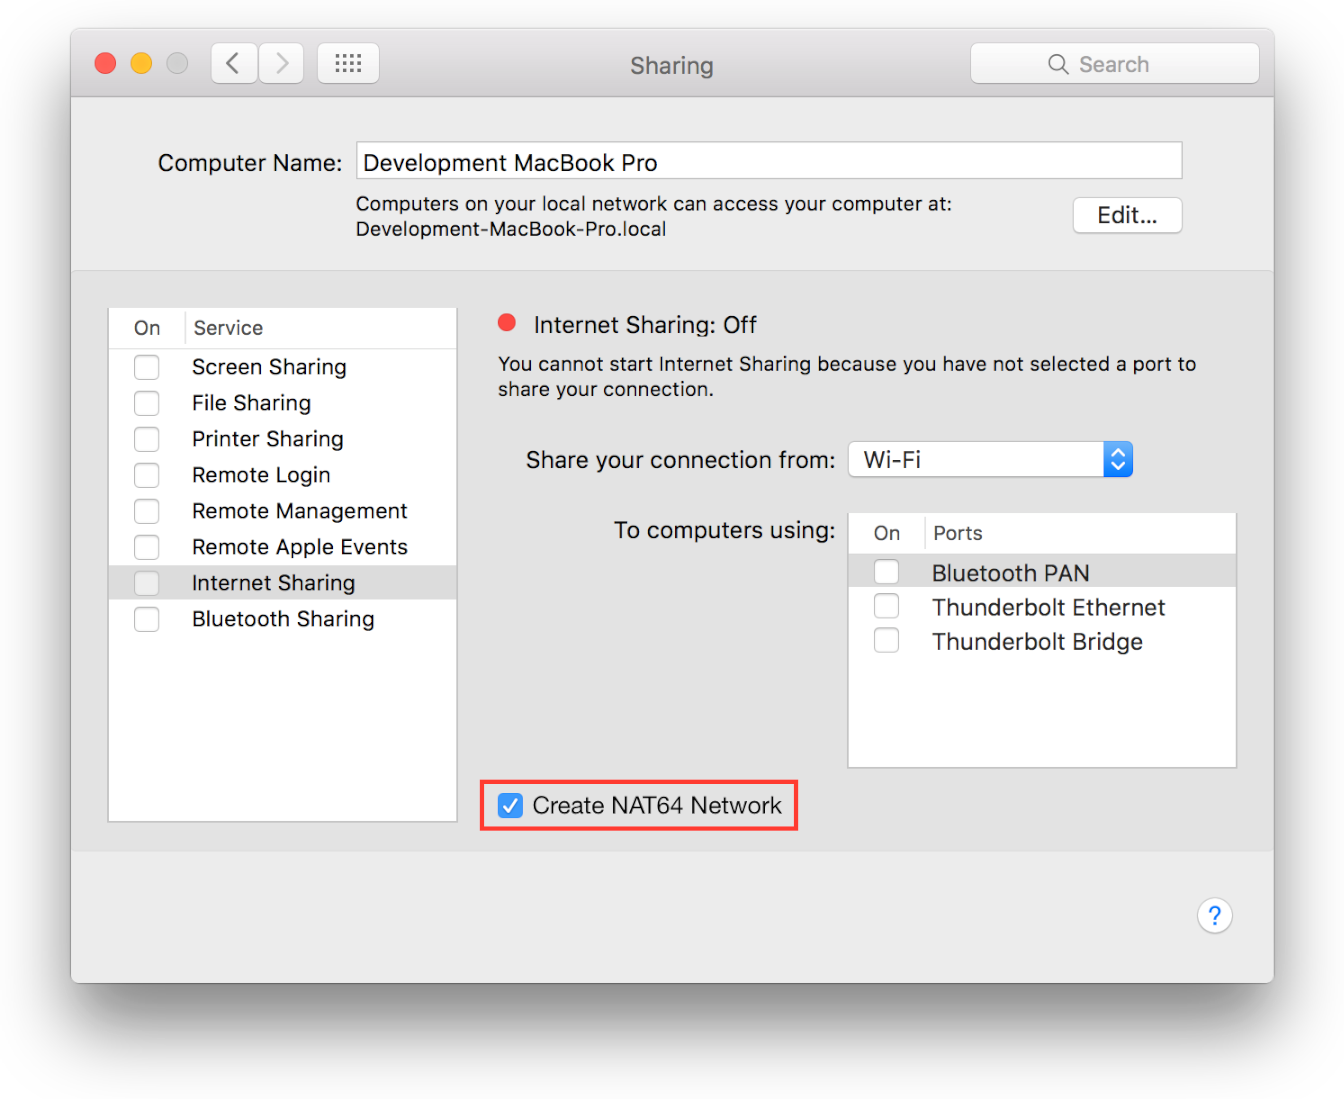
Choose the network interface that provides your Internet connection, such as Thunderbolt Ethernet.
Figure 10-10 Choosing a network interface to share 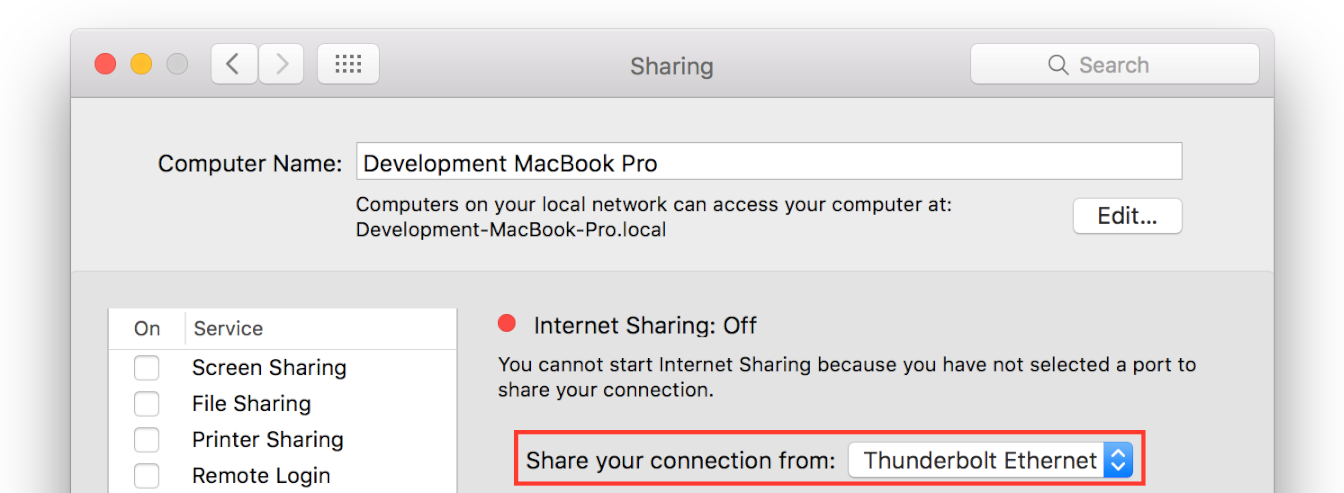
Select the Wi-Fi checkbox.
Figure 10-11 Enabling sharing over Wi-Fi 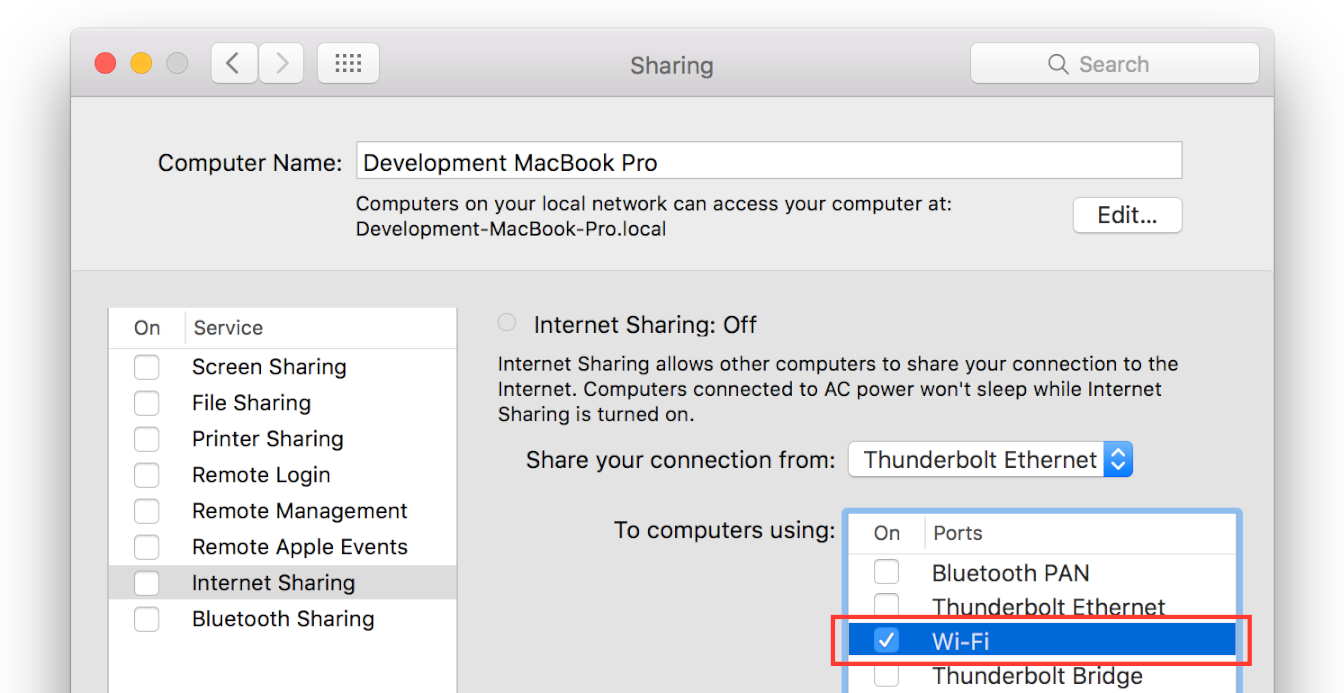
Click Wi-Fi Options, and configure the network name and security options for your network.
Figure 10-12 Accessing Wi-Fi network options 
Figure 10-13 Setting up local Wi-Fi network options 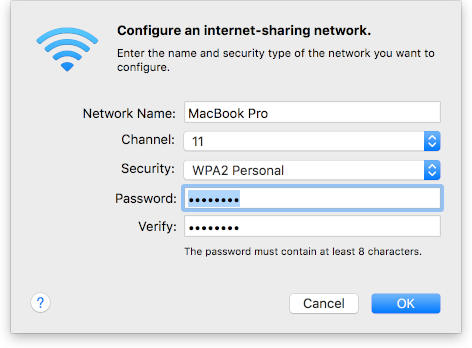
Select the Internet Sharing checkbox to enable your local network.
Figure 10-14 Enabling Internet sharing 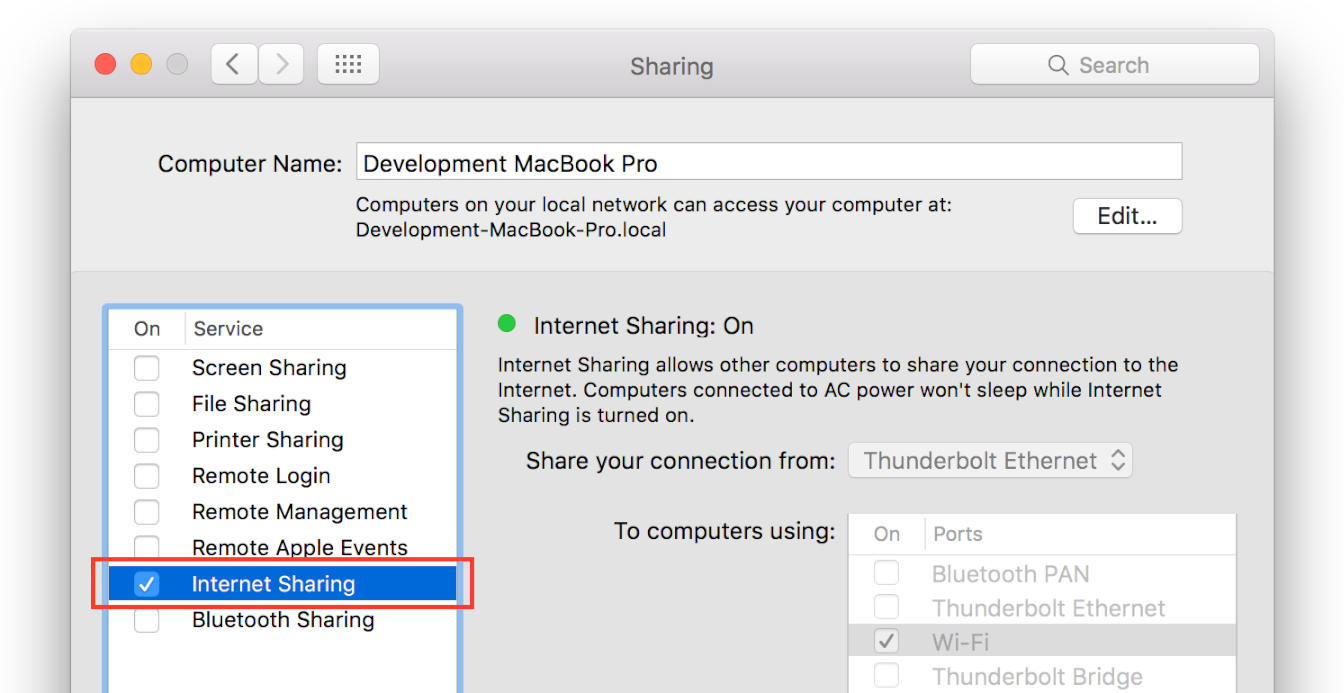
When prompted to confirm you want to begin sharing, click Start.
Figure 10-15 Starting Internet sharing 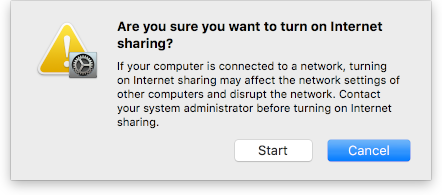
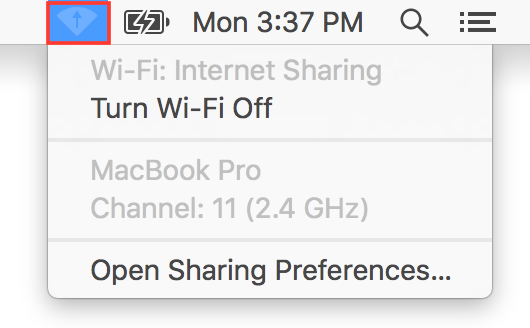
Once sharing is active, you should see a green status light and a label that says Internet Sharing: On. In the Wi-Fi menu, you will also see a small, faint arrow pointing up, indicating that Internet Sharing is enabled. You now have an IPv6 NAT64 network and can connect to it from other devices in order to test your app.
Limitations of Local Testing
A Mac-based IPv6 DNS64/NAT64 network is a useful tool for testing your app in an IPv6 environment. However, because it always generates synthesized IPv6 addresses and transmits data on the WAN side using IPv4, it’s not an exact replica of the networks supplied by service providers. These networks (as well as the one used during App Review) do allow for direct IPv6-to-IPv6 connectivity. If your server is misconfigured, this might result in your app behaving differently in regular use or during review than it does in your local testing. It might even result in an App Review failure that is hard to reproduce in your own environment.
In particular, you may run into trouble if your server claims to support IPv6, but in practice does not. In this case, during your initial testing, your app appears to be communicating with your server via an IPv6 path, and thus behaves properly. However, your test network is actually translating the IPv6 traffic that your app generates to IPv4 traffic on the WAN. Therefore, you’re actually exercising your server’s IPv4 data path. Later, during App Review (or in the real world), the app operates identically, but the network makes a direct IPv6 connection to the server. If your server fails to respond properly to IPv6 traffic, your app fails to operate as expected, and might fail App Review.
To avoid this, in addition to using a Mac-based IPv6 DNS64/NAT64 test network to validate your app, independently verify that your server is working properly as an IPv6 server. For example, make sure that the server:
Has the correct DNS information. In addition to examining the server itself, you can use the command line tool
dig(1)from your Mac to see how server reports its AAAA record.Is actually listening on IPv6. Use a tool like ipv6-test.com to test a web server (HTTP or HTTPS). For other protocols, you’ll need to verify this from a native IPv6 network.
Responds properly to IPv6 requests. If you have access, look at the server logs to verify that IPv6 traffic is being handled properly. If not, you’ll need to test from a native IPv6 network.
Resources
For more information on implementing networking, see:
For more information on the IPv6 transition, see:
For technical issues encountered while transitioning to IPv6, see:
Copyright © 2004, 2017 Apple Inc. All Rights Reserved. Terms of Use | Privacy Policy | Updated: 2017-03-27