Retired Document
Important: This document is retired. Use the information in View Controller Programming Guide for iOS instead.
Modal View Controllers
Modal view controllers provide interesting ways to manage the flow of your application. Most commonly, applications use modal view controllers as a temporary interruption in order to obtain key information from the user. However, you can also use modally presented view controllers to implement alternate interfaces for your application at specific times.
This chapter describes the uses for modal views in your application and shows you when and how to present them.
About Modal View Controllers
Modal view controllers are a tool that you have at your disposal for interrupting the current workflow and displaying a new set of views. A modal view controller is not a specific subclass of UIViewController, like UITabBarController or UINavigationController are. Instead, any view controller can be presented modally by your application. However, like tab bar and navigation controllers, you present view controllers modally when you want to convey a specific meaning about the relationship between the previous view hierarchy and the newly presented view hierarchy.
There are several reasons to use modal view controllers in your application:
Use them to gather information from the user immediately.
Use them to present some content temporarily.
Use them to change work modes temporarily.
Use them to implement alternate interfaces for different device orientations.
Use them to present a new view hierarchy with a specific type of animated transition (or no transition).
Most of these reasons involve interrupting your application’s workflow temporarily in order to gather or display some information. Once you have the information you need (or have presented the user with the appropriate information), you dismiss the modal view controller to return the application to its previous state. Even the last option (implementing an alternate interface) should be treated as a temporary interruption.
When you present a modal view controller, the system creates a parent-child relationship between the view controller that did the presenting and the view controller that was presented. Specifically, the view controller that did the presenting updates its modalViewController property to point to its presented (child) view controller. Similarly, the presented view controller updates its parentViewController property to point back to the view controller that presented it. Figure 6-1 shows the relationship between the view controller managing the main screen in the Calendar application and the modal view controller used to create new events.

Any view controller object can present any other single view controller modally. This is true even for view controllers that were themselves presented modally. In other words, you can chain modal view controllers together as needed, presenting new modal view controllers on top of other modal view controllers as needed. Figure 6-2 shows a visual representation of the chaining process and the actions that initiate it. In this case, when the user taps the icon in the camera view, the application presents a modal view controller with the user’s photos. Tapping the action button in the photo library’s toolbar prompts the user for an appropriate action and then presents another modal view controller (the people picker) in response to that action. Selecting a contact (or canceling the people picker) dismisses that interface and takes the user back to the photo library. Tapping the Done button then dismisses the photo library and takes the user back to the camera interface.
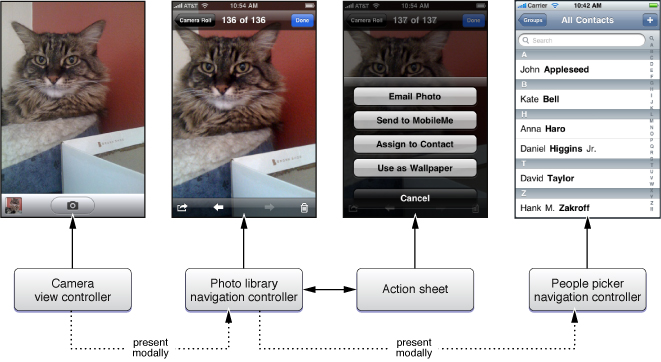
Each view controller in a chain of modally presented view controllers has pointers to the other objects surrounding it in the chain. In other words, a modal view controller that presents another modal view controller has valid objects in both its parentViewController and modalViewController properties. You can use these relationships to trace through the chain of view controllers as needed. For example, if the user cancels the current operation, you could remove all objects in the chain by dismissing the first modally presented view controller. In other words, dismissing a modal view controller dismisses not only that view controller but any view controllers it presented modally.
In Figure 6-2, a point worth noting is that the modally presented view controllers are both navigation controllers. You can present UINavigationController objects modally in the same way that you would present a custom view controller. (In rare cases, you could even present a tab bar controller.)
When presenting a navigation controller modally, you always present the UINavigationController object itself, rather than presenting any of the view controllers on its navigation stack. However, individual view controllers on the navigation stack may themselves present other view controllers modally, including other navigation controllers. Figure 6-3 shows more detail of the objects that would be involved in the preceding example. As you can see, the people picker is not presented by the photo library navigation controller but by one of the custom view controllers on its navigation stack.

Configuring the Presentation Style for Modal Views
For iPad applications, you can present content modally using several different styles. In iPhone applications, modally presented views always cover the visible portion of the window, but when running on an iPad, view controllers use the value in their modalPresentationStyle property to determine their appearance when presented modally. Different options for this property allow you to present the view controller so that it fills all or only part of the screen.
Figure 6-4 shows the core presentation styles that are available. (The UIModalPresentationCurrentContext style lets a view controller adopt the presentation style of its parent.) In each modal view, the dimmed areas show the underlying content but do not allow taps in that content. Therefore, unlike a popover, your modal views must still have controls that allow the user to dismiss the modal view.

For guidance on when to use the different presentation styles, see Popover (iPad Only).
Presenting a View Controller Modally
To present a view controller modally, you must do the following:
Create the view controller you want to present.
Set the
modalTransitionStyleproperty of the view controller to the desired value.Assign a delegate object where appropriate. (The delegate is used primarily by system view controllers to notify your code when the view controller is ready to be dismissed. For more information, see Presenting Standard System Modal View Controllers. )
Call the
presentModalViewController:animated:method of the current view controller, passing in the view controller you want to present modally.
The presentModalViewController:animated: method presents the view for the specified view controller object and configures the parent-child relationships between the modal view controller and the current view controller. Unless you are restoring your application to some previous state, you usually want to animate the appearance of a modal view controller. The transition style you should use depends on how you plan to use the presented view controller. Table 6-1 lists the transition styles you can assign to the modalTransitionStyle property of the presented view controller and how you might use each one.
Transition style | Usage |
|---|---|
Use this style when you want to interrupt the current workflow to gather information from the user. You can also use it to present content that the user might or might not modify. For this style of transition, custom view controllers should provide buttons to dismiss the view controller explicitly. Typically, this would be a Done button and an optional Cancel button. If you do not explicitly set a transition style, this style is used by default. | |
Use this style to change the work mode of your application temporarily. The most common usage for this style is to display settings that might change frequently, such as in the Stocks and Weather applications. These settings could be meant for the entire application or they could be specific to the current screen. For this style of transition, you usually provide some sort of button to return the user to the normal running mode of your application. | |
Use this style to present an alternate interface when the device changes orientations. In such a case, your application would be responsible for presenting and dismissing the alternate interface in response to orientation change notifications. Media-based applications can also use this style to fade in screens displaying media content. For an example of how to implement an alternate interface in response to device orientation changes, see Creating an Alternate Landscape Interface. |
Listing 6-1 shows an example from a custom recipes application of how to present a modal controller. When the user adds a new recipe, the application prompts the user for basic information about the recipe by presenting a navigation controller modally. A navigation controller was chosen so that there would be a standard place to put a Cancel and Done button. Using a navigation controller also makes it easier to expand the new recipe interface in the future. All you would have to do is push new view controllers on the navigation stack.
Listing 6-1 Presenting a view controller modally
- (void)add:(id)sender { |
// Create the root view controller for the navigation controller |
// The new view controller configures a Cancel and Done button for the |
// navigation bar. |
RecipeAddViewController *addController = [[RecipeAddViewController alloc] |
initWithNibName:@"RecipeAddView" bundle:nil]; |
// Configure the RecipeAddViewController. In this case, it reports any |
// changes to a custom delegate object. |
addController.delegate = self; |
// Create the navigation controller and present it modally. |
UINavigationController *navigationController = [[UINavigationController alloc] |
initWithRootViewController:addController]; |
[self presentModalViewController:navigationController animated:YES]; |
// The navigation controller is now owned by the current view controller |
// and the root view controller is owned by the navigation controller, |
// so both objects should be released to prevent over-retention. |
[navigationController release]; |
[addController release]; |
} |
When the user taps either the Done or Cancel button from the new recipe entry interface, the application dismisses the view controller and returns the user to the main view. Although you could call the dismissModalViewControllerAnimated: method directly from the action method associated with either button, a more robust approach involves using a delegate object, as described in Dismissing a Modal View Controller.
Dismissing a Modal View Controller
When it comes time to dismiss a modal view controller, the preferred approach is to let the parent view controller do the dismissing. In other words, the same view controller that presented the modal view controller should also take responsibility for dismissing it whenever possible. Although there are several techniques for notifying a parent view controller that it should dismiss its modally presented child, the preferred technique is delegation.
In a delegate-based model, the view controller being presented modally must define a protocol for its delegate to implement. The protocol defines methods that are called by the modal view controller in response to specific actions, such as taps in a Done button. The delegate is then responsible for implementing these methods and providing an appropriate response. In the case of a parent view controller acting as a delegate for its modal child, the response would include dismissing the child view controller when appropriate.
This use of delegation to manage interactions with a modal view controller has some key advantages over other techniques:
The delegate object has the opportunity to validate or incorporate changes from the modal view controller before that view controller is dismissed.
The use of a delegate promotes better encapsulation because the modal view controller does not have to know anything about the parent object that presented it. This enables you to reuse that modal view controller in other parts of your application.
To illustrate the implementation of a delegate protocol, consider the recipe view controller example that was used in Presenting a View Controller Modally. In that example, a recipes application presented a modal view controller in response to the user wanting to add a new recipe. Prior to presenting the modal view controller, the current view controller made itself the delegate of the RecipeAddViewController object. Listing 6-2 shows the definition of the delegate protocol for RecipeAddViewController objects.
Listing 6-2 Delegate protocol for dismissing a modal view controller
@protocol RecipeAddDelegate <NSObject> |
// recipe == nil on cancel |
- (void)recipeAddViewController:(RecipeAddViewController *)recipeAddViewController |
didAddRecipe:(MyRecipe *)recipe; |
@end |
When the user taps the Cancel or Done button in the new recipe interface, the RecipeAddViewController object calls the preceding method on its delegate object. The delegate is then responsible for deciding what course of action to take.
Listing 6-3 shows the implementation of the delegate method that handles the addition of new recipes. This method is implemented by the view controller that presented the RecipeAddViewController object modally. If the user accepted the new recipe—that is, the recipe object is not nil—this method adds the recipe to its internal data structures and tells its table view to refresh itself. (The table view subsequently reloads the recipe data from the same recipesController object shown here.) As its final act, the delegate method dismisses the modal view controller.
Listing 6-3 Dismissing a modal view controller using a delegate
- (void)recipeAddViewController:(RecipeAddViewController *)recipeAddViewController |
didAddRecipe:(Recipe *)recipe { |
if (recipe) { |
// Add the recipe to the recipes controller. |
int recipeCount = [recipesController countOfRecipes]; |
UITableView *tableView = [self tableView]; |
[recipesController insertObject:recipe inRecipesAtIndex:recipeCount]; |
[tableView reloadData]; |
} |
[self dismissModalViewControllerAnimated:YES]; |
} |
Presenting Standard System Modal View Controllers
In iOS, there are a number of standard system view controllers that are designed to be presented modally by your application. The basic rules for presenting these view controllers are the same as for your custom view controllers. However, because your application does not have access to the view hierarchy managed by the system view controllers, you cannot simply implement actions for the controls in the views. Interactions with the system view controllers typically take place through a delegate object.
Each system view controller defines a corresponding protocol, whose methods you implement in your delegate object. Each delegate usually implements a method to accept whatever item was selected or cancel the operation. Your delegate object should always be ready to handle both cases. One of the most important things the delegate must do is dismiss the presented view controller by calling the dismissModalViewControllerAnimated: method of the view controller that did the presenting—in other words, the parent of the modal view controller.
Table 6-2 lists several of the standard system view controllers found in iOS. For more information about each of these classes, including the features it provides, see the corresponding class reference documentation.
Framework | View controllers |
|---|---|
Address Book UI | |
Event Kit UI | |
Game Kit | |
Message UI | |
Media Player | |
UIKit |
Copyright © 2013 Apple Inc. All Rights Reserved. Terms of Use | Privacy Policy | Updated: 2013-09-18