Still and Video Media Capture
To manage the capture from a device such as a camera or microphone, you assemble objects to represent inputs and outputs, and use an instance of AVCaptureSession to coordinate the data flow between them. Minimally you need:
An instance of
AVCaptureDeviceto represent the input device, such as a camera or microphoneAn instance of a concrete subclass of
AVCaptureInputto configure the ports from the input deviceAn instance of a concrete subclass of
AVCaptureOutputto manage the output to a movie file or still imageAn instance of
AVCaptureSessionto coordinate the data flow from the input to the output
To show the user a preview of what the camera is recording, you can use an instance of AVCaptureVideoPreviewLayer (a subclass of CALayer).
You can configure multiple inputs and outputs, coordinated by a single session, as shown in Figure 4-1
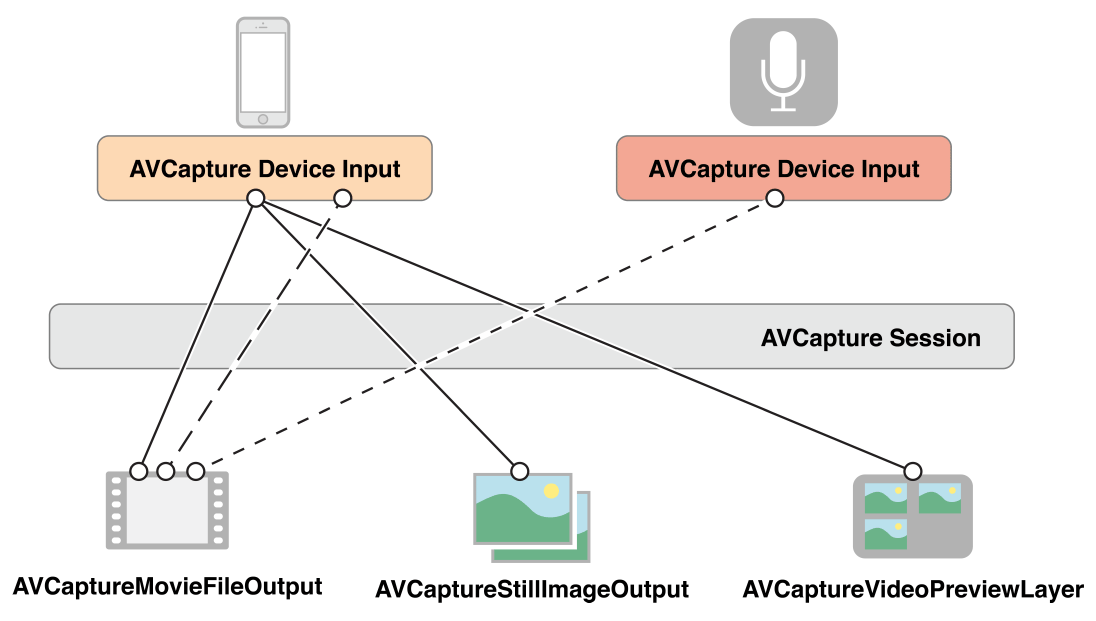
For many applications, this is as much detail as you need. For some operations, however, (if you want to monitor the power levels in an audio channel, for example) you need to consider how the various ports of an input device are represented and how those ports are connected to the output.
A connection between a capture input and a capture output in a capture session is represented by an AVCaptureConnection object. Capture inputs (instances of AVCaptureInput) have one or more input ports (instances of AVCaptureInputPort). Capture outputs (instances of AVCaptureOutput) can accept data from one or more sources (for example, an AVCaptureMovieFileOutput object accepts both video and audio data).
When you add an input or an output to a session, the session forms connections between all the compatible capture inputs’ ports and capture outputs, as shown in Figure 4-2. A connection between a capture input and a capture output is represented by an AVCaptureConnection object.
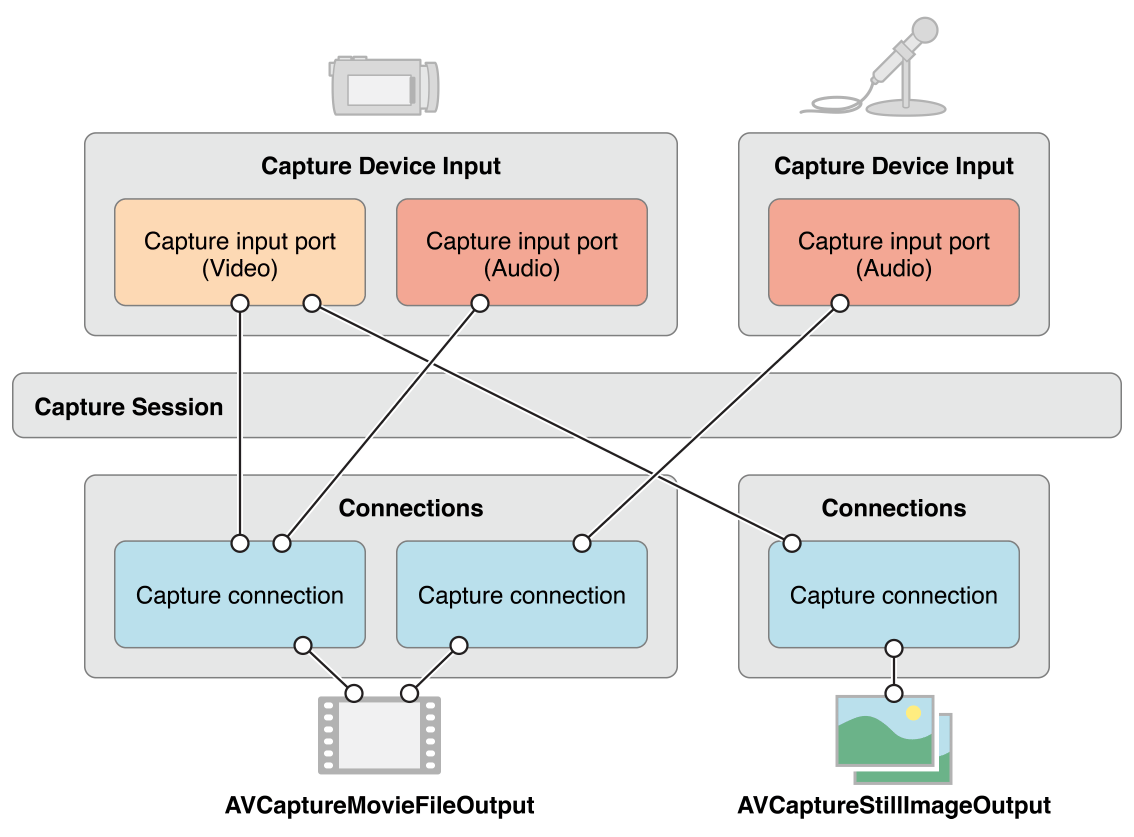
You can use a capture connection to enable or disable the flow of data from a given input or to a given output. You can also use a connection to monitor the average and peak power levels in an audio channel.
Use a Capture Session to Coordinate Data Flow
An AVCaptureSession object is the central coordinating object you use to manage data capture. You use an instance to coordinate the flow of data from AV input devices to outputs. You add the capture devices and outputs you want to the session, then start data flow by sending the session a startRunning message, and stop the data flow by sending a stopRunning message.
AVCaptureSession *session = [[AVCaptureSession alloc] init]; |
// Add inputs and outputs. |
[session startRunning]; |
Configuring a Session
You use a preset on the session to specify the image quality and resolution you want. A preset is a constant that identifies one of a number of possible configurations; in some cases the actual configuration is device-specific:
Symbol | Resolution | Comments |
|---|---|---|
High | Highest recording quality. This varies per device. | |
Medium | Suitable for Wi-Fi sharing. The actual values may change. | |
Low | Suitable for 3G sharing. The actual values may change. | |
640x480 | VGA. | |
1280x720 | 720p HD. | |
Photo | Full photo resolution. This is not supported for video output. |
If you want to set a media frame size-specific configuration, you should check whether it is supported before setting it, as follows:
if ([session canSetSessionPreset:AVCaptureSessionPreset1280x720]) { |
session.sessionPreset = AVCaptureSessionPreset1280x720; |
} |
else { |
// Handle the failure. |
} |
If you need to adjust session parameters at a more granular level than is possible with a preset, or you’d like to make changes to a running session, you surround your changes with the beginConfiguration and commitConfiguration methods. The beginConfiguration and commitConfiguration methods ensure that devices changes occur as a group, minimizing visibility or inconsistency of state. After calling beginConfiguration, you can add or remove outputs, alter the sessionPreset property, or configure individual capture input or output properties. No changes are actually made until you invoke commitConfiguration, at which time they are applied together.
[session beginConfiguration]; |
// Remove an existing capture device. |
// Add a new capture device. |
// Reset the preset. |
[session commitConfiguration]; |
Monitoring Capture Session State
A capture session posts notifications that you can observe to be notified, for example, when it starts or stops running, or when it is interrupted. You can register to receive an AVCaptureSessionRuntimeErrorNotification if a runtime error occurs. You can also interrogate the session’s running property to find out if it is running, and its interrupted property to find out if it is interrupted. Additionally, both the running and interrupted properties are key-value observing compliant and the notifications are posted on the main thread.
An AVCaptureDevice Object Represents an Input Device
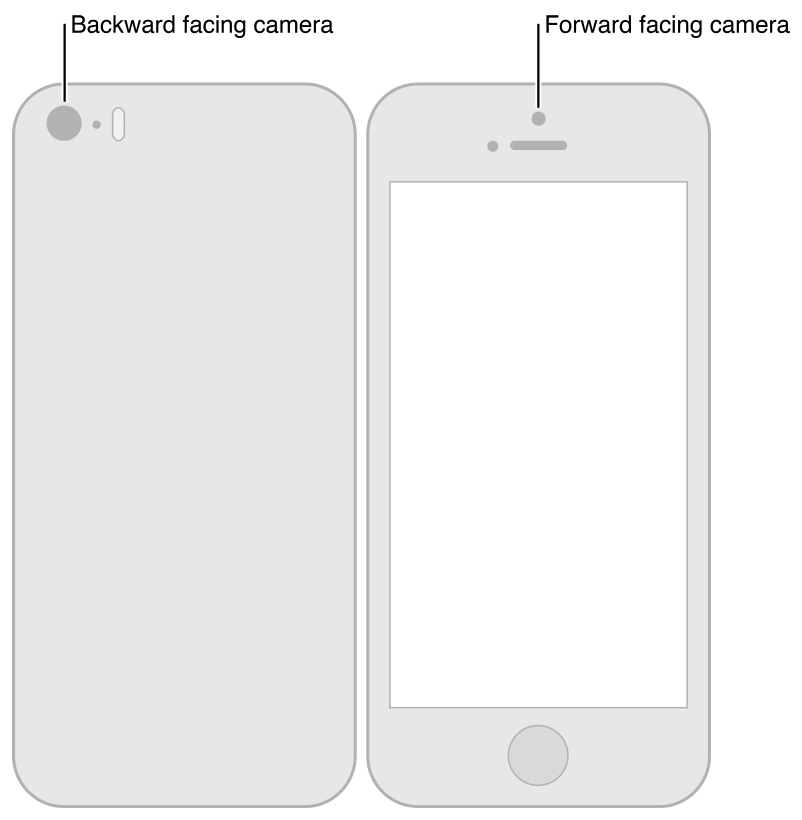
An AVCaptureDevice object abstracts a physical capture device that provides input data (such as audio or video) to an AVCaptureSession object. There is one object for each input device, for example, two video inputs—one for the front-facing the camera, one for the back-facing camera—and one audio input for the microphone.
You can find out which capture devices are currently available using the AVCaptureDevice class methods devices and devicesWithMediaType:. And, if necessary, you can find out what features an iPhone, iPad, or iPod offers (see Device Capture Settings). The list of available devices may change, though. Current input devices may become unavailable (if they’re used by another application), and new input devices may become available, (if they’re relinquished by another application). You should register to receive AVCaptureDeviceWasConnectedNotification and AVCaptureDeviceWasDisconnectedNotification notifications to be alerted when the list of available devices changes.
You add an input device to a capture session using a capture input (see Use Capture Inputs to Add a Capture Device to a Session).
Device Characteristics
You can ask a device about its different characteristics. You can also test whether it provides a particular media type or supports a given capture session preset using hasMediaType: and supportsAVCaptureSessionPreset: respectively. To provide information to the user, you can find out the position of the capture device (whether it is on the front or the back of the unit being tested), and its localized name. This may be useful if you want to present a list of capture devices to allow the user to choose one.
Figure 4-3 shows the positions of the back-facing (AVCaptureDevicePositionBack) and front-facing (AVCaptureDevicePositionFront) cameras.
The following code example iterates over all the available devices and logs their name—and for video devices, their position—on the unit.
NSArray *devices = [AVCaptureDevice devices]; |
for (AVCaptureDevice *device in devices) { |
NSLog(@"Device name: %@", [device localizedName]); |
if ([device hasMediaType:AVMediaTypeVideo]) { |
if ([device position] == AVCaptureDevicePositionBack) { |
NSLog(@"Device position : back"); |
} |
else { |
NSLog(@"Device position : front"); |
} |
} |
} |
In addition, you can find out the device’s model ID and its unique ID.
Device Capture Settings
Different devices have different capabilities; for example, some may support different focus or flash modes; some may support focus on a point of interest.
The following code fragment shows how you can find video input devices that have a torch mode and support a given capture session preset:
NSArray *devices = [AVCaptureDevice devicesWithMediaType:AVMediaTypeVideo]; |
NSMutableArray *torchDevices = [[NSMutableArray alloc] init]; |
for (AVCaptureDevice *device in devices) { |
[if ([device hasTorch] && |
[device supportsAVCaptureSessionPreset:AVCaptureSessionPreset640x480]) { |
[torchDevices addObject:device]; |
} |
} |
If you find multiple devices that meet your criteria, you might let the user choose which one they want to use. To display a description of a device to the user, you can use its localizedName property.
You use the various different features in similar ways. There are constants to specify a particular mode, and you can ask a device whether it supports a particular mode. In several cases, you can observe a property to be notified when a feature is changing. In all cases, you should lock the device before changing the mode of a particular feature, as described in Configuring a Device.
Focus Modes
There are three focus modes:
AVCaptureFocusModeLocked: The focal position is fixed.This is useful when you want to allow the user to compose a scene then lock the focus.
AVCaptureFocusModeAutoFocus: The camera does a single scan focus then reverts to locked.This is suitable for a situation where you want to select a particular item on which to focus and then maintain focus on that item even if it is not the center of the scene.
AVCaptureFocusModeContinuousAutoFocus: The camera continuously autofocuses as needed.
You use the isFocusModeSupported: method to determine whether a device supports a given focus mode, then set the mode using the focusMode property.
In addition, a device may support a focus point of interest. You test for support using focusPointOfInterestSupported. If it’s supported, you set the focal point using focusPointOfInterest. You pass a CGPoint where {0,0} represents the top left of the picture area, and {1,1} represents the bottom right in landscape mode with the home button on the right—this applies even if the device is in portrait mode.
You can use the adjustingFocus property to determine whether a device is currently focusing. You can observe the property using key-value observing to be notified when a device starts and stops focusing.
If you change the focus mode settings, you can return them to the default configuration as follows:
if ([currentDevice isFocusModeSupported:AVCaptureFocusModeContinuousAutoFocus]) { |
CGPoint autofocusPoint = CGPointMake(0.5f, 0.5f); |
[currentDevice setFocusPointOfInterest:autofocusPoint]; |
[currentDevice setFocusMode:AVCaptureFocusModeContinuousAutoFocus]; |
} |
Exposure Modes
There are two exposure modes:
AVCaptureExposureModeContinuousAutoExposure: The device automatically adjusts the exposure level as needed.
AVCaptureExposureModeLocked: The exposure level is fixed at its current level.
You use the isExposureModeSupported: method to determine whether a device supports a given exposure mode, then set the mode using the exposureMode property.
In addition, a device may support an exposure point of interest. You test for support using exposurePointOfInterestSupported. If it’s supported, you set the exposure point using exposurePointOfInterest. You pass a CGPoint where {0,0} represents the top left of the picture area, and {1,1} represents the bottom right in landscape mode with the home button on the right—this applies even if the device is in portrait mode.
You can use the adjustingExposure property to determine whether a device is currently changing its exposure setting. You can observe the property using key-value observing to be notified when a device starts and stops changing its exposure setting.
If you change the exposure settings, you can return them to the default configuration as follows:
if ([currentDevice isExposureModeSupported:AVCaptureExposureModeContinuousAutoExposure]) { |
CGPoint exposurePoint = CGPointMake(0.5f, 0.5f); |
[currentDevice setExposurePointOfInterest:exposurePoint]; |
[currentDevice setExposureMode:AVCaptureExposureModeContinuousAutoExposure]; |
} |
Flash Modes
There are three flash modes:
AVCaptureFlashModeOff: The flash will never fire.AVCaptureFlashModeOn: The flash will always fire.AVCaptureFlashModeAuto: The flash will fire dependent on the ambient light conditions.
You use hasFlash to determine whether a device has a flash. If that method returns YES, you then use the isFlashModeSupported: method, passing the desired mode to determine whether a device supports a given flash mode, then set the mode using the flashMode property.
Torch Mode
In torch mode, the flash is continuously enabled at a low power to illuminate a video capture. There are three torch modes:
AVCaptureTorchModeOff: The torch is always off.AVCaptureTorchModeOn: The torch is always on.AVCaptureTorchModeAuto: The torch is automatically switched on and off as needed.
You use hasTorch to determine whether a device has a flash. You use the isTorchModeSupported: method to determine whether a device supports a given flash mode, then set the mode using the torchMode property.
For devices with a torch, the torch only turns on if the device is associated with a running capture session.
Video Stabilization
Cinematic video stabilization is available for connections that operate on video, depending on the specific device hardware. Even so, not all source formats and video resolutions are supported.
Enabling cinematic video stabilization may also introduce additional latency into the video capture pipeline. To detect when video stabilization is in use, use the videoStabilizationEnabled property. The enablesVideoStabilizationWhenAvailable property allows an application to automatically enable video stabilization if it is supported by the camera. By default automatic stabilization is disabled due to the above limitations.
White Balance
There are two white balance modes:
AVCaptureWhiteBalanceModeLocked: The white balance mode is fixed.AVCaptureWhiteBalanceModeContinuousAutoWhiteBalance: The camera continuously adjusts the white balance as needed.
You use the isWhiteBalanceModeSupported: method to determine whether a device supports a given white balance mode, then set the mode using the whiteBalanceMode property.
You can use the adjustingWhiteBalance property to determine whether a device is currently changing its white balance setting. You can observe the property using key-value observing to be notified when a device starts and stops changing its white balance setting.
Setting Device Orientation
You set the desired orientation on a AVCaptureConnection to specify how you want the images oriented in the AVCaptureOutput (AVCaptureMovieFileOutput, AVCaptureStillImageOutput and AVCaptureVideoDataOutput) for the connection.
Use the AVCaptureConnectionsupportsVideoOrientation property to determine whether the device supports changing the orientation of the video, and the videoOrientation property to specify how you want the images oriented in the output port. Listing 4-1 shows how to set the orientation for a AVCaptureConnection to AVCaptureVideoOrientationLandscapeLeft:
Listing 4-1 Setting the orientation of a capture connection
AVCaptureConnection *captureConnection = <#A capture connection#>; |
if ([captureConnection isVideoOrientationSupported]) |
{ |
AVCaptureVideoOrientation orientation = AVCaptureVideoOrientationLandscapeLeft; |
[captureConnection setVideoOrientation:orientation]; |
} |
Configuring a Device
To set capture properties on a device, you must first acquire a lock on the device using lockForConfiguration:. This avoids making changes that may be incompatible with settings in other applications. The following code fragment illustrates how to approach changing the focus mode on a device by first determining whether the mode is supported, then attempting to lock the device for reconfiguration. The focus mode is changed only if the lock is obtained, and the lock is released immediately afterward.
if ([device isFocusModeSupported:AVCaptureFocusModeLocked]) { |
NSError *error = nil; |
if ([device lockForConfiguration:&error]) { |
device.focusMode = AVCaptureFocusModeLocked; |
[device unlockForConfiguration]; |
} |
else { |
// Respond to the failure as appropriate. |
You should hold the device lock only if you need the settable device properties to remain unchanged. Holding the device lock unnecessarily may degrade capture quality in other applications sharing the device.
Switching Between Devices
Sometimes you may want to allow users to switch between input devices—for example, switching from using the front-facing to to the back-facing camera. To avoid pauses or stuttering, you can reconfigure a session while it is running, however you should use beginConfiguration and commitConfiguration to bracket your configuration changes:
AVCaptureSession *session = <#A capture session#>; |
[session beginConfiguration]; |
[session removeInput:frontFacingCameraDeviceInput]; |
[session addInput:backFacingCameraDeviceInput]; |
[session commitConfiguration]; |
When the outermost commitConfiguration is invoked, all the changes are made together. This ensures a smooth transition.
Use Capture Inputs to Add a Capture Device to a Session
To add a capture device to a capture session, you use an instance of AVCaptureDeviceInput (a concrete subclass of the abstract AVCaptureInput class). The capture device input manages the device’s ports.
NSError *error; |
AVCaptureDeviceInput *input = |
[AVCaptureDeviceInput deviceInputWithDevice:device error:&error]; |
if (!input) { |
// Handle the error appropriately. |
} |
You add inputs to a session using addInput:. If appropriate, you can check whether a capture input is compatible with an existing session using canAddInput:.
AVCaptureSession *captureSession = <#Get a capture session#>; |
AVCaptureDeviceInput *captureDeviceInput = <#Get a capture device input#>; |
if ([captureSession canAddInput:captureDeviceInput]) { |
[captureSession addInput:captureDeviceInput]; |
} |
else { |
// Handle the failure. |
} |
See Configuring a Session for more details on how you might reconfigure a running session.
An AVCaptureInput vends one or more streams of media data. For example, input devices can provide both audio and video data. Each media stream provided by an input is represented by an AVCaptureInputPort object. A capture session uses an AVCaptureConnection object to define the mapping between a set of AVCaptureInputPort objects and a single AVCaptureOutput.
Use Capture Outputs to Get Output from a Session
To get output from a capture session, you add one or more outputs. An output is an instance of a concrete subclass of AVCaptureOutput. You use:
AVCaptureMovieFileOutputto output to a movie fileAVCaptureVideoDataOutputif you want to process frames from the video being captured, for example, to create your own custom view layerAVCaptureAudioDataOutputif you want to process the audio data being capturedAVCaptureStillImageOutputif you want to capture still images with accompanying metadata
You add outputs to a capture session using addOutput:. You check whether a capture output is compatible with an existing session using canAddOutput:. You can add and remove outputs as required while the session is running.
AVCaptureSession *captureSession = <#Get a capture session#>; |
AVCaptureMovieFileOutput *movieOutput = <#Create and configure a movie output#>; |
if ([captureSession canAddOutput:movieOutput]) { |
[captureSession addOutput:movieOutput]; |
} |
else { |
// Handle the failure. |
} |
Saving to a Movie File
You save movie data to a file using an AVCaptureMovieFileOutput object. (AVCaptureMovieFileOutput is a concrete subclass of AVCaptureFileOutput, which defines much of the basic behavior.) You can configure various aspects of the movie file output, such as the maximum duration of a recording, or its maximum file size. You can also prohibit recording if there is less than a given amount of disk space left.
AVCaptureMovieFileOutput *aMovieFileOutput = [[AVCaptureMovieFileOutput alloc] init]; |
CMTime maxDuration = <#Create a CMTime to represent the maximum duration#>; |
aMovieFileOutput.maxRecordedDuration = maxDuration; |
aMovieFileOutput.minFreeDiskSpaceLimit = <#An appropriate minimum given the quality of the movie format and the duration#>; |
The resolution and bit rate for the output depend on the capture session’s sessionPreset. The video encoding is typically H.264 and audio encoding is typically AAC. The actual values vary by device.
Starting a Recording
You start recording a QuickTime movie using startRecordingToOutputFileURL:recordingDelegate:. You need to supply a file-based URL and a delegate. The URL must not identify an existing file, because the movie file output does not overwrite existing resources. You must also have permission to write to the specified location. The delegate must conform to the AVCaptureFileOutputRecordingDelegate protocol, and must implement the captureOutput:didFinishRecordingToOutputFileAtURL:fromConnections:error: method.
AVCaptureMovieFileOutput *aMovieFileOutput = <#Get a movie file output#>; |
NSURL *fileURL = <#A file URL that identifies the output location#>; |
[aMovieFileOutput startRecordingToOutputFileURL:fileURL recordingDelegate:<#The delegate#>]; |
In the implementation of captureOutput:didFinishRecordingToOutputFileAtURL:fromConnections:error:, the delegate might write the resulting movie to the Camera Roll album. It should also check for any errors that might have occurred.
Ensuring That the File Was Written Successfully
To determine whether the file was saved successfully, in the implementation of captureOutput:didFinishRecordingToOutputFileAtURL:fromConnections:error: you check not only the error but also the value of the AVErrorRecordingSuccessfullyFinishedKey in the error’s user info dictionary:
- (void)captureOutput:(AVCaptureFileOutput *)captureOutput |
didFinishRecordingToOutputFileAtURL:(NSURL *)outputFileURL |
fromConnections:(NSArray *)connections |
error:(NSError *)error { |
BOOL recordedSuccessfully = YES; |
if ([error code] != noErr) { |
// A problem occurred: Find out if the recording was successful. |
id value = [[error userInfo] objectForKey:AVErrorRecordingSuccessfullyFinishedKey]; |
if (value) { |
recordedSuccessfully = [value boolValue]; |
} |
} |
// Continue as appropriate... |
You should check the value of the AVErrorRecordingSuccessfullyFinishedKeykey in the user info dictionary of the error, because the file might have been saved successfully, even though you got an error. The error might indicate that one of your recording constraints was reached—for example, AVErrorMaximumDurationReached or AVErrorMaximumFileSizeReached. Other reasons the recording might stop are:
The disk is full—
AVErrorDiskFullThe recording device was disconnected—
AVErrorDeviceWasDisconnectedThe session was interrupted (for example, a phone call was received)—
AVErrorSessionWasInterrupted
Adding Metadata to a File
You can set metadata for the movie file at any time, even while recording. This is useful for situations where the information is not available when the recording starts, as may be the case with location information. Metadata for a file output is represented by an array of AVMetadataItem objects; you use an instance of its mutable subclass, AVMutableMetadataItem, to create metadata of your own.
AVCaptureMovieFileOutput *aMovieFileOutput = <#Get a movie file output#>; |
NSArray *existingMetadataArray = aMovieFileOutput.metadata; |
NSMutableArray *newMetadataArray = nil; |
if (existingMetadataArray) { |
newMetadataArray = [existingMetadataArray mutableCopy]; |
} |
else { |
newMetadataArray = [[NSMutableArray alloc] init]; |
} |
AVMutableMetadataItem *item = [[AVMutableMetadataItem alloc] init]; |
item.keySpace = AVMetadataKeySpaceCommon; |
item.key = AVMetadataCommonKeyLocation; |
CLLocation *location - <#The location to set#>; |
item.value = [NSString stringWithFormat:@"%+08.4lf%+09.4lf/" |
location.coordinate.latitude, location.coordinate.longitude]; |
[newMetadataArray addObject:item]; |
aMovieFileOutput.metadata = newMetadataArray; |
Processing Frames of Video
An AVCaptureVideoDataOutput object uses delegation to vend video frames. You set the delegate using setSampleBufferDelegate:queue:. In addition to setting the delegate, you specify a serial queue on which they delegate methods are invoked. You must use a serial queue to ensure that frames are delivered to the delegate in the proper order. You can use the queue to modify the priority given to delivering and processing the video frames. See SquareCam for a sample implementation.
The frames are presented in the delegate method, captureOutput:didOutputSampleBuffer:fromConnection:, as instances of the CMSampleBufferRef opaque type (see Representations of Media). By default, the buffers are emitted in the camera’s most efficient format. You can use the videoSettings property to specify a custom output format. The video settings property is a dictionary; currently, the only supported key is kCVPixelBufferPixelFormatTypeKey. The recommended pixel formats are returned by the availableVideoCVPixelFormatTypes property , and the availableVideoCodecTypes property returns the supported values. Both Core Graphics and OpenGL work well with the BGRA format:
AVCaptureVideoDataOutput *videoDataOutput = [AVCaptureVideoDataOutput new]; |
NSDictionary *newSettings = |
@{ (NSString *)kCVPixelBufferPixelFormatTypeKey : @(kCVPixelFormatType_32BGRA) }; |
videoDataOutput.videoSettings = newSettings; |
// discard if the data output queue is blocked (as we process the still image |
[videoDataOutput setAlwaysDiscardsLateVideoFrames:YES];) |
// create a serial dispatch queue used for the sample buffer delegate as well as when a still image is captured |
// a serial dispatch queue must be used to guarantee that video frames will be delivered in order |
// see the header doc for setSampleBufferDelegate:queue: for more information |
videoDataOutputQueue = dispatch_queue_create("VideoDataOutputQueue", DISPATCH_QUEUE_SERIAL); |
[videoDataOutput setSampleBufferDelegate:self queue:videoDataOutputQueue]; |
AVCaptureSession *captureSession = <#The Capture Session#>; |
if ( [captureSession canAddOutput:videoDataOutput] ) |
[captureSession addOutput:videoDataOutput]; |
Performance Considerations for Processing Video
You should set the session output to the lowest practical resolution for your application. Setting the output to a higher resolution than necessary wastes processing cycles and needlessly consumes power.
You must ensure that your implementation of captureOutput:didOutputSampleBuffer:fromConnection: is able to process a sample buffer within the amount of time allotted to a frame. If it takes too long and you hold onto the video frames, AV Foundation stops delivering frames, not only to your delegate but also to other outputs such as a preview layer.
You can use the capture video data output’s minFrameDuration property to be sure you have enough time to process a frame—at the cost of having a lower frame rate than would otherwise be the case. You might also make sure that the alwaysDiscardsLateVideoFrames property is set to YES (the default). This ensures that any late video frames are dropped rather than handed to you for processing. Alternatively, if you are recording and it doesn’t matter if the output fames are a little late and you would prefer to get all of them, you can set the property value to NO. This does not mean that frames will not be dropped (that is, frames may still be dropped), but that they may not be dropped as early, or as efficiently.
Capturing Still Images
You use an AVCaptureStillImageOutput output if you want to capture still images with accompanying metadata. The resolution of the image depends on the preset for the session, as well as the device.
Pixel and Encoding Formats
Different devices support different image formats. You can find out what pixel and codec types are supported by a device using availableImageDataCVPixelFormatTypes and availableImageDataCodecTypes respectively. Each method returns an array of the supported values for the specific device. You set the outputSettings dictionary to specify the image format you want, for example:
AVCaptureStillImageOutput *stillImageOutput = [[AVCaptureStillImageOutput alloc] init]; |
NSDictionary *outputSettings = @{ AVVideoCodecKey : AVVideoCodecJPEG}; |
[stillImageOutput setOutputSettings:outputSettings]; |
If you want to capture a JPEG image, you should typically not specify your own compression format. Instead, you should let the still image output do the compression for you, since its compression is hardware-accelerated. If you need a data representation of the image, you can use jpegStillImageNSDataRepresentation: to get an NSData object without recompressing the data, even if you modify the image’s metadata.
Capturing an Image
When you want to capture an image, you send the output a captureStillImageAsynchronouslyFromConnection:completionHandler: message. The first argument is the connection you want to use for the capture. You need to look for the connection whose input port is collecting video:
AVCaptureConnection *videoConnection = nil; |
for (AVCaptureConnection *connection in stillImageOutput.connections) { |
for (AVCaptureInputPort *port in [connection inputPorts]) { |
if ([[port mediaType] isEqual:AVMediaTypeVideo] ) { |
videoConnection = connection; |
break; |
} |
} |
if (videoConnection) { break; } |
} |
The second argument to captureStillImageAsynchronouslyFromConnection:completionHandler: is a block that takes two arguments: a CMSampleBuffer opaque type containing the image data, and an error. The sample buffer itself may contain metadata, such as an EXIF dictionary, as an attachment. You can modify the attachments if you want, but note the optimization for JPEG images discussed in Pixel and Encoding Formats.
[stillImageOutput captureStillImageAsynchronouslyFromConnection:videoConnection completionHandler: |
^(CMSampleBufferRef imageSampleBuffer, NSError *error) { |
CFDictionaryRef exifAttachments = |
CMGetAttachment(imageSampleBuffer, kCGImagePropertyExifDictionary, NULL); |
if (exifAttachments) { |
// Do something with the attachments. |
} |
// Continue as appropriate. |
}]; |
Showing the User What’s Being Recorded
You can provide the user with a preview of what’s being recorded by the camera (using a preview layer) or by the microphone (by monitoring the audio channel).
Video Preview
You can provide the user with a preview of what’s being recorded using an AVCaptureVideoPreviewLayer object. AVCaptureVideoPreviewLayer is a subclass ofCALayer (see Core Animation Programming Guide. You don’t need any outputs to show the preview.
Using the AVCaptureVideoDataOutput class provides the client application with the ability to access the video pixels before they are presented to the user.
Unlike a capture output, a video preview layer maintains a strong reference to the session with which it is associated. This is to ensure that the session is not deallocated while the layer is attempting to display video. This is reflected in the way you initialize a preview layer:
AVCaptureSession *captureSession = <#Get a capture session#>; |
CALayer *viewLayer = <#Get a layer from the view in which you want to present the preview#>; |
AVCaptureVideoPreviewLayer *captureVideoPreviewLayer = [[AVCaptureVideoPreviewLayer alloc] initWithSession:captureSession]; |
[viewLayer addSublayer:captureVideoPreviewLayer]; |
In general, the preview layer behaves like any other CALayer object in the render tree (see Core Animation Programming Guide). You can scale the image and perform transformations, rotations, and so on just as you would any layer. One difference is that you may need to set the layer’s orientation property to specify how it should rotate images coming from the camera. In addition, you can test for device support for video mirroring by querying the supportsVideoMirroring property. You can set the videoMirrored property as required, although when the automaticallyAdjustsVideoMirroring property is set to YES (the default), the mirroring value is automatically set based on the configuration of the session.
Video Gravity Modes
The preview layer supports three gravity modes that you set using videoGravity:
AVLayerVideoGravityResizeAspect: This preserves the aspect ratio, leaving black bars where the video does not fill the available screen area.AVLayerVideoGravityResizeAspectFill: This preserves the aspect ratio, but fills the available screen area, cropping the video when necessary.AVLayerVideoGravityResize: This simply stretches the video to fill the available screen area, even if doing so distorts the image.
Using “Tap to Focus” with a Preview
You need to take care when implementing tap-to-focus in conjunction with a preview layer. You must account for the preview orientation and gravity of the layer, and for the possibility that the preview may be mirrored. See the sample code project AVCam-iOS: Using AVFoundation to Capture Images and Movies for an implementation of this functionality.
Showing Audio Levels
To monitor the average and peak power levels in an audio channel in a capture connection, you use an AVCaptureAudioChannel object. Audio levels are not key-value observable, so you must poll for updated levels as often as you want to update your user interface (for example, 10 times a second).
AVCaptureAudioDataOutput *audioDataOutput = <#Get the audio data output#>; |
NSArray *connections = audioDataOutput.connections; |
if ([connections count] > 0) { |
// There should be only one connection to an AVCaptureAudioDataOutput. |
AVCaptureConnection *connection = [connections objectAtIndex:0]; |
NSArray *audioChannels = connection.audioChannels; |
for (AVCaptureAudioChannel *channel in audioChannels) { |
float avg = channel.averagePowerLevel; |
float peak = channel.peakHoldLevel; |
// Update the level meter user interface. |
} |
} |
Putting It All Together: Capturing Video Frames as UIImage Objects
This brief code example to illustrates how you can capture video and convert the frames you get to UIImage objects. It shows you how to:
Create an
AVCaptureSessionobject to coordinate the flow of data from an AV input device to an outputFind the
AVCaptureDeviceobject for the input type you wantCreate an
AVCaptureDeviceInputobject for the deviceCreate an
AVCaptureVideoDataOutputobject to produce video framesImplement a delegate for the
AVCaptureVideoDataOutputobject to process video framesImplement a function to convert the CMSampleBuffer received by the delegate into a
UIImageobject
Create and Configure a Capture Session
You use an AVCaptureSession object to coordinate the flow of data from an AV input device to an output. Create a session, and configure it to produce medium-resolution video frames.
AVCaptureSession *session = [[AVCaptureSession alloc] init]; |
session.sessionPreset = AVCaptureSessionPresetMedium; |
Create and Configure the Device and Device Input
Capture devices are represented by AVCaptureDevice objects; the class provides methods to retrieve an object for the input type you want. A device has one or more ports, configured using an AVCaptureInput object. Typically, you use the capture input in its default configuration.
Find a video capture device, then create a device input with the device and add it to the session. If an appropriate device can not be located, then the deviceInputWithDevice:error: method will return an error by reference.
AVCaptureDevice *device = |
[AVCaptureDevice defaultDeviceWithMediaType:AVMediaTypeVideo]; |
NSError *error = nil; |
AVCaptureDeviceInput *input = |
[AVCaptureDeviceInput deviceInputWithDevice:device error:&error]; |
if (!input) { |
// Handle the error appropriately. |
} |
[session addInput:input]; |
Create and Configure the Video Data Output
You use an AVCaptureVideoDataOutput object to process uncompressed frames from the video being captured. You typically configure several aspects of an output. For video, for example, you can specify the pixel format using the videoSettings property and cap the frame rate by setting the minFrameDuration property.
Create and configure an output for video data and add it to the session; cap the frame rate to 15 fps by setting the minFrameDuration property to 1/15 second:
AVCaptureVideoDataOutput *output = [[AVCaptureVideoDataOutput alloc] init]; |
[session addOutput:output]; |
output.videoSettings = |
@{ (NSString *)kCVPixelBufferPixelFormatTypeKey : @(kCVPixelFormatType_32BGRA) }; |
output.minFrameDuration = CMTimeMake(1, 15); |
The data output object uses delegation to vend the video frames. The delegate must adopt the AVCaptureVideoDataOutputSampleBufferDelegate protocol. When you set the data output’s delegate, you must also provide a queue on which callbacks should be invoked.
dispatch_queue_t queue = dispatch_queue_create("MyQueue", NULL); |
[output setSampleBufferDelegate:self queue:queue]; |
dispatch_release(queue); |
You use the queue to modify the priority given to delivering and processing the video frames.
Implement the Sample Buffer Delegate Method
In the delegate class, implement the method (captureOutput:didOutputSampleBuffer:fromConnection:) that is called when a sample buffer is written. The video data output object delivers frames as CMSampleBuffer opaque types, so you need to convert from the CMSampleBuffer opaque type to a UIImage object. The function for this operation is shown in Converting CMSampleBuffer to a UIImage Object.
- (void)captureOutput:(AVCaptureOutput *)captureOutput |
didOutputSampleBuffer:(CMSampleBufferRef)sampleBuffer |
fromConnection:(AVCaptureConnection *)connection { |
UIImage *image = imageFromSampleBuffer(sampleBuffer); |
// Add your code here that uses the image. |
} |
Remember that the delegate method is invoked on the queue you specified in setSampleBufferDelegate:queue:; if you want to update the user interface, you must invoke any relevant code on the main thread.
Starting and Stopping Recording
After configuring the capture session, you should ensure that the camera has permission to record according to the user’s preferences.
NSString *mediaType = AVMediaTypeVideo; |
[AVCaptureDevice requestAccessForMediaType:mediaType completionHandler:^(BOOL granted) { |
if (granted) |
{ |
//Granted access to mediaType |
[self setDeviceAuthorized:YES]; |
} |
else |
{ |
//Not granted access to mediaType |
dispatch_async(dispatch_get_main_queue(), ^{ |
[[[UIAlertView alloc] initWithTitle:@"AVCam!" |
message:@"AVCam doesn't have permission to use Camera, please change privacy settings" |
delegate:self |
cancelButtonTitle:@"OK" |
otherButtonTitles:nil] show]; |
[self setDeviceAuthorized:NO]; |
}); |
} |
}]; |
If the camera session is configured and the user has approved access to the camera (and if required, the microphone), send a startRunning message to start the recording.
[session startRunning]; |
To stop recording, you send the session a stopRunning message.
High Frame Rate Video Capture
iOS 7.0 introduces high frame rate video capture support (also referred to as “SloMo” video) on selected hardware. The full AVFoundation framework supports high frame rate content.
You determine the capture capabilities of a device using the AVCaptureDeviceFormat class. This class has methods that return the supported media types, frame rates, field of view, maximum zoom factor, whether video stabilization is supported, and more.
Capture supports full 720p (1280 x 720 pixels) resolution at 60 frames per second (fps) including video stabilization and droppable P-frames (a feature of H264 encoded movies, which allow the movies to play back smoothly even on slower and older hardware.)
Playback has enhanced audio support for slow and fast playback, allowing the time pitch of the audio can be preserved at slower or faster speeds.
Editing has full support for scaled edits in mutable compositions.
Export provides two options when supporting 60 fps movies. The variable frame rate, slow or fast motion, can be preserved, or the movie and be converted to an arbitrary slower frame rate such as 30 frames per second.
The SloPoke sample code demonstrates the AVFoundation support for fast video capture, determining whether hardware supports high frame rate video capture, playback using various rates and time pitch algorithms, and editing (including setting time scales for portions of a composition).
Playback
An instance of AVPlayer manages most of the playback speed automatically by setting the setRate: method value. The value is used as a multiplier for the playback speed. A value of 1.0 causes normal playback, 0.5 plays back at half speed, 5.0 plays back five times faster than normal, and so on.
The AVPlayerItem object supports the audioTimePitchAlgorithm property. This property allows you to specify how audio is played when the movie is played at various frame rates using the Time Pitch Algorithm Settings constants.
The following table shows the supported time pitch algorithms, the quality, whether the algorithm causes the audio to snap to specific frame rates, and the frame rate range that each algorithm supports.
Time pitch algorithm | Quality | Snaps to specific frame rate | Rate range |
|---|---|---|---|
Low quality, suitable for fast-forward, rewind, or low quality voice. |
| 0.5, 0.666667, 0.8, 1.0, 1.25, 1.5, 2.0 rates. | |
Modest quality, less expensive computationally, suitable for voice. |
| 0.5–2x rates. | |
Highest quality, most expensive computationally, preserves the pitch of the original item. |
| 1/32–32 rates. | |
High-quality playback with no pitch correction. |
| 1/32–32 rates. |
Editing
When editing, you use the AVMutableComposition class to build temporal edits.
Create a new
AVMutableCompositioninstance using thecompositionclass method.Insert your video asset using the
insertTimeRange:ofAsset:atTime:error:method.Set the time scale of a portion of the composition using
scaleTimeRange:toDuration:
Export
Exporting 60 fps video uses the AVAssetExportSession class to export an asset. The content can be exported using two techniques:
Use the
AVAssetExportPresetPassthroughpreset to avoid reencoding the movie. It retimes the media with the sections of the media tagged as section 60 fps, section slowed down, or section sped up.Use a constant frame rate export for maximum playback compatibility. Set the
frameDurationproperty of the video composition to 30 fps. You can also specify the time pitch by using setting the export session’saudioTimePitchAlgorithmproperty.
Recording
You capture high frame rate video using the AVCaptureMovieFileOutput class, which automatically supports high frame rate recording. It will automatically select the correct H264 pitch level and bit rate.
To do custom recording, you must use the AVAssetWriter class, which requires some additional setup.
assetWriterInput.expectsMediaDataInRealTime=YES; |
This setting ensures that the capture can keep up with the incoming data.
Copyright © 2015 Apple Inc. All Rights Reserved. Terms of Use | Privacy Policy | Updated: 2015-06-30