Views
Because view objects are the main way your application interacts with the user, they have many responsibilities. Here are just a few:
Layout and subview management
A view defines its own default resizing behaviors in relation to its parent view.
A view can manage a list of subviews.
A view can override the size and position of its subviews as needed.
A view can convert points in its coordinate system to the coordinate systems of other views or the window.
Drawing and animation
A view draws content in its rectangular area.
Some view properties can be animated to new values.
Event handling
A view can receive touch events.
A view participates in the responder chain.
This chapter focuses on the steps for creating, managing, and drawing views and for handling the layout and management of view hierarchies. For information about how to handle touch events (and other events) in your views, see Event Handling Guide for iOS.
Creating and Configuring View Objects
You create views as self-contained objects either programmatically or using Interface Builder, and then you assemble them into view hierarchies for use.
Creating View Objects Using Interface Builder
The simplest way to create views is to assemble them graphically using Interface Builder. From Interface Builder, you can add views to your interface, arrange those views into hierarchies, configure each view’s settings, and connect view-related behaviors to your code. Because Interface Builder uses live view objects—that is, actual instances of the view classes—what you see at design time is what you get at runtime. You then save those live objects in a nib file, which is a resource file that preserves the state and configuration of your objects.
You usually create nib files in order to store an entire view hierarchy for one of your application’s view controllers. The top level of the nib file usually contains a single view object that represents your view controller’s view. (The view controller itself is typically represented by the File’s Owner object.) The top-level view should be sized appropriately for the target device and contain all of the other views that are to be presented. It is rare to use a nib file to store only a portion of your view controller’s view hierarchy.
When using nib files with a view controller, all you have to do is initialize the view controller with the nib file information. The view controller handles the loading and unloading of your views at the appropriate times. However, if your nib file is not associated with a view controller, you can load the nib file contents manually using an NSBundle or UINib object, which use the data in the nib file to reconstitute your view objects.
For more information about how to use Interface Builder to create and configure your views, see Interface Builder User Guide. For information about how view controllers load and manage their associated nib files, see Creating Custom Content View Controllers in View Controller Programming Guide for iOS. For more information about how to load views programmatically from a nib file, see Nib Files in Resource Programming Guide.
Creating View Objects Programmatically
If you prefer to create views programmatically, you can do so using the standard allocation/initialization pattern. The default initialization method for views is the initWithFrame: method, which sets the initial size and position of the view relative to its (soon-to-be-established) parent view. For example, to create a new generic UIView object, you could use code similar to the following:
CGRect viewRect = CGRectMake(0, 0, 100, 100); |
UIView* myView = [[UIView alloc] initWithFrame:viewRect]; |
After you create a view, you must add it to a window (or to another view in a window) before it can become visible. For information on how to add views to your view hierarchy, see Adding and Removing Subviews.
Setting the Properties of a View
The UIView class has several declared properties for controlling the appearance and behavior of the view. These properties are for manipulating the size and position of the view, the view’s transparency, its background color, and its rendering behavior. All of these properties have appropriate default values that you can change later as needed. You can also configure many of these properties from Interface Builder using the Inspector window.
Table 3-1 lists some of the more commonly used properties (and some methods) and describes their usage. Related properties are listed together so that you can see the options you have for affecting certain aspects of the view.
Properties | Usage |
|---|---|
These properties affect the opacity of the view. The The | |
These properties affect the size and position of the view. The The For information about the relationship between the | |
These properties affect the automatic resizing behavior of the view and its subviews. The | |
These properties affect the rendering behavior of content inside the view. The For more information on how the content mode affects your view, see Content Modes. For information about how the content stretch rectangle affects your view, see Stretchable Views. For information about how to handle scale factors, see Supporting High-Resolution Screens In Views in Drawing and Printing Guide for iOS. | |
| These properties affect how your view processes touch events. The For information about how to respond to events in your views, see Event Handling Guide for iOS. |
| These properties and methods help you manage the actual content of your view. For simple views, you can set a background color and add one or more subviews. The For more advanced content, you can work directly with the view’s Core Animation |
For information about the basic properties common to all views, see UIView Class Reference. For more information about specific properties of a view, see the reference documentation for that view.
Tagging Views for Future Identification
The UIView class contains a tag property that you can use to tag individual view objects with an integer value. You can use tags to uniquely identify views inside your view hierarchy and to perform searches for those views at runtime. (Tag-based searches are faster than iterating the view hierarchy yourself.) The default value for the tag property is 0.
To search for a tagged view, use the viewWithTag: method of UIView. This method performs a depth-first search of the receiver and its subviews. It does not search superviews or other parts of the view hierarchy. Thus, calling this method from the root view of a hierarchy searches all views in the hierarchy but calling it from a specific subview searches only a subset of views.
Creating and Managing a View Hierarchy
Managing view hierarchies is a crucial part of developing your application’s user interface. The organization of your views influences both the visual appearance of your application and how your application responds to changes and events. For example, the parent-child relationships in the view hierarchy determine which objects might handle a specific touch event. Similarly, parent-child relationships define how each view responds to interface orientation changes.
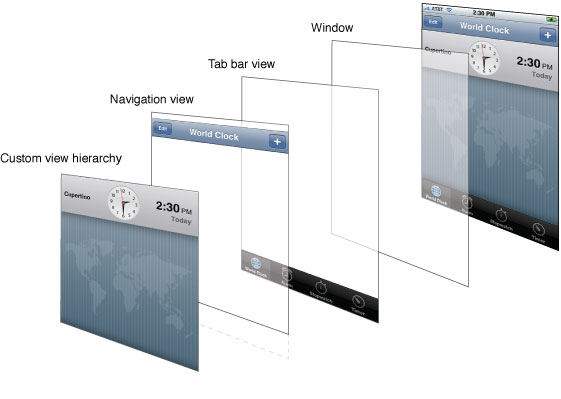
Figure 3-1 shows an example of how the layering of views creates the desired visual effect for an application. In the case of the Clock application, the view hierarchy is composed of a mixture of views derived from different sources. The tab bar and navigation views are special view hierarchies provided by the tab bar and navigation controller objects to manage portions of the overall user interface. Everything between those bars belongs to the custom view hierarchy that the Clock application provides.
There are several ways to build view hierarchies in iOS applications, including graphically in Interface Builder and programmatically in your code. The following sections show you how to assemble your view hierarchies and, having done that, how to find views in the hierarchy and convert between different view coordinate systems.
Adding and Removing Subviews
Interface Builder is the most convenient way to build view hierarchies because you assemble your views graphically, see the relationships between the views, and see exactly how those views will appear at runtime. When using Interface Builder, you save your resulting view hierarchy in a nib file, which you load at runtime as the corresponding views are needed.
If you prefer to create your views programmatically instead, you create and initialize them and then use the following methods to arrange them into hierarchies:
To add a subview to a parent, call the
addSubview:method of the parent view. This method adds the subview to the end of the parent’s list of subviews.To insert a subview in the middle of the parent’s list of subviews, call any of the
insertSubview:...methods of the parent view. Inserting a subview in the middle of the list visually places that view behind any views that come later in the list.To reorder existing subviews inside their parent, call the
bringSubviewToFront:,sendSubviewToBack:, orexchangeSubviewAtIndex:withSubviewAtIndex:methods of the parent view. Using these methods is faster than removing the subviews and reinserting them.To remove a subview from its parent, call the
removeFromSuperviewmethod of the subview (not the parent view).
When adding a subview to its parent, the subview’s current frame rectangle denotes its initial position inside the parent view. A subview whose frame lies outside of its superview’s visible bounds is not clipped by default. If you want your subview to be clipped to the superview’s bounds, you must explicitly set the clipsToBounds property of the superview to YES.
One place where you might add subviews to a view hierarchy is in the loadView or viewDidLoad methods of a view controller. If you are building your views programmatically, you put your view creation code in the loadView method of your view controller. Whether you create your views programmatically or load them from a nib file, you could include additional view configuration code in the viewDidLoad method.
Listing 3-1 shows the viewDidLoad method of the TransitionsViewController class from the UIKit Catalog (iOS): Creating and Customizing UIKit Controls sample application. The TransitionsViewController class manages the animations associated with transitioning between two views. The application’s initial view hierarchy (consisting of a root view and toolbar) is loaded from a nib file. The code in the viewDidLoad method subsequently creates the container view and image views used to manage the transitions. The purpose of the container view is to simplify the code needed to implement the transition animations between the two image views. The container view has no real content of its own.
Listing 3-1 Adding views to an existing view hierarchy
- (void)viewDidLoad |
{ |
[super viewDidLoad]; |
self.title = NSLocalizedString(@"TransitionsTitle", @""); |
// create the container view which we will use for transition animation (centered horizontally) |
CGRect frame = CGRectMake(round((self.view.bounds.size.width - kImageWidth) / 2.0), |
kTopPlacement, kImageWidth, kImageHeight); |
self.containerView = [[[UIView alloc] initWithFrame:frame] autorelease]; |
[self.view addSubview:self.containerView]; |
// The container view can represent the images for accessibility. |
[self.containerView setIsAccessibilityElement:YES]; |
[self.containerView setAccessibilityLabel:NSLocalizedString(@"ImagesTitle", @"")]; |
// create the initial image view |
frame = CGRectMake(0.0, 0.0, kImageWidth, kImageHeight); |
self.mainView = [[[UIImageView alloc] initWithFrame:frame] autorelease]; |
self.mainView.image = [UIImage imageNamed:@"scene1.jpg"]; |
[self.containerView addSubview:self.mainView]; |
// create the alternate image view (to transition between) |
CGRect imageFrame = CGRectMake(0.0, 0.0, kImageWidth, kImageHeight); |
self.flipToView = [[[UIImageView alloc] initWithFrame:imageFrame] autorelease]; |
self.flipToView.image = [UIImage imageNamed:@"scene2.jpg"]; |
} |
When you add a subview to another view, UIKit notifies both the parent and child views of the change. If you implement custom views, you can intercept these notifications by overriding one or more of the willMoveToSuperview:, willMoveToWindow:, willRemoveSubview:, didAddSubview:, didMoveToSuperview, or didMoveToWindow methods. You can use these notifications to update any state information related to your view hierarchy or to perform additional tasks.
After creating a view hierarchy, you can navigate it programmatically using the superview and subviews properties of your views. The window property of each view contains the window in which that view is currently displayed (if any). Because the root view in a view hierarchy has no parent, its superview property is set to nil. For views that are currently onscreen, the window object is the root view of the view hierarchy.
Hiding Views
To hide a view visually, you can either set its hidden property to YES or change its alpha property to 0.0. A hidden view does not receive touch events from the system. However, hidden views do participate in autoresizing and other layout operations associated with the view hierarchy. Thus, hiding a view is often a convenient alternative to removing views from your view hierarchy, especially if you plan to show the views again at some point soon.
If you want to animate a view’s transition from visible to hidden (or the reverse), you must do so using the view’s alpha property. The hidden property is not an animatable property, so any changes you make to it take effect immediately.
Locating Views in a View Hierarchy
There are two ways to locate views in a view hierarchy:
Store pointers to any relevant views in an appropriate location, such as in the view controller that owns the views.
Assign a unique integer to each view’s
tagproperty and use theviewWithTag:method to locate it.
Storing references to relevant views is the most common approach to locating views and makes accessing those views very convenient. If you used Interface Builder to create your views, you can connect objects in your nib file (including the File’s Owner object that represents the managing controller object) to one another using outlets. For views you create programmatically, you can store references to those views in private member variables. Whether you use outlets or private member variables, you are responsible for retaining the views as needed and then releasing them as well. The best way to ensure objects are retained and released properly is to use declared properties.
Tags are a useful way to reduce hard-coded dependencies and support more dynamic and flexible solutions. Rather than storing a pointer to a view, you could locate it using its tag. Tags are also a more persistent way of referring to views. For example, if you wanted to save the list of views that are currently visible in your application, you would write out the tags of each visible view to a file. This is simpler than archiving the actual view objects, especially in situations where you are tracking only which views are currently visible. When your application is subsequently loaded, you would then re-create your views and use the saved list of tags to set the visibility of each view, and thereby return your view hierarchy to its previous state.
Translating, Scaling, and Rotating Views
Every view has an associated affine transform that you can use to translate, scale, or rotate the view’s content. View transforms alter the final rendered appearance of the view and are often used to implement scrolling, animations, or other visual effects.
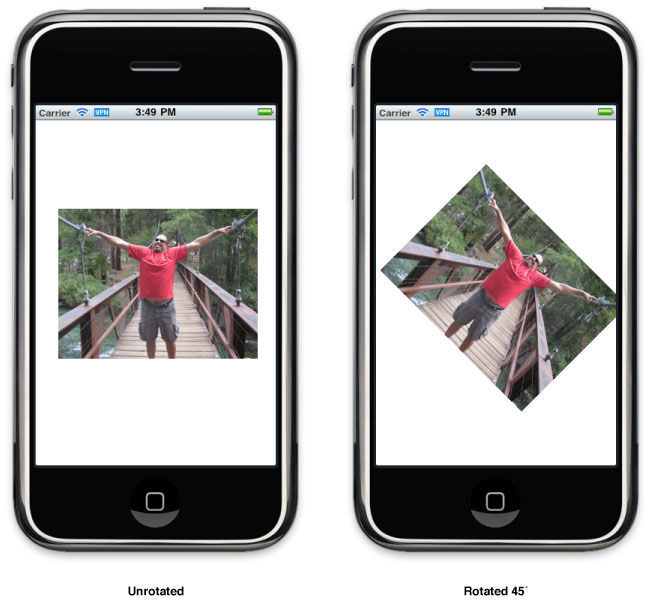
The transform property of UIView contains a CGAffineTransform structure with the transformations to apply. By default, this property is set to the identity transform, which does not modify the appearance of the view. You can assign a new transform to this property at any time. For example, to rotate a view by 45 degrees, you could use the following code:
// M_PI/4.0 is one quarter of a half circle, or 45 degrees. |
CGAffineTransform xform = CGAffineTransformMakeRotation(M_PI/4.0); |
self.view.transform = xform; |
Applying the transform in the preceding code to a view would rotate that view clockwise about its center point. Figure 3-2 shows how this transformation would look if it were applied to an image view embedded in an application.
When applying multiple transformations to a view, the order in which you add those transformations to the CGAffineTransform structure is significant. Rotating the view and then translating it is not the same as translating the view and then rotating it. Even if the amounts of rotation and translation are the same in each case, the sequence of the transformations affects the final results. In addition, any transformations you add are applied to the view relative to its center point. Thus, applying a rotation factor rotates the view around its center point. Scaling a view changes the width and height of the view but does not change its center point.
For more information about creating and using affine transforms, see Transforms in Quartz 2D Programming Guide.
Converting Coordinates in the View Hierarchy
At various times, particularly when handling events, an application may need to convert coordinate values from one frame of reference to another. For example, touch events report the location of each touch in the window’s coordinate system but view objects often need that information in the view’s local coordinate system. The UIView class defines the following methods for converting coordinates to and from the view’s local coordinate system:
The convert...:fromView: methods convert coordinates from some other view’s coordinate system to the local coordinate system (bounds rectangle) of the current view. Conversely, the convert...:toView: methods convert coordinates from the current view’s local coordinate system (bounds rectangle) to the coordinate system of the specified view. If you specify nil as the reference view for any of the methods, the conversions are made to and from the coordinate system of the window that contains the view.
In addition to the UIView conversion methods, the UIWindow class also defines several conversion methods. These methods are similar to the UIView versions except that instead of converting to and from a view’s local coordinate system, these methods convert to and from the window’s coordinate system.
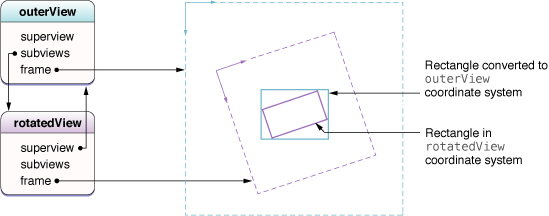
When converting coordinates in rotated views, UIKit converts rectangles under the assumption that you want the returned rectangle to reflect the screen area covered by the source rectangle. Figure 3-3 shows an example of how rotations can cause the size of the rectangle to change during a conversion. In the figure, an outer parent view contains a rotated subview. Converting a rectangle in the subview’s coordinate system to the parent’s coordinate system yields a rectangle that is physically larger. This larger rectangle is actually the smallest rectangle in the bounds of outerView that completely encloses the rotated rectangle.
Adjusting the Size and Position of Views at Runtime
Whenever the size of a view changes, the size and position of its subviews must change accordingly. The UIView class supports both the automatic and manual layout of views in a view hierarchy. With automatic layout, you set the rules that each view should follow when its parent view resizes, and then forget about resizing operations altogether. With manual layout, you manually adjust the size and position of views as needed.
Being Prepared for Layout Changes
Layout changes can occur whenever any of the following events happens in a view:
The size of a view’s bounds rectangle changes.
An interface orientation change occurs, which usually triggers a change in the root view’s bounds rectangle.
The set of Core Animation sublayers associated with the view’s layer changes and requires layout.
Your application forces layout to occur by calling the
setNeedsLayoutorlayoutIfNeededmethod of a view.Your application forces layout by calling the
setNeedsLayoutmethod of the view’s underlying layer object.
Handling Layout Changes Automatically Using Autoresizing Rules
When you change the size of a view, the position and size of any embedded subviews usually needs to change to account for the new size of their parent. The autoresizesSubviews property of the superview determines whether the subviews resize at all. If this property is set to YES, the view uses the autoresizingMask property of each subview to determine how to size and position that subview. Size changes to any subviews trigger similar layout adjustments for their embedded subviews.
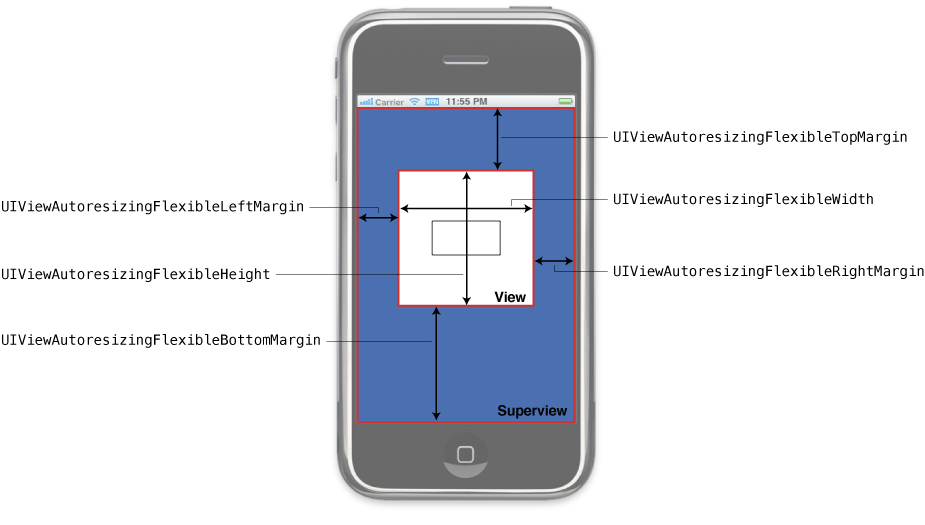
For each view in your view hierarchy, setting that view’s autoresizingMask property to an appropriate value is an important part of handling automatic layout changes. Table 3-2 lists the autoresizing options you can apply to a given view and describes their effects during layout operations. You can combine constants using an OR operator or just add them together before assigning them to the autoresizingMask property. If you are using Interface Builder to assemble your views, you use the Autosizing inspector to set these properties.
Autoresizing mask | Description |
|---|---|
The view does not autoresize. (This is the default value.) | |
The view’s height changes when the superview’s height changes. If this constant is not included, the view’s height does not change. | |
The view’s width changes when the superview's width changes. If this constant is not included, the view’s width does not change. | |
The distance between the view’s left edge and the superview’s left edge grows or shrinks as needed. If this constant is not included, the view’s left edge remains a fixed distance from the left edge of the superview. | |
The distance between the view’s right edge and the superview’s right edge grows or shrinks as needed. If this constant is not included, the view’s right edge remains a fixed distance from the right edge of the superview. | |
The distance between the view’s bottom edge and the superview’s bottom edge grows or shrinks as needed. If this constant is not included, the view’s bottom edge remains a fixed distance from the bottom edge of the superview. | |
The distance between the view’s top edge and the superview’s top edge grows or shrinks as needed. If this constant is not included, the view’s top edge remains a fixed distance from the top edge of the superview. |
Figure 3-4 shows a graphical representation of how the options in the autoresizing mask apply to a view. The presence of a given constant indicates that the specified aspect of the view is flexible and may change when the superview’s bounds change. The absence of a constant indicates that the view’s layout is fixed in that aspect. When you configure a view that has more than one flexible attribute along a single axis, UIKit distributes any size changes evenly among the corresponding spaces.
The easiest way to configure autoresizing rules is using the Autosizing controls in the Size inspector of Interface Builder. The flexible width and height constants from the preceding figure have the same behavior as the width and size indicators in the Autosizing controls diagram. However, the behavior and use of margin indicators is effectively reversed. In Interface Builder, the presence of a margin indicator means that the margin has a fixed size and the absence of the indicator means the margin has a flexible size. Fortunately, Interface Builder provides an animation to show you how changes to the autoresizing behaviors affect your view.
After the automatic autoresizing rules for all affected views have been applied, UIKit goes back and gives each view a chance to make any necessary manual adjustments to its superview. For more information about how to manage the layout of views manually, see Tweaking the Layout of Your Views Manually.
Tweaking the Layout of Your Views Manually
Whenever the size of a view changes, UIKit applies the autoresizing behaviors of that view’s subviews and then calls the layoutSubviews method of the view to let it make manual changes. You can implement the layoutSubviews method in custom views when the autoresizing behaviors by themselves do not yield the results you want. Your implementation of this method can do any of the following:
Adjust the size and position of any immediate subviews.
Add or remove subviews or Core Animation layers.
Force a subview to be redrawn by calling its
setNeedsDisplayorsetNeedsDisplayInRect:method.
One place where applications often lay out subviews manually is when implementing a large scrollable area. Because it is impractical to have a single large view for its scrollable content, applications often implement a root view that contains a number of smaller tile views. Each tile represents a portion of the scrollable content. When a scroll event happens, the root view calls its setNeedsLayout method to initiate a layout change. Its layoutSubviews method then repositions the tile views based on the amount of scrolling that occurred. As tiles scroll out of the view’s visible area, the layoutSubviews method moves the tiles to the incoming edge, replacing their contents in the process.
When writing your layout code, be sure to test your code in the following ways:
Change the orientation of your views to make sure the layout looks correct in all supported interface orientations.
Make sure your code responds appropriately to changes in the height of the status bar. When a phone call is active, the status bar height increases in size, and when the user ends the call, the status bar decreases in size.
For information about how autoresizing behaviors affect the size and position of your views, see Handling Layout Changes Automatically Using Autoresizing Rules. For an example of how to implement tiling, see the ScrollViewSuite sample.
Modifying Views at Runtime
As applications receive input from the user, they adjust their user interface in response to that input. An application might modify its views by rearranging them, changing their size or position, hiding or showing them, or loading an entirely new set of views. In iOS applications, there are several places and ways in which you perform these kinds of actions:
In a view controller:
A view controller has to create its views before showing them. It can load the views from a nib file or create them programmatically. When those views are no longer needed, it disposes of them.
When a device changes orientations, a view controller might adjust the size and position of views to match. As part of its adjustment to the new orientation, it might hide some views and show others.
When a view controller manages editable content, it might adjust its view hierarchy when moving to and from edit mode. For example, it might add extra buttons and other controls to facilitate editing various aspects of its content. This might also require the resizing of any existing views to accommodate the extra controls.
In animation blocks:
When you want to transition between different sets of views in your user interface, you hide some views and show others from inside an animation block.
When implementing special effects, you might use an animation block to modify various properties of the view. For example, to animate changes to the size of a view, you would change the size of its frame rectangle.
Other ways:
When touch events or gestures occur, your interface might respond by loading a new set of views or changing the current set of views. For information about handling events, see Event Handling Guide for iOS.
When the user interacts with a scroll view, a large scrollable area might hide and show tile subviews. For more information about supporting scrollable content, see Scroll View Programming Guide for iOS.
When the keyboard appears, you might reposition or resize views so that they do not lie underneath the keyboard. For information about how to interact with the keyboard, see Text Programming Guide for iOS.
View controllers are a common place to initiate changes to your views. Because a view controller manages the view hierarchy associated with the content being displayed, it is ultimately responsible for everything that happens to those views. When loading its views or handling orientation changes, the view controller can add new views, hide or replace existing ones, and make any number of changes to make the views ready for the display. And if you implement support for editing your view’s content, the setEditing:animated: method in UIViewController gives you a place to transition your views to and from their editable versions.
Animation blocks are another common place to initiate view-related changes. The animation support built into the UIView class makes it easy to animate changes to view properties. You can also use the transitionWithView:duration:options:animations:completion: or transitionFromView:toView:duration:options:completion: methods to swap out entire sets of views for new ones.
For more information about animating views and initiating view transitions, see Animations. For more information on how you use view controllers to manage view-related behaviors, see View Controller Programming Guide for iOS.
Interacting with Core Animation Layers
Each view object has a dedicated Core Animation layer that manages the presentation and animation of the view’s content on the screen. Although you can do a lot with your view objects, you can also work directly with the corresponding layer objects as needed. The layer object for the view is stored in the view’s layer property.
Changing the Layer Class Associated with a View
The type of layer associated with a view cannot be changed after the view is created. Therefore, each view uses the layerClass class method to specify the class of its layer object. The default implementation of this method returns the CALayer class and the only way to change this value is to subclass, override the method, and return a different value. You can change this value to use a different kind of layer. For example, if your view uses tiling to display a large scrollable area, you might want to use the CATiledLayer class to back your view.
Implementation of the layerClass method should simply create the desired Class object and return it. For example, a view that uses tiling would have the following implementation for this method:
+ (Class)layerClass |
{ |
return [CATiledLayer class]; |
} |
Each view calls its layerClass method early in its initialization process and uses the returned class to create its layer object. In addition, the view always assigns itself as the delegate of its layer object. At this point, the view owns its layer and the relationship between the view and layer must not change. You must also not assign the same view as the delegate of any other layer object. Changing the ownership or delegate relationships of the view will cause drawing problems and potential crashes in your application.
For more information about the different types of layer objects provided by Core Animation, see Core Animation Reference Collection.
Embedding Layer Objects in a View
If you prefer to work primarily with layer objects instead of views, you can incorporate custom layer objects into your view hierarchy as needed. A custom layer object is any instance of CALayer that is not owned by a view. You typically create custom layers programmatically and incorporate them using Core Animation routines. Custom layers do not receive events or participate in the responder chain but do draw themselves and respond to size changes in their parent view or layer according to the Core Animation rules.
Listing 3-2 shows an example of the viewDidLoad method from a view controller that creates a custom layer object and adds it to its root view. The layer is used to display a static image that is animated. Instead of adding the layer to the view itself, you add it to the view’s underlying layer.
Listing 3-2 Adding a custom layer to a view
- (void)viewDidLoad { |
[super viewDidLoad]; |
// Create the layer. |
CALayer* myLayer = [[CALayer alloc] init]; |
// Set the contents of the layer to a fixed image. And set |
// the size of the layer to match the image size. |
UIImage layerContents = [[UIImage imageNamed:@"myImage"] retain]; |
CGSize imageSize = layerContents.size; |
myLayer.bounds = CGRectMake(0, 0, imageSize.width, imageSize.height); |
myLayer = layerContents.CGImage; |
// Add the layer to the view. |
CALayer* viewLayer = self.view.layer; |
[viewLayer addSublayer:myLayer]; |
// Center the layer in the view. |
CGRect viewBounds = backingView.bounds; |
myLayer.position = CGPointMake(CGRectGetMidX(viewBounds), CGRectGetMidY(viewBounds)); |
// Release the layer, since it is retained by the view's layer |
[myLayer release]; |
} |
You can add any number of sublayers and arrange them into sublayer hierarchies, if you want. However, at some point, those layers must be attached to the layer object of a view.
For information on how to work with layers directly, see Core Animation Programming Guide.
Defining a Custom View
If the standard system views do not do exactly what you need, you can define a custom view. Custom views give you total control over the appearance of your application’s content and how interactions with that content are handled.
Checklist for Implementing a Custom View
The job of a custom view is to present content and manage interactions with that content. The successful implementation of a custom view involves more than just drawing and handling events, though. The following checklist includes the more important methods you can override (and behaviors you can provide) when implementing a custom view:
Define the appropriate initialization methods for your view:
For views you plan to create programmatically, override the
initWithFrame:method or define a custom initialization method.For views you plan to load from nib files, override the
initWithCoder:method. Use this method to initialize your view and put it into a known state.
Implement a
deallocmethod to handle the cleanup of any custom data.To handle any custom drawing, override the
drawRect:method and do your drawing there.Set the
autoresizingMaskproperty of the view to define its autoresizing behavior.If your view class manages one or more integral subviews, do the following:
Create those subviews during your view’s initialization sequence.
Set the
autoresizingMaskproperty of each subview at creation time.If your subviews require custom layout, override the
layoutSubviewsmethod and implement your layout code there.
To handle touch-based events, do the following:
Attach any suitable gesture recognizers to the view by using the
addGestureRecognizer:method.For situations where you want to process the touches yourself, override the
touchesBegan:withEvent:,touchesMoved:withEvent:,touchesEnded:withEvent:, andtouchesCancelled:withEvent:methods. (Remember that you should always override thetouchesCancelled:withEvent:method, regardless of which other touch-related methods you override.)
If you want the printed version of your view to look different from the onscreen version, implement the
drawRect:forViewPrintFormatter:method. For detailed information about how to support printing in your views, see Drawing and Printing Guide for iOS.
In addition to overriding methods, remember that there is a lot you can do with the view’s existing properties and methods. For example, the contentMode and contentStretch properties let you change the final rendered appearance of your view and might be preferable to redrawing the content yourself. In addition to the UIView class itself, there are many aspects of a view’s underlying CALayer object that you can configure directly or indirectly. You can even change the class of the layer object itself.
For more information about the methods and properties of the view class, see UIView Class Reference.
Initializing Your Custom View
Every new view object you define should include a custom initWithFrame: initializer method. This method is responsible for initializing the class at creation time and putting your view object into a known state. You use this method when creating instances of your view programmatically in your code.
Listing 3-3 shows a skeletal implementation of a standard initWithFrame: method. This method calls the inherited implementation of the method first and then initializes the instance variables and state information of the class before returning the initialized object. Calling the inherited implementation is traditionally performed first so that if there is a problem, you can abort your own initialization code and return nil.
Listing 3-3 Initializing a view subclass
- (id)initWithFrame:(CGRect)aRect { |
self = [super initWithFrame:aRect]; |
if (self) { |
// setup the initial properties of the view |
... |
} |
return self; |
} |
If you plan to load instances of your custom view class from a nib file, you should be aware that in iOS, the nib-loading code does not use the initWithFrame: method to instantiate new view objects. Instead, it uses the initWithCoder: method that is part of the NSCoding protocol.
Even if your view adopts the NSCoding protocol, Interface Builder does not know about your view’s custom properties and therefore does not encode those properties into the nib file. As a result, your own initWithCoder: method should perform whatever initialization code it can to put the view into a known state. You can also implement the awakeFromNib method in your view class and use that method to perform additional initialization.
Implementing Your Drawing Code
For views that need to do custom drawing, you need to override the drawRect: method and do your drawing there. Custom drawing is recommended only as a last resort. In general, if you can use other views to present your content, that is preferred.
The implementation of your drawRect: method should do exactly one thing: draw your content. This method is not the place to be updating your application’s data structures or performing any tasks not related to drawing. It should configure the drawing environment, draw your content, and exit as quickly as possible. And if your drawRect: method might be called frequently, you should do everything you can to optimize your drawing code and draw as little as possible each time the method is called.
Before calling your view’s drawRect: method, UIKit configures the basic drawing environment for your view. Specifically, it creates a graphics context and adjusts the coordinate system and clipping region to match the coordinate system and visible bounds of your view. Thus, by the time your drawRect: method is called, you can begin drawing your content using native drawing technologies such as UIKit and Core Graphics. You can get a pointer to the current graphics context using the UIGraphicsGetCurrentContext function.
Listing 3-4 shows a simple implementation of a drawRect: method that draws a 10-pixel-wide red border around the view. Because UIKit drawing operations use Core Graphics for their underlying implementations, you can mix drawing calls, as shown here, to get the results you expect.
Listing 3-4 A drawing method
- (void)drawRect:(CGRect)rect { |
CGContextRef context = UIGraphicsGetCurrentContext(); |
CGRect myFrame = self.bounds; |
// Set the line width to 10 and inset the rectangle by |
// 5 pixels on all sides to compensate for the wider line. |
CGContextSetLineWidth(context, 10); |
CGRectInset(myFrame, 5, 5); |
[[UIColor redColor] set]; |
UIRectFrame(myFrame); |
} |
If you know that your view’s drawing code always covers the entire surface of the view with opaque content, you can improve system performance by setting the opaque property of your view to YES. When you mark a view as opaque, UIKit avoids drawing content that is located immediately behind your view. This not only reduces the amount of time spent drawing but also minimizes the work that must be done to composite your view with other content. However, you should set this property to YES only if you know your view’s content is completely opaque. If your view cannot guarantee that its contents are always opaque, you should set the property to NO.
Another way to improve drawing performance, especially during scrolling, is to set the clearsContextBeforeDrawing property of your view to NO. When this property is set to YES, UIKIt automatically fills the area to be updated by your drawRect: method with transparent black before calling your method. Setting this property to NO eliminates the overhead for that fill operation but puts the burden on your application to fill the update rectangle passed to your drawRect: method with content.
Responding to Events
View objects are responder objects—instances of the UIResponder class—and are therefore capable of receiving touch events. When a touch event occurs, the window dispatches the corresponding event object to the view in which the touch occurred. If your view is not interested in an event, it can ignore it or pass it up the responder chain to be handled by a different object.
In addition to handling touch events directly, views can also use gesture recognizers to detect taps, swipes, pinches, and other types of common touch-related gestures. Gesture recognizers do the hard work of tracking touch events and making sure that they follow the right criteria to qualify them as the target gesture. Instead of your application having to track touch events, you can create the gesture recognizer, assign an appropriate target object and action method to it, and install it on your view using the addGestureRecognizer: method. The gesture recognizer then calls your action method when the corresponding gesture occurs.
If you prefer to handle touch events directly, you can implement the following methods for your view, which are described in more detail in Event Handling Guide for iOS:
The default behavior for views is to respond to only one touch at a time. If the user puts a second finger down, the system ignores the touch event and does not report it to your view. If you plan to track multi-finger gestures from your view’s event-handler methods, you need to enable multitouch events by setting the multipleTouchEnabled property of your view to YES.
Some views, such as labels and images, disable event handling altogether initially. You can control whether a view is able to receive touch events by changing the value of the view’s userInteractionEnabled property. You might temporarily set this property to NO to prevent the user from manipulating the contents of your view while a long operation is pending. To prevent events from reaching any of your views, you can also use the beginIgnoringInteractionEvents and endIgnoringInteractionEvents methods of the UIApplication object. These methods affect the delivery of events for the entire application, not just for a single view.
As it handles touch events, UIKit uses the hitTest:withEvent: and pointInside:withEvent: methods of UIView to determine whether a touch event occurred inside a given view’s bounds. Although you rarely need to override these methods, you could do so to implement custom touch behaviors for your view. For example, you could override these methods to prevent subviews from handling touch events.
Cleaning Up After Your View
If your view class allocates any memory, stores references to any custom objects, or holds resources that must be released when the view is released, you must implement a dealloc method. The system calls the dealloc method when your view’s retain count reaches zero and it is time to deallocate the view. Your implementation of this method should release any objects or resources held by the view and then call the inherited implementation, as shown in Listing 3-5. You should not use this method to perform any other types of tasks.
Listing 3-5 Implementing the dealloc method
- (void)dealloc { |
// Release a retained UIColor object |
[color release]; |
// Call the inherited implementation |
[super dealloc]; |
} |
Copyright © 2014 Apple Inc. All Rights Reserved. Terms of Use | Privacy Policy | Updated: 2014-09-17