Printing
In iOS 4.2 and later, apps can add support for printing content to local AirPrint-capable printers. Although not all apps need printing support, it is often a useful feature if your app is used for creating content (such as a word processor or a drawing program), making purchases (printing order confirmations), and other tasks where the user might reasonably want a permanent record.
This chapter explains how to add printing support to your app. At a high level, your app creates a print job, providing either an array of ready-to-print images and PDF documents, a single image or PDF document, an instance of any of the built-in print formatter classes, or a custom page renderer.
Printing in iOS is Designed to be Simple and Intuitive
To print, users tap a button that is usually in a navigation bar or toolbar that is associated with the view or selected item the user wants to print. The app then presents a view of printing options. The user selects a printer and various options and then requests printing. The app is asked to generate printing output from its content or provide printable data or file URLs. The requested print job is spooled and control returns to the app. If the destination printer is currently not busy, printing begins immediately. If the printer is already printing or if there are jobs before it in the queue, the print job remains in the iOS print queue until it moves to the top of queue and is printed.
The Printing User Interface
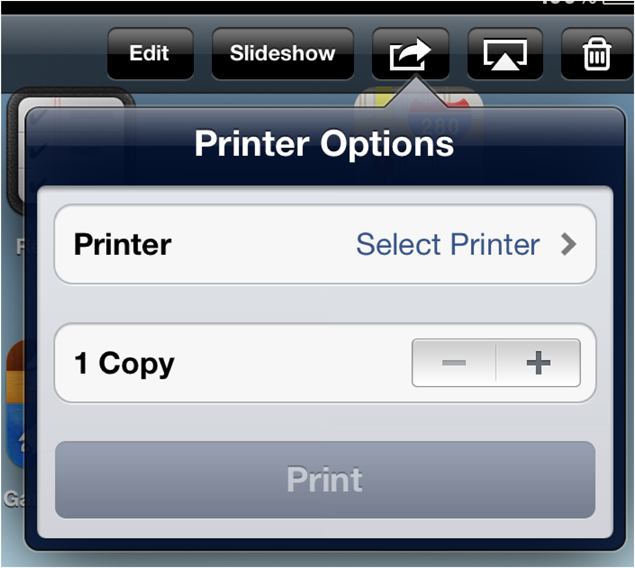
The first thing a user sees related to printing is a print button. The print button is often a bar-button item on a navigation bar or a toolbar. The print button should logically apply to the content the app is presenting; if the user taps the button, the app should print that content. Although the print button can be any custom button, it is recommended that you use the system item-action button shown in Figure 5-1. This is a UIBarButtonItem object, specified with the UIBarButtonSystemItemAction constant, that you create either in Interface Builder or by calling initWithBarButtonSystemItem:target:action:.

When a user taps the print button, a controller object of the app receives the action message. The controller responds by preparing for printing and displaying the printer-options view. The options always include the destination printer (selected from a list of discoverable printers), the number of copies, and sometimes the range of pages to print. If the selected printer is capable of duplex printing, users can choose single-sided or double-sided output. If users decide not to print, they tap outside the options view (on iPad) or tap the Cancel button (on iPhone and iPod touch) to dismiss the printer-options view.
The kind of user interface shown depends on the device. On iPad, the UIKit framework displays a popover view containing the options, as shown in Figure 5-2. An app can animate this view to appear from the print button or from an arbitrary area of the app’s user interface.
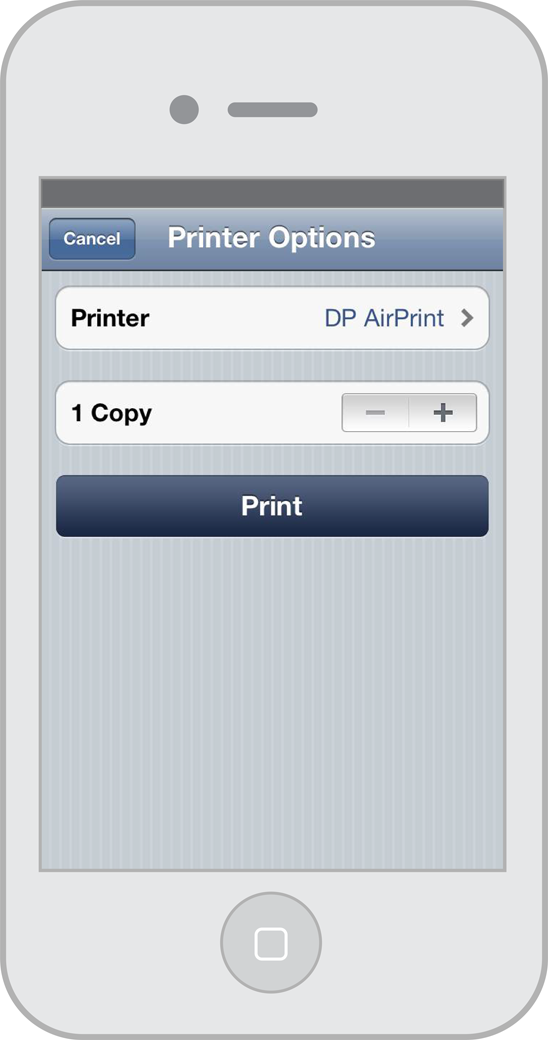
On iPhone and iPod touch devices, UIKit displays a sheet of printing options that an app can animate to slide up from the bottom of the screen, as shown in Figure 5-3.
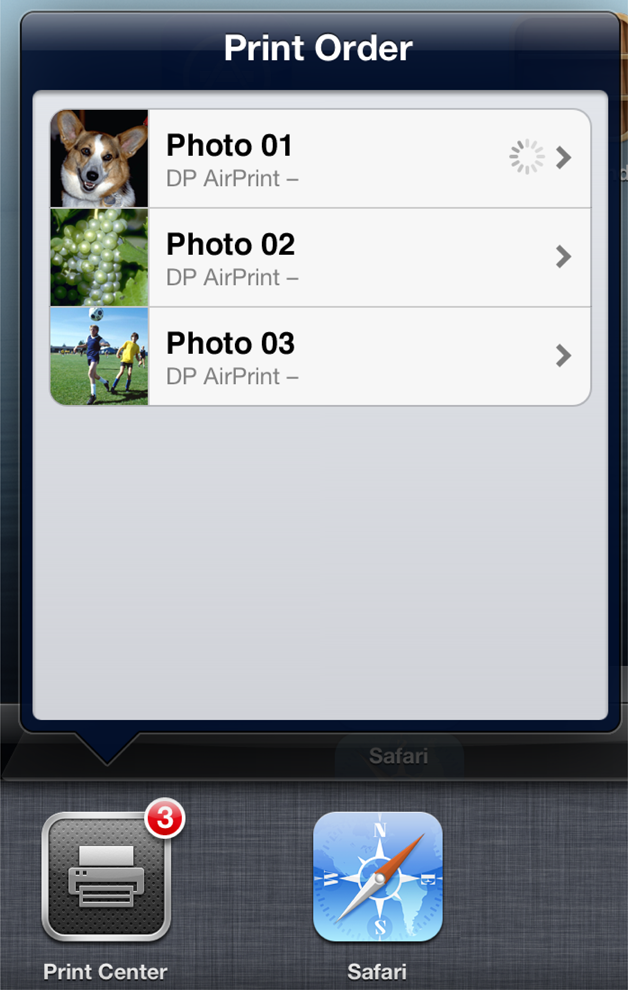
Once a print job has been submitted and is either printing or waiting in the print queue, users can check on its status by double-tapping the Home button to access the Print Center in the multitasking UI. The Print Center (shown in Figure 5-4) is a background system app that shows the order of jobs in the print queue, including those that are currently printing. It is only available while a print job is in progress.
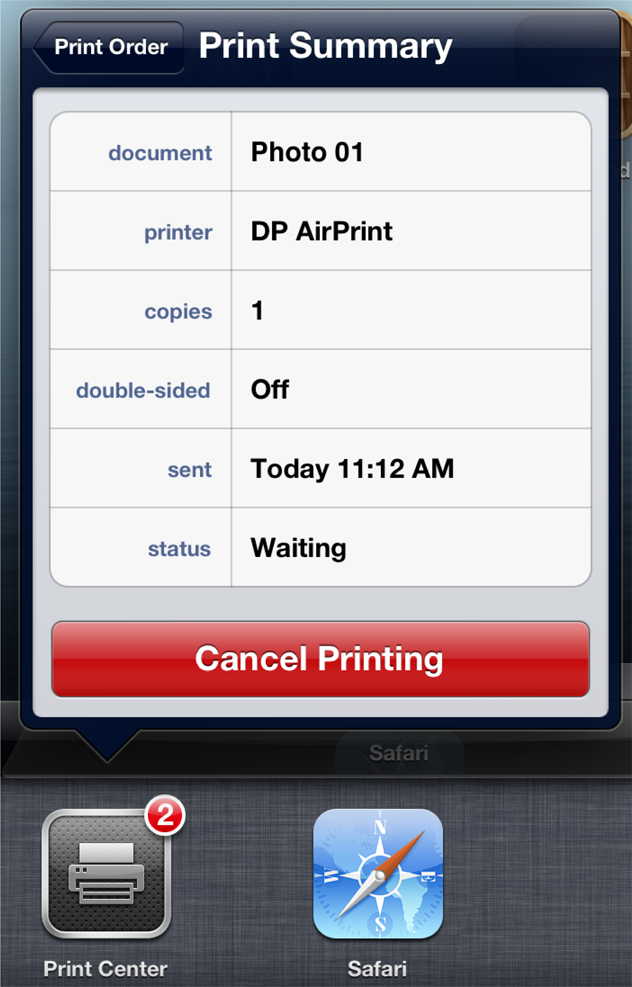
Users can tap a print job in the Print Center to get detailed information about it (Figure 5-5) and cancel jobs that are printing or waiting in the queue.
How Printing Works in iOS
An app uses the UIKit printing API to assemble the elements of a print job, including the content to print and information related to the print job. It then presents the printer-options view described in The Printing User Interface. The user makes his or her choices and then taps Print. In some cases, the UIKit framework then asks the app to draw the content to be printed; UIKit records what the app draws as PDF data. UIKit then hands off the printing data to the printing subsystem.
The printing system does a few things. As UIKit passes the print data to the printing subsystem, it writes this data to storage (that is, it spools the data). It also captures information about the print job. The printing system manages the combined print data and metadata for each print job in a first-in-first-out print queue. Multiple apps on a device can submit multiple print jobs to the printing subsystem, and all of these are placed in the print queue. Each device has one queue for all print jobs regardless of originating app or destination printer.
When a print job rises to the top of the queue, the system printing daemon (printd) considers the destination printer's requirements and, if necessary, converts the print data to a form that is usable by the printer. The printing system reports error conditions such as "Out of Paper" to the user as alerts. It also reports the progress of print jobs programmatically to the Print Center, which displays information such as “page 2 of 5” for a print job.
This overall architecture is shown in Figure 5-6.

The UIKit Printing API
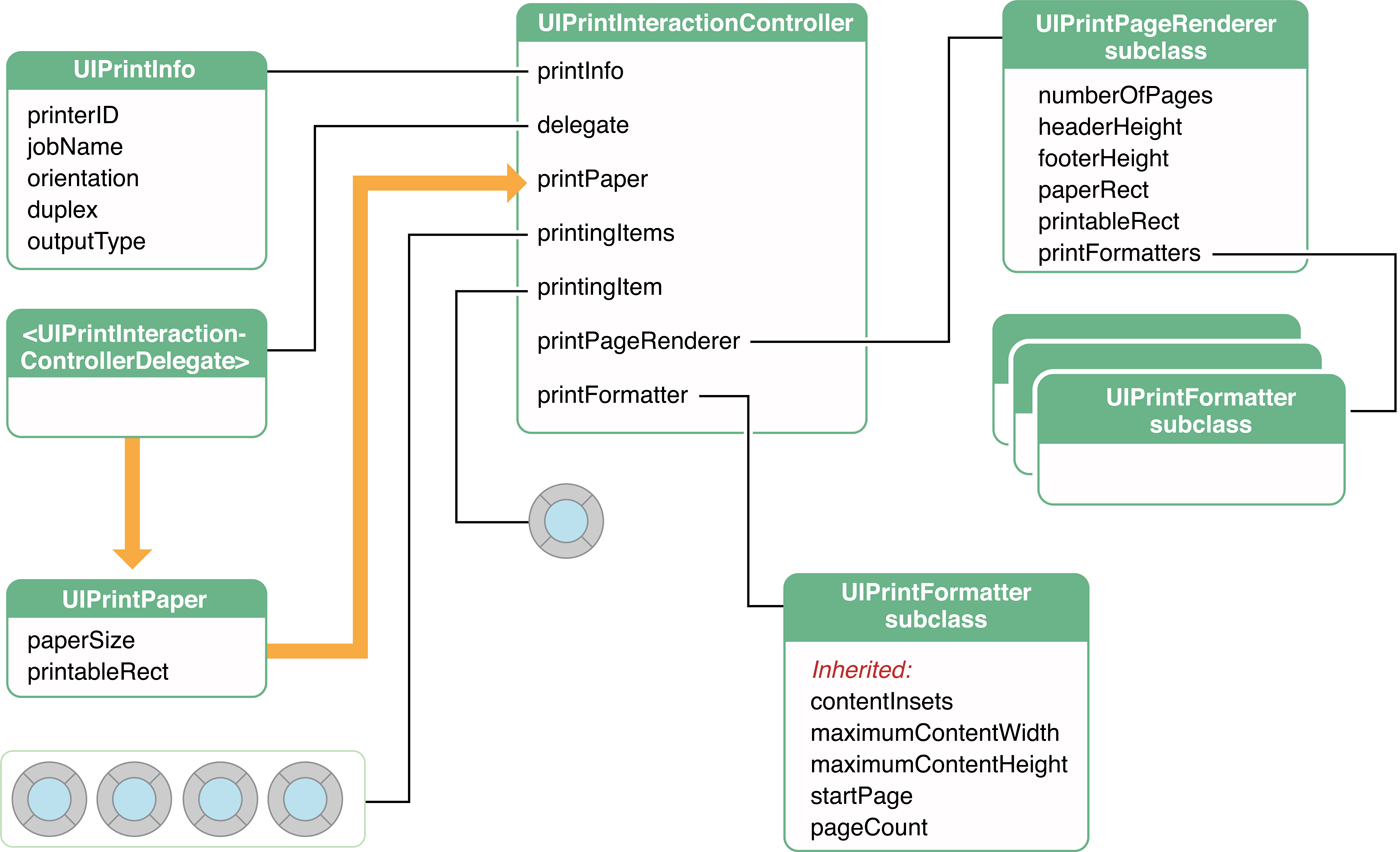
The UIKit printing API includes eight classes and one formal protocol. Objects of these classes and the delegate implementing the protocol have runtime relationships as depicted in Figure 5-7.
Printing Support Overview
At a high level, there are two ways to add printing to your app. If you are using a UIActivityViewController, and if you do not need the ability to control whether the user can choose a page range or override the paper selection process, you can add a printing activity.
Otherwise, to add printing to your app, you must work with the UIPrintInteractionController class. A shared instance of the UIPrintInteractionController class provides your app with the ability to specify what should happen when the user tells your app to print. It contains information about the print job (UIPrintInfo) and the size of the paper and the area for the printed content (UIPrintPaper). It can also have a reference to a delegate object that adopts the UIPrintInteractionControllerDelegate protocol for further configuring behavior.
More importantly, the print interaction controller lets your app provide the content to be printed. The UIPrintInteractionController class provides three distinct ways to print content:
Static images or PDFs. For simple content, you can use the print interaction controller’s
printingItemorprintingItemsproperties to provide an image (in various formats), a PDF file, or an array of images and PDF files.Print formatters. If you need to print text and HTML content with automatic reflow, you can assign an instance of any of the built-in print formatter classes to the print interaction controller’s
printFormatterproperty.Page renderers. Page renderers let you provide your own drawing routines for custom content, and give you complete control over the page layout, including headers and footers. To use a page renderer, you must first write a page renderer subclass, then assign an instance of it to the print interaction controller’s
printPageRendererproperty.
With such a range of options available to you, what is the best option for your app? Table 5-1 clarifies the factors involved in making this decision.
If... | Then... |
|---|---|
Your app has access to directly printable content (images or PDF documents). | Use the |
You want to print a single image or PDF document and want the user to be able to select a page range. | Use the |
You want to print a plain text or HTML document (and do not want additional content such as headers and footers). | Assign a |
You want to print the content of a UIKit view (and do not want additional content such as headers and footers). | Get a |
You want the printed pages to have repeating headers and footers, possibly with incremented page numbers. | Assign an instance of a custom subclass of |
You have mixed content or sources that you want to print—for example, HTML and custom drawing. | Assign an instance of |
You want to have the greatest amount of control over what gets drawn for printing. | Assign an instance of a custom subclass of |
Printing Workflow
The general workflow for printing an image, document, or other printable content of an app is as follows:
Obtain the shared instance of
UIPrintInteractionController.(Optional, but strongly recommended) Create a
UIPrintInfoobject, set attributes such as output type, job name, and print orientation; then assign the object to theprintInfoproperty of theUIPrintInteractionControllerinstance. (Setting the output type and job name are strongly recommended.)If you don’t assign a print-info object, UIKit assumes default attributes for the print job (for example, the job name is the app name).
(Optional) Assign a custom controller object to the
delegateproperty. This object must adopt theUIPrintInteractionControllerDelegateprotocol. The delegate can do a range of tasks. It can respond appropriately when printing options are presented and dismissed, and when the print job starts and ends. It can return a parent view controller for the print interaction controller.Also, by default, UIKit chooses a default paper size and printable area based on the output type, which indicates the kind of content your app is printing. If your app needs more control over paper size, you can override this standard behavior. See Specifying Paper Size, Orientation, and Duplexing Options for more details.
Assign one of the following to a property of the
UIPrintInteractionControllerinstance:A single
NSData,NSURL,UIImage, orALAssetobject containing or referencing PDF data or image data to theprintingItemproperty.An array of directly printable images or PDF documents to the
printingItemsproperty. Array elements must beNSData,NSURL,UIImage, orALAssetobjects containing, referencing, or representing PDF data or images in supported formats.A
UIPrintFormatterobject to theprintFormatterproperty. Print formatters perform custom layout of printable content.A
UIPrintPageRendererobject to theprintPageRendererproperty.
Only one of these properties can be non-
nilfor any print job. See Printing Support Overview for descriptions of these properties.If you assigned a page renderer in the previous step, that object is typically an instance of a custom subclass of
UIPrintPageRenderer. This object draws pages of content for printing when requested by the UIKit framework. It can also draw content in headers and footers of printed pages. A custom page renderer must override one or more of the “draw” methods and, if it is drawing at least part of the content (excluding headers and footers), it must compute and return the number of pages for the print job. (Note that you can use an instance ofUIPrintPageRenderer“as-is” to connect a series of print formatters.)(Optional) If you are using a page renderer, you can create one or more
UIPrintFormatterobjects using concrete subclasses of this class; then add the print formatters for specific pages (or page ranges) to theUIPrintPageRendererinstance either by calling theaddPrintFormatter:startingAtPageAtIndex:method ofUIPrintPageRendereror by creating an array of one or more print formatters (each with its own starting page) and assigning that array to theprintFormattersproperty ofUIPrintPageRenderer.If the current user-interface idiom is iPad, present the printing interface to the user by calling
presentFromBarButtonItem:animated:completionHandler:orpresentFromRect:inView:animated:completionHandler:; if the idiom is iPhone or iPod touch, callpresentAnimated:completionHandler:. Alternatively, you can embed the printing UI into your existing UI by implementing aprintInteractionControllerParentViewController:delegate method. If your app uses an activity sheet (in iOS 6.0 and later), you can also add a printing activity item.
From here, the process varies depending on whether you are printing using static content, a print formatter, or a page renderer.
Printing Printer-Ready Content
The iOS printing system accepts certain objects and prints their contents directly, with minimal involvement by the app. These objects are instances of the NSData, NSURL, UIImage, and ALAsset classes, and they must contain or reference image data or PDF data. Image data involves all of these object types; PDF data is either referenced by NSURL objects or encapsulated by NSData objects. There are additional requirements for these printer-ready objects:
An image must be in a format supported by the Image I/O framework. See Supported Image Formats in UIImage Class Reference for a list of these formats.
NSURLobjects must use as a schemefile:,assets-library:, or anything that can return anNSDatawith a registered protocol (for example, QuickLook’sx-apple-ql-id:scheme).ALAssetobjects must be of typeALAssetTypePhoto.
You assign printer-ready objects either to the printingItem or printingItems property of the shared UIPrintInteractionController instance. You assign a single printer-ready object to printingItem and an array of printer-ready objects to the printingItems property.
Before assigning objects to the these properties, you should validate the objects by using one of the class methods of UIPrintInteractionController. If, for example, you have the UTI of an image and you want to verify that the image is printer-ready, you can test it first with the printableUTIs class method, which returns the set of UTIs that are valid for the printing system:
if ([[UIPrintInteractionController printableUTIs] containsObject:mysteryImageUTI]) |
printInteractionController.printingItem = mysteryImage; |
Similarly, you can apply the canPrintURL: and canPrintData: class methods of UIPrintInteractionController to NSURL and NSData objects prior to assigning those objects to the printingItem or printingItems properties. These methods determine if the printing system can directly print those objects. Their use is strongly recommended, especially for PDF.
Listing 5-1 shows code that prints a PDF document encapsulated in an NSData object. Before assigning it to printingItem, it tests the object’s validity. It also tells the print interaction controller to include the page-range controls in the printing options presented to the user.
Listing 5-1 Printing a single PDF document with capability for page-range selection
- (IBAction)printContent:(id)sender { |
UIPrintInteractionController *pic = [UIPrintInteractionController sharedPrintController]; |
if (pic && [UIPrintInteractionController canPrintData: self.myPDFData] ) { |
pic.delegate = self; |
UIPrintInfo *printInfo = [UIPrintInfo printInfo]; |
printInfo.outputType = UIPrintInfoOutputGeneral; |
printInfo.jobName = [self.path lastPathComponent]; |
printInfo.duplex = UIPrintInfoDuplexLongEdge; |
pic.printInfo = printInfo; |
pic.showsPageRange = YES; |
pic.printingItem = self.myPDFData; |
void (^completionHandler)(UIPrintInteractionController *, BOOL, NSError *) = |
^(UIPrintInteractionController *pic, BOOL completed, NSError *error) { |
self.content = nil; |
if (!completed && error) |
NSLog(@"FAILED! due to error in domain %@ with error code %u", |
error.domain, error.code); |
}; |
if (UI_USER_INTERFACE_IDIOM() == UIUserInterfaceIdiomPad) { |
[pic presentFromBarButtonItem:self.printButton animated:YES |
completionHandler:completionHandler]; |
} else { |
[pic presentAnimated:YES completionHandler:completionHandler]; |
} |
} |
The procedure for submitting several printer-ready objects at once is identical—except (of course), you must assign an array of these objects to the printingItems property:
pic.printingItems = [NSArray arrayWithObjects:imageViewOne.image, imageViewTwo.image, imageViewThree.image, nil]; |
Using Print Formatters and Page Renderers
Print formatters and page renderers are objects that lay out printable content over multiple pages. They specify the beginning page of content and compute the final page of content based on the starting page, the content area, and the content they lay out. They can also specify the margins relative to the printable area of the page. The difference can be summarized as follows:
Print formatters lay out a single piece of content (a block of text or HTML, a view, and so on).
Page renderers let you add headers and footers, perform custom drawing, and so on. Page renderers can, if desired, use print formatters to do most of their work.
If you create a custom subclass of
UIPrintPageRenderer, you can draw each page of printable content partially or entirely. A page renderer can have one or more print formatters associated with specific pages or page ranges of the printable content.
Setting the Layout Properties for the Print Job
To define the areas on pages for printable content, the UIPrintFormatter class declares four key properties for its concrete subclasses. These properties, along with the footerHeight and headerHeight properties of UIPrintPageRenderer and the paperSize and printableRect properties of UIPrintPaper, define the layout of a multi-page print job. Figure 5-8 depicts this layout.
Property | Description |
|---|---|
Distances in points inset from the top, left, and right boundaries of the printable rectangle. These values set the margins of the printed content, although they can be overridden by the | |
Specifies the maximum height of the content area, which factors in any header or footer height. UIKit compares this value against the height of the content area minus the top content-inset and uses the lesser of the two values. | |
Specifies the maximum width of the content area. UIKit compares this value against the width of the content area created by the left content-inset and right content-inset and uses the lesser of the two values. | |
The page on which this formatter should start drawing content for printing. This value is zero-based—the first page of output has a value of 0—but a formatter used by a pager renderer may begin drawing on a later page. For example, to tell a formatter to start printing on the third page, a page renderer would specify 2 for |
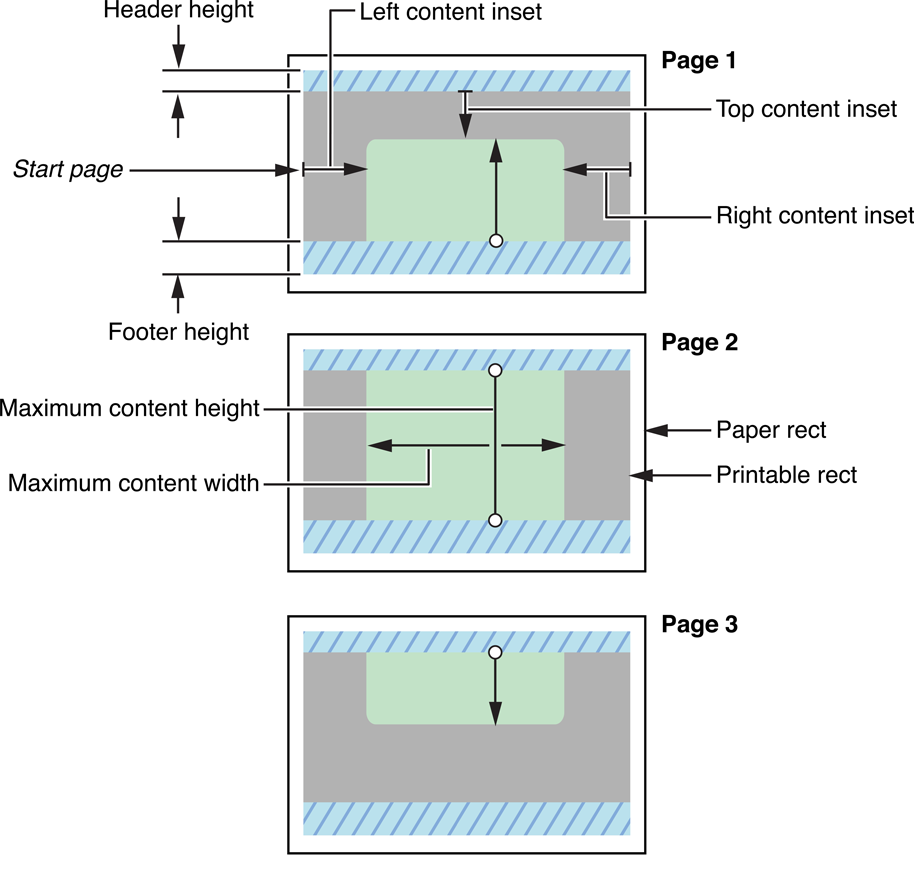
UIPrintFormatter uses all the properties depicted in the diagram in Figure 5-8 to compute the number of pages needed for the print job; it stores this value in the read-only pageCount property.
Using a Print Formatter
UIKit allows you to assign a single print formatter for a print job. This can be a useful capability if you have plain-text or HTML documents, because UIKit has concrete print-formatter classes for these types of textual content. The framework also implements a concrete print-formatter subclass that enables you to print the content of certain UIKit views in a printer-friendly way.
The UIPrintFormatter class is the abstract base class for the system-provided print formatters. Currently, iOS provides the following built-in print formatters:
UIViewPrintFormatter—automatically lays out the content of a view over multiple pages.To obtain a print formatter for a view, call the view’s
viewPrintFormattermethod.Not all built-in UIKit classes support printing. Currently, only the view classes
UIWebView,UITextView, andMKMapViewknow how to draw their contents for printing.View formatters should not be used for printing your own custom views. To print the contents of a custom view, use a
UIPrintPageRendererinstead.UISimpleTextPrintFormatter—automatically draws and lays out plain-text documents. This formatter allows you to set global properties for the text, such a font, color, alignment, and line-break mode.UIMarkupTextPrintFormatter—automatically draws and lays out HTML documents.
Although the following discussion pertains to the use of a single formatter (and no page renderer), much of the information about print formatters applies to print formatters used in conjunction with page renderers, which is described in Using One or More Formatters with a Page Renderer.
Printing Text or HTML Documents
Many apps include textual content that users might want to print. If the content is plain text or HTML text, and you have access to the backing string for the displayed textual content, you can use an instance of UISimpleTextPrintFormatter or UIMarkupTextPrintFormatter to lay out and draw the text for printing. Simply create the instance, initializing it with the backing string, and specify the layout properties. Then assign it to the printFormatter instance variable of the shared UIPrintInteractionController instance.
Listing 5-2 illustrates how you might use a UIMarkupTextPrintFormatter object to print an HTML document. It adds an additional inch of margin inside the (printer-defined) printable area. You can determine the printable area by examining the printPaper property of the UIPrintInteractionController object. For a more complete example of how to create margins of a specific width, see the UIKit Printing with UIPrintInteractionController and UIViewPrintFormatter sample code project.
Listing 5-2 Printing an HTML document (without header information)
- (IBAction)printContent:(id)sender { |
UIPrintInteractionController *pic = [UIPrintInteractionController sharedPrintController]; |
pic.delegate = self; |
UIPrintInfo *printInfo = [UIPrintInfo printInfo]; |
printInfo.outputType = UIPrintInfoOutputGeneral; |
printInfo.jobName = self.documentName; |
pic.printInfo = printInfo; |
UIMarkupTextPrintFormatter *htmlFormatter = [[UIMarkupTextPrintFormatter alloc] |
initWithMarkupText:self.htmlString]; |
htmlFormatter.startPage = 0; |
htmlFormatter.contentInsets = UIEdgeInsetsMake(72.0, 72.0, 72.0, 72.0); // 1 inch margins |
pic.printFormatter = htmlFormatter; |
pic.showsPageRange = YES; |
void (^completionHandler)(UIPrintInteractionController *, BOOL, NSError *) = |
^(UIPrintInteractionController *printController, BOOL completed, NSError *error) { |
if (!completed && error) { |
NSLog(@"Printing could not complete because of error: %@", error); |
} |
}; |
if (UI_USER_INTERFACE_IDIOM() == UIUserInterfaceIdiomPad) { |
[pic presentFromBarButtonItem:sender animated:YES completionHandler:completionHandler]; |
} else { |
[pic presentAnimated:YES completionHandler:completionHandler]; |
} |
} |
Remember that if you use a single print formatter for a print job (that is, a UIPrintFormatter object assigned to the printFormatter property of the UIPrintInteractionController instance), you cannot draw header and footer content on each printed page. To do this you must use a UIPrintPageRenderer object plus any needed print formatters. For more information, see Using One or More Formatters with a Page Renderer.
The procedure for using a UISimpleTextPrintFormatter object to lay out and print a plain text document is almost identical. However, the class of this object includes properties that enable you to set the font, color, and alignment of the printed text.
Using a View Print Formatter
You can use an instance of the UIViewPrintFormatter class to lay out and print the contents of some system views. The UIKit framework creates these view print formatters for the view. Often the same code used to draw the view for display is used to draw the view for printing. Currently, the system views whose contents you can print using a view print formatter are instances of UIWebView, UITextView, and MKMapView (MapKit framework).
To get the view print formatter for a UIView object, call viewPrintFormatter on the view. Set the starting page and any layout properties and then assign the object to the printFormatter property of the UIPrintInteractionController shared instance. Alternatively, you can add the view print formatter to a UIPrintPageRenderer object if you are using that object to draw portions of the printed output. Listing 5-3 shows code that uses a view print formatter from a UIWebView object to print the contents of that view.
Listing 5-3 Printing the contents of a web view
- (void)printWebPage:(id)sender { |
UIPrintInteractionController *controller = [UIPrintInteractionController sharedPrintController]; |
void (^completionHandler)(UIPrintInteractionController *, BOOL, NSError *) = |
^(UIPrintInteractionController *printController, BOOL completed, NSError *error) { |
if(!completed && error){ |
NSLog(@"FAILED! due to error in domain %@ with error code %u", |
error.domain, error.code); |
} |
}; |
UIPrintInfo *printInfo = [UIPrintInfo printInfo]; |
printInfo.outputType = UIPrintInfoOutputGeneral; |
printInfo.jobName = [urlField text]; |
printInfo.duplex = UIPrintInfoDuplexLongEdge; |
controller.printInfo = printInfo; |
controller.showsPageRange = YES; |
UIViewPrintFormatter *viewFormatter = [self.myWebView viewPrintFormatter]; |
viewFormatter.startPage = 0; |
controller.printFormatter = viewFormatter; |
if (UI_USER_INTERFACE_IDIOM() == UIUserInterfaceIdiomPad) { |
[controller presentFromBarButtonItem:printButton animated:YES completionHandler:completionHandler]; |
}else |
[controller presentAnimated:YES completionHandler:completionHandler]; |
} |
For a complete example based on UIViewPrintFormatter, see the UIKit Printing with UIPrintInteractionController and UIViewPrintFormatter sample code project.
Using a Page Renderer
A page renderer is an instance of a custom subclass of UIPrintPageRenderer that draws the full or partial content of a print job. To use one, you must create the subclass, add it to your project, and instantiate it when you prepare a UIPrintInteractionController instance for a print job. Then assign the page renderer to the printPageRenderer property of the UIPrintInteractionController instance. A page renderer can have one or more print formatters associated with it; if it does, it mixes its drawing with the drawing of the print formatters.
A page renderer can draw and lay out printable content on its own or it can use print formatters to handle some or all of the rendering of specific ranges of pages. Thus, for relatively straightforward formatting needs, you can use an instance of UIPrintPageRenderer “as-is” to connect multiple print formatters. However, most page renderers are typically instances of custom subclasses of UIPrintPageRenderer.
The UIPrintPageRenderer base class includes properties for the page count and for heights of headers and footers of pages. It also declares several methods that you can override to draw specific portions of a page: the header, the footer, the content itself, or to integrate page renderer and print formatter drawing.
Setting Page Renderer Attributes
If your page renderer is going to draw in the header or footer of each printed page, you should specify a height for the header and footer. To do this, assign float values (representing points) to the headerHeight and footerHeight properties inherited by your subclass. If these properties have height values of 0 (the default), the drawHeaderForPageAtIndex:inRect: and drawFooterForPageAtIndex:inRect: methods are not called.
If your page renderer is going to draw in the content area of the page—that is, the area between any header or footer areas—then your subclass should override the numberOfPages method to compute and return the number of pages the page renderer will draw. If print formatters associated with the page renderer are going to draw all of the content between the header and footer, then the print formatters will compute the number of pages for you. This situation occurs your page renderer just draws in the header and footer areas and you let the print formatter draw all the other content.
With a page renderer with no associated print formatter, the layout of each page of printable content is entirely up to you. When computing layout metrics, you can take into account the headerHeight, footerHeight, paperRect, and printableRect properties of UIPrintPageRenderer (the last two properties are read-only). If the page renderer uses print formatters, the layout metrics also include the contentInsets, maximumContentHeight, and maximumContentWidth properties of UIPrintFormatter. See Setting the Layout Properties for the Print Job for an illustration and explanation.
Implementing the Drawing Methods
When an app uses a page renderer to draw printable content, UIKit calls the following methods for each page of requested content. Note that there is no guarantee that UIKit calls these methods in page-sequence order. Moreover, if users request a subset of pages for printing (that is, they specify a page range), UIKit does not invoke the methods for pages not in the subset.
The drawPageAtIndex:inRect: method calls each of the other draw methods, in the order listed below. Your app can override this method if you want to have complete control over what is drawn for printing.
Override... | To... |
|---|---|
Draw content in the header. This method is not called if headerHeight is 0. | |
Draw the content of the print job (that is, the area between the header and the footer). | |
Intermix custom drawing with the drawing performed by print formatters. This method is called for each print formatter associated with a given page. See Using One or More Formatters with a Page Renderer for more information. | |
Draw content in the footer. This method is not called if footerHeight is 0. |
All of these drawing methods are set up for drawing to the current graphics context (as returned by UIGraphicsGetCurrentContext). The rectangle passed into each method—defining header area, footer area, content area, and entire page—has values relative to the origin of the page, which is in the upper-left corner.
Listing 5-4 shows example implementations of the drawHeaderForPageAtIndex:inRect: and drawFooterForPageAtIndex:inRect: methods. They use CGRectGetMaxX and CGRectGetMaxY to compute placement of text in the footerRect and headerRect rectangles in the coordinate system of the printable rectangle.
Listing 5-4 Drawing the header and footer of a page
- (void)drawHeaderForPageAtIndex:(NSInteger)pageIndex inRect:(CGRect)headerRect { |
UIFont *font = [UIFont fontWithName:@"Helvetica" size:12.0]; |
CGSize titleSize = [self.jobTitle sizeWithFont:font]; |
//center title in header |
CGFloat drawX = CGRectGetMaxX(headerRect)/2 - titleSize.width/2; |
CGFloat drawY = CGRectGetMaxY(headerRect) - titleSize.height; |
CGPoint drawPoint = CGPointMake(drawX, drawY); |
[self.jobTitle drawAtPoint:drawPoint withFont: font]; |
} |
- (void)drawFooterForPageAtIndex:(NSInteger)pageIndex inRect:(CGRect)footerRect { |
UIFont *font = [UIFont fontWithName:@"Helvetica" size:12.0]; |
NSString *pageNumber = [NSString stringWithFormat:@"%d.", pageIndex+1]; |
// page number at right edge of footer rect |
CGSize pageNumSize = [pageNumber sizeWithFont:font]; |
CGFloat drawX = CGRectGetMaxX(footerRect) - pageNumSize.width - 1.0; |
CGFloat drawY = CGRectGetMaxY(footerRect) - pageNumSize.height; |
CGPoint drawPoint = CGPointMake(drawX, drawY); |
[pageNumber drawAtPoint:drawPoint withFont: font]; |
} |
Using One or More Formatters with a Page Renderer
A page renderer can draw printable content in conjunction with one or more print formatters. For example, an app can use a UISimpleTextPrintFormatter object to draw pages of textual content for printing, but use a page renderer to draw a document title in each page header. Or an app can use two print formatters, one to draw header (or summary) information at the beginning of the first page and another print formatter to draw the remaining content; then it might use a page renderer to draw a line separating the two parts.
As you may recall, you can use a single print formatter for a print job by assigning it the printFormatter property of the UIPrintInteractionController shared instance. But if you use a page renderer and print formatters, you must associate each print formatter with the page renderer. You do this one of two ways:
Include each print formatter in the array assigned to the
printFormattersproperty.Add each print formatter by calling the
addPrintFormatter:startingAtPageAtIndex:method.
Before you associate a print formatter with a page renderer, be sure to set its layout properties, including the starting page (startPage) of the print job. Once you have set these properties, UIPrintFormatter computes the number of pages for the print formatter. Note that if you specify a starting page by calling addPrintFormatter:startingAtPageAtIndex:; that value overwrites any value assigned to startPage. For a discussion of print formatters and layout metrics, see Setting the Layout Properties for the Print Job.
A page renderer can override drawPrintFormatter:forPageAtIndex: to integrate its drawing with the drawing performed by the print formatters assigned to a given page. It can draw in an area of the page where the print formatter doesn’t draw and then call the drawInRect:forPageAtIndex: method on the passed-in print formatter to have it draw its portion of the page. Or the page renderer can achieve an “overlay” effect by having the print formatter draw first and then drawing something over the content drawn by the print formatter.
For complete examples based on UIPrintPageRenderer, see the PrintPhoto: Using the Printing API with Photos, Sample Print Page Renderer, and UIKit Printing with UIPrintInteractionController and UIViewPrintFormatter sample code projects.
Testing the Printing of App Content
The iOS 4.2 SDK (and later) provides a Printer Simulator app that you can use to test your app’s printing capabilities. The app simulates printers of various general types (inkjet, black-and-white laser, color laser, and so on). It displays printed pages in the OS X Preview app. You can set a preference to show the printable area of each page. Printer Simulator also logs information from the printing system about each print job.
You can run the Printer Simulator in one of thee ways:
Choose Open Printer Simulator from the File menu in the iOS Simulator.
Choose the Printer Simulator in Xcode using the Xcode > Open Developer Tool menu.
You can find Printer Simulator in the following file-system location:
<Xcode>/Platforms/iPhoneOS.platform/Developer/Applications/PrinterSimulator.app
When testing your app’s printing code, you should also implement the completion handler passed into the present... methods and log any errors returned from the printing system. These errors are typically programming errors, which you should catch before your app is deployed. See Responding to Print-Job Completion and Errors for details.
Common Printing Tasks
All the coding tasks described below are things that an app does (or can do) in response to a request for printing. Although most of the tasks can occur in any order, you should first check that the device is capable of printing and you should conclude with presenting the printing options. See Printing Printer-Ready Content, Using Print Formatters and Page Renderers, and Using a Page Renderer for complete examples.
An important set of tasks not covered here is adding a print button to an appropriate place in the app’s user interface, declaring an action method, making a target-action connection, and implementing the action method. (See The Printing User Interface for a recommendation on which print button to use.) The following tasks (except for Specifying Paper Size, Orientation, and Duplexing Options) are part of the implementation of the action method.
Testing for Printing Availability
Some iOS devices do not support printing. You should immediately determine this fact once your view loads. If printing is not available for the device, you should either not programmatically add any printing user-interface element (button, bar button item, and so on), or you should remove any printing element loaded from a nib file. To determine if printing is available, call the isPrintingAvailable class method of UIPrintInteractionController. Listing 5-5 illustrates how you might do this; it assumes an outlet to a print button (myPrintButton) loaded from a nib file.
Listing 5-5 Enabling or disabling a print button based on availability of printing
- (void)viewDidLoad { |
if (![UIPrintInteractionController isPrintingAvailable]) |
[myPrintButton removeFromSuperView]; |
// other tasks... |
} |
Specifying Print-Job Information
An instance of the UIPrintInfo class encapsulates information about a print job, specifically:
The output type (indicating the type of content)
The print-job name
The printing orientation
The duplex mode
The identifier of the selected printer
You do not need to assign values to all UIPrintInfo properties; users choose some of these values and UIKit assumes default values for others. (Indeed, you don’t even have to explicitly create an instance of UIPrintInfo.)
However, in most cases you’ll want to specify some aspects of a print job, such as output type. Get an instance of UIPrintInfo by calling the printInfo class method. Assign values to the object’s properties you want to configure. Then assign the UIPrintInfo object to the printInfo property of the shared UIPrintInteractionController instance. Listing 5-6 gives an example of this procedure.
Listing 5-6 Setting properties of a UIPrintInfo object and assigning it to the printInfo property
UIPrintInteractionController *controller = [UIPrintInteractionController sharedPrintController]; |
UIPrintInfo *printInfo = [UIPrintInfo printInfo]; |
printInfo.outputType = UIPrintInfoOutputGeneral; |
printInfo.jobName = [self.path lastPathComponent]; |
printInfo.duplex = UIPrintInfoDuplexLongEdge; |
controller.printInfo = printInfo; |
One of the UIPrintInfo properties is the printing orientation: portrait or landscape. You might want the printing orientation to suit the dimensions of the object being printed. In other words, if the object is large, and its width is greater than its height, landscape would be a suitable printing orientation for it. Listing 5-7 illustrates this with an image.
Listing 5-7 Setting the printing orientation to match image dimension
UIPrintInteractionController *controller = [UIPrintInteractionController sharedPrintController]; |
// other code here... |
UIPrintInfo *printInfo = [UIPrintInfo printInfo]; |
UIImage *image = ((UIImageView *)self.view).image; |
printInfo.outputType = UIPrintInfoOutputPhoto; |
printInfo.jobName = @"Image from PrintPhoto"; |
printInfo.duplex = UIPrintInfoDuplexNone; |
// only if drawing... |
if (!controller.printingItem && image.size.width > image.size.height) |
printInfo.orientation = UIPrintInfoOrientationLandscape; |
Specifying Paper Size, Orientation, and Duplexing Options
By default, UIKit presents a set of default paper sizes for printable content based on the destination printer and the output type of the print job, as specified by the outputType property of the UIPrintInfo object.
For example, if the output type is UIPrintInfoOutputPhoto, the default paper size is 4 x 6 inches, A6, or some other standard size, depending on locale; if the output type is UIPrintInfoOutputGeneral or UIPrintInfoOutputGrayscale, the default paper size is US Letter (8 1/2 x 11 inches), A4, or some other standard size, depending on locale.
For most apps, these default paper sizes are acceptable. However, some apps might need a special paper size. A page-based app might need to show the user how content will actually appear on paper of a given size, an app that produces brochures or greeting cards might have its own preferred size, and so on.
In this case, the delegate of the print interaction controller can implement the UIPrintInteractionControllerDelegate protocol method printInteractionController:choosePaper: to return a UIPrintPaper object representing the optimal combination of available paper size and printable rectangle for a given content size.
The delegate has two approaches it can take. It can examine the passed-in array of UIPrintPaper objects and identify the one that is most suitable. Or it can let the system pick the most suitable object by calling the UIPrintPaper class method bestPaperForPageSize:withPapersFromArray:. Listing 5-8 shows an implementation of the method for an app that supports multiple document types, each with its own page size.
Listing 5-8 Implementing the printInteractionController:choosePaper: method
- (UIPrintPaper *)printInteractionController:(UIPrintInteractionController *)pic |
choosePaper:(NSArray *)paperList { |
// custom method & properties... |
CGSize pageSize = [self pageSizeForDocumentType:self.document.type]; |
return [UIPrintPaper bestPaperForPageSize:pageSize |
withPapersFromArray:paperList]; |
} |
Typically, apps that use custom page renderers factor the paper size into their calculations of the number of pages for a print job (numberOfPages).
If your app needs to present the user with a choice of page size (for a word processing app, for example), you must implement that UI yourself, and you must then use that paper size in your printInteractionController:choosePaper: implementation. For example:
// Create a custom CGSize for 8.5" x 11" paper. |
CGSize custompapersize = CGSizeMake(8.5 * 72.0, 11.0 * 72.0); |
The UIPrintInfo class also lets you provide additional settings, such as the printing orientation, selected printer, and the duplexing mode (if the printer supports duplex printing). Users can change the selected printer and duplex settings from the values you provide
Integrating Printing Into Your User Interface
There are two ways to integrate printing into your user interface:
Using a print interaction controller.
From the activity sheet (in iOS 6.0 and later).
The way you integrate printing depends on which of these techniques you choose.
Presenting Printing Options Using a Print Interaction Controller
UIPrintInteractionController declares three methods for presenting the printing options to users, each with its own animation:
presentFromBarButtonItem:animated:completionHandler:animates a popover view from a button in the navigation bar or toolbar (usually the print button).presentFromRect:inView:animated:completionHandler:animates a popover view from an arbitrary rectangle in the app’s view.presentAnimated:completionHandler:animates a sheet that slides up from the bottom of the screen.
The first two of these methods are intended to be invoked on iPad devices; the third method is intended to be invoked on iPhone and iPod touch devices. You can conditionally code for each device type (or, user-interface idiom) by calling the UI_USER_INTERFACE_IDIOM and comparing the result to UIUserInterfaceIdiomPad or UIUserInterfaceIdiomPhone. Listing 5-9 gives an example of this.
Listing 5-9 Presenting printing options based upon current device type
if (UI_USER_INTERFACE_IDIOM() == UIUserInterfaceIdiomPad) { |
[controller presentFromBarButtonItem:self.printButton animated:YES |
completionHandler:completionHandler]; |
} else { |
[controller presentAnimated:YES completionHandler:completionHandler]; |
} |
If your app calls one of the iPad-specific methods on an iPhone (and requests animation), the default behavior is to display the printing options in a sheet that slides up from the bottom of the screen. If your app calls the iPhone-specific method on iPad, the default behavior is to animate the popover view from the current window frame.
If you call one of the present… methods when the printing options are already displayed, UIPrintInteractionController hides the printing-options view or sheet. You must call the method again to display the options.
If you assign a printer ID or a duplex mode as print-info values, these appear as defaults in the printing options. (The printer must be capable of double-sided printing for the duplex control to appear.) If you want to let your users select ranges of pages for printing, you should set the showsPageRange property of the UIPrintInteractionController object to YES (NO is the default value). Be aware, however, that no page-range control appears in the printing options if you supply printable content via the printingItems property or if the total number of pages is 1, even if showsPageRange is YES.
If you want the printing UI to appear within a particular view, you can do this by implementing the printInteractionControllerParentViewController: method in your UIPrintInteractionControllerDelegate class. This method should return the view controller that should be used as the parent for the print interaction controller. If the provided parent view controller is a UINavigationController instance, the printing UI is pushed into view in that controller. For any other UIViewController instance, the print navigation is shown as a modal dialog within the specified view.
Printing From the Activity Sheet
If your app uses an activity sheet (in iOS 6.0 and later), you can allow printing from the activity sheet. Printing from the activity sheet is simpler than using a print interaction controller. There are two caveats, however:
The app cannot control whether a user can choose a page range.
The app cannot use delegate methods to override behavior, such as manually overriding the paper size selection process.
To use this technique, your app must create an activity items array containing:
A
UIPrintInfoobject.Either a page renderer formatter object, a page renderer or a printable item.
Any additional activity items appropriate for your app.
You then call initWithActivityItems:applicationActivities:, passing that array as the first parameter and nil as the second parameter (or an array of custom activities, if your app provides any).
Finally, you present the activity view using the standard view controller present* methods. If the user chooses to print from that activity view, iOS creates a print job for you. For more information, read UIActivityViewController Class Reference and UIActivity Class Reference.
Responding to Print-Job Completion and Errors
The final parameter of the presentation methods declared by UIPrintInteractionController and described in Presenting Printing Options Using a Print Interaction Controller is a completion handler. The completion handler is a block of type UIPrintInteractionCompletionHandler that is invoked when a print job completes successfully or when it is terminated because of an error. You can provide a block implementation that cleans up state that you have set up for the print job. The completion handler can also log error messages.
The example in Listing 5-10 clears an internal property upon completion or error; if there is an error, it logs information about it.
Listing 5-10 Implementing a completion-handler block
void (^completionHandler)(UIPrintInteractionController *, BOOL, NSError *) = |
^(UIPrintInteractionController *pic, BOOL completed, NSError *error) { |
self.content = nil; |
if (!completed && error) |
NSLog(@"FAILED! due to error in domain %@ with error code %u", |
error.domain, error.code); |
}; |
UIKit automatically releases all objects assigned to the UIPrintInteractionController instance at the end of a print job (except for the delegate), so you do not have to do this yourself in a completion handler.
A printing error is represented by an NSError object having a domain of UIPrintErrorDomain and an error code declared in UIPrintError.h. In almost all cases, these codes indicate programming errors, so usually there is no need to inform the user about them. However, some errors can result from an attempt to print a file (located by a file-scheme NSURL object) that results in an error.
Copyright © 2012 Apple Inc. All Rights Reserved. Terms of Use | Privacy Policy | Updated: 2012-09-19