Retired Document
Important: This document may not represent best practices for current development. Links to downloads and other resources may no longer be valid.
Communicating with Objects
Several of the Cocoa adaptations of design patterns assist communication between objects in an application. These mechanisms and paradigms include delegation, notification, target-action, and the bindings technology. This chapter describes those mechanisms and paradigms.
Communication in Object-Oriented Programs
With Cocoa and Objective-C, the object-oriented language for Cocoa, one way of adding the behavior that is specific to your program is through inheritance. You create a subclass of an existing class that either augments the attributes and behavior of an instance of that class or modifies them in some way. But there are other ways of adding the special logic that characterizes your program. There are other mechanisms for reusing and extending the capabilities of Cocoa objects.
The relationships between objects in a program exist in more than one dimension. There is the hierarchical structure of inheritance, but objects in a program also exist dynamically, in a network of other objects that must communicate with one another at runtime to get the work of the program done. In a fashion similar to a musician in an orchestra, each object in a program has a role, a limited set of behaviors it contributes to the program. It displays an oval surface that responds to mouse clicks, or it manages a collection of objects, or it coordinates the major events in the life of a window. It does what it is designed to do, and nothing more. But for its contributions to be realized in the program, it must be able to communicate them to other objects. It must be able to send messages to other objects or be able to receive messages from other objects.
Before your object can send a message to another object, it must either have a reference to it or have some delivery mechanism it can rely on. Cocoa gives objects many ways to communicate with each other. These mechanisms and techniques, which are based on design patterns described in Cocoa Design Patterns, make it possible to construct robust applications efficiently. They range from the simple to the slightly more elaborate, and often are a preferable alternative to subclassing. You can configure them programmatically and sometimes graphically in Interface Builder.
Outlets
An outlet is an object instance variable—that is, an instance variable of an object that references another object. With outlets, the reference is configured and archived through Interface Builder. The connections between the containing object and its outlets are reestablished every time the containing object is unarchived from its nib file. The containing object holds an outlet as an instance variable with the type qualifier of IBOutlet. For example:
@interface AppController : NSObject |
{ |
IBOutlet NSArray *keywords; |
} |
Because it is an instance variable, an outlet becomes part of an object’s encapsulated data. But an outlet is more than a simple instance variable. The connection between an object and its outlets is archived in a nib file; when the nib file is loaded, each connection is unarchived and reestablished, and is thus always available whenever it becomes necessary to send messages to the other object. The type qualifier IBOutlet is a tag applied to an instance-variable declaration so that the Interface Builder application can recognize the instance variable as an outlet and synchronize the display and connection of it with Xcode.
You connect an outlet in Interface Builder, but you must first declare an outlet in the header file of your custom class by tagging the instance variable with the IBOutlet qualifier.
An application typically sets outlet connections between its custom controller objects and objects on the user interface, but they can be made between any objects that can be represented as instances in Interface Builder, even between two custom objects. As with any instance variable, you should be able to justify its inclusion in a class; the more instance variables an object has, the more memory it takes up. If there are other ways to obtain a reference to an object, such as finding it through its index position in a matrix, or through its inclusion as a function parameter, or through use of a tag (an assigned numeric identifier), you should do that instead.
Outlets are a form of object composition, which is a dynamic pattern that requires an object to somehow acquire references to its constituent objects so that it can send messages to them. It typically holds these other objects as instance variables. These variables must be initialized with the appropriate references at some point during the execution of the program.
Delegates and Data Sources
A delegate is an object that acts on behalf of, or in coordination with, another object when that object encounters an event in a program. The delegating object is often a responder object—that is, an object inheriting from NSResponder in AppKit or UIResponder in UIKit—that is responding to a user event. The delegate is an object that is delegated control of the user interface for that event, or is at least asked to interpret the event in an application-specific manner.
To better appreciate the value of delegation, it helps to consider an off-the-shelf Cocoa object such as a text field (an instance of NSTextField or UITextField) or a table view (an instance of NSTableView or UITableView ). These objects are designed to fulfill a specific role in a generic fashion; a window object in the AppKit framework, for example, responds to mouse manipulations of its controls and handles such things as closing, resizing, and moving the physical window. This restricted and generic behavior necessarily limits what the object can know about how an event affects (or will affect) something elsewhere in the application, especially when the affected behavior is specific to your application. Delegation provides a way for your custom object to communicate application-specific behavior to the off-the-shelf object.
The programming mechanism of delegation gives objects a chance to coordinate their appearance and state with changes occurring elsewhere in a program, changes usually brought about by user actions. More importantly, delegation makes it possible for one object to alter the behavior of another object without the need to inherit from it. The delegate is almost always one of your custom objects, and by definition it incorporates application-specific logic that the generic and delegating object cannot possibly know itself.
How Delegation Works
The design of the delegation mechanism is simple (Figure 5-1). The delegating class has an outlet or property, usually one that is named delegate; if it is an outlet, it includes methods for setting and accessing the value of the outlet. It also declares, without implementing, one or more methods that constitute a formal protocol or an informal protocol. A formal protocol that uses optional methods—a feature of Objective-C 2.0—is the preferred approach, but both kinds of protocols are used by the Cocoa frameworks for delegation.
In the informal protocol approach, the delegating class declares methods on a category of NSObject, and the delegate implements only those methods in which it has an interest in coordinating itself with the delegating object or affecting that object’s default behavior. If the delegating class declares a formal protocol, the delegate may choose to implement those methods marked optional, but it must implement the required ones.
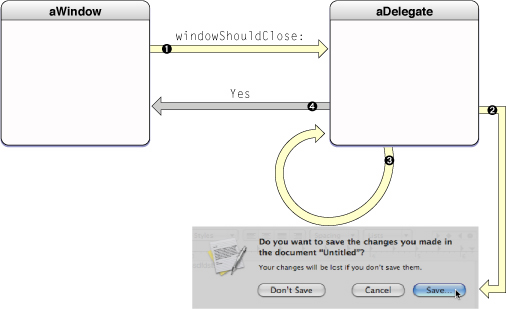
Delegation follows a common design, illustrated by Figure 5-1.
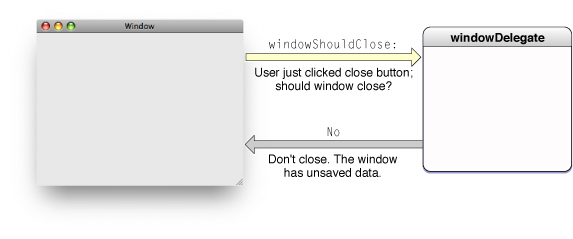
The methods of the protocol mark significant events handled or anticipated by the delegating object. This object wants either to communicate these events to the delegate or, for impending events, to request input or approval from the delegate. For example, when a user clicks the close button of a window in OS X, the window object sends the windowShouldClose: message to its delegate; this gives the delegate the opportunity to veto or defer the closing of the window if, for example, the window has associated data that must be saved (see Figure 5-2).
The delegating object sends a message only if the delegate implements the method. It makes this discovery by invoking the NSObject method respondsToSelector: in the delegate first.
The Form of Delegation Messages
Delegation methods have a conventional form. They begin with the name of the AppKit or UIKit object doing the delegating—application, window, control, and so on; this name is in lower-case and without the “NS” or “UI” prefix. Usually (but not always) this object name is followed by an auxiliary verb indicative of the temporal status of the reported event. This verb, in other words, indicates whether the event is about to occur (“Should” or “Will”) or whether it has just occurred (“Did” or “Has”). This temporal distinction helps to categorize those messages that expect a return value and those that don’t. Listing 5-1 includes a few AppKit delegation methods that expect a return value.
Listing 5-1 Sample delegation methods with return values
- (BOOL)application:(NSApplication *)sender |
openFile:(NSString *)filename; // NSApplication |
- (BOOL)application:(UIApplication *)application |
handleOpenURL:(NSURL *)url; // UIApplicationDelegate |
- (UITableRowIndexSet *)tableView:(NSTableView *)tableView |
willSelectRows:(UITableRowIndexSet *)selection; // UITableViewDelegate |
- (NSRect)windowWillUseStandardFrame:(NSWindow *)window |
defaultFrame:(NSRect)newFrame; // NSWindow |
The delegate that implements these methods can block the impending event (by returning NO in the first two methods) or alter a suggested value (the index set and the frame rectangle in the last two methods). It can even defer an impending event; for example, the delegate implementing the applicationShouldTerminate:method can delay application termination by returning NSTerminateLater.
Other delegation methods are invoked by messages that don’t expect a return value and so are typed to return void. These messages are purely informational, and the method names often contain “Did”, “Will”, or some other indication of a transpired or impending event. Listing 5-2 shows a few examples of these kinds of delegation method.
Listing 5-2 Sample delegation methods returning void
- (void) tableView:(NSTableView*)tableView |
mouseDownInHeaderOfTableColumn:(NSTableColumn *)tableColumn; // NSTableView |
- (void)windowDidMove:(NSNotification *)notification; // NSWindow |
- (void)application:(UIApplication *)application |
willChangeStatusBarFrame:(CGRect)newStatusBarFrame; // UIApplication |
- (void)applicationWillBecomeActive:(NSNotification *)notification; // NSApplication |
There are a couple of things to note about this last group of methods. The first is that an auxiliary verb of “Will” (as in the third method) does not necessarily mean that a return value is expected. In this case, the event is imminent and cannot be blocked, but the message gives the delegate an opportunity to prepare the program for the event.
The other point of interest concerns the second and last method declarations in Listing 5-2 . The sole parameter of each of these methods is an NSNotification object, which means that these methods are invoked as the result of the posting of a particular notification. For example, the windowDidMove: method is associated with the NSWindow notification NSWindowDidMoveNotification. The section Notifications discusses notifications in detail, but here it’s important to understand the relationship of notifications to delegation messages in AppKit. The delegating object automatically makes its delegate an observer of all notifications it posts. All the delegate needs to do is implement the associated method to get the notification.
To make an instance of your custom class the delegate of an AppKit object, simply connect the instance to the delegate outlet or property in Interface Builder. Or you can set it programmatically through the delegating object’s setDelegate: method or delegate property, preferably early on, such as in the awakeFromNib or applicationDidFinishLaunching: method.
Delegation and the Cocoa Application Frameworks
The delegating object in a Cocoa application is often a responder object such as a UIApplication, NSWindow, or NSTableView object. The delegate object itself is typically, but not necessarily, an object, often a custom object, that controls some part of the application (that is, a coordinating controller object). The following AppKit classes define a delegate:
The UIKit framework also uses delegation extensively and always implements it using formal protocols. The application delegate is extremely important in an application running in iOS because it must respond to application-launch, application-quit, low-memory, and other messages from the application object. The application delegate must adopt the UIApplicationDelegate protocol.
Delegating objects do not (and should not) retain their delegates. However, clients of delegating objects (applications, usually) are responsible for ensuring that their delegates are around to receive delegation messages. To do this, they may have to retain the delegate in memory-managed code. This precaution applies equally to data sources, notification observers, and targets of action messages. Note that in a garbage-collection environment, the reference to the delegate is strong because the retain-cycle problem does not apply.
Some AppKit classes have a more restricted type of delegate called a modal delegate. Objects of these classes (NSOpenPanel, for example) run modal dialogs that invoke a handler method in the designated delegate when the user clicks the dialog’s OK button. Modal delegates are limited in scope to the operation of the modal dialog.
The existence of delegates has other programmatic uses. For example, with delegates it is easy for two coordinating controllers in the same program to find and communicate with each other. For example, the object controlling the application overall can find the controller of the application’s inspector window (assuming it’s the current key window) using code similar to the following:
id winController = [[NSApp keyWindow] delegate]; |
And your code can find the application-controller object—by definition, the delegate of the global application instance—by doing something similar to the following:
id appController = [NSApp delegate]; |
Data Sources
A data source is like a delegate except that, instead of being delegated control of the user interface, it is delegated control of data. A data source is an outlet held by NSView and UIView objects such as table views and outline views that require a source from which to populate their rows of visible data. The data source for a view is usually the same object that acts as its delegate, but it can be any object. As with the delegate, the data source must implement one or more methods of an informal protocol to supply the view with the data it needs and, in more advanced implementations, to handle data that users directly edit in such views.
As with delegates, data sources are objects that must be present to receive messages from the objects requesting data. The application that uses them must ensure their persistence, retaining them if necessary in memory-managed code.
Data sources are responsible for the persistence of the objects they hand out to user-interface objects. In other words, they are responsible for the memory management of those objects. However, whenever a view object such as an outline view or table view accesses the data from a data source, it retains the objects as long as it uses the data. But it does not use the data for very long. Typically it holds on to the data only long enough to display it.
Implementing a Delegate for a Custom Class
To implement a delegate for your custom class, complete the following steps:
Declare the delegate accessor methods in your class header file.
- (id)delegate;
- (void)setDelegate:(id)newDelegate;
Implement the accessor methods. In a memory-managed program, to avoid retain cycles, the setter method should not retain or copy your delegate.
- (id)delegate {return delegate;
}
- (void)setDelegate:(id)newDelegate {delegate = newDelegate;
}
In a garbage-collected environment, where retain cycles are not a problem, you should not make the delegate a weak reference (by using the
__weaktype modifier). For more on retain cycles, see Object Ownership and Disposal in Advanced Memory Management Programming Guide. For more on weak references in garbage collection, see Garbage Collection for Cocoa Essentials in Garbage Collection Programming Guide.Declare a formal or informal protocol containing the programmatic interface for the delegate. Informal protocols are categories on the
NSObjectclass. If you declare a formal protocol for your delegate, make sure you mark groups of optional methods with the@optionaldirective.The Form of Delegation Messages gives advice for naming your own delegation methods.
Before invoking a delegation method, make sure the delegate implements it by sending it a
respondsToSelector:message.- (void)someMethod {if ( [delegate respondsToSelector:@selector(operationShouldProceed)] ) {if ( [delegate operationShouldProceed] ) {// do something appropriate
}
}
}
The precaution is necessary only for optional methods in a formal protocol or methods of an informal protocol.
The Target-Action Mechanism
Although delegation, bindings, and notification are useful for handling certain forms of communication between objects in a program, they are not particularly suitable for the most visible sort of communication. A typical application’s user interface consists of a number of graphical objects, and perhaps the most common of these objects are controls. A control is a graphical analog of a real-world or logical device (button, slider, checkboxes, and so on); as with a real-world control, such as a radio tuner, you use it to convey your intent to some system of which it is a part—that is, an application.
The role of a control on a user interface is simple: It interprets the intent of the user and instructs some other object to carry out that request. When a user acts on the control by, say, clicking it or pressing the Return key, the hardware device generates a raw event. The control accepts the event (as appropriately packaged for Cocoa) and translates it into an instruction that is specific to the application. However, events by themselves don't give much information about the user's intent; they merely tell you that the user clicked a mouse button or pressed a key. So some mechanism must be called upon to provide the translation between event and instruction. This mechanism is called target-action.
Cocoa uses the target-action mechanism for communication between a control and another object. This mechanism allows the control and, in OS X its cell or cells, to encapsulate the information necessary to send an application-specific instruction to the appropriate object. The receiving object—typically an instance of a custom class—is called the target. The action is the message that the control sends to the target. The object that is interested in the user event—the target—is the one that imparts significance to it, and this significance is usually reflected in the name it gives to the action.
The Target
A target is a receiver of an action message. A control or, more frequently, its cell holds the target of its action message as an outlet (see Outlets). The target usually is an instance of one of your custom classes, although it can be any Cocoa object whose class implements the appropriate action method.
You can also set a cell’s or control’s target outlet to nil and let the target object be determined at runtime. When the target is nil, the application object (NSApplication or UIApplication) searches for an appropriate receiver in a prescribed order:
It begins with the first responder in the key window and follows
nextResponderlinks up the responder chain to the window object’s (NSWindoworUIWindow) content view.It tries the window object and then the window object’s delegate.
If the main window is different from the key window, it then starts over with the first responder in the main window and works its way up the main window’s responder chain to the window object and its delegate.
Next, the application object tries to respond. If it can’t respond, it tries its delegate. The application object and its delegate are the receivers of last resort.
Control objects do not (and should not) retain their targets. However, clients of controls sending action messages (applications, usually) are responsible for ensuring that their targets are available to receive action messages. To do this, they may have to retain their targets in memory-managed environments. This precaution applies equally to delegates and data sources.
The Action
An action is the message a control sends to the target or, from the perspective of the target, the method the target implements to respond to the action message. A control or—as is frequently the case in AppKit—a control’s cell stores an action as an instance variable of type SEL. SEL is an Objective-C data type used to specify the signature of a message. An action message must have a simple, distinct signature. The method it invokes returns nothing and usually has a sole parameter of type id. This parameter, by convention, is named sender. Here is an example from the NSResponder class, which defines a number of action methods:
- (void)capitalizeWord:(id)sender; |
Action methods declared by some Cocoa classes can also have the equivalent signature:
- (IBAction) deleteRecord:(id)sender; |
In this case, IBAction does not designate a data type for a return value; no value is returned. IBAction is a type qualifier that Interface Builder notices during application development to synchronize actions added programmatically with its internal list of action methods defined for a project.
The sender parameter usually identifies the control sending the action message (although it can be another object substituted by the actual sender). The idea behind this is similar to a return address on a postcard. The target can query the sender for more information if it needs to. If the actual sending object substitutes another object as sender, you should treat that object in the same way. For example, say you have a text field and when the user enters text, the action method nameEntered: is invoked in the target:
- (void)nameEntered:(id) sender { |
NSString *name = [sender stringValue]; |
if (![name isEqualToString:@""]) { |
NSMutableArray *names = [self nameList]; |
[names addObject:name]; |
[sender setStringValue:@""]; |
} |
} |
Here the responding method extracts the contents of the text field, adds the string to an array cached as an instance variable, and clears the field. Other possible queries to the sender would be asking an NSMatrix object for its selected row ([sender selectedRow]), asking an NSButton object for its state ([sender state]), and asking any cell associated with a control for its tag ([[sender cell] tag]), a tag being a numeric identifier.
Target-Action in the AppKit Framework
The AppKit framework uses specific architectures and conventions in implementing target-action.
Controls, Cells, and Menu Items
Most controls in AppKit are objects that inherit from the NSControl class. Although a control has the initial responsibility for sending an action message to its target, it rarely carries the information needed to send the message. For this, it usually relies on its cell or cells.
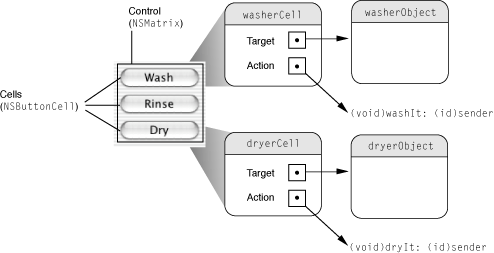
A control almost always has one or more cells—objects that inherit from NSCell—associated with it. Why is there this association? A control is a relatively “heavy” object because it inherits all the combined instance variables of its ancestors, which include the NSView and NSResponder classes. Because controls are expensive, cells are used to subdivide the screen real estate of a control into various functional areas. Cells are lightweight objects that can be thought of as overlaying all or part of the control. But it's not only a division of area, it's a division of labor. Cells do some of the drawing that controls would otherwise have to do, and cells hold some of the data that controls would otherwise have to carry. Two items of this data are the instance variables for target and action. Figure 5-3 depicts the control-cell architecture.
Being abstract classes, NSControl and NSCell both incompletely handle the setting of the target and action instance variables. By default, NSControl simply sets the information in its associated cell, if one exists. (NSControl itself supports only a one-to-one mapping between itself and a cell; subclasses of NSControl such as NSMatrix support multiple cells.) In its default implementation, NSCell simply raises an exception. You must go one step further down the inheritance chain to find the class that really implements the setting of target and action: NSActionCell.
Objects derived from NSActionCell provide target and action values to their controls so the controls can compose and send an action message to the proper receiver. An NSActionCell object handles mouse (cursor) tracking by highlighting its area and assisting its control in sending action messages to the specified target. In most cases, the responsibility for an NSControl object’s appearance and behavior is completely given over to a corresponding NSActionCell object. (NSMatrix, and its subclass NSForm, are subclasses of NSControl that don’t follow this rule.)
When users choose an item from a menu, an action is sent to a target. Yet menus (NSMenu objects) and their items (NSMenuItem objects) are completely separate, in an architectural sense, from controls and cells. The NSMenuItem class implements the target-action mechanism for its own instances; an NSMenuItem object has both target and action instance variables (and related accessor methods) and sends the action message to the target when a user chooses it.
Setting the Target and Action
You can set the targets and actions of cells and controls programmatically or by using Interface Builder. For most developers and most situations, Interface Builder is the preferred approach. When you use it to set controls and targets, Interface Builder provides visual confirmation, allows you to lock the connections, and archives the connections to a nib file. The procedure is simple:
Declare an action method in the header file of your custom class that has the
IBActionqualifier.In Interface Builder, connect the control sending the message to the action method of the target.
If the action is handled by a superclass of your custom class or by an off-the-shelf AppKit or UIKit class, you can make the connection without declaring any action method. Of course, if you declare an action method yourself, you must be sure to implement it.
To set the action and the target programmatically, use the following methods to send messages to a control or cell object:
- (void)setTarget:(id)anObject; |
- (void)setAction:(SEL)aSelector; |
The following example shows how you might use these methods:
[aCell setTarget:myController]; |
[aControl setAction:@selector(deleteRecord:)]; |
[aMenuItem setAction:@selector(showGuides:)]; |
Programmatically setting the target and action does have its advantages and in certain situations it is the only possible approach. For example, you might want the target or action to vary according to some runtime condition, such as whether a network connection exists or whether an inspector window has been loaded. Another example is when you are dynamically populating the items of a pop-up menu, and you want each pop-up item to have its own action.
Actions Defined by AppKit
The AppKit framework not only includes many NSActionCell-based controls for sending action messages, it defines action methods in many of its classes. Some of these actions are connected to default targets when you create a Cocoa application project. For example, the Quit command in the application menu is connected to the terminate: method in the global application object (NSApp).
The NSResponder class also defines many default action messages (also known as standard commands) for common operations on text. This allows the Cocoa text system to send these action messages up an application’s responder chain—a hierarchical sequence of event-handling objects—where it can be handled by the first NSView, NSWindow, or NSApplication object that implements the corresponding method.
Target-Action in UIKit
The UIKit framework also declares and implements a suite of control classes; the control classes in this framework inherit from the UIControl class, which defines most of the target-action mechanism for iOS. However there are some fundamental differences in how the AppKit and UIKit frameworks implement target-action. One of these differences is that UIKit does not have any true cell classes. Controls in UIKit do not rely upon their cells for target and action information.
A larger difference in how the two frameworks implement target-action lies in the nature of the event model. In the AppKit framework, the user typically uses a mouse and keyboard to register events for handling by the system. These events—such as clicking on a button—are limited and discrete. Consequently, a control object in AppKit usually recognizes a single physical event as the trigger for the action it sends to its target. (In the case of buttons, this is a mouse-up event.) In iOS, the user’s fingers are what originate events instead of mouse clicks, mouse drags, or physical keystrokes. There can be more than one finger touching an object on the screen at one time, and these touches can even be going in different directions.
To account for this multitouch event model, UIKit declares a set of control-event constants in UIControl.h that specify various physical gestures that users can make on controls, such as lifting a finger from a control, dragging a finger into a control, and touching down within a text field. You can configure a control object so that it responds to one or more of these touch events by sending an action message to a target. Many of the control classes in UIKit are implemented to generate certain control events; for example, instances of the UISlider class generate a UIControlEventValueChanged control event, which you can use to send an action message to a target object.
You set up a control so that it sends an action message to a target object by associating both target and action with one or more control events. To do this, send addTarget:action:forControlEvents: to the control for each target-action pair you want to specify. When the user touches the control in a designated fashion, the control forwards the action message to the global UIApplication object in a sendAction:to:from:forEvent: message. As in AppKit, the global application object is the centralized dispatch point for action messages. If the control specifies a nil target for an action message, the application queries objects in the responder chain until it finds one that is willing to handle the action message—that is, one implementing a method corresponding to the action selector.
In contrast to the AppKit framework, where an action method may have only one or perhaps two valid signatures, the UIKit framework allows three different forms of action selector:
- (void)action- (void)action:(id)sender- (void)action:(id)sender forEvent:(UIEvent *)event
To learn more about the target-action mechanism in UIKit, read UIControl Class Reference.
Bindings (OS X)
Bindings are a Cocoa technology that you can use to synchronize the display and storage of data in a Cocoa application created for OS X. They are an important tool in the Cocoa toolbox for enabling communication between objects. The technology is an adaptation of both the Model-View-Controller and object modeling design patterns. (The Model-View-Controller Design Pattern introduced bindings in its discussion of controller objects.) It allows you to establish a mediated connection—a binding—between the attribute of a view object that displays a value and a model-object property that stores that value; when a change occurs in the value in one side of the connection, it is automatically reflected in the other. The controller object that mediates the connection provides additional support, including selection management, placeholder values, and sortable tables.
How Bindings Work
Bindings arise from the conceptual space defined by the Model-View-Controller (MVC) and object modeling design patterns. An MVC application assigns objects general roles and maintains separation between objects based on these roles. Objects can be view objects, model objects, or controller objects whose roles can be briefly stated as follows:
View objects display the data of the application.
Model objects encapsulate and operate on application data. They are typically the persistent objects that your users create and save while an application is running.
Controller objects mediate the exchange of data between view and model objects and also perform command-and-control services for the application.
All objects, but most importantly model objects, have defining components or characteristics called properties. Properties can be of two sorts: attributes—values such as strings, scalars, and data structures—and relationships to other objects. Relationships can be of two sorts: one-to-one and one-to-many. They can also be bidirectional and reflexive. The objects of an application thus have various relationships with each other, and this web of objects is called an object graph. A property has an identifying name called a key. Using key paths—period-separated sequences of keys—one can traverse the relationships in an object graph to access the attributes of related objects.
The bindings technology makes use of an object graph to establish bindings among the view, model, and controller objects of an application. With bindings you can extend the web of relationships from the object graph of model objects to the controller and view objects of an application. You can establish a binding between an attribute of a view object and a property of a model object (typically through a mediating property of a controller object). Any change in the displayed attribute value is automatically propagated through the binding to the property where the value is stored. And any internal change in the value of the property is communicated back to the view for display.
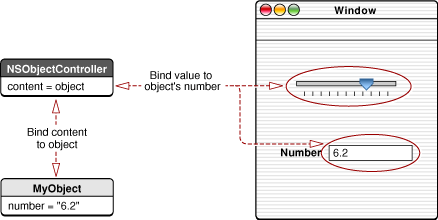
For example, Figure 5-4 shows a simplified set of bindings between the displayed values of a slider and a text field (attributes of those view objects) and the number attribute of a model object (MyObject) through the content property of a controller object. With these bindings established, if a user moves the slider, the change in value is applied to the number attribute and communicated back to the text field for display.
The implementation of bindings rests on the enabling mechanisms of key-value coding, key-value observing, and key-value binding. See Key-Value Mechanisms for overviews of these mechanisms and their associated informal protocols. The discussion of the Observer pattern in Observer also describes key-value observing.
You can establish a binding between any two objects. The only requirement is that the objects comply with the conventions of key-value coding and key-value observing. However, you generally want to establish the binding through a mediating controller because such controller objects offer bindings-related services such as selection management, placeholder values, and the ability to commit or discard pending changes. Mediating controllers are instances of several NSController subclasses; they are available in the Objects & Controllers section of the Interface Builder library (see How You Establish Bindings). You can also create custom mediating-controller classes to acquire more specialized behavior.
How You Establish Bindings
If the only custom classes of your application are model classes, the only requirement for establishing bindings is that those classes be compliant with key-value coding conventions for any properties you want to bind. If you are using a custom view or custom controller, you should also ensure that it is compliant with key-value observing. See Key-Value Mechanisms for a summary of the requirements for compliance with both key-value coding and key-value observing.
You can also establish bindings programmatically but for most situations you use the Interface Builder application to establish bindings. In Interface Builder, you start by dragging NSController objects from the library into your nib file. Then you use the Bindings pane of the Info window to specify the relationships between the properties of the view, controller, and model objects of your application and the attributes you want bound.
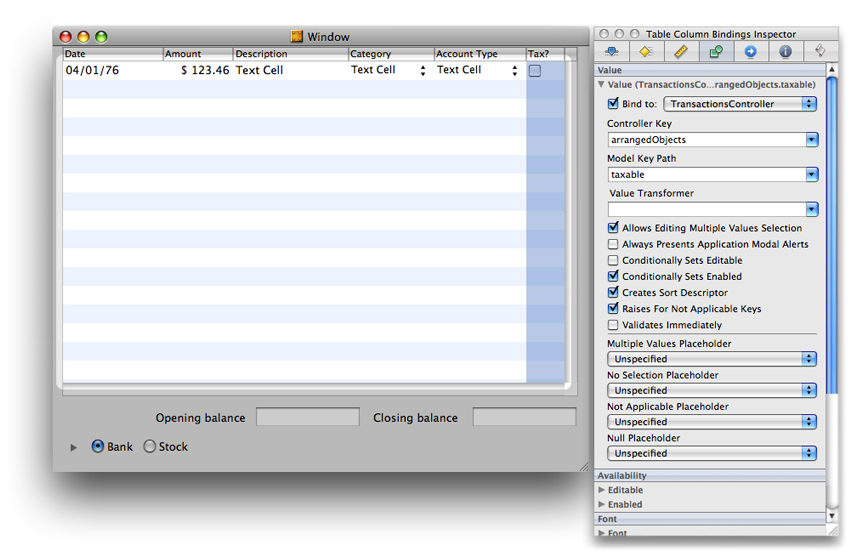
Figure 5-5 gives an example of a binding. It shows the "Tax?" column of the top table view bound to the model attribute taxable, where the controller is TransactionsController (an NSArrayController object); this controller is itself bound to an array of model objects (not shown).
Notifications
The standard way to pass information between objects is message passing—in which one object invokes the method of another object. However, message passing requires that the object sending the message know who the receiver is and what messages it responds to. This requirement is true of delegation messages as well as other types of messages. At times, this tight coupling of two objects is undesirable—most notably because it would join together what might be two otherwise independent subsystems. And it is impractical because it would require hard-coded connections between many disparate objects in an application.
For cases where standard message passing just won’t do, Cocoa offers the broadcast model of notification. By using the notification mechanism, one object can keep other objects informed of what it is doing. In this sense, it is similar to delegation, but the differences are important. The key distinction between delegation and notification is that the former is a one-to-one communication path (between the delegating object and its delegate). But notification is a potentially one-to-many form of communication—it is a broadcast. An object can have only one delegate, but it can have many observers, as the recipients of notification are known. And the object doesn’t have to know what those observers are. Any object can observe an event indirectly via notification and adjust its own appearance, behavior, and state in response to the event. Notification is a powerful mechanism for attaining coordination and cohesion in a program.
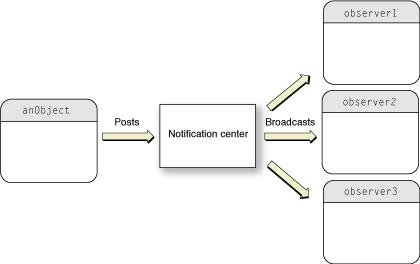
How the notification mechanism works is conceptually straightforward. A process has an object called a notification center, which acts as a clearing house and broadcast center for notifications. Objects that need to know about an event elsewhere in the application register with the notification center to let it know they want to be notified when that event happens. An example of this is a controller object that needs to know when a pop-up menu choice is made so it can reflect this change in the user interface. When the event does happen, the object that is handling the event posts a notification to the notification center, which then dispatches the notification to all of its observers. Figure 5-6 depicts this mechanism.
Any object can post a notification and any object can register itself with the notification center as an observer of a notification. The object posting the notification, the object that the posting object includes in the notification, and the observer of the notification may all be different objects or the same object. (Having the posting and observing object be the same does have its uses, such as in idle-time processing.) Objects that post notifications need not know anything about the observers. On the other hand, observers need to know at least the notification name and the keys to any dictionary encapsulated by the notification object. (The Notification Object describes what a notification object consists of.)
When and How to Use Notifications
As with delegation, the notification mechanism is a great tool for enabling communication between objects in an application. Notifications allow objects within an application to learn about changes that occur elsewhere in that application. Generally, an object registers to be an observer of a notification because it wants to make adjustments when a certain event occurs or is about to occur. For example, if a custom view wants to change its appearance when its window is resized, it can observe the NSWindowDidResizeNotification posted by that window object. Notifications also permit information to be passed between objects because a notification can include a dictionary of data related to the event.
But there are differences between notification and delegation, and these differences dictate what these mechanisms should be used for. As noted earlier, the main difference between the notification model and the delegation model is that the former is a broadcast mechanism whereas delegation is a one-to-one relationship. Each model has its advantages; with notifications they include the following:
The posting object does not have to know the identity of the observing objects.
An application is not limited to the notifications declared by the Cocoa frameworks; any class can declare notifications for its instances to post.
Notifications are not limited to intra-application communication; with distributed notifications, one process can notify another process about events that occur.
But the one-to-one model of delegation has its advantages too. A delegate is given the opportunity to affect an event by returning a value to the delegating object. A notification observer, on the other hand, must play a more passive role; it can affect only itself and its environment in response to the event. Notification methods must have the following signature:
- (void)notificationHandlerName:(NSNotification *); |
This requirement precludes the observing object from affecting the original event in any direct way. A delegate, however, can often affect how the delegating object will handle an event. Moreover, the delegate of an AppKit object is automatically registered as an observer of its notifications. All it need do is implement the notification methods defined by the framework class for its notifications.
The notification mechanism is not the only Cocoa alternative for observing changes in object state, and indeed for many situations should not be the preferred one. The Cocoa bindings technology, and specifically its enabling key-value observing (KVO) and key-value binding (KVB) protocols, also allow objects in an application to observe changes in the properties of other objects. The bindings mechanism accomplishes this function more efficiently than do notifications. In bindings, the communication between observed and observing object is direct, and does not require an intermediary object such as the notification center. Moreover, the bindings mechanism imposes no performance penalty for unobserved changes, as do regular notifications.
However, there can be situations where it makes sense to prefer notifications over bindings. You may want to observe events other than a change in object properties. Or it might be impractical to implement KVO and KVB compliance, especially when the notifications to be posted and observed are few.
Even if the situation warrants the use of notifications, you should be aware of the performance implications. When you post a notification, it is eventually dispatched to observing objects synchronously by the local notification center. This occurs regardless of whether the posting was done synchronously or asynchronously. If there are many observers or each observer does a lot of work while handling the notification, your program could experience a significant delay. Therefore you should be careful about overusing notifications or using them inefficiently. The following guidelines for notification usage should help toward this end:
Be selective about which notifications your application should observe.
Be specific about notification names and posting objects when you register for notifications.
Implement the methods that then handle notifications to do so as efficiently as possible.
Refrain from adding and removing numerous observers; it is much better to have a few intermediary observers that can communicate the results of notifications to the objects they have access to.
The Notification Object
A notification is an object, an instance of NSNotification. This object encapsulates information about an event, such as a window gaining focus or a network connection closing. When the event does happen, the object handling the event posts the notification to the notification center, which immediately broadcasts the notification to all registered objects.
An NSNotification object contains a name, an object, and an optional dictionary. The name is a tag identifying the notification. The object is any object that the poster of the notification wants to send to observers of that notification (typically it is the object that posted the notification). It is similar to the sender object in delegation messages, allowing the receiver to query the object for more information. The dictionary stores any information related to the event.
Notification Centers
A notification center manages the sending and receiving of notifications. It notifies all observers of notifications meeting specific criteria. The notification information is encapsulated in NSNotification objects. Client objects register themselves with the notification center as observers of specific notifications posted by other objects. When an event occurs, an object posts an appropriate notification to the notification center. The notification center dispatches a message to each registered observer, passing the notification as the sole parameter. It is possible for the posting object and the observing object to be the same.
Cocoa includes two types of notification centers:
A notification center (an instance of
NSNotificationCenter) manages notifications within a single task.A distributed notification center (an instance of
NSDistributedNotificationCenter) manages notifications across multiple tasks on a single computer.
Note that in contrast to many other Foundation classes, NSNotificationCenter is not toll-free bridged to its Core Foundation counterpart (CFNotificationCenterRef).
NSNotificationCenter
Each task has a default notification center that you access with the NSNotificationCenter class method defaultCenter. The notification center handles notifications within a single task. For communication between tasks on the same computer, use a distributed notification center (see NSDistributedNotificationCenter).
A notification center delivers notifications to observers synchronously. In other words, the poster of the notification doesn’t regain control until all observers have received and processed the notification. To send notifications asynchronously, use a notification queue, which is described in Notification Queues.
In a multithreaded application, notifications are always delivered in the thread in which the notification was posted, which may not be the same thread in which an observer registered itself.
NSDistributedNotificationCenter
Each task has a default distributed notification center that you access with the NSDistributedNotificationCenter class method defaultCenter. This distributed notification center handles notifications that can be sent between tasks on a single computer. For communication between tasks on different computers, use distributed objects (see Distributed Objects Programming Topics).
Posting a distributed notification is an expensive operation. The notification gets sent to a systemwide server that then distributes it to all the tasks that have objects registered for distributed notifications. The latency between posting the notification and the notification’s arrival in another task is unbounded. In fact, if too many notifications are being posted and the server’s queue fills up, notifications might be dropped.
Distributed notifications are delivered via a task’s run loop. A task must be running a run loop in one of the common modes, such as NSDefaultRunLoopMode, to receive a distributed notification. If the receiving task is multithreaded, do not depend on the notification arriving on the main thread. The notification is usually delivered to the main thread’s run loop, but other threads could also receive the notification.
Whereas a regular notification center allows any object to be the notification object (that is, the object encapsulated by the notification), a distributed notification center is restricted to having an NSString object as its notification object. Because the posting object and the observer may be in different tasks, notifications cannot contain pointers to arbitrary objects. Therefore a distributed notification center requires notifications to use a string as the notification object. Notification-matching is done based on this string, rather than based on an object pointer.
Notification Queues
NSNotificationQueue objects (or simply, notification queues) act as buffers for notification centers (instances of NSNotificationCenter). A notification queue maintains notifications (instances of NSNotification) generally in a First In First Out (FIFO) order. When a notification rises to the front of the queue, the queue posts it to the notification center, which in turn dispatches the notification to all objects registered as observers.
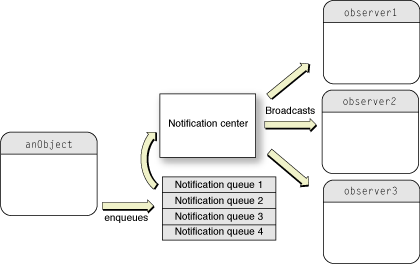
Every thread has a default notification queue, which is associated with the default notification center for the task. Figure 5-7 illustrates this association. You can create your own notification queues and have multiple queues per center and thread.
Coalescing Notifications
The NSNotificationQueue class contributes two important features to the Foundation framework’s notification mechanism: the coalescing of notifications and asynchronous posting. Coalescing is a process that removes notifications in the queue that are similar to the notification just queued. If the new item is similar to a notification already queued, the new one isn’t queued and all similar notifications (except the first one in the queue) are removed. However, you should not depend on this particular coalescing behavior.
You indicate the criteria for similarity in notifications by specifying one or more of the following constants in the third parameter of the enqueueNotification:postingStyle:coalesceMask:forModes: method.
NSNotificationNoCoalescingNSNotificationCoalescingOnNameNSNotificationCoalescingOnSender
You can perform a bitwise-OR operation with the NSNotificationCoalescingOnName and NSNotificationCoalescingOnSender constants to specify coalescing using both the notification name and notification object. In this case, all notifications having the same name and sender as the one enqueued are coalesced.
Asynchronously Posting Notifications
With the NSNotificationCenter method postNotification: and its variants, you can post a notification immediately to a notification center. However, the invocation of the method is synchronous: Before the posting object can resume its thread of execution, it must wait until the notification center dispatches the notification to all observers and returns. With the NSNotificationQueue methods enqueueNotification:postingStyle: and enqueueNotification:postingStyle:coalesceMask:forModes:, however, you can post a notification asynchronously by putting it in a queue. These methods immediately return to the invoking object after putting the notification in the queue.
The notification queue is emptied and its notifications are posted based on the posting style and run-loop mode specified in the enqueuing method. The mode parameter specifies the run loop mode in which the queue is emptied. For example, if you specify NSModalPanelRunLoopMode, the notifications is posted only when the run loop is in this mode. If the run loop is not currently in this mode, the notifications wait until the next time that mode is entered.
Posting to a notification queue can occur in one of three different styles: NSPostASAP, NSPostWhenIdle, and NSPostNow. These styles are described in the following sections.
Posting as Soon as Possible
Any notification queued with the NSPostASAP style is posted to the notification center when the current iteration of the run loop completes, assuming the current run-loop mode matches the requested mode. (If the requested and current modes are different, the notification is posted when the requested mode is entered.) Because the run loop can make multiple callouts during each iteration, the notification may or may not get delivered as soon as the current callout exits and control returns to the run loop. Other callouts may take place first, such as a timer or source firing or the delivery of other asynchronous notifications.
You typically use the NSPostASAP posting style for an expensive resource, such as the display server. When many clients draw on the window buffer during a callout from the run loop, it is expensive to flush the buffer to the display server after every draw operation. In this situation, each draw... method enqueues some notification such as “FlushTheServer” with coalescing on name and object specified and with a posting style of NSPostASAP. As a result, only one of those notifications is dispatched at the end of the run loop and the window buffer is flushed only once.
Posting When Idle
A notification queued with the NSPostWhenIdle style is posted only when the run loop is in a wait state. In this state, there’s nothing in the run loop’s input channels, including timers or other asynchronous events. Note that a run loop that is about to exit (which occurs when all of the input channels have expired) is not in a wait state and thus does not post a notification.
Posting Immediately
A notification queued with NSPostNow is posted immediately after coalescing to the notification center. You queue a notification with NSPostNow (or post one with the NSNotificationCenter method postNotification:) when you do not require asynchronous calling behavior. For many programming situations, synchronous behavior is not only allowable but desirable: You want the notification center to return after dispatching so you can be sure that observing objects have received and processed the notification. Of course, you should use enqueueNotification... with NSPostNow rather than use postNotification: when there are similar notifications in the queue that you want to remove through coalescing.
Ownership of Delegates, Observers, and Targets
Delegating objects are not considered to own their delegates or data sources. Similarly, controls and cells are not considered to own their targets, and the notification center does not own the observers of notifications. Consequently, for memory-managed code these framework objects follow the convention of not retaining their targets, observers, delegates, and data sources; instead, they simply store a pointer to the object.
The object-ownership policy in memory management recommends that owned objects should be retained and archived unconditionally, and that referenced (but not owned) objects should not be retained and should be archived conditionally. The practical intent of this ownership policy is to avoid circular references, a situation where two objects retain each other. (This is often called a retain cycle.) Retaining an object creates a strong reference, and an object cannot be deallocated until all of its strong references are released. If two objects retain each other, neither object ever gets deallocated because the connection between them cannot be broken.
You must ensure that an object that acts as a delegate remains a valid reference or your application can crash. When that object is deallocated, you need to remove the delegate link by sending a setDelegate: message with a nil parameter to the other object. You normally send these messages from the object’s dealloc method.
If you create a subclass from a Cocoa framework class with a delegate, data source, observer, or target, you should never explicitly retain the object in your subclass. You should create a nonretained reference to it and archive it conditionally.
Copyright © 2013 Apple Inc. All Rights Reserved. Terms of Use | Privacy Policy | Updated: 2013-09-18