Retired Document
Important: This document is retired because the content has been migrated to SpriteKit reference.
Simulating Physics
The physics simulation in SpriteKit is performed by adding physics bodies to scenes. A physics body is a simulated physical object connected to a node in the scene’s node tree. It uses the node’s position and orientation to place itself in the simulation. Every physics body has other characteristics that define how the simulation operates on it. These include innate properties of the physical object, such as its mass and density, and also properties imposed on it, such as its velocity. These characteristics define how a body moves, how it is affected by forces in the simulation, and how it responds to collisions with other physics bodies.
Each time a scene computes a new frame of animation, it simulates the effects of forces and collisions on physics bodies connected to the node tree. It computes a final position, orientation, and velocity for each physics body. Then, the scene updates the position and rotation of each corresponding node.
To use physics in your game, you need to:
Attach physics bodies to nodes in the node tree. See All Physics is Simulated on Physics Bodies.
Configure the physical properties of the physics bodies. See Configuring the Physical Properties of a Physics Body.
Define global characteristics of the scene’s physics simulation, such as gravity. See Configuring the Physics World.
Where necessary to support your gameplay, set the velocity of physics bodies in the scene or apply forces or impulses to them. See Making Physics Bodies Move and Adding Physics Fields to Your Scene.
Define how the physics bodies in the scene interact when they come in contact with each other. See Working with Collisions and Contacts.
Optimize your physics simulation to limit the number of calculations it must perform. See Tips and Tricks for Using Physics in Your Game.
SpriteKit uses the International System of Units, also known as SI, or the meter-kilogram-second system. Where necessary, you may need to consult other reference materials online to learn more about the physics equations used by SpriteKit.
All Physics is Simulated on Physics Bodies
An SKPhysicsBody object defines the shape and simulation parameters for a physics body in the system. When the scene simulates physics, it performs the calculations for all physics bodies connected to the scene tree. So, you create an SKPhysicsBody object, configure its properties, and then assign it to a node’s physicsBody property.
There are three kinds of physics bodies:
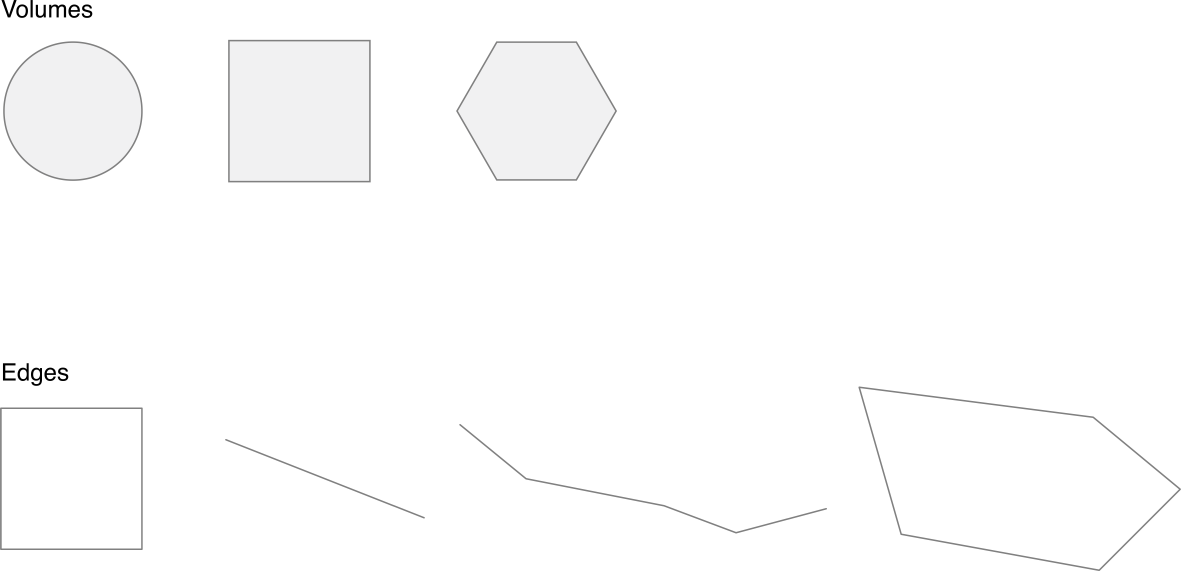
A dynamic volume simulates a physical object with volume and mass that can be affected by forces and collisions in the system. Use dynamic volumes to represent items in the scene that need to move around and collide with each other.
A static volume is similar to a dynamic volume, but its velocity is ignored and it is unaffected by forces or collisions. However, because it still has volume, other objects can bounce off it or interact with it. Use static volumes to represent items that take up space in the scene, but that should not be moved by the simulation. For example, you might use static volumes to represent the walls of a maze.
While it is useful to think of static and dynamic volumes as distinct entities, in practice these are two different modes you can apply to any volume-based physics body. This can be useful because you can selectively enable or disable effects for a body.
An edge is a static volume-less body. Edges are never moved by the simulation and their mass doesn’t matter. Edges are used to represent negative space within a scene (such as a hollow spot inside another entity) or an uncrossable, invisibly thin boundary. For example, edges are frequently used to represent the boundaries of your scene.
The main difference between a edge and a volume is that an edge permits movement inside its own boundaries, while a volume is considered a solid object. If edges are moved through other means, they only interact with volumes, not with other edges.
SpriteKit provides a few standard shapes, as well as shapes based on arbitrary paths. Figure 6-1 shows the shapes available.
Use a Physics Shape That Matches the Graphical Representation
In most cases, a physics body should have a size and shape that closely approximates the visual representation of the corresponding node. For example, in Figure 6-2, the rocket has a narrow shape that is not well represented by either a circle or a rectangle. A convex polygon shape is chosen and fitted to match the sprite’s artwork.
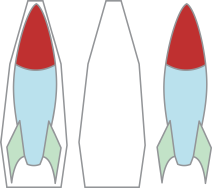
If you do not want to create your own shapes, you can use SpriteKit to create a shape for you based on the sprite’s texture.
SKSpriteNode *sprite = [SKSpriteNode spriteNodeWithImageNamed:@"Spaceship"]; |
sprite.physicsBody = [SKPhysicsBody bodyWithTexture:sprite.texture size:sprite.texture.size]; |
When choosing a shape for your physics body, do not be overly precise. More complex shapes require more work to be properly simulated. For volume-based bodies, use the following guidelines:
A circle is the most efficient shape (
bodyWithCircleOfRadius:).A path-based polygon is the least efficient shape, and the computational work scales with the complexity of the polygon (
bodyWithPolygonFromPath:).
An edge-based body is more expensive to compute than a volume-based body. This is because the bodies it interacts with can potentially be on either side of an open edge or on the inside or outside of a closed shape. Use these guidelines:
Lines and rectangles are the most efficient edge-based bodies (
bodyWithEdgeFromPoint:toPoint:andbodyWithEdgeLoopFromRect:).Edge loops and edge chains are the most expensive edge-based bodies, and the computational work scales with the complexity of the path (
bodyWithEdgeLoopFromPath:andbodyWithEdgeChainFromPath:).
Creating Physics Bodies
A physics body is created by calling one of the SKPhysicsBody class methods. Each class method defines whether a volume-based or edge-based body is being created and what shape it has.
Creating an Edge Loop Around the Scene
Listing 6-1 shows code that is used frequently in games that do not need to scroll the content. In this case, the game wants physics bodies that hit the borders of the scene to bounce back into the gameplay area.
Listing 6-1 A scene border
- (void) createSceneContents |
{ |
self.backgroundColor = [SKColor blackColor]; |
self.scaleMode = SKSceneScaleModeAspectFit; |
self.physicsBody = [SKPhysicsBody bodyWithEdgeLoopFromRect:self.frame]; |
} |
Creating a Circular Volume for a Sprite
Listing 6-2 shows the code that creates the physics body for a spherical or circular object. Because the physics body is attached to a sprite object, it usually needs volume. In this case, the sprite image is assumed to closely approximate a circle centered on the anchor point, so the radius of the circle is calculated and used to create the physics body.
Listing 6-2 A physics body for a circular sprite
SKSpriteNode *sprite = [SKSpriteNode spriteNodeWithImageNamed:@"sphere.png"]; |
sprite.physicsBody = [SKPhysicsBody bodyWithCircleOfRadius:sprite.size.width/2]; |
sprite.physicsBody.dynamic = YES; |
If the physics body were significantly smaller than the sprite’s image, the data used to create the physics body might need to be provided by some other source, such as a property list. See SpriteKit Best Practices.
Configuring the Physical Properties of a Physics Body
The SKPhysicsBody class defines properties that determine how the physics body is simulated. These properties affect how the body reacts to forces, what forces it generates on itself (to simulate friction), and how it reacts to collisions in the scene. In most cases, the properties are used to simulate physical effects.
Each individual body also has its own property values that determine exactly how it reacts to forces and collisions in the scene. Here are the most important properties:
The
massproperty determines how forces affect the body, as well as how much momentum the body has when it is involved in a collision.The
frictionproperty determines the roughness of the body’s surface. It is used to calculate the frictional force that a body applies to other bodies moving along its surface.The
linearDampingandangularDampingproperties are used to calculate friction on the body as it moves through the world. For example, this might be used to simulate air or water friction.The
restitutionproperty determines how much energy a body maintains during a collision—its bounciness.
Other properties are used to determine how the simulation is performed on the body itself:
The
dynamicproperty determines whether the body is simulated by the physics subsystem.The
affectedByGravityproperty determines whether the simulation exerts a gravitational force on the body. For more information on the physics world, see Configuring the Physics World.The
allowsRotationproperty determines whether forces can impart angular velocity on the body.
Mass Determines a Body’s Resistance to Acceleration
You should set the mass on every volume-based body in your scene so that it properly reacts to forces applied to it.
A physics body’s mass, area, and density properties are all interrelated. When you first create a body, the body’s area is calculated, and never changes afterwards. The other two properties change values at the same time, based on the following formula:
mass = density x area
When you configure a physics body, you have two options:
Set the
massproperty of the body. Thedensityproperty is then automatically recalculated. This approach is most useful when you want to precisely control each body’s mass.Set the
densityproperty of the body. Themassproperty is then automatically recalculated. This approach is most useful when you have a collection of similar bodies created with different sizes. For example, if your physics bodies were used to simulate asteroids, you might give all asteroids the same density, and then set an appropriate bounding polygon for each. Each body automatically computes an appropriate mass based on its size on the screen.
When to Adjust a Body’s Properties
Most often, you configure a physics body once and then never change it. For example, the mass of a body is unlikely to change during play. However, you are not restricted from doing so. Some kinds of games may require the ability to adjust a body’s properties even while the simulation is executing. Here are a few examples of when you might do so:
In a realistic rocket simulation, the rocket expends fuel to apply thrust. As fuel is used up, the mass of the rocket changes. To implement this in SpriteKit, you might create a rocket class that includes a
fuelproperty. When the rocket thrusts, the fuel is reduced and the corresponding body’s mass is recalculated.The damping properties are usually based on the body’s characteristics and the medium it is traveling through. For example, a vacuum applies no damping forces, and water applies more damping forces than air. If your game simulates multiple environments and bodies can move between those environments, your game can update a body’s damping properties whenever it enters a new environment.
Typically, you make these changes as part of scene pre- and post-processing. See Advanced Scene Processing.
Configuring the Physics World
All physics bodies in a scene are part of the physics world, which is represented in SpriteKit by an SKPhysicsWorld object attached to the scene. The physics world defines two important characteristics of the simulation:
The
gravityproperty applies an acceleration to volume-based bodies in the simulation. Static volumes and physics bodies that have set theaffectedByGravityproperty toNOare unaffected.The
speedproperty determines the rate at which the simulation runs.
Making Physics Bodies Move
By default, only gravity is applied to physics bodies in the scene. In some cases, that might be enough to build a game. But in most cases, you need to take other steps to change the speed of physics bodies.
First, you can control a physics body’s velocity directly, by setting its velocity and angularVelocity properties. As with many other properties, you often set these properties once when the physics body is first created and then let the physics simulation adjust them as necessary. For example, assume for a moment you are making a space-based game where a rocket ship can fire missiles. When the ship fires a missile, the missile should have a starting velocity of the ship plus an additional vector in the direction of the launch. Listing 6-3 shows one implementation for calculating the launch velocity.
Listing 6-3 Calculating the missile’s initial velocity
missile.physicsBody.velocity = self.physicsBody.velocity; |
[missile.physicsBody applyImpulse: CGVectorMake(missileLaunchImpulse*cosf(shipDirection), |
missileLaunchImpulse*sinf(shipDirection))]; |
When a body is in the simulation, it is more common for the velocity to be adjusted based on forces applied to the body. Another source of velocity changes, collisions, is discussed later.
The default collection of forces that apply to a body include:
The gravitational force applied by the physics world
The damping forces applied by the body’s own properties
A frictional force based on contact with another body in the system
You can also apply your own forces and impulses to physics bodies. Most often, you apply forces and impulses in a pre-processing step before the simulation executes. Your game logic is responsible for determining which forces need to be applied and for making the appropriate method calls to apply those forces.
You can choose to apply either a force or an impulse:
A force is applied for a length of time based on the amount of simulation time that passes between when you apply the force and when the next frame of the simulation is processed. So, to apply a continuous force to an body, you need to make the appropriate method calls each time a new frame is processed. Forces are usually used for continuous effects
An impulse makes an instantaneous change to the body’s velocity that is independent of the amount of simulation time that has passed. Impulses are usually used for immediate changes to a body’s velocity.
To continue with the rocket example, a rocket ship probably applies a force to itself when it turns on its engines. However, when it fires a missile, it might launch the missile with the rocket’s own velocity and then apply a single impulse to it to give it the initial burst of speed.
Because forces and impulses are modeling the same concept—adjusting a body’s velocity—the remainder of this section focuses on forces.
You can apply a force to a body in one of three ways:
A linear force that only affects the body’s linear velocity.
An angular force that only affects the body’s angular velocity.
A force applied to a point on the body. The physics simulation calculates separate changes to the body’s angular and linear velocity, based on the shape of the object and the point where the force was applied.
Listing 6-4 shows code you could implement in a sprite subclass to apply a force to the ship. This force accelerates the rocket when the main engines are activated. Because the engines are at the back of the rocket, the force is applied to linearly to the rocket body. The code calculates the thrust vector based on the current orientation of the rocket. The orientation is based on the zRotation property of the corresponding node, but the orientation of the artwork may differ from the orientation of the node. The thrust should always be oriented with the artwork. See Drawing Your Content.
Listing 6-4 Applying rocket thrust
static const CGFloat thrust = 0.12; |
CGFloat shipDirection = [self shipDirection]; |
CGVector thrustVector = CGVectorMake(thrust*cosf(shipDirection), |
thrust*sinf(shipDirection)); |
[self.physicsBody applyForce:thrustVector]; |
Listing 6-5 shows a similar effect, but this time the rocket is being rotated by the force, so the thrust is applied as an angular thrust.
Listing 6-5 Applying lateral thrust
[self.physicsBody applyTorque:thrust]; |
Working with Collisions and Contacts
Sooner or later, two bodies are going to try to occupy the same space. It is up to you to decide how your game responds. SpriteKit uses two kinds of interactions between physics bodies:
A contact is used when you need to know that two bodies are touching each other. In most cases, you use contacts when you need to make gameplay changes when a collision occurs.
A collision is used to prevent two objects from interpenetrating each other. When one body strikes another body, SpriteKit automatically computes the results of the collision and applies impulse to the bodies in the collision.
Your game configures the physics bodies in the scene to determine when collisions should occur and when interactions between physics bodies require additional game logic to be performed. Limiting these interactions is not only important for defining your game’s logic, it is also necessary in order to get good performance from SpriteKit. SpriteKit uses two mechanisms to limit the number of interactions in each frame:
Edge-based physics bodies never interact with other edge-based bodies. This means that even if you move edge-based bodies by repositioning the nodes, the physics bodies never collide or contact each other.
Every physics body is categorized. Categories are defined by your app; each scene can have up to 32 categories. When you configure a physics body, you define which categories it belongs to and which categories of bodies it wants to interact with. Contacts and collisions are specified separately.
Collision and Contact Example: Rockets in Space
The contacts and collision system is easier to understand by exploring an example. In this example, the scene is used to implement a space game. Two rocket ships are dueling over a portion of outer space. This area of space has planets and asteroids that the ships can collide with. Finally, because this is a duel, both rocket ships are armed with missiles they can shoot at each other. This simple description defines the rough gameplay for the example. But implementing this example requires a more precise expression of what bodies are in the scene and how they interact with each other.
From the description above, you can see that the game has four kinds of unit types that appear in the scene:
Missiles
Rocket ships
Asteroids
Planets
The small number of unit types suggests that a simple list of categories is a good design. Although the scene is limited to 32 categories, this design only needs four, one for each unit type. Each physics body belongs to one and only one category. So, a missile might appear as a sprite node. The missile’s sprite node has an associated physics body, and that body belongs to the missile category. The other nodes and physics bodies are defined similarly.
Given those four categories, the next step is to define the interactions that are permitted between these physics bodies. The contact interactions are usually important to tackle first, because they are almost always dictated by your gameplay logic. In many cases, if a contact is detected, you need a collision to be calculated also. This is most common when the contact results in one of the two physics bodies being removed from the scene.
Table 6-1 describes the contact interactions for the rockets game.
Missile | Rocket ship | Asteroid | Planet | |
|---|---|---|---|---|
Missile | No | Yes | Yes | Yes |
Rocket ship | No | Yes | Yes | Yes |
Asteroid | No | No | No | Yes |
Planet | No | No | No | No |
All of these interactions are based on the game logic. That is, when any of these contacts occur, the game needs to be notified so that it can update the game state. Here’s what needs to happen:
A missile explodes when it strikes a ship, asteroid, or planet. If the missile strikes a ship, the ship takes damage.
A ship that contacts a ship, asteroid, or planet takes damage.
An asteroid that contacts a planet is destroyed.
It isn’t necessary for these interactions to be symmetrical, because SpriteKit only calls your delegate once per frame for each contact. Either body can specify that it is interested in the contact. Because a missile already requests a contact message when it strikes a ship, the ship does not need to ask for the same contact message.
The next step is determining when collisions should be calculated by the scene. Each body describes which kinds of bodies in the scene can collide with it. Table 6-2 describes the list of permitted collisions.
Missile | Rocket ship | Asteroid | Planet | |
|---|---|---|---|---|
Missile | No | No | No | No |
Rocket ship | No | Yes | Yes | Yes |
Asteroid | No | Yes | Yes | No |
Planet | No | No | No | Yes |
When working with collisions, each physics body’s collision information is important. When two bodies collide, it is possible for only one body to affected by the collision. When this occurs, only the affected body’s velocity is updated.
In the table, the following assumptions are made:
Missiles are always destroyed in any interactions with other objects, so a missile ignores all collisions with other bodies. Similarly, missiles are considered to have too little mass to move other bodies in a collision. Although the game could choose to have missiles collide with other missiles, the game chooses not to because there will be a lot of missiles flying around. Because every missile might need to be tested against every other missile, these interactions would require a lot of extra computations.
A ship tracks collisions with ships, asteroids, and planets.
An asteroid ignores planetary collisions because the gameplay description for contacts states that the asteroid is going to be destroyed.
Planets track only collisions with other planets. Nothing else has enough mass to move the planet, so the game ignores those collisions and avoids potentially expensive calculations.
Implementing the Rocket Example in Code
When you have determined your categorizations and interactions, you need to implement these in your game’s code. The categorizations and interactions are each defined by a 32-bit mask. Whenever a potential interaction occurs, the category mask of each body is tested against the contact and collision masks of the other body. SpriteKit performs these tests by logically ANDing the two masks together. If the result is a nonzero number, then that interaction occurs.
Here’s how you would turn the rocket example into SpriteKit code:
Define the category mask values:
Listing 6-6 Category mask values for the space duel
static const uint32_t missileCategory = 0x1 << 0;
static const uint32_t shipCategory = 0x1 << 1;
static const uint32_t asteroidCategory = 0x1 << 2;
static const uint32_t planetCategory = 0x1 << 3;
When a physics body is initialized, set its
categoryBitMask,collisionBitMask, andcontactTestBitMaskproperties.Listing 6-7 shows a typical implementation for the rocket ship entry in Table 6-1 and Table 6-2.
Listing 6-7 Assigning contact and collision masks to a rocket
SKSpriteNode *ship = [SKSpriteNode spriteNodeWithImageNamed:@"spaceship.png"];
ship.physicsBody = [SKPhysicsBody bodyWithRectangleOfSize:ship.size];
ship.physicsBody.categoryBitMask = shipCategory;
ship.physicsBody.collisionBitMask = shipCategory | asteroidCategory | planetCategory;
ship.physicsBody.contactTestBitMask = shipCategory | asteroidCategory | planetCategory;
Assign a contact delegate to the scene’s physics world.
Often, the delegate protocol is implemented by the scene. This is the case in Listing 6-8.
Listing 6-8 Adding the scene as the contact delegate
-(id)initWithSize:(CGSize)size
{if (self = [super initWithSize:size])
{...
self.physicsWorld.gravity = CGVectorMake(0,0);
self.physicsWorld.contactDelegate = self;
...
}
return self;
}
Implement the contact delegate method to add the game logic.
Listing 6-9 A partial implementation of a contact delegate
- (void)didBeginContact:(SKPhysicsContact *)contact
{SKPhysicsBody *firstBody, *secondBody;
if (contact.bodyA.categoryBitMask < contact.bodyB.categoryBitMask)
{firstBody = contact.bodyA;
secondBody = contact.bodyB;
}
else
{firstBody = contact.bodyB;
secondBody = contact.bodyA;
}
if ((firstBody.categoryBitMask & missileCategory) != 0)
{[self attack: secondBody.node withMissile:firstBody.node];
}
...
}
This example shows a few important concepts to consider when implementing your contact delegate:
The delegate is passed an
SKPhysicsContactobject that declares which bodies were involved in the collision.The bodies in the contact can appear in any order. In the Rockets code, the interaction grids are always specified in the sorted order of the categories. In this case, the code relies on this to sort the two entries when a contact occurs. A simpler alternative would be to check both bodies in the contact and dispatch if either matches the mask entry.
When your game needs to work with contacts, you need to determine the outcome based on both bodies in the collision. Consider studying the Double Dispatch Pattern and using it to farm out the work to other objects in the system. Embedding all of the logic in the scene can result in long, complicated contact delegate methods that are difficult to read.
The
nodeproperty can access the node that a physics body is attached to. Use it to access information about the nodes participating in the collision. For example, you might use the node’s class, itsnameproperty, or data stored in itsuserDatadictionary to determine how the contact should be processed.
Specify High Precision Collisions for Small or Fast-Moving Objects
When SpriteKit performs collision detection, it first determines the locations of all of the physics bodies in the scene. Then it determines whether collisions or contacts occurred. This computational method is fast, but can sometimes result in missed collisions. A small body might move so fast that it completely passes through another physics body without ever having a frame of animation where the two touch each other.
If you have physics bodies that must collide, you can hint to SpriteKit to use a more precise collision model to check for interactions. This model is more expensive, so it should be used sparingly. When either body uses precise collisions, multiple movement positions are contacted and tested to ensure that all contacts are detected.
ship.physicsBody.usesPreciseCollisionDetection = YES; |
Adding Physics Fields to Your Scene
It is possible to implement a game using only physics bodies, collisions, and applied forces, but sometimes this can be a lot of work. For example, if you wanted two objects to be attracted to each other, you would have to perform gravity calculations and apply those forces every time a new frame is calculated. When you want to apply generalized effects to a scene, you can do this easier using physics fields.
A physics field is a node that is placed inside your scene’s node tree. When the scene simulates physics, the physics field affects physics bodies that are configured to interact with it. There are many different kinds of fields effects, all of which are defined in SKFieldNode Class Reference.
Listing 6-10 shows one of these fields, a linear gravity field. In this example, a field node replaces the default gravity provided by the scene’s physics world. First, the default gravity is disabled. Then, the scene creates a linear gravity field with a vector pointing towards the bottom of the screen and gives the node a strength equal to Earth’s gravity. Finally, it adds the node to itself.
Listing 6-10 Replacing the default gravity with a gravity field node
self.physicsWorld.gravity = CGVectorMake(0,0); |
vector_float3 gravityVector = {0,-1,0}; |
SKFieldNode *gravityNode = [SKFieldNode linearGravityFieldWithVector: gravityVector]; |
gravityNode.strength = 9.8; |
[self addChild:gravityNode]; |
Here are some reasons you might use a field node rather than the default gravity:
You can vary the strength and direction of gravity independently of each other.
You can even the strength of the field using actions.
You can change the direction of gravity by rotating the field node.
gravityNode.zRotation = M_PI; // Flip gravity.
You can enable and disable gravity using the field node’s
enabledproperty, without changing the field node’s strength or direction.
Limiting the Effect of Field Nodes through Categories and Regions
By default, a field node affects all physics bodies in the scene. However, it doesn’t have to be this way. By carefully controlling which physics bodies are affected by a field node, you can create some interesting game effects.
Field nodes are categorized just like physics bodies. Similarly, physics bodies declare which field categories affect them. Combining these two properties, you can decide which kinds of fields are implemented by your game and which physics bodies are affected by each of those fields. Typically, you do this by using the field categories to define general effects that you can drop into a game. For example, assume for the moment that you are implementing the Rocket example, and you want to add gravity to the planet. Gravity should pull ships and asteroids towards the planet. Listing 6-11 creates one category for gravity effects and a second category for shields (used later in this section). When a planet is created, a separate radial gravity field node is added as a child, and is configured to use the gravity category. Whenever a new physics body is created, the body’s mask is configured to determine which fields should affect it. Ships are affected by gravity, and missiles are affected by force fields.
Listing 6-11 Using field categories to add gameplay
static const uint32_t gravityCategory = 0x1 << 0; |
static const uint32_t shieldCategory = 0x1 << 1; |
... |
SKFieldNode *gravity = [SKFieldNode radialGravityField]; |
gravity.strength = 3; |
gravity.categoryBitMask = gravityCategory; |
[planet addChild:gravity]; |
... |
ship.physicsBody.fieldBitMask = gravityCategory; |
... |
missile.physicsBody.fieldBitMask = shieldCategory; |
So, time to implement that force field. One interesting way to do this is with another radial gravity field, but using a negative field strength: physics bodies are repelled away from the ship. But a field that affects the whole scene might be more than you want; instead the field should only affect nearby missiles. You define the area that a field effects using two properties on the field node object.
A field node’s
regionproperty determines the area where the field can affect things. By default, this region covers the entire scene. However, you can choose to give the region a finite shape instead. For the forcefield, a circular area is fine, but other shapes are possible. You can even construct them using constructive set geometry (CSG).A field node’s
falloffproperty determines how fast the field loses its strength. You can choose to have the field not lose strength at all or you can choose to have it fall off more quickly than the default. For a radial gravity field, the default is to have it drop off based on the square of the distance to the other body’s center. Not all field types are affected by thefalloffproperty.
Listing 6-12 adds a temporary force field to the rocket ship. The field node is created and configured to repel missiles. Then a circular region is added to limit the area affected by the node and the field is configured so that its strength drops off more quickly as a function of distance. Finally, the field should weaken and disappear so that the ship is not invulnerable. The field is weakened using an action that first animates a drop in strength to nothing, and then removes the shield node. In an actual game, the shield effect might be embellished with a graphical effect rendered on top of the ship.
Listing 6-12 Force field node
SKFieldNode *shield = [SKFieldNode radialGravityField]; |
shield.strength = -5; |
shield.categoryBitMask = shieldCategory; |
shield.region = [[SKRegion alloc] initWithRadius:100]; |
shield.falloff = 4; |
[shield runAction:[SKAction sequence:@[ |
[SKAction strengthTo:0 duration:2.0], [SKAction removeFromParent]]]]; |
[ship addChild:shield]; |
Connecting Physics Bodies
Although you can make a lot of interesting games that use the physics systems that have already been described, you can take your designs further by connecting physics bodies using joints. When the scene simulates the physics, it takes these joints into account when calculating how forces affect the bodies.
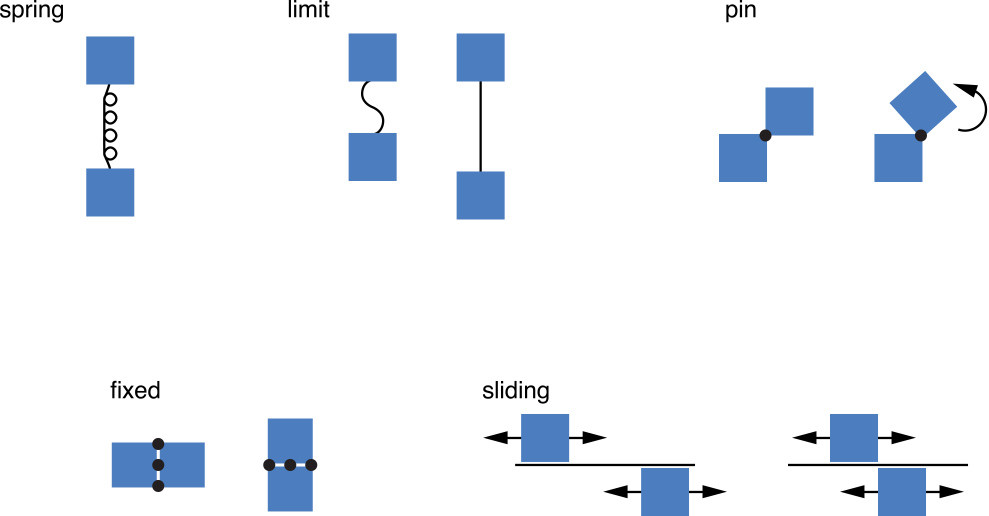
Table 6-3 describes the kinds of joints you can create in SpriteKit.
Class | Description |
|---|---|
A fixed joint fuses two bodies together at a reference point. Fixed joints are useful for creating complex shapes that can be broken apart later. | |
A sliding joint permits the anchor points of two bodies to slide along a chosen axis. | |
A spring joint acts as a spring whose length is the initial distance between two bodies. | |
A limit joint imposes a maximum distance between two bodies, as if they were connected by a rope. | |
A pin joint pins two bodies together. The bodies rotate independently around the anchor point. |
You add or remove joints using the physics world. When you create a joint, the points that connect the joint are always specified in the scene’s coordinate system. This may require you to first convert from node coordinates to scene coordinates before creating a joint.
To use a physics joint in your game, follow these steps:
Create two physics bodies.
Attach the physics bodies to a pair of
SKNodeobjects in the scene.Create a joint object using one of the subclasses listed in Table 6-3.
If necessary, configure the joint object’s properties to define how the joint should operate.
Retrieve the scene’s
SKPhysicsWorldobject.Call the physics world’s
addJoint:method.
Searching for Physics Bodies
Sometimes, it is necessary to find physics bodies in the scene. For example, you might need to:
Discover whether a physics body is located in a region of the scene.
Detect when a physics body (such as the one controlled by the player) crosses a particular line.
Trace the line of sight between two physics bodies, to see whether another physics body, such as a wall, is interposed between the two objects.
In some cases, you can implement these interactions using the collisions and contacts system. For example, to discover when a physics body enters a region, you could create a physics body and attach it to an invisible node in the scene. Then, configure the physics body’s collision mask so that it never collides with anything, and its contact mask to detect the physics bodies you are interested in. Your contact delegate is called when the desired interactions occur.
However, it’s not easy to implement concepts such as line of sight using this design. To implement these, you use the scene’s physics world. With the physics world, you can search for all physics bodies along a ray or physics bodies that intersect a particular point or rectangle.
An example illustrates the basic technique. Listing 6-13 shows one possible implementation of a line-of-sight detection system. It casts a ray from the origin of the scene in a particular direction, searching for the nearest physics body along the ray. If it finds a physics body, then it tests the category mask to see whether this is a target it should attack. If it sees a target designated for attack, it shoots the cannon.
Listing 6-13 Casting a ray from the center of the scene
- (BOOL) isTargetVisibleAtAngle:(CGFloat)angle distance:(CGFloat) distance |
[ |
CGPoint rayStart = CGPointZero; |
CGPoint rayEnd = CGPointMake(distance*cosf(angle), distance*sinf(angle)); |
SKPhysicsBody *body = [self.physicsWorld bodyAlongRayStart:rayStart end:rayEnd]; |
return (body && body.categoryBitMask == targetCategory); |
} |
- (void) attackTargetIfVisible |
{ |
if ([self isTargetVisibleAtAngle: self.cannon.zRotation distance: 512]) |
{ |
[self shootCannon]; |
} |
} |
Another way to implement the same behavior is to set the starting and ending positions of the ray to those of two physics bodies in your scene. For example, you might use the location of the player’s game object as one position and the position of an enemy unit as the other position.
You can also perform searches for physics bodies that intersect a point or rectangle using the bodyAtPoint: and bodyInRect: methods.
Sometimes you can’t make a simple determination based on the closest physics body within the scene. For example, in the logic of your game, you might decide that not all physics bodies block the line of sight. In this case, you need to enumerate all of the physics bodies along the ray using the enumerateBodiesAlongRayStart:end:usingBlock: method. You supply a block that is called once for each body along the ray. You can then use this information to make a more informed decision about whether the line of sight exists to a target.
Tips and Tricks for Using Physics in Your Game
Consider the following advice when building a physics-based game.
Design Your Physics Bodies Systematically
Before you spend too much time adding physics to your scene, you should first understand what kinds of bodies you are going to include in the scene and how they interact with each other. Systematically go through this process for each body:
Is it an edge, a static volume, or a dynamic volume? See All Physics is Simulated on Physics Bodies.
What shape best approximates the body, keeping in mind that some shapes are computationally more expensive than others? See Use a Physics Shape That Matches the Graphical Representation
What kind of body is it and how does it interact with other bodies? See Working with Collisions and Contacts.
Does this body move quickly, or is it very small? If so, determine whether high-precision collision detection is necessary. See Specify High Precision Collisions for Small or Fast-Moving Objects.
Fudging the Numbers
While it is useful to know that SpriteKit measures items in the International System of Units, worrying about precise numbers is not that important. It doesn’t matter much whether your rocket ship weights 1 kilogram or 1,000,000 kilograms, as long as the mass is consistent with other physics values used in the game. Often, proportions are more important than the actual values being used.
Game design is usually an iterative process, as you tweak the numbers in the simulation. This sort of design often results in many hard-coded numbers in your game. Resist the urge to do this! Instead, implement these numbers as data that can be archived with the corresponding node objects or physics bodies. Your code should provide the behaviors, but the specific numbers used to implement those behaviors should be editable values that an artist or designer can tweak or test.
Most of the information stored in a physics body and corresponding node can be archived using the standard archiving mechanisms found in Cocoa. This suggests that your own tools may also be able to save and load these archives and use them as the preferred data format. This is usually possible, but keep in mind that the shape of a physics body is private data that cannot be determined from the object. This means if you do use archives as the primary format for saving data in your tools, you may also need to archive other information used to create the physics body. The general topic of developing tools using SpriteKit is described in SpriteKit Best Practices.
Most Physics Properties Are Dynamic, so Adapt Them at Runtime
Very few characteristics of a physics body are fixed. Outside of a physics body’s area, most properties can be changed at any time. Take advantage of this. Here are a few examples:
You can lock a static volume in place until the player performs the task that unlocks it. Then, change the body to a dynamic volume.
You can construct a box from multiple smaller physics bodies and hold it together using fixed joints. Create the pieces with a contact mask so that when they hit something, the contact delegate can break the joints.
As an object moves throughout the scene, you adjust its linear and rotational damping based on the medium it is in. For example, when the object moves into water, you update the properties to match.
Copyright © 2015 Apple Inc. All Rights Reserved. Terms of Use | Privacy Policy | Updated: 2015-03-09