-
RealityKit의 개선 사항 살펴보기
앱과 게임을 그 어느 때보다 더 사실적이고 몰입감 넘치게 만들 수 있도록 설계된 RealityKit의 최신 혁신 기술을 알아보세요. 인터랙티브 천 시뮬레이션, NavMesh 경로 탐색, 혼합 현실 조명, 향상된 공간 음향을 위한 맞춤 설정 가능한 리버브 메시 등 강력한 새 기능을 살펴보세요. 향상된 그림자, 캐릭터 렌더링 관련 개선 사항, 가우시안 스플래팅 지원으로 시각적 충실도를 높여 보세요.
챕터
- 0:00 - 소개
- 2:00 - 조명과 그림자
- 7:44 - 내비게이션 메시
- 11:01 - 천 시뮬레이션
- 13:42 - 성능
- 17:09 - 3D 가우시안 스플랫
- 19:08 - 몰입형 오디오
- 22:42 - 다음 단계
리소스
관련 비디오
WWDC26
-
비디오 검색…
안녕하세요, 저는 Dennis입니다 저는 RealityKit 팀의 소프트웨어 엔지니어입니다 제 세션에 오신 것을 환영합니다: "RealityKit의 발전 살펴보기" RealityKit의 최신 발전 사항 중 몇 가지를 소개해 드리겠습니다 2019년에 저희는 RealityKit을 도입했습니다 쉽게 구축할 수 있는 프레임워크죠 다양한 Apple 플랫폼에서 3D 공간 경험을 만들 수 있어요 RealityKit을 사용하면 앱과 게임을 한 번만 만들어서 visionOS, iOS, iPadOS, macOS, tvOS에 배포할 수 있습니다
올해 저희는 이런 앱과 게임을 더 잘 구축하는 방법을 선보입니다 바로 Reality Composer Pro 3입니다 Reality Composer Pro 3에 대해 더 자세히 알아볼 세션을 확인해 보세요: 빠른 반복 씬 편집 도구부터 강력한 그래프 인터페이스까지 복잡한 파티클과 캐릭터 동작을 모델링할 수 있습니다 그리고 여러분의 소중한 피드백 덕분에 올해 RealityKit에 흥미로운 새 기능들을 추가하게 되었습니다 이 기능들로 그 어느 때보다 고충실도의 몰입형 경험을 더 쉽게 제작할 수 있습니다 먼저 RealityKit의 조명과 그림자에 적용된 발전 사항을 살펴볼게요 여러분의 세계와 자연스럽게 어우러지는 더욱 현실적인 효과가 가능해집니다 그런 다음 RealityKit의 내비게이션 메시를 소개할 텐데요 플레이어와 NPC가 제작된 세계를 탐색하는 데 도움이 됩니다 정교한 천 시뮬레이션을 구축하는 방법도 보여드릴 거예요 가상의 가구와 캐릭터를 꾸미는 데 활용할 수 있습니다
주의하지 않으면 이 기능들이 성능에 부담을 줄 수 있습니다 이 문제를 해결하기 위해 활용 가능한 도구들을 문제 완화 및 모니터링 측면에서 살펴보겠습니다 성능을 파악했다면 이를 시연해 드리겠습니다 현실 세계의 일부를 가져오는 방법을 보여드릴게요 앱과 게임에 담는 방법이에요 RealityKit의 3D 가우시안 스플랫으로요 마지막으로 RealityKit의 몰입형 오디오 기능에 대해 가상 세계의 공간 현실감을 높이는 방법을 알아볼게요 바로 시작해서 RealityKit의 조명과 그림자의 새로운 기능을 살펴봐요 저희가 제작한 새 게임 Chaparral Village를 통해서요 이 게임에서 신비로운 마을이 플레이어의 세계로 옮겨옵니다 그러면 부엉이에 의해 작아져서 길을 찾아야 하죠 이 마을을 통과해서 연금술 구역에 도달하기 위해서요 그곳에서 부엉이의 지시에 따라 여러 물약을 만들게 됩니다 Chaparral Village의 연금술 구역 내부를 살펴볼게요 꽤 멋져 보이지만 구석 몇 군데가 좀 어두운 것 같습니다 여기서 RealityKit의 지원을 활용할 수 있어요 라이트맵을 사용해서 구역 내부 조명을 개선하는 거죠 Reality Composer Pro 3의 light baker를 사용해서 간접 조명 라이트맵을 만들고 씬에 적용하겠습니다 이렇게 하면 구석과 그림자가 밝아집니다 반사광의 기여도가 올바르게 반영되었기 때문이에요 RealityKit의 API는 직접 라이트맵 텍스처를 지원합니다: 간접 조명, 주변광 차폐, 그리고 뷰티입니다 하지만 최상의 결과를 위해서는 Reality Composer Pro 3의 light baker를 사용해서 생성하는 것을 권장합니다 Reality Composer Pro 3의 라이트 베이킹에 대해 자세히 알아보려면 다음 세션을 확인해 보세요: "Reality Composer Pro 3으로 공간 씬 빠르게 반복 작업하기" 라이트맵은 복잡한 조명 효과를 렌더링하는 데 도움이 됩니다 하지만 정적 조명에만 적용됩니다 이 복잡한 효과 중 하나를 동적 조명에도 적용할 수 있어요 RealityKit의 소프트 그림자로요 기본적으로 RealityKit의 그림자는 경계가 선명합니다 일부 시나리오에서는 정확합니다 예를 들어 광원의 크기가 무한히 작을 때입니다 하지만 광원에 면적이 생기면 더 이상 정확하지 않습니다 이제 드리워지는 그림자는 더 부드러운 경계를 가집니다 이 영역에서 일부 빛만 차단되기 때문입니다 이를 그림자의 반음영이라고도 합니다 반음영의 크기는 광원의 면적에 영향을 받습니다 광원의 면적이 클수록 반음영도 커집니다 연금술 구역의 벽난로입니다 스포트라이트로 벽난로의 빛을 시뮬레이션 중입니다 이 스포트라이트의 그림자를 부드럽게 만들어 볼게요 먼저 벽난로 스포트라이트의 그림자를 가져옵니다 그런 다음 그림자의 lightSize 변수를 업데이트할 거예요 이것은 광원의 지름을 미터 단위로 나타냅니다 기본값은 0으로 설정되어 선명한 그림자를 생성합니다 0.7미터로 업데이트해서 멋진 소프트 그림자를 만들겠습니다 그림자의 품질도 설정해야 합니다 이 변수는 소프트 그림자 계산에 사용되는 샘플 수를 제어합니다 품질을 high로 설정하면 더 좋은 결과를 얻을 수 있지만 성능 부담이 더 커집니다 그래서 저는 medium으로 유지하겠습니다 보는 거리에서는 여전히 좋아 보이거든요 품질을 low로 설정하면 광원 크기와 관계없이 그림자가 선명해집니다 소프트 그림자를 구현하려면 품질을 medium 또는 high로 설정해야 합니다 마지막으로 그림자를 hearthSpotLight 엔티티에 다시 추가합니다 이제 변경 사항을 적용하면 그림자가 부드러워진 것을 볼 수 있습니다 특히 가마솥이 드리우는 그림자가 그렇습니다 지금까지 보여드린 모든 조명은 가상 객체에 드리워지는 것이었습니다 그런데 조명이 가상 세계를 넘어 확장되면 어떨까요? 여러분의 세계에 빛을 드리우려면요? RealityKit으로 제작한 플라네타리움 프로젝터입니다 프로젝터가 회전하면서 현실 세계 환경이 물들어갑니다 가상의 별과 성운으로요 방의 벽면에 현실적으로 맞춰지는 모습을 보세요 이 효과는 두 가지 RealityKit 기능으로 구현했습니다: 투영 텍스처와 물리 공간 조명입니다 투영 텍스처를 먼저 살펴볼게요 손전등 하나와 필름 한 장이 있다고 상상해 보세요 필름을 통해 빛을 비추면 필름의 이미지가 나타납니다 손전등이 향하는 표면 위에요 이 효과가 바로 RealityKit의 투영 텍스처 기능이 모방하는 것입니다 투영 텍스처를 사용하면 다양한 효과를 렌더링할 수 있습니다 복잡한 창문을 통해 빛이 비출 때 나타나는 패턴부터 애니메이션을 적용하면 해저에서 볼 수 있는 밝게 물결치는 코스틱 효과까지요 제 가상 플라네타리움에서는 별과 성운이 투영 텍스처로 회전하는 스포트라이트에 연결됩니다 이런 스포트라이트 중 하나를 만들려면 먼저 생성부터 시작합니다 Entity를 만들고 SpotLightComponent를 연결합니다 색상을 흰색으로 설정할게요 투영 텍스처에 색조를 적용하지 않기 위해서요 있는 공간에 맞게 다른 파라미터들을 조정할게요 예를 들어 공간이 더 크면 더 높은 강도가 필요할 수 있습니다 벽에서 투영 텍스처가 잘 보이도록 하기 위해서요 그런 다음 별과 성운 텍스처를 생성하겠습니다 이 텍스처가 플라네타리움에서 투영될 텍스처입니다 마지막으로 SpotLight의 projectiveTexture 컴포넌트를 연결합니다 방금 생성한 텍스처를 연결합니다 별과 성운이 가상 벽에 투영되는 것을 볼 수 있습니다 그렇다면 어떻게 실제 방의 벽에 투영할 수 있을까요? 이를 위해 물리 공간 조명을 활성화해야 합니다 이 기능을 통해 가상 조명이 시스템 환경과 상호작용합니다 또는 RealityKit의 씬 이해 메시를 사용해 주변 세계와 상호작용합니다 현재 이 기능은 스포트라이트와 포인트 라이트에서만 사용 가능합니다
플라네타리움 스포트라이트에서 이 기능을 활성화해 볼게요 앞서 사용한 spotLightEntity가 있습니다 물리 공간 조명을 활성화하는 방법은 아주 간단합니다 SpotLight의 SurroundingsLight 컴포넌트를 추가하면 됩니다 이것으로 충분합니다 이제 별과 성운이 실제 방에 투영됩니다
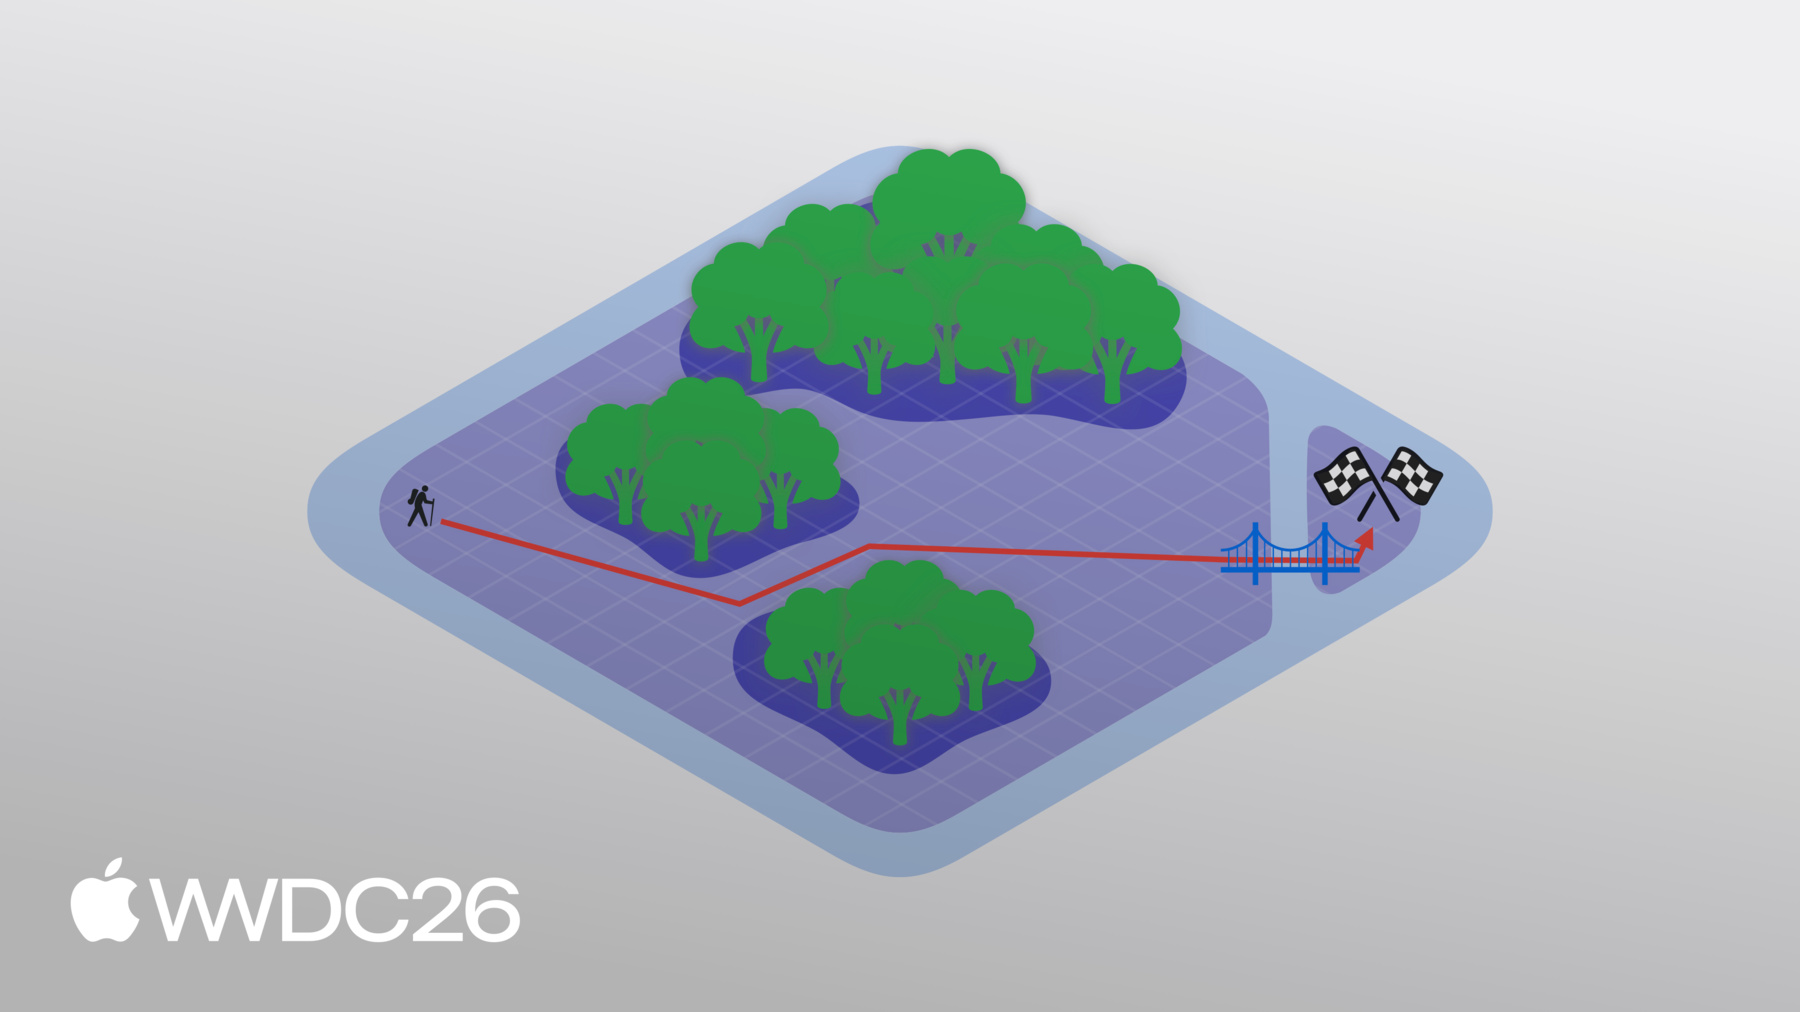
이 물리 공간 조명 효과를 Chaparral Village의 연금술 구역에도 적용했습니다 그렇다면 플레이어의 캐릭터는 연금술 구역까지의 경로를 어떻게 선택할까요? 이 경로는 RealityKit의 내비게이션 메시로 결정됩니다 간단한 예시로 메시의 작동 방식을 설명해 드리겠습니다 맵의 한쪽에서 시작하는 씬을 상상해 보세요 목표는 반대편의 깃발에 도달하는 것입니다 꽤 간단해 보이죠 그런데 저런! 앞에 장애물이 나타났습니다! 내비게이션 메시를 사용해 씬에서 이동 가능한 영역을 정의할 수 있습니다 울창한 숲은 피하면서요 그러면 RealityKit은 이 내비게이션 메시로 깃발까지의 경로를 계산합니다 하지만 숲을 완전히 배제하고 싶지 않다면요? 숲을 통과할 수 있지만 속도가 느려질 뿐입니다 내비게이션 메시에 이를 반영하면 이 영역에 다른 이동 비용을 부여하면 됩니다 숲을 통과할 때 느려지는 속도가 반영되는 것입니다 이제 경로를 계산하면 이 비용을 고려합니다 그리고 새 경로를 선택합니다 그런데 이게 뭐죠? 균열이 씬을 분리시켜 깃발이 고립되었습니다 이로 인해 두 영역이 연결되지 않은 내비게이션 메시 두 개로 표현됩니다 걱정 마세요, 오프 메시 연결로 이 둘을 연결할 수 있습니다 이 경우에는 다리입니다 하지만 이 연결의 위치 때문에 새 경로를 계산해야 합니다
RealityKit의 내비게이션 메시를 사용하려면 먼저 NavigationMeshResource를 정의해야 합니다 내비게이션 메시의 기하학적 데이터와 레이블이 있는 영역이 포함됩니다 해당 영역에 대한 커스텀 플래그와 영역 간의 연결도 포함됩니다 Swift API나 Reality Composer Pro 3을 사용해 정의할 수 있습니다 Reality Composer Pro 3에서 내비게이션 메시를 만드는 방법을 배우려면 다음 세션을 확인해 보세요: "Reality Composer Pro 3으로 공간 워크플로 강화하기" 그러면 이 NavigationMeshResource는 NavigationComponent에 전달됩니다 이 컴포넌트에는 영역의 비용을 정의하는 데 사용되는 필터가 있습니다 영역의 플래그에 따라 포함할지 제외할지도 정합니다 그런 다음 NavigationComponent는 NavigationController에서 경로를 계산하는 데 사용됩니다 동기적으로 또는 비동기적으로요
Chaparral Village에서 내비게이션 메시를 쿼리하는 방법은 navigate 엔티티 확장 함수에서입니다 navigate 내에서 먼저 NavigationController를 생성합니다 컨트롤러에는 내비게이션 컴포넌트가 있는 엔티티가 필요합니다 엔티티 자체에서 가져오겠습니다 그런 다음 async computePath 함수를 사용해 경로를 가져옵니다 엔티티의 현재 위치에서 플레이어가 탭한 원하는 위치까지 결과가 nil이면 NavigationController가 유효한 경로를 찾지 못한 것으로 반환합니다 배열이 비어 있으면 목적지에 도달한 것입니다 마찬가지로 반환합니다 그렇지 않으면 이 배열에는 경로 노드 컬렉션이 있습니다 NavigationController가 계산한 경로를 나타냅니다
이 노드들을 반복 처리해서 엔티티가 가야 할 경로를 결정합니다 내비게이션 메시 자체의 노드라면 해당 위치를 경로에 추가하면 됩니다 오프 메시 연결이라면 사다리를 건너야 합니다 이 상황은 별도로 처리하겠습니다 플레이어의 캐릭터가 마을을 탐색하는 모습입니다 RealityKit의 내비게이션 메시로요 꼭대기에 도달하면 두 개의 커튼을 통과해야 합니다 연금술 구역 입구를 장식하고 있는 커튼입니다 이 커튼들은 RealityKit의 고급 천 시뮬레이션으로 만들었습니다 RealityKit의 천 시뮬레이션에서 천은 메시로 표현됩니다 버텍스는 파티클을 나타내고 버텍스를 연결하는 에지는 스프링을 나타냅니다
충분한 버텍스가 있는 메시라면 RealityKit이 정확하게 모든 것을 시뮬레이션할 수 있습니다 황금빛 드레스의 흐름부터 침대 커버까지요
커버를 당기면 현실적으로 주름지고 접히는 모습을 보세요 모두 실시간으로요 RealityKit의 천 시뮬레이션을 사용하려면 씬에 cloth body 컴포넌트를 추가해야 합니다 이 컴포넌트는 천 자체를 나타냅니다 소재 속성에 대한 참조가 포함되어 있습니다 파티클과 스프링의 배치를 설명하는 천 메시 리소스도 있습니다 cloth collider 컴포넌트를 추가해 단단한 객체를 나타낼 수도 있습니다 천이 충돌할 수 있는 객체입니다 앞서 본 침대나 마네킹처럼요 cloth body 컴포넌트와 마찬가지로 소재 속성에 대한 참조가 포함되어 있습니다 콜라이더 자체의 지오메트리도 있습니다 시뮬레이션을 실행하려면 cloth simulation 컴포넌트를 추가해야 합니다 이 컴포넌트에는 소재 배열이 포함됩니다 cloth body와 콜라이더에서 참조하는 소재 배열입니다 각 소재에는 스프링 강도와 마찰 같은 속성 집합이 있습니다 구체적인 속성은 천인지 천 콜라이더 소재인지에 따라 다릅니다 시뮬레이션 자체에도 여러 속성이 있습니다 천 시뮬레이션에 참여하는 모든 하위 엔티티에 영향을 줍니다 이러한 속성에는 사용할 솔버, 적용할 중력, 시뮬레이션의 타임 스텝 크기 등이 포함됩니다 Chaparral Village에서 RealityKit의 천 시뮬레이션을 사용해 연금술 구역 입구에 커튼을 장식했습니다 그렇다면 커튼이 떨어지지 않도록 고리는 어떻게 구현할까요? 이를 위해 커스텀 curtain pin 컴포넌트를 사용합니다 여기서 핀을 반복합니다 다음의 튜플을 담은 배열이에요 이 커스텀 컴포넌트들과 해당 엔티티의 튜플입니다 이 엔티티의 위치를 사용합니다 커튼을 고정하는 위치로요 그런 다음 핀 자체의 크기를 나타내는 구를 만듭니다 크기는 커스텀 컴포넌트를 통해 제어됩니다 위치를 사용합니다 방금 만든 구와 함께 고정하거나 움직이지 않게 할 모든 버텍스 배열을 가져옵니다 그런 다음 이 버텍스들을 kinematic으로 설정합니다 kinematic 버텍스는 엔티티의 transform으로만 이동할 수 있습니다 천 시뮬레이션 자체로는 이동할 수 없습니다 이렇게 하면 제자리에 고정됩니다 이렇게 하면 연금술 구역에 커튼을 고정할 수 있습니다 고리 위치에 고정해서 떨어지지 않도록 합니다 이제 여러 기능을 살펴봤는데 주의하지 않으면 성능 비용이 발생할 수 있습니다 이 문제를 해결하기 위해 먼저 한 가지 기법을 살펴볼게요 성능을 개선하는 데 활용할 수 있는 그리고 성능 지표를 추적하는 방법입니다 앱과 게임이 그에 맞게 적응할 수 있도록요 메시 레벨 오브 디테일은 지오메트리를 렌더링하는 프로세스를 말합니다 낮은 디테일로 렌더링해도 시각적 영향이 미미하게 말이죠 이를 시연하기 위해 가마솥을 사용하겠습니다 Chaparral Village 연금술 구역의 가마솥입니다 관례적으로 이른바 "레벨 오브 디테일" 즉 LOD는 인덱스 0부터 시작합니다 가마솥의 기하학적 복잡성이 감소하는 것을 확인해 보세요 다음으로 이동할수록 LOD 1, 2, 3, 4, 마지막으로 5입니다 LOD 5에서 가마솥이 꽤 나빠 보입니다 그런데 가마솥이 매우 멀리 있는 것처럼 축소하면 LOD 0과 비교할 수 있습니다 차이는 미미하고 가마솥을 렌더링하는 데 연산이 덜 필요합니다 RealityKit에서 LOD를 설정하는 방법을 살펴봐요 다양한 LOD는 엔티티 배열로 지정됩니다 이 예에서는 각각 하나의 엔티티로 구성된 3가지 다른 LOD가 있습니다 그런 다음 LOD를 담을 엔티티를 생성합니다 그리고 그 사이를 전환합니다
그렇다면 RealityKit은 어떤 LOD를 사용할지 어떻게 알 수 있을까요? 이를 위해 전환 알고리즘을 선택해야 합니다 RealityKit의 두 가지 전환 알고리즘을 안내해 드리겠습니다 첫 번째는 카메라까지의 거리를 기반으로 합니다 엔티티가 카메라에서 멀어질수록 더 높은 LOD를 선택할 수 있습니다 두 번째는 엔티티가 차지하는 화면 영역을 기반으로 합니다 엔티티가 화면에서 차지하는 영역이 작을수록 더 높은 LOD를 선택할 수 있습니다 여기서 저는 LevelOfDetailComponent의 addByCameraDistance 편의 함수를 사용합니다 카메라 거리 기반 LOD를 설정합니다 각 LOD에 대해 해당 LOD를 사용할 최대 거리를 지정합니다 엔티티가 이 거리를 초과하면 다음 LOD로 전환됩니다 마지막 LOD의 경우 최대 거리를 무한으로 설정합니다 이는 엔티티가 이전 임계값을 얼마나 넘어도 상관없이 이 LOD를 사용하겠다는 뜻입니다 화면 영역 기반으로 LOD를 전환하고 싶다면 addByScreenArea 편의 함수를 사용하면 됩니다 화면 영역의 비율로 최소 영역을 지정합니다 엔티티가 이 지정된 화면 영역보다 적게 차지하면 다음 LOD로 전환됩니다 앱과 게임에서 LOD를 사용하면 성능을 개선하는 좋은 방법입니다 하지만 앱과 게임에서 반응하는 것도 중요합니다 성능이 문제가 될 때를 대비해서요 thermalStateDidChange 알림에 옵저버를 등록하면 됩니다 기기의 프로세서가 너무 과열되는지 알 수 있습니다 열 상태가 변경되면 현재 상태를 쿼리할 수 있습니다 nominal 또는 fair이면 완화 작업이 성공한 것이고 앱이나 게임을 그대로 계속 실행할 수 있습니다 하지만 serious 또는 critical이면 성능을 개선하기 위한 조치를 취해야 합니다 LOD 전환 임계값을 더 공격적으로 설정하거나 그림자 품질을 낮추는 것처럼요 앱과 게임의 성능을 파악하는 것은 중요합니다 사용자의 편안함을 보장하기 때문입니다 또한 다른 고급 RealityKit 기능을 활용할 수 있게 해줍니다 이런 기능 중 하나가 RealityKit의 3D 가우시안 스플랫 렌더링 기능입니다 3D 가우시안 스플랫은 고성능의 고품질 기법으로 볼류메트릭 데이터를 렌더링합니다 현실 세계에서 캡처한 데이터입니다 이 기법을 사용하면 3D 씬이 표현됩니다 3D 가우시안 컬렉션으로요
이것은 다양한 불투명도를 가진 타원체로 생각할 수 있습니다 이런 씬을 렌더링하려면 각 픽셀에서 모든 가우시안을 따라 레이를 평가해야 합니다 이 과정에서 여러 최적화를 적용할 수 있습니다 RealityKit의 API를 사용하면 자동으로 처리해 드립니다 이 API의 실제 동작을 보려면 developer.apple.com에서 가우시안 스플랫 샘플을 다운로드하세요 Apple Vision Pro에서 실행 중인 샘플입니다 화분에 심긴 다육식물의 섬세한 디테일을 보세요 식물의 기하학적 복잡성을 캡처할 수 있었습니다 그 안의 흙까지요, RealityKit이 두 가지 모두를 완벽하게 렌더링했습니다 RealityKit API는 가우시안 스플랫에 대해 특정 파일 형식을 전제하지 않습니다 대신 버퍼를 제공해야 합니다 캡처에서 스플랫의 속성을 설명하는 버퍼를요 구체적으로는: 위치, 스케일, 회전, 불투명도, 그리고 구면 조화 함수입니다 구면 조화 함수를 통해 타원체의 색상을 제어할 수 있습니다 보는 방향에 따라서요 구면 조화 함수의 차수도 지정해야 합니다 이것은 색상 변화의 수를 나타냅니다 타원체 주변을 이동할 때 예를 들어 차수가 0이면 모든 방향에서 단색을 나타냅니다 그런 다음 이 버퍼들을 모두 BufferResource에 통합합니다 그리고 GaussianSplatResource를 생성합니다 이 리소스로 GaussianSplatComponent를 생성합니다 그런 다음 3D 가우시안 스플랫을 렌더링하려면 씬의 엔티티에 컴포넌트를 연결합니다 이렇게 하면 가상 경험에 3D 가우시안 스플랫을 가져올 수 있습니다 사용자에게 실제 사물의 고충실도 캡처를 제공할 수 있습니다 마지막으로 RealityKit의 새로운 몰입형 오디오 기능을 살펴봐요 향상된 현실감을 제공하는 Apple Vision Pro 앱과 게임에 사운드로 말이에요 공간 오디오 렌더링은 중요한 요소입니다 공간 컴퓨팅 사운드 디자인에서 직접 경로의 정확한 방향과 타이밍, 그리고 반사 경로가 현실적인 공간 오디오 경험에 필요합니다 사람과 오디오 소스가 환경 안에서 이동하면 현실감을 유지하려면 타이밍과 방향을 적절히 업데이트해야 합니다 환경의 지오메트리와 소재는 오디오 소스의 소리에 큰 영향을 미칩니다 예를 들어 동일한 오디오 소스도 매우 다르게 들릴 수 있습니다 작은 거실에 있을 때와 큰 박물관에 있을 때처럼요 RealityKit을 사용해 반사를 시뮬레이션할 수 있습니다 환경의 리버브도 마찬가지예요 레이트레이스 기하 음향을 사용해서요 예를 들어 이 주방과 다이닝 룸 씬에서 RealityKit의 커스텀 리버브 메시를 사용하면 나무 바닥, 석고 벽, 석재 조리대를 음향적으로 모델링합니다 사람과 오디오 소스가 씬의 어디에 있느냐에 따라 배치에 적합한 리버브가 적용됩니다 이 기능을 보여드리기 위해 샘플을 공개합니다 커스텀 리버브 메시를 활용하는 샘플입니다 이 샘플에서는 가상 밴드의 연주를 들을 수 있습니다 대형 박물관 환경을 탐색하면서요 각 악기에서 나오는 소리를 독립적으로 제어할 수도 있습니다 RealityKit의 커스텀 리버브 메시 덕분에 악기에서 발산되는 소리가 박물관 전체에 현실적으로 퍼져나갑니다 이것은 Apple Vision Pro에서만 진정으로 경험할 수 있습니다 developer.apple.com에서 샘플을 다운로드해 직접 경험해 보세요! 커스텀 리버브 메시를 만들려면 씬의 지오메트리를 정의합니다 ReverbMeshResource로요 메시 디스크립터나 메시 리소스로 생성할 수 있습니다 하지만 시작하기 가장 쉬운 방법은 shoebox입니다 면이 안쪽을 향한 박스입니다 너비 5미터, 높이 4미터, 깊이 6미터로 설정하겠습니다 그런 다음 이 메시를 dryWall 프리셋 오디오 소재와 결합해 시뮬레이션된 리버브를 만듭니다 마지막으로 이 리버브를 사용해 리버브 컴포넌트를 생성하고 씬의 엔티티에 연결합니다 이렇게 하면 리버브 메시가 효과를 발휘합니다 하지만 내장 프리셋 소재에만 국한되지 않습니다 커스텀 리버브 메시에 커스텀 소재를 만드는 방법을 알아봐요 먼저 thickCarpet 소재를 정의하겠습니다 이 소재는 프리셋 카펫 소재보다 더 흡음력이 있어야 합니다 그래서 scalingAbsorption을 호출합니다 모든 주파수에 대해 흡음을 약간 높입니다 다음으로 bookshelf 소재를 만들겠습니다 이번에는 처음부터 만들겠습니다 흡음 계수를 정의해야 합니다 그리고 산란 계수도요 이것은 얼마나 많은 음향 에너지가 흡수되는지 또는 다양한 주파수에서 산란되는지를 정의합니다 먼저 흡음 계수를 설정합니다 10밴드 중심 주파수에 대해서요 특정 주파수에 대한 계수만 알고 있다면요? 그러면 몇 가지 특정 주파수에 대한 산란 계수를 정의합니다 그러면 RealityKit이 외삽합니다 가청 주파수 스펙트럼 전체를 커버합니다 마지막으로 다음을 구성해서 bookshelf 소재를 생성합니다 흡음과 산란 데이터입니다 이것은 몰입형 스페이스에서만 작동함을 유의해 주세요 공유 스페이스에서는 시스템의 room-sense 리버브 지오메트리가 대신 사용됩니다 이것은 Apple Vision Pro가 구축한 리버브 메시입니다 실제 주변 환경을 기반으로요 이번 세션에서 많은 내용을 다뤘습니다 하지만 이것은 올해 RealityKit이 제공하는 것의 일부일 뿐입니다 올해 추가로 출시하는 기능들이 훨씬 더 많습니다: 정확한 동기화 오디오 재생을 지원하는 코디네이티드 멀티소스 오디오처럼요 여러 엔티티에 걸쳐서요 서브서피스 스캐터링을 제공하는 고품질 캐릭터 렌더링, 그리고 캐릭터에 생동감을 불어넣는 고급 헤어 셰이더; 커스텀 포털 소재를 만들 수 있는 포털 커스터마이징, 포털의 불투명도와 형태를 변경하는; 그리고 훨씬 더 많은 기능들이 있습니다 developer.apple.com의 Apple 개발자 포털을 방문하세요 이 세션의 샘플을 다운로드하세요 흥미로운 새로운 RealityKit 기능들이 실제로 작동하는 것을 확인하세요 그리고 방문하시면 Reality Composer Pro 3도 꼭 확인해 보세요 Reality Composer Pro의 주요 새 릴리스입니다 RealityKit의 기능을 더 잘 활용할 수 있게 해줍니다 이 세션들을 확인해서 Reality Composer Pro 3에 대해 알아보세요 그리고 모든 새로운 기능들을요 RealityKit으로 어떤 놀라운 공간 경험을 만들지 기대됩니다 시청해 주셔서 감사합니다!
-
-
4:02 - Soft shadows
// Enable soft shadows for the hearth spotlight guard var shadow = hearthSpotlight.components[SpotLightComponent.Shadow.self] else { // handle error } shadow.lightSize = 0.7 // meters shadow.quality = .medium // or .high // shadow.quality = .low // will result in hard shadows hearthSpotlight.components.set(shadow) -
6:13 - Projective textures
// Create one of the planetarium spotlights let spotLightEntity = Entity() spotLightEntity.components.set(SpotLightComponent( color: .white, intensity: intensity, innerAngleInDegrees: innerAngle, outerAngleInDegrees: outerAngle, attenuationRadius: attenuationRadius, )) let projectiveTexture: TextureResource = generateStarsAndNebulaeTexture() spotLightEntity.components.set(SpotLightComponent.ProjectiveTexture( texture: projectiveTexture )) -
7:13 - Physical space lighting
// Enable physical space lighting spotLightEntity.components.set(SpotLightComponent.SurroundingsLight()) -
9:46 - Querying the navigation mesh
// Querying the navigation mesh in Chaparral Village extension Entity { public func navigate(/* ... */) async { let navigator = try! NavigationController(entity: self) guard let result = await navigator.computePath(from: fromPosition, to: toPosition) else { return } if result.isEmpty { return } for node in result { switch node.category { case .meshPoint: finalPath.append(node.position) case .offMeshConnection: // handle ladders } } } } -
12:51 - Pinning cloth to anchor points
// Pin the curtains to the Alchemist's lab for (pin, pinComponent) in pins { let position = pin.position(relativeTo: event.entity) let selectionSphere = ClothSphereShape(radius: pinComponent.radius) let vertices = clothMesh.vertices(in: .sphere(selectionSphere), center: position) clothBody.motionTypes.set(vertexIndices: vertices, value: .kinematic) } -
14:42 - LOD by camera distance
// Create entity with LODs let lod0 = [ModelEntity(mesh: lodMesh0)] let lod1 = [ModelEntity(mesh: lodMesh1)] let lod2 = [ModelEntity(mesh: lodMesh2)] let entity = Entity() LevelOfDetailComponent.addByCameraDistance(to: entity, levels: [ (entities: lod0, maxDistance: 1.0 /* meters */), // highest detail (entities: lod1, maxDistance: 5.0), // medium detail (entities: lod2, maxDistance: .infinity), // lowest detail ]) -
15:58 - LOD by screen area
// Create entity with LODs let lod0 = [ModelEntity(mesh: lodMesh0)] let lod1 = [ModelEntity(mesh: lodMesh1)] let lod2 = [ModelEntity(mesh: lodMesh2)] let entity = Entity() LevelOfDetailComponent.addByScreenArea(to: entity, levels: [ (entities: lod0, minArea: 0.2 /* fraction of screen area */), // highest detail (entities: lod1, minArea: 0.1), // medium detail (entities: lod2, minArea: 0.01), // lowest detail ]) -
16:26 - Responding to thermal state changes
// Respond to changes in device thermal state NotificationCenter.default.addObserver(of: ProcessInfo.self, for: .thermalStateDidChange) {_ in switch ProcessInfo.processInfo.thermalState { case .nominal, .fair: // Stay the course case .serious, .critical: // Improve performance by: // More aggressive LOD switching // Lower shadow quality } } -
18:44 - Creating a Gaussian splat
// Create Gaussian splat resource and component let resource = try GaussianSplatResource.BufferResource(count: splatCount, position: positionBuffer, scale: scaleBuffer, rotation: rotationBuffer, opacity: opacityBuffer, sphericalHarmonics: (sphericalHarmonicsBuffer, degree)) let splatResource = GaussianSplatResource(resource) let splatComponent = GaussianSplatComponent(splatResource) splatEntity.components.set(splatComponent) -
20:49 - Creating a custom reverb mesh
// Create and use custom reverb mesh let mesh: ReverbMeshResource = .shoebox(size: [5, 4, 6]) let reverb: Reverb = .simulated(mesh: mesh, materials: [.dryWall]) entity.components.set(ReverbComponent(reverb: reverb)) -
21:33 - Creating custom reverb materials
// Create custom materials for custom reverb mesh

let thickCarpet: Audio.Material = .carpet.scalingAbsorption {freq in 0.1 }

let bookshelf: Audio.Material

// Absorption coefficients by center frequency:
// 31.5Hz, 63Hz, 125Hz, 250Hz, 500Hz, 1kHz, 2kHz, 4kHz, 8kHz, 16kHz
let bookshelfAbsorption = Audio.Absorption(
    [0.10, 0.15, 0.28, 0.20, 0.15, 0.10, 0.10, 0.07, 0.07, 0.05])

// Scattering coefficients for: 500Hz, 1000Hz, 4000Hz
let bookshelfScattering = Audio.Scattering([500: 0.5, 1000: 0.6, 4000: 0.7])

bookshelf = .init(absorption: bookshelfAbsorption,
              scattering: bookshelfScattering)
-