-
SwiftUI로 고급 그래픽 효과 구성하기
SwiftUI 레이아웃 및 그래픽 API를 창의적으로 구성하여 풍부한 맞춤형 경험을 만드는 방법을 알아보세요. 복잡한 디자인을 세분화하고 창의적인 파이프라인을 사용하여 간단한 기본 요소들을 체인으로 연결하는 방법을 안내합니다. 레이어 셰이더로 그리고, 타임라인으로 애니메이션 효과를 적용하며, 정렬 가이드로 뷰를 고정하는 방법을 알아보세요.
챕터
- 0:00 - 소개
- 1:40 - 설계 분해
- 4:11 - 표지 아트 및 셰이더 효과
- 11:07 - 시간으로 애니메이션 제어
- 12:00 - 시간이 동기화된 전사문 뷰
- 13:18 - 정렬 가이드와 함께 떠있는 타임스탬프
- 16:16 - 창의적 파이프라인
- 17:13 - 다음 단계
리소스
관련 비디오
WWDC24
-
비디오 검색…
안녕하세요! 저는 UI Frameworks 팀의 엔지니어 Haotian입니다 SwiftUI는 처음부터 그래픽과 레이아웃 기능을 꾸준히 발전시켜 왔으며 Apple 기기에서 풍부하고 독창적인 경험을 원하는 분들에게 최선의 선택이 되었습니다 Apple도 SwiftUI로 자체 앱에 고급 효과를 구현합니다 "고급"이라는 말이 부담스럽게 들릴 수 있습니다 하지만 고급 효과라도 SwiftUI 앱은 기본 요소를 동일하게 공유합니다 마치 파이프라인과 같습니다
데이터가 일련의 표준 파이프를 통해 흐릅니다 무언가를 받아서 변환하고 다음으로 전달합니다 SwiftUI의 점진적 공개 방식으로 각 파이프는 단독으로 작동합니다 하지만 파이프를 연결하고 분기를 만들거나 흐름을 합칠 수 있습니다 그때 창의력을 발휘하세요 "고급"은 복잡성이 아닌 구성 방식에 있습니다 로드맵을 살펴보겠습니다 먼저 디자인을 분석하고 분해해 보겠습니다 그 다음 고급 효과를 구현합니다 마지막으로 이 기술들을 앱에 적용하는 방법을 공유합니다 크리에이티브 파이프라인을 활용해서 제가 만들고 있는 디자인입니다
저만의 팟캐스트 앱을 만들고 있습니다 현재 모습은 기본적인 트랜스크립트 뷰입니다 이것을 더 멋지게 만들겠습니다 Apple Music의 실시간 가사 뷰처럼요 애니메이션 커버 아트와 시간 동기화 스크롤 트랜스크립트로 어떻게 시작할까요?
이미 가진 것에서 시작합니다 기존 사용자 인터페이스에는 필요한 모든 데이터가 있습니다 커버 아트를 포함해서 재생 정보와 트랜스크립트 텍스트도 있습니다 어떤 데이터가 필요한지가 아니라 파이프라인으로 어떻게 변환하는지가 중요합니다 몇 가지 예를 살펴보겠습니다
커버 아트부터 시작하면 이미지를 시각화 도구로 변환하는 파이프가 필요합니다 여기에 셰이더 파이프가 맞습니다
시각화 도구가 재생 상태를 반영하려면 움직여야 합니다 동적 시각 효과를 위해 타임 파이프와 연결합니다 두 파이프가 하나로 합쳐집니다
타임 파이프는 그 이상도 할 수 있습니다 트랜스크립트 파이프에는 타임스탬프 오버레이가 적용되었지만 현재 시간을 알지 못해서 올바르게 스크롤할 수 없습니다
같은 타임 파이프를 연결해 시간 동기화 스크롤 텍스트를 만듭니다 이제 배경에는 동적 시각 효과가 전경에는 스크롤 트랜스크립트가 생겼습니다 두 병렬 파이프를 연결할 차례입니다 줌아웃해 보면 모든 modifier가 모든 API가 파이프라인의 또 다른 단계임을 알 수 있습니다 그냥 흘러갑니다
방금 보여드린 것처럼 제 팟캐스트 앱에는 고급 레이아웃과 그래픽이 포함되어 있습니다 전체 화면 커버 아트가 있고 셰이더 효과와 시간 기반 애니메이션이 적용됩니다 또한 시간 동기화 스크롤 트랜스크립트 뷰와 플로팅 뷰 첨부로 완성됩니다! 각각에 대해 살펴보고 방법을 설명하겠습니다 커버 아트부터 시작합니다
원본 재료가 여기 있습니다 커버 아트 이미지입니다
커버 아트는 아름답지만 트랜스크립트 뒤에 배치됩니다 .blur modifier로 부드럽게 처리해 겹치지 않도록 합니다
커버 아트에 블러를 적용했으면 다음으로 셰이더 마법을 씁니다 셰이더란 무엇인지 궁금하실 수 있습니다 SwiftUI 코드와는 어떻게 다를까요? 설명해 드리겠습니다
이 아이콘은 벡터로 시작합니다 그런 다음 GPU가 픽셀로 래스터화합니다
이 시점에서 GPU의 셰이더라는 프로그램을 실행할 수 있습니다 픽셀을 어떤 색상으로 채울지 결정합니다
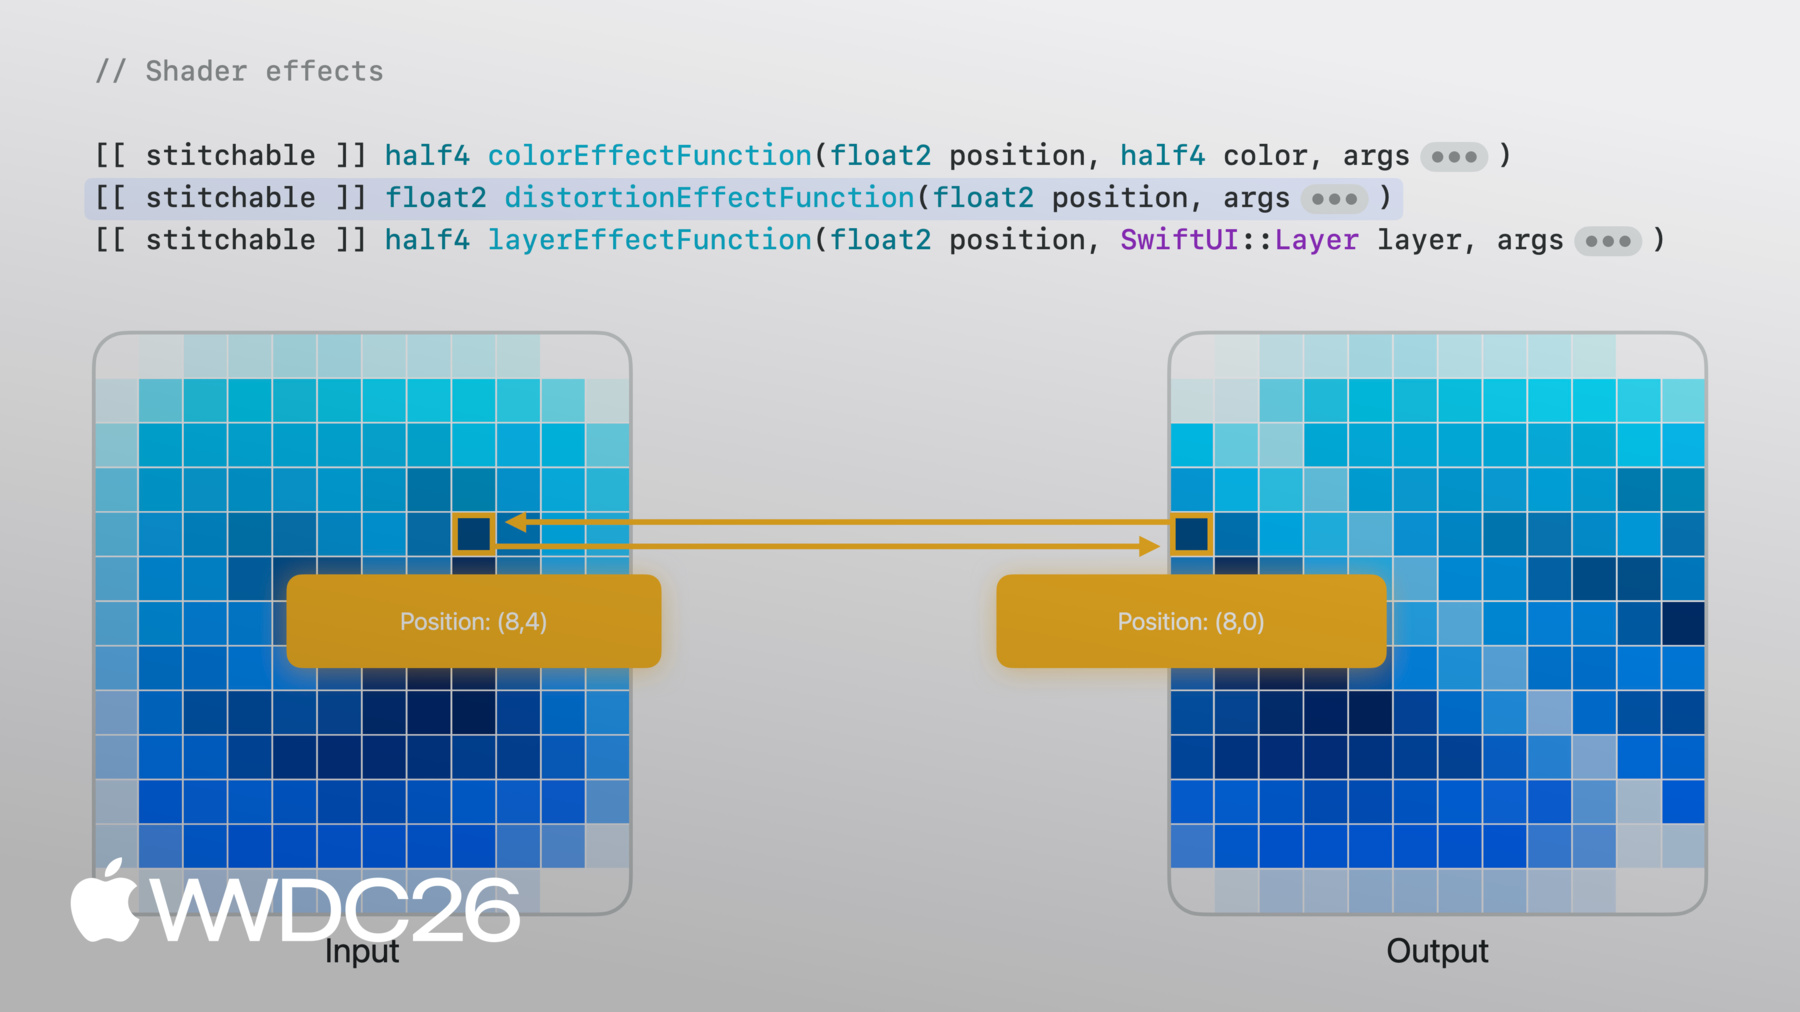
셰이더 함수는 병렬로 실행됩니다 각 픽셀은 독립적으로 실행되며 이웃 픽셀을 인식하지 못합니다 이를 이해하면 Metal 셰이더가 SwiftUI의 shader effect API에서 호출되는 이유가 납득됩니다 셰이더 효과는 세 가지 유형이 있습니다 각각 다른 메서드 서명이 있으며 특정 매개변수는 필수입니다 추가 매개변수를 덧붙일 수도 있습니다 SwiftUI에서 셰이더로 전달하려는 정보를 위해서입니다
colorEffect는 각 픽셀의 색상을 새 색상으로 변환합니다 각 픽셀에는 픽셀 위치가 제공되고 해당 위치의 원본 뷰 픽셀 색상도 제공됩니다 그 정보를 바탕으로 새 색상을 반환합니다 간단한 효과에 유용합니다 예를 들어 컬러 이미지를 흑백으로 변환하는 것이죠
distortionEffect는 다르게 작동합니다 특정 위치의 색상을 기대하는 대신 distortionEffect 함수는 기존 위치를 새 위치로 받아서 SwiftUI가 원본 이미지에서 샘플링하게 합니다 픽셀 색상은 관여하지 않습니다 "이 위치 색상은 저 위치 색상을 따르세요."라고 지정합니다 여기 보이는 시어 효과 같은 기하학적 효과에 유용합니다
layerEffect가 가장 유연합니다 layerEffect 함수도 픽셀 단위로 작동합니다 하지만 전체 뷰의 레이어를 제공합니다 인접한 픽셀이나 전체 영역을 샘플링할 수 있습니다 블러 같은 효과에 유용합니다 출력 픽셀 색상이 여러 입력 픽셀에 의존할 때입니다
제 경우에는 distortionEffect가 맞지만 layerEffect가 가장 많은 유연성을 제공합니다 layerEffect modifier를 추가하고 backgroundWarp라는 셰이더 함수를 추가합니다
지금은 주어진 위치에서 원본 레이어를 그대로 샘플링하여 동일한 이미지를 반환합니다 하지만 이제 발전시킬 수 있는 셰이더 함수가 생겼습니다
layerEffect로 원본 뷰 어디서든 샘플링할 수 있습니다 예를 들어 float2 벡터를 셰이더 함수에 전달할 수 있습니다 이를 사용해 셰이더에서 샘플 위치를 오프셋합니다
함수 매개변수와 맞추기 위해 이제 SwiftUI 쪽에서 float2 벡터를 전달합니다
오프셋을 높이면 각 픽셀이 이 오프셋 값으로 셰이더를 실행하고 모두 균일하게 점점 더 먼 거리에서 샘플링합니다
오프셋을 0으로 줄이면 이미지가 돌아옵니다
하지만 균일한 오프셋이어서 고정된 패턴으로 이동된 픽셀만 얻습니다 더 자연스러운 것이 필요합니다 픽셀마다 달라야 합니다
자연스러운 변화를 위해 NoiseTexture를 사용합니다 부드럽고 임의적인 값으로 미리 계산된 이미지입니다
이번에는 SwiftUI 쪽에서 뷰 크기와 NoiseTexture를 이미지 매개변수로 함께 전달합니다
Metal 쪽에서는 이미지가 texture2d로 도착합니다
이제 정말 Metal다운 Metal 코드를 보여드리겠습니다
먼저 현재 픽셀 위치와 크기로 uv 값을 구합니다 이는 이미지 내 상대적 위치를 나타내며 절대 위치 없이 텍스처를 샘플링합니다
이제 NoiseTexture를 분석합니다
RGB 채널이 있는데 빨간색과 초록색 채널이 흥미롭습니다 각각 다른 노이즈 패턴이 담겨 있기 때문입니다
uv를 이동하면 빨간색과 초록색 값이 달라집니다 이렇게 계속 변하는 값 쌍은 픽셀마다 다른 X, Y의 자연스러운 오프셋에 적합합니다
Metal 셰이더로 돌아갑니다
타일링을 위해 반복 모드로 sampler를 생성하고 각 픽셀의 UV 위치에서 노이즈를 샘플링합니다 빨간색과 초록색 채널이 2차원 오프셋을 제공하고 이를 위치에 더해 원본 뷰에서 샘플링합니다 이제 셰이더가 이미지를 약간 비틉니다
픽셀별 변화였지만 더 풍부한 것이 필요합니다
실험해 보겠습니다 노이즈 샘플을 한 번이 아니라 두 번 하면 어떨까요 첫 번째는 초기 오프셋을 줍니다 그 다음 노이즈를 다시 샘플링하되 이번에는 초기 오프셋으로 이동된 위치에서 그렇게 하면 자연스럽게 흘러다니는 얼룩 패턴이 생깁니다
이 레이어드 노이즈 방식은 domain warping이라는 잘 알려진 기법입니다 어떻게 했는지 알아보려면 샘플 앱을 다운로드하세요 미리보기도 있어서 원하는 대로 매개변수를 조정해 볼 수 있습니다
멋진 셰이더 효과가 생겼지만 아직 정지되어 있습니다 움직이게 해야 합니다 바로 여기서 시간이 필요합니다
SwiftUI의 트랜잭션 기반 애니메이션과 달리 셰이더는 상태가 없습니다 이전 프레임의 메모리가 없으며 출력은 매개변수에만 의존합니다 애니메이션을 원한다면 시간에 따라 달라지는 값을 전달하세요
TimelineView가 바로 연결해야 할 파이프입니다 애니메이션 스케줄로 매 프레임마다 타임스탬프를 보냅니다 그 타임스탬프를 셰이더에 전달하고 노이즈에서 샘플링할 위치에 더하면 패턴이 흘러가기 시작합니다
이것이 시간으로 구동되는 셰이더 애니메이션입니다 트랜스크립트 뷰에서도 시간을 추가해야 합니다 현재 실행 중인 트랜스크립트 줄이 하이라이트되어 스크롤 뷰 중앙에 위치하도록요
트랜스크립트입니다 ScrollView 안의 LazyVStack에 있는 텍스트 뷰들입니다 각 줄이 하나의 뷰 익숙한 SwiftUI입니다 이제 재생 상태를 따라가도록 만들어야 합니다
재생 타임스탬프로 현재 줄을 결정합니다 현재 줄은 굵고 선명하며 나머지는 흐릿해집니다 onChange modifier로 현재 줄 변경을 모니터링하고 현재 줄이 중앙에 오도록 스크롤합니다
시간 동기화 스크롤 뷰가 작동하기 시작했습니다 이제 현재 줄의 작은 타임스탬프에 집중하겠습니다 모든 줄의 오버레이에 타임스탬프가 있지만 현재 줄의 것만 표시됩니다 이렇게 하면 레이아웃을 방해하지 않습니다 항상 그 자리에 있지만 표시되기를 기다리고 있습니다
이 한 행에 집중해 보겠습니다 컨테이너 가장자리에 부착된 서브 뷰입니다 어떻게 배치할까요? offset modifier는 두 뷰의 크기를 알지 못하면 할 수 없습니다
먼저 얼라인먼트를 설명합니다 모든 뷰에는 얼라인먼트가 있습니다 레이아웃 시스템이 뷰를 배치할 때 사용하는 기준점으로 생각하세요 두 축으로 정의됩니다
overlay 컨테이너에 서브 뷰를 배치하면 레이아웃 시스템이 기본 center 얼라인먼트로 정렬합니다
두 뷰를 핀이 꿰뚫는 것처럼 생각해 보세요 각 뷰의 얼라인먼트 지점에서 고정됩니다
overlay 얼라인먼트를 .bottomLeading으로 변경합니다
이제 핀이 각 뷰의 bottomLeading 지점을 통과하고 거기서 고정됩니다
현재 레이아웃 시스템은 bottomLeading 얼라인먼트를 요청하고 서브 뷰는 핀이 통과할 bottomLeading 지점을 반환합니다
코드로 명시적으로 표현한다면 얼라인먼트 가이드를 작성해 bottom이 bottom임을 의미합니다
목표를 기억하세요 서브 뷰의 위쪽 가장자리가 컨테이너 아래쪽에 닿아야 합니다
서브 뷰에 이렇게 알리면 어떨까요 레이아웃 시스템이 bottom 얼라인먼트를 요청할 때 기본값을 사용하지 마세요 대신 커스텀 오버라이드가 있는데 bottom 얼라인먼트를 위쪽 가장자리로 이동합니다
이제 핀이 통과할 때 그 지점을 따라갑니다
순수한 의미론적 오버라이드만 써서 결과를 얻었습니다 뷰를 수동으로 오프셋하지 않고 이 API에는 더 많은 기능이 있습니다 나만의 커스텀 얼라인먼트를 정의하고 클로저에서 ViewDimensions를 제공하여 뷰의 실제 크기에서 지점을 계산할 수 있습니다 전체 내용은 "SwiftUI Alignment" 문서를 확인하세요
결과입니다 처음 시작했던 기본 트랜스크립트 뷰가 이제 셰이더와 시간으로 구동되는 애니메이션 배경과 재생에 맞게 스크롤되는 트랜스크립트 얼라인먼트 가이드로 배치된 플로팅 타임스탬프가 생겼습니다
모두 간단한 파이프에서 조합해서 만든 것입니다 그리고 Apple 기기 전체에서 작동합니다
잠시 되돌아봅시다 디자인을 가져다 레이어로 분해하고 각 레이어에서 원시 데이터를 뷰로 변환할 올바른 API를 찾았습니다 각 단계의 출력이 다음 단계의 입력이 됩니다
이렇게 단계를 연결하는 것이 크리에이티브 파이프라인입니다 하지만 이는 팟캐스트 앱을 위해 제가 내린 선택들입니다 여러분의 앱에서 파이프라인은 더욱 창의적일 수 있습니다 입력이 오디오 대신 자이로스코프 데이터일 수도 있고 셰이더가 왜곡 대신 물결 효과일 수도 있습니다 전경이 스크롤 뷰 대신 자유형 캔버스일 수도 있습니다 모든 조합이 다른 결과를 만들어 냅니다 그것이 창의적인 부분이고 API는 동일합니다 무엇을 넣고 어떻게 연결하는지는 여러분의 몫입니다
그러니 여러분만의 것을 만들어 보세요 샘플 프로젝트를 다운로드해 셰이더를 실험해 보세요 노이즈를 바꾸고, 속도를 조정하고 다른 이미지를 사용해 보세요 여러분의 앱에서 기회를 찾아보세요 작은 시각 효과가 큰 차이를 만들 수 있는 곳을요 파이프를 연결하기 시작하면 단순한 것이 얼마나 빠르게 고급스러워지는지 놀랄 것입니다
시청해 주셔서 감사합니다 안녕히 계세요!
-
-
4:18 - Cover art image
Image("CoverArt") -
4:24 - Blurred cover art image
Image("CoverArt") .blur(radius: 30) -
7:09 - Applying layer effect in SwiftUI
GeometryReader { proxy in CoverArtView() .layerEffect( ShaderLibrary.backgroundWarp(), maxSampleOffset: .zero ) } .ignoresSafeArea() -
7:21 - Writing layer effect shader in Metal
[[stitchable]] half4 backgroundWarp( float2 position, SwiftUI::Layer layer ) { return layer.sample(position); } -
7:39 - Metal shader with offset parameter
[[stitchable]] half4 backgroundWarp( float2 position, SwiftUI::Layer layer, float2 offset ) { return layer.sample(position + offset); } -
7:55 - SwiftUI layer effect with offset parameter
GeometryReader { proxy in CoverArtView() .layerEffect( ShaderLibrary.backgroundWarp( .float2(.init(x: 0, y: 0)) ), maxSampleOffset: .zero ) } .ignoresSafeArea() -
8:04 - SwiftUI layer effect with full-width offset
GeometryReader { proxy in CoverArtView() .layerEffect( ShaderLibrary.backgroundWarp( .float2(.init(x: proxy.size.width, y: 0)) ), maxSampleOffset: .zero ) } .ignoresSafeArea() -
8:37 - SwiftUI layer effect with noise sampling
GeometryReader { proxy in CoverArtView() .layerEffect( ShaderLibrary.backgroundWarp( .float2(proxy.size), .image(Image("NoiseTexture")) ), maxSampleOffset: .zero ) } .ignoresSafeArea() -
8:55 - Metal shader with noise sampling
[[stitchable]] half4 backgroundWarp( float2 position, SwiftUI::Layer layer, float2 size, texture2d<half> noiseTex ) { constexpr sampler s(address::repeat, filter::linear); float2 uv = position / size; half4 n = noiseTex.sample(s, uv); float2 offset = (float2(n.r, n.g) - 0.5) * 200.0; return layer.sample(position + offset); } -
10:22 - Metal shader with domain warping
[[stitchable]] half4 backgroundWarp( float2 position, SwiftUI::Layer layer, float2 size, texture2d<half> noiseTex ) { constexpr sampler s(address::repeat, filter::linear); float2 uv = position / size; half4 n = noiseTex.sample(s, uv); float2 q = float2(n.r, n.g); n = noiseTex.sample(s, uv + q); float2 offset = (float2(n.r, n.g) - 0.5) * 200.0; return layer.sample(position + offset); } -
11:16 - SwiftUI layer effect with static visual
GeometryReader { proxy in CoverArtView() .layerEffect( ShaderLibrary.backgroundWarp( .float2(proxy.size), .image(Image("NoiseTexture")) ), maxSampleOffset: .zero ) } .ignoresSafeArea() -
11:37 - SwiftUI layer effect with animated visual
@State private var startDate = Date.now TimelineView(.animation) { timeline in let elapsed = timeline.date.timeIntervalSince( startDate ) CoverArtView() .layerEffect( ShaderLibrary.backgroundWarp( .float2(proxy.size), .image(Image("NoiseTexture")), .float(elapsed) ), maxSampleOffset: .zero ) } -
12:15 - Basic transcript view
ScrollView { LazyVStack(alignment: .leading, spacing: 12) { ForEach(sampleTranscript) { line in .font(.title) .fontWeight(.bold) } } } -
12:33 - Time-synced transcript view
@State private var playback = PlaybackState() ScrollViewReader { scrollProxy in ScrollView { LazyVStack(alignment: .leading, spacing: 12) { ForEach(sampleTranscript) { line in Text(line.text) .transcriptLineStyle(isCurrent: line.id == playback.currentLineIndex ) } } } .onChange(of: playback.currentLineIndex, { _, i in scrollProxy.scrollTo(i, anchor: .center) }) } -
13:53 - Overlay with center alignment
Text(line.text) .overlay { Text(line.formattedTimestamp) } -
14:06 - Overlay with bottom leading alignment
Text(line.text) .overlay(alignment: .bottomLeading) { Text(line.formattedTimestamp) } -
14:32 - Overlay with alignment guide override
Text(line.text)
     .overlay(alignment: .bottomLeading) {
          Text(line.formattedTimestamp)
              .alignmentGuide(.bottom) { $0[.top] }
     }
-