-
利用 SwiftUI 打造自定视觉效果
探索如何利用 SwiftUI 打造令人惊艳的视觉效果。了解如何构建独一无二的滚动效果、丰富的色彩测试方案以及自定过渡效果。我们还将探索如何利用 Metal 着色器和自定文本渲染功能打造高级图形特效。
章节
- 0:00 - Introduction
- 1:29 - Scroll effects
- 6:21 - Color treatments
- 9:10 - View transitions
- 12:49 - Text transitions
- 19:40 - Metal shaders
- 25:28 - Next steps
资源
-
搜索此视频…
大家好 欢迎观看 “利用 SwiftUI 打造自定视觉效果” 我是 Philip 稍后 Rob 也会 在本讲座中介绍一些内容 我们将一起分享 如何打造视觉效果 让 App 变得更富有表现力 使用起来也更愉快 要打造出色的 App 体验 通常需要不断做出 细微的改进 微小的细节积累起来 可能会带来很大的不同 视觉效果在 App 的使用方式 和感知体验方面发挥着巨大作用 它们可以表明某个功能 正在按预期运行 让你的 App 界面彰显个人风格 并帮助用户集中注意力 处理正在发生的重要事项 我在打造新的视觉效果时 通常直到真正开始构建时 才能确定哪些效果行得通 我需要不断试验和修改 尝试各种想法 直到实现理想的效果 在本讲座中 我和 Rob 将构建一些示例 并探索如何使用 SwiftUI 打造自定滚动效果 通过网格渐变效果 让 App 呈现丰富的色彩 构建自定视图过渡效果 使用文本渲染功能 打造精美的文本过渡效果 以及编写 Metal 着色器 来打造高级图形特效 我们首先来讨论 大家可能都很熟悉的体验 滚动 我们很多的 App 使用体验 都涉及到滚动浏览各种项目集合 无论是照片、视频还是文本块 滚动视图无处不在
这是一个简单的照片集合 位于水平滚动视图中 在 SwiftUI 中 滚动视图 为常见用例提供丰富的自动支持
我这里使用了分页操作 来实现分页效果 对于标准滚动视图来说 这看起来还不错 但我想打造一些更独特的效果
我们来看一张照片的代码
SwiftUI 的 scrollTransition 修饰符可用于将标准元素集合 更改为自定元素集合
scrollTransition 公开了 我想要过渡的内容 以及阶段
通过使用这些值 我可以基于照片的位置 更改滚动视图中每张照片的 旋转和偏移量
当我滚动浏览照片时 前缘和后缘的照片会旋转 营造出一种环形轮播效果
我可以使用 value 属性来决定 图像距离屏幕有多远 并使用这个值来定义旋转 如果我的视图全屏显示在屏幕上 isIdentity 属性将为 true
这个旋转效果不错 但它不太符合 我想在这里使用的比喻 我希望每张卡片 给人的感觉都像一个窗口 你可以透过它往里看
更改修饰符后 scrollTransition 也会更新 我可以完全改变 这个滚动视图给人的感觉 打造一种视差效果
在这里 我使用 scrollTransition 来更改图像的 x 偏移量 但不更改裁剪图像的形状 我可以使用 scrollTransition 通过大量不同的方式 处理这些内容
我可以采用这个修饰符 将它应用到我想要 根据滚动值更新的所有内容上 我在图像下方的文本说明中 添加了滚动过渡效果 使文本淡出并偏移 以增强滚动视图的动感
scrollTransition 是打造 有趣、独特的滚动体验的 绝佳方式 不过 有时你可能需要更好地控制 视图的位置或大小 对视觉外观的影响
这是一个简单并且可以滚动浏览的 食品杂货集合 目前 每个项目的颜色 都相同 看起来单调乏味
我可以添加 visualEffect 修饰符 这样就可以使用内容占位符 和代理 内容占位符的运作方式 与 scrollTransition 中相同 代理可以提供视图的几何值
我可以使用代理提供的视图位置 来更改视图的色调 从而打造出色的渐变效果 设备上的视图越靠下 色调旋转就越强烈
借助 visualEffect 修饰符 你可以根据视图的 位置和大小高效地更改视觉属性 这意味着它非常适合 在滚动视图中使用
除了更改颜色外 还可以更改其他视觉属性 在这里 我采用 形状的相同 y 位置 并将它应用到元素 让元素 在到达滚动视图顶部时呈现 偏移、缩放、淡出和模糊效果 scrollTransition 和 visualEffect 修饰符 是打造自定滚动 视图效果的绝佳方式
利用这些修饰符 你可以打造可根据元素 在屏幕上的位置来调整 缩放比例的滚动视图
你可以使用修饰符提供的 旋转和倾斜等不同 转换效果来更改视角
使用偏移属性来打造堆叠效果 或者调整亮度、饱和度 和色调等颜色属性 来突出重点并清晰地表明内容
不过 有时你可能不清楚 某个效果是适合你的 App 还是会分散注意力 花时间努力进行视觉试验很有帮助 即使在新奇感消退后 视觉效果 仍应给人带来愉快的使用体验 在不同的情境中测试效果 在一段时间内的表现 可帮助你确认效果是否有效 或者哪些方面仍然需要改进 接下来 我们来谈谈如何 向 App 添加颜色效果
颜色在界面中发挥着重要作用 它有助于彰显 App 特色、 集中用户的注意力或明确意图 SwiftUI 提供众多工具 可为你的 App 增添色彩 它支持不同的渐变类型、 颜色控制、混合模式等等
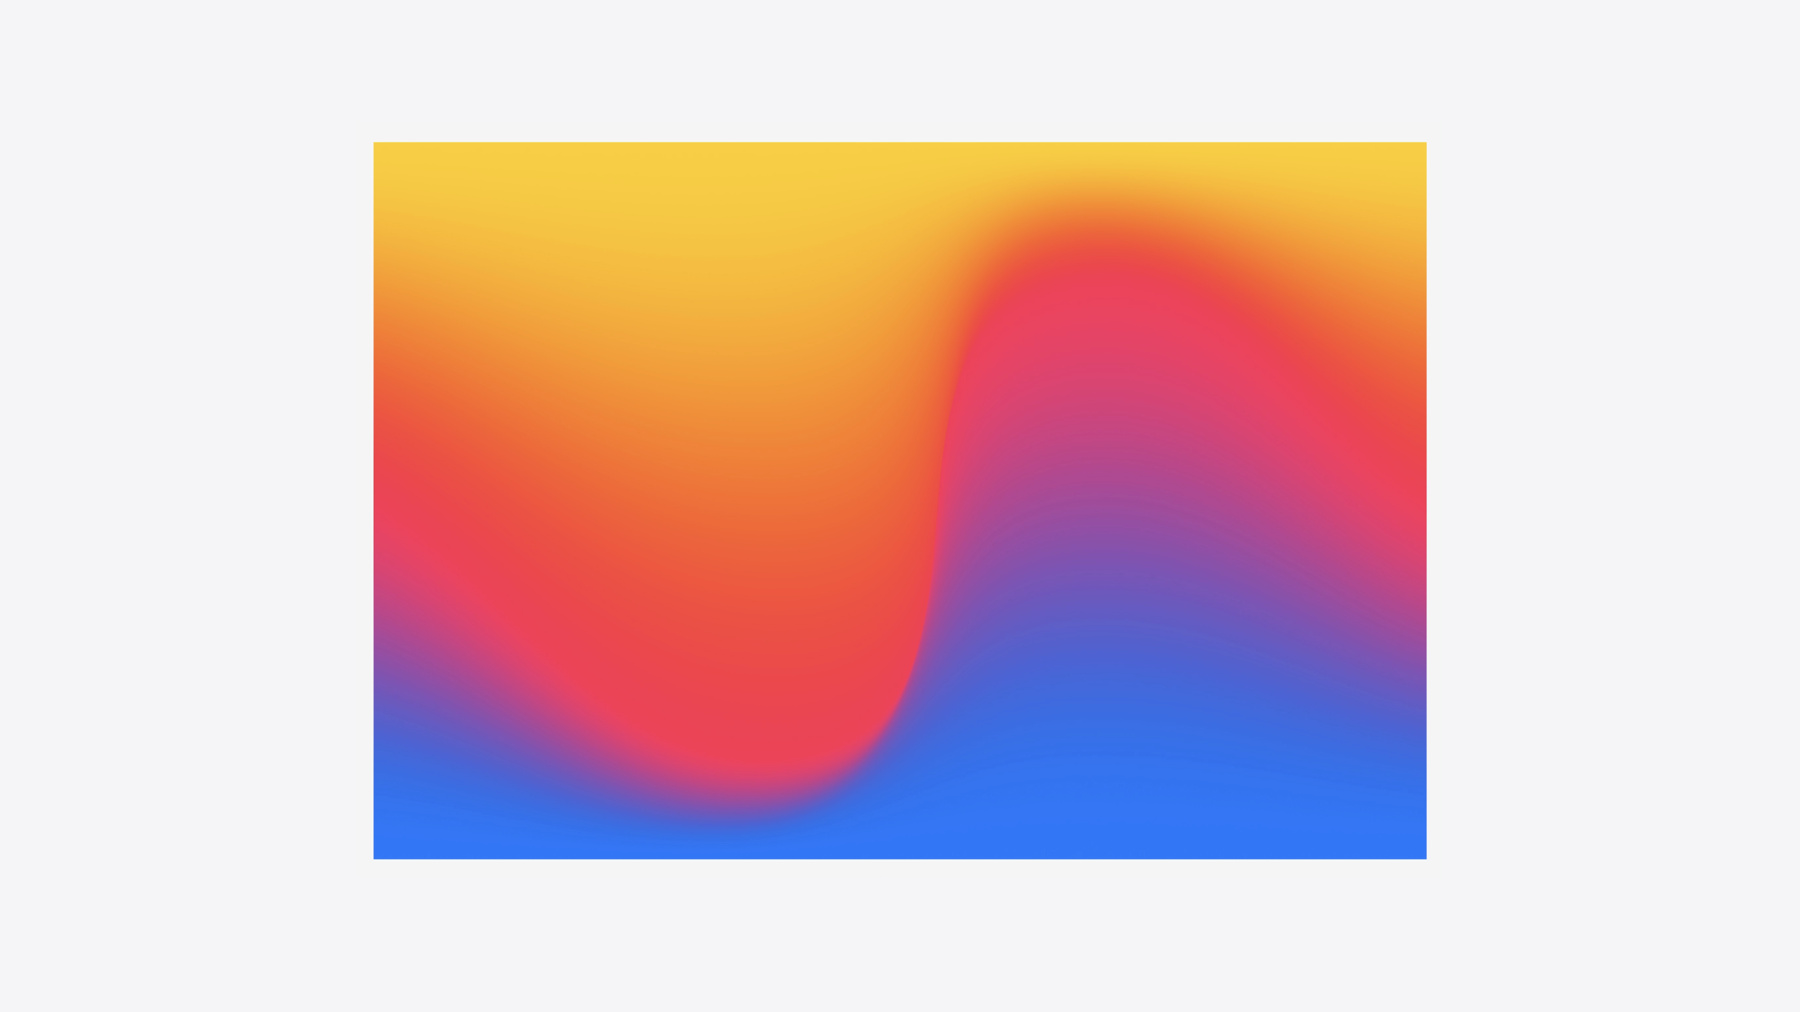
SwiftUI 的一项新功能 是支持网格渐变效果 当你需要动态背景时 或需要为界面增添一些 与众不同的视觉效果时 网格渐变效果非常有用
网格渐变由网格点组成 其中每个点都有一种关联的颜色
SwiftUI 会在网格上的 这些颜色之间进行插值 以创建颜色填充
你可以移动这些点 来打造美丽的颜色效果 这些颜色融合得非常自然 距离较近的点之间的 颜色过渡更加鲜明
为了打造网格渐变效果 我将使用 新的 MeshGradient 视图
我使用 width 和 height 参数 来定义网格的行和列 在这个示例中 我使用 3x3 的网格
接下来 我们要定义 这个 3x3 网格中的 X 和 Y 坐标的位置 网格中的点使用 SIMD2 浮点值定义 作为视图使用时 这些浮点 在 X 轴和 Y 轴上的 取值范围是 0 到 1
最后 我为每个点添加相应的颜色
这样就打造出了网格渐变效果 它现在看起来有点像线性渐变 如果我移动 中心点的 X 和 Y 坐标 颜色也会移动以匹配新位置
网格渐变是为 App 增添颜色效果的好方法 你可以利用它来打造各种视觉效果 这些效果可以单纯用作装饰 但也可以用来 为界面添加合适的图像 甚至可以通过网格渐变动画 来指示某种变化
尝试使用不同的值 例如控制点的位置、 网格大小和调色盘等 不断调整参数 探索视觉上 可以实现的各种可能性 这会促使你产生远比最初的想法 更有创意的灵感 所以大胆尝试吧 充分发挥自己的创造力 来打造全新的效果 接下来 我们来讨论 如何打造自定过渡效果 界面可以让用户了解 App 正在幕后执行哪些操作 而过渡可以有效地表明 内容正在发生变化
当你想要显示新视图 或移除不再需要的视图时 过渡非常有用
它们可以帮助提供背景信息 说明发生了什么变化 以及变化的原因 有时 这些过渡是由轻点按钮 或拖移元素导致的 有时是由 App 其他用户的 行为触发的
我的头像视图会根据用户的 在线状态来显示和隐藏头像 我希望视图在用户在线时显示头像 离线时隐藏头像
目前 头像就这样直接出现和消失 看起来有点生硬 我们来添加一个过渡效果
我们可以应用 SwiftUI 的 某个标准过渡效果 例如缩放 让头像在进入 和退出界面时放大和缩小
如果想要更改多个过渡效果 可以使用 combined 方法 再添加一个效果 我们来结合使用缩放 和不透明度过渡效果
这样看起来好多了 但如果想要 更个性化的效果 该怎么办?
为了打造自定过渡效果 我将创建一个新结构 称为 Twirl 它将遵从 Transition 协议
Transition 主体函数采用 content 和 phase 参数 content 参数的工作方式与之前 介绍过的滚动视图中的方式相同 用作我想要过渡的内容的占位符 我可以使用 phase 值 来检查当前是否在显示视图 并使用这个值 有条件地设置视图样式
对于缩放 我希望头像 在出现时显示全尺寸 在消失时缩小到一半尺寸
对于不透明度 我希望元素 在完全可见和隐藏之间切换
我可以将自定过渡附加到视图中 并查看效果
回到自定过渡代码 我想添加模糊效果 让头像看起来在出现时对焦 在消失时失焦 同时再加上一些旋转 让头像旋转
我可以查看 phase 值 了解某个视图是否会显示 或者是否会消失 看到这个值后 我可以使用负值 让头像在消失时沿相同方向旋转
最后 我将添加一个 brightness 修饰符 当头像进入界面时 它会呈现一点闪光效果 从而吸引用户的注意
只需进行一些小小的改进 就可以让界面元素 以优雅的方式对变化做出响应
过渡效果可用于多种场景 例如在载入元素时 让元素缓缓进入视图
介绍重要信息 或者给图形元素带来动态感觉
好的过渡效果能够自然地 融入所在的更大情境中 而不会让人感觉 像是附加到视图中的 从整体上审视 App 界面 可以帮助你决定哪些 过渡效果适合你的 App 说到过渡效果 接下来由 Robb 介绍 文本过渡效果
谢谢你 Phillip 我们来深入了解一下
Philip 已经介绍了如何使用 内置的 SwiftUI 过渡效果 在视图中添加动画效果 例如这个不透明度过渡效果 虽然我完全可以使用内置 修饰符让整个过程更加有趣 我还是想尝试为文本 逐行添加动画效果
为此 我将使用 TextRenderer 它是 iOS 18 和一致版本中 推出的全新 API TextRenderer 是一个 强大的新协议 可让你自定 SwiftUI 文本在整个 视图树中的绘制方式 这为自定文本绘制 开辟了全新的可能性 但最让我兴奋的还是动画效果
TextRenderer 协议的核心 是 draw(layout:in:) 方法 它的参数是 Text.Layout 和 GraphicsContext Text.Layout 可让我们 访问文本的各个组件 包括 Line、Run 和 Glyph GraphicsContext 的类型 与画布视图使用的类型相同 如需详细了解如何 使用这个参数绘制图形 请观看“向你的 SwiftUI App 添加丰富图形”
对于最精简的 TextRenderer 只需使用 for 循环对布局中的 各个行进行迭代 并将它们绘制到上下文中 这将执行默认的渲染操作
为了实现过渡效果 我向 TextRenderer 添加了三个属性 elapsedTime 表示到目前为止经过了多长时间 elementDuration 表示应该花多长时间来为单个行 或字符添加动画效果 以及 totalDuration 表示整个过渡将花费多长时间 为了让 SwiftUI 自动 为 elapsedTime 值添加动画效果 我实现了 Animatable 协议 在这个示例中 操作很简单 只需将 animatableData 属性 转发到 elapsedTime 即可
现在就可以开始迭代动画了 首先 我将尝试逐行添加动画效果 为了在整个动画过程中 平均分配可用时间 我需要使用这个称为 elementDelay(count:) 的 辅助函数 来计算两个连续行 之间的延迟时间 接下来 我枚举了所有行 并根据它们的索引和延迟值 计算它们的相对开始时间 每个行已用的时间 等于实际经过的总时间 减去相应元素各自的时间偏移量 我还为这个值设定了限制 接下来 我创建了当前 图形上下文的副本 这将确保对辅助函数的 各个单独调用 不会相互影响 因为 GraphicsContext 具有值语义
最后 调用我的辅助函数 来绘制单独的行
奇妙的事情将在这里发生 在绘制行之前 我更新了需要添加动画效果的 GraphicsContext 的属性 为了简化操作 我还计算了 小数形式的进度值
首先 我希望行实现淡入效果 所以我快速计算了不透明度渐变
同时 将它的模糊半径降为 0 让人感觉行内容从模糊变得清晰
初始 blurRadius 根据我从相应行的 typographicBounds 属性中 读取的行高度计算得出
最后 我使用 spring 在 y 轴上添加平移动画效果
我根据行的下坡度长度 从 y 位置开始向上移动 最后 我使用新的绘制 options 方法来绘制行
通过选择停用子像素量化 可以在 spring 稳定时避免抖动
为了使用渲染器 为文本添加动画效果 我实现了 Philip 之前 介绍过的自定过渡效果 通过不断试验 我发现 0.9 秒很适合 用作这个用例的持续时间 但是 我需要考虑当前事务上 可能已经存在动画效果 例如 调用 withAnimation 时 会触发这个过渡效果
通过使用事务主体视图修饰符 我可以在恰当的情况下 覆盖动画效果 这样一来 就能确保每个行 都保持均匀的线性速度 然后 我使用新的 textRenderer 视图修饰符 并在要过渡的视图上 设置自定渲染器
这就是过渡的实际效果
看起来还可以 但是不惊艳 这种效果取决于行数 而行数会根据语言区 或动态字样大小发生变化 另外 它也不太能让我对“Visual Effects”这两个词产生兴奋感 我们来尝试为每个字形 添加动画效果
为此 我需要迭代 Text.Layout 的 RunSlice 它们代表最小的布局单位 例如字形或嵌入的图像
Text.Layout 是行的集合 行是 Run 的集合 Run 则是 RunSlice 的集合
因此 使用这个名为 flattenedRunSlices 的辅助方法 我只需要迭代 RunSlice 并保留几乎所有逻辑
我还需要重新检查辅助函数 但只需将 Line 参数的 类型和名称 更改为 RunSlice
来看看实际效果 看起来要好一点 但现在 我遇到了相反的问题 整个动画中用于为单个字形 添加动画效果的时间所剩无几 这会降低整体效果 让过渡变得没那么有趣 而且有点雷同 我想我需要稍微改进一下 不应该以相同的方式 为所有内容添加动画效果 而是只重点处理 “Visual Effects”这两个词
这样一来 不仅能 为内容添加过渡效果 还能突出重点
为此 我使用了与 iOS 18 和一致版本中的 TextRenderer 一同推出的 新 TextAttribute 协议 通过实现这个协议 我可以将文本中的数据 传递给 TextRenderer
应用这个属性非常简单 通过使用 customAttribute 文本修饰符 我用自定 EmphasisAttribute 标记了单词“Visual Effects” 由于它仅用于标记一个文本范围 我实际上不需要在 TextAttribute 结构中 添加任何成员变量
最后来检查一下 draw 方法 我现在对布局的 flattenedRuns 进行迭代 我使用以属性类型作为键的子脚本 来检查 run 中是否存在 EmphasisAttribute
如果存在这个属性 我将采用与之前完全 相同的方式迭代这些切片 如果不存在这个属性 我会在 0.2 秒内快速淡入 run
这是最终效果 看起来好多了 过渡效果现在真正突出 显示了“Visual Effects”
TextRenderer 开启了各种新的可能性 通过将视图分解成较小的组件 并单独为组件添加动画效果 你可以打造更具表现力的 动画和视觉效果 SwiftUI 中还有另一个 功能强大的图形 API 可提供更精细的控制 那就是着色器 着色器是直接在 设备的 GPU 上计算 各种渲染效果的小程序 SwiftUI 在内部使用着色器 来实现 Philip 在前面 展示的许多视觉效果 例如新的网格渐变效果 借助 iOS 17 和一致版本中 推出的 SwiftUI 着色器 你可以解锁相同水平的性能 并编写你自己的惊艳特效
在 ShaderLibrary 上 通过着色器名称调用函数 即可在 SwiftUI 中 实例化着色器 在这里 你还可以向着色器函数 传递其他参数 例如颜色、数字或图像 使用 layerEffect 视图修饰符 将这个效果应用到视图时 SwiftUI 会为视图中的 每个像素调用着色器函数
像素非常多 为了实时实现这种调用 着色器会在设备的 GPU 上运行 而 GPU 已针对这类 高度并行的任务进行了优化 但是 由于 GPU 编程 具有专用性质 着色器本身不能使用 Swift 编写 而是使用 Metal 着色语言编写而成 简称 Metal
这是我之前展示的着色器 对应的 Metal 文件 着色器函数的名称与 ShaderLibrabry 上调用的函数一致
这是 SwiftUI 将在 GPU 上 针对每个视图像素 执行的函数 执行函数时 position 参数 将引用像素的位置 同时 layer 参数将呈现视图内容 你可以对 layer 进行采样 以获取它的内容 但必须保持在着色器 实例化时所采用的 相对于位置的 maxSampleOffset 范围内
SwiftUI 还会将颜色等类型 解析和转换为可在 Metal 中 使用的表示形式 在这里 粉红色转换为了 half4
Metal 会大量使用这样的矢量类型 half4 是一个由 16 位 浮点数组成的四分量矢量 这个类型会对颜色的红、绿、蓝 和 alpha 分量进行编码 类似地 float2 是一个 由 32 位浮点数 组成的二分量矢量 经常用于 2D 点或维度
在 SwifUI 中 着色器 可用于进行自定填充 以及添加三种效果:颜色效果、 扭曲效果和层效果
在三种效果中 层效果的功能最强大 它实际上是其他两种效果的超集 下面我来展示一下如何编写层效果
目前 我在视图上 安装了 PushEffect 每次轻点时都会触发这个效果 视图使用 spring 缩小 然后立即恢复原状 这为我的互动提供了直接反馈 但动画效果没有对 我触摸的位置做出响应 让人感觉呆板无趣
我希望它呈现这样的效果 每当我触摸视图时 缩放效果会从触摸位置 向外扩展 以不同的方式影响 视图中的每个像素 借助 SwiftUI 着色器 我现在就有了 实现这种效果所需的工具
为了实现这种效果 我在 Metal 文件中 添加了一个新的着色器函数 称为 Ripple 我添加了层效果 API 所需的两个参数 position 和 layer
我已经制定了公式 来描述每个像素的输出 这个函数包含视图被触摸的点、 经过的时间以及这四个参数
我计算了这个像素的变形程度 得到了这个 newPosition 值 并在这个位置对视图进行了采样
根据变形强度进行一些调整后 返回了修改后的颜色 接下来 需要从 SwiftUI 调用这个着色器函数
为此 我创建了这个名为 RippleModifier 的视图修饰符 用来向 SwiftUI 显示 着色器函数的所有参数 SwiftUI 使用 body(content:) 方法对着色器进行实例化 并将它应用到内容中
由于着色器没有时间概念 我们还需要通过 SwiftUI 实现动画效果
我是这样做的 我编写了第二个视图修饰符 名为 RippleEffect keyframeAnimator 视图修饰符可以根据 手势等外部变化 轻松地运行动画 我为 elapsedTime 添加了 动画效果 每当触发值更新时 这个值都会从 0 变为 最终持续时间值 这样一来 在动画的每一步 系统都会向 RippleModifier 传递当前时间 以及我触摸视图所在的原点
等等 我还没有给之前 展示的四个参数分配值 说实话 我也不知道为它们 设置哪些值比较合适 我只能试验各种值 所以我 给自己构建了这个调试 UI
由于 RippleModifier 本身无法执行任何动画 我可以利用这个 UI 以交互方式前后拖动滑块 来调整动画效果 这样我就可以在手机上 或在 Xcode 预览中 针对着色器函数进行调整 以找到合适的参数
打造出色的体验需要进行大量试错 而调试 UI 是迭代 复杂动画的绝佳方式 这可能意味着公开参数 或绘制叠加内容 来直观地呈现中间值 获得这样的即时反馈非常有帮助 可让你更轻松地进行快速迭代 这一点很重要 因为使用着色器 可以创造无限可能
你可以使用着色器 打造填充动画效果 为 App 增添质感 可以结合使用着色器和 TextRenderer 向文本应用扭曲效果 或者使用着色器来创建渐变映射 打造独特的照片效果
在本视频中 我们了解了使用 SwiftUI 打造视觉效果的多种方法 我们鼓励大家在使用 这些方法时融入自己的想法
尝试使用自定滚动效果 让你的 App 与众不同 通过网格渐变效果 为 App 增添一抹亮色 为 App 构建一些 自定视图过渡效果 使用新的文本渲染器 API 生动鲜活地呈现文本 并利用 Metal 着色器 打造全新体验
利用这些工具来发挥创意吧! 感谢观看
-
-
1:45 - Scroll view with pagination
ScrollView(.horizontal) { LazyHStack(spacing: 22) { ForEach(animals, id: \.self) { animal in AnimalPhoto(image: animal) } }.scrollTargetLayout() } .contentMargins(.horizontal, 44) .scrollTargetBehavior(.paging) -
2:30 - Rotation effect
AnimalPhoto(image: animal) .scrollTransition( axis: .horizontal ) { content, phase in content .rotationEffect(.degrees(phase.value * 2.5)) .offset(y: phase.isIdentity ? 0 : 8) } -
3:14 - Parallax Effect
ScrollView(.horizontal) { LazyHStack(spacing: 16) { ForEach(animals, id: \.self) { animal in VStack(spacing: 8) { ZStack { AnimalPhoto(image: animal) .scrollTransition( axis: .horizontal ) { content, phase in return content .offset(x: phase.value * -250) } } .containerRelativeFrame(.horizontal) .clipShape(RoundedRectangle(cornerRadius: 32)) } }.scrollTargetLayout() } .contentMargins(.horizontal, 32) .scrollTargetBehavior(.paging) -
4:41 - Visual effect hue rotation
RoundedRectangle(cornerRadius: 24) .fill(.purple) .visualEffect({ content, proxy in content .hueRotation(Angle(degrees: proxy.frame(in: .global).origin.y / 10)) }) -
7:30 - Mesh gradient
MeshGradient( width: 3, height: 3, points: [ [0.0, 0.0], [0.5, 0.0], [1.0, 0.0], [0.0, 0.5], [0.9, 0.3], [1.0, 0.5], [0.0, 1.0], [0.5, 1.0], [1.0, 1.0] ], colors: [ .black,.black,.black, .blue, .blue, .blue, .green, .green, .green ] ) -
10:36 - Custom transition
struct Twirl: Transition { func body(content: Content, phase: TransitionPhase) -> some View { content .scaleEffect(phase.isIdentity ? 1 : 0.5) .opacity(phase.isIdentity ? 1 : 0) .blur(radius: phase.isIdentity ? 0 : 10) .rotationEffect( .degrees( phase == .willAppear ? 360 : phase == .didDisappear ? -360 : .zero ) ) .brightness(phase == .willAppear ? 1 : 0) } } -
13:29 - The Minimum Viable TextRenderer
// The Minimum Viable TextRenderer struct AppearanceEffectRenderer: TextRenderer { func draw(layout: Text.Layout, in context: inout GraphicsContext) { for line in layout { context.draw(line) } } } -
14:01 - A Custom Text Transition
import SwiftUI #Preview("Text Transition") { @Previewable @State var isVisible: Bool = true VStack { GroupBox { Toggle("Visible", isOn: $isVisible.animation()) } Spacer() if isVisible { let visualEffects = Text("Visual Effects") .customAttribute(EmphasisAttribute()) .foregroundStyle(.pink) .bold() Text("Build \(visualEffects) with SwiftUI 🧑💻") .font(.system(.title, design: .rounded, weight: .semibold)) .frame(width: 250) .transition(TextTransition()) } Spacer() } .multilineTextAlignment(.center) .padding() } struct EmphasisAttribute: TextAttribute {} /// A text renderer that animates its content. struct AppearanceEffectRenderer: TextRenderer, Animatable { /// The amount of time that passes from the start of the animation. /// Animatable. var elapsedTime: TimeInterval /// The amount of time the app spends animating an individual element. var elementDuration: TimeInterval /// The amount of time the entire animation takes. var totalDuration: TimeInterval var spring: Spring { .snappy(duration: elementDuration - 0.05, extraBounce: 0.4) } var animatableData: Double { get { elapsedTime } set { elapsedTime = newValue } } init(elapsedTime: TimeInterval, elementDuration: Double = 0.4, totalDuration: TimeInterval) { self.elapsedTime = min(elapsedTime, totalDuration) self.elementDuration = min(elementDuration, totalDuration) self.totalDuration = totalDuration } func draw(layout: Text.Layout, in context: inout GraphicsContext) { for run in layout.flattenedRuns { if run[EmphasisAttribute.self] != nil { let delay = elementDelay(count: run.count) for (index, slice) in run.enumerated() { // The time that the current element starts animating, // relative to the start of the animation. let timeOffset = TimeInterval(index) * delay // The amount of time that passes for the current element. let elementTime = max(0, min(elapsedTime - timeOffset, elementDuration)) // Make a copy of the context so that individual slices // don't affect each other. var copy = context draw(slice, at: elementTime, in: ©) } } else { // Make a copy of the context so that individual slices // don't affect each other. var copy = context // Runs that don't have a tag of `EmphasisAttribute` quickly // fade in. copy.opacity = UnitCurve.easeIn.value(at: elapsedTime / 0.2) copy.draw(run) } } } func draw(_ slice: Text.Layout.RunSlice, at time: TimeInterval, in context: inout GraphicsContext) { // Calculate a progress value in unit space for blur and // opacity, which derive from `UnitCurve`. let progress = time / elementDuration let opacity = UnitCurve.easeIn.value(at: 1.4 * progress) let blurRadius = slice.typographicBounds.rect.height / 16 * UnitCurve.easeIn.value(at: 1 - progress) // The y-translation derives from a spring, which requires a // time in seconds. let translationY = spring.value( fromValue: -slice.typographicBounds.descent, toValue: 0, initialVelocity: 0, time: time) context.translateBy(x: 0, y: translationY) context.addFilter(.blur(radius: blurRadius)) context.opacity = opacity context.draw(slice, options: .disablesSubpixelQuantization) } /// Calculates how much time passes between the start of two consecutive /// element animations. /// /// For example, if there's a total duration of 1 s and an element /// duration of 0.5 s, the delay for two elements is 0.5 s. /// The first element starts at 0 s, and the second element starts at 0.5 s /// and finishes at 1 s. /// /// However, to animate three elements in the same duration, /// the delay is 0.25 s, with the elements starting at 0.0 s, 0.25 s, /// and 0.5 s, respectively. func elementDelay(count: Int) -> TimeInterval { let count = TimeInterval(count) let remainingTime = totalDuration - count * elementDuration return max(remainingTime / (count + 1), (totalDuration - elementDuration) / count) } } extension Text.Layout { /// A helper function for easier access to all runs in a layout. var flattenedRuns: some RandomAccessCollection<Text.Layout.Run> { self.flatMap { line in line } } /// A helper function for easier access to all run slices in a layout. var flattenedRunSlices: some RandomAccessCollection<Text.Layout.RunSlice> { flattenedRuns.flatMap(\.self) } } struct TextTransition: Transition { static var properties: TransitionProperties { TransitionProperties(hasMotion: true) } func body(content: Content, phase: TransitionPhase) -> some View { let duration = 0.9 let elapsedTime = phase.isIdentity ? duration : 0 let renderer = AppearanceEffectRenderer( elapsedTime: elapsedTime, totalDuration: duration ) content.transaction { transaction in // Force the animation of `elapsedTime` to pace linearly and // drive per-glyph springs based on its value. if !transaction.disablesAnimations { transaction.animation = .linear(duration: duration) } } body: { view in view.textRenderer(renderer) } } } -
22:55 - A simple ripple effect Metal shader
// Insert #include <metal_stdlib> #include <SwiftUI/SwiftUI.h> using namespace metal; [[ stitchable ]] half4 Ripple( float2 position, SwiftUI::Layer layer, float2 origin, float time, float amplitude, float frequency, float decay, float speed ) { // The distance of the current pixel position from `origin`. float distance = length(position - origin); // The amount of time it takes for the ripple to arrive at the current pixel position. float delay = distance / speed; // Adjust for delay, clamp to 0. time -= delay; time = max(0.0, time); // The ripple is a sine wave that Metal scales by an exponential decay // function. float rippleAmount = amplitude * sin(frequency * time) * exp(-decay * time); // A vector of length `amplitude` that points away from position. float2 n = normalize(position - origin); // Scale `n` by the ripple amount at the current pixel position and add it // to the current pixel position. // // This new position moves toward or away from `origin` based on the // sign and magnitude of `rippleAmount`. float2 newPosition = position + rippleAmount * n; // Sample the layer at the new position. half4 color = layer.sample(newPosition); // Lighten or darken the color based on the ripple amount and its alpha // component. color.rgb += 0.3 * (rippleAmount / amplitude) * color.a; return color; } -
23:36 - A Custom Ripple Effect
import SwiftUI

#Preview("Ripple") {
    @Previewable @State var counter: Int = 0
    @Previewable @State var origin: CGPoint = .zero

    VStack {
        Spacer()

        Image("palm_tree")
            .resizable()
            .aspectRatio(contentMode: .fit)
            .clipShape(RoundedRectangle(cornerRadius: 24))
            .onPressingChanged { point in
                if let point {
                    origin = point
                    counter += 1
                }
            }
            .modifier(RippleEffect(at: origin, trigger: counter))
            .shadow(radius: 3, y: 2)

        Spacer()
    }
    .padding()
}

#Preview("Ripple Editor") {
    @Previewable @State var origin: CGPoint = .zero
    @Previewable @State var time: TimeInterval = 0.3
    @Previewable @State var amplitude: TimeInterval = 12
    @Previewable @State var frequency: TimeInterval = 15
    @Previewable @State var decay: TimeInterval = 8

    VStack {
        GroupBox {
            Grid {
                GridRow {
                    VStack(spacing: 4) {
                        Text("Time")
                        Slider(value: $time, in: 0 ... 2)
                    }
                    VStack(spacing: 4) {
                        Text("Amplitude")
                        Slider(value: $amplitude, in: 0 ... 100)
                    }
                }
                GridRow {
                    VStack(spacing: 4) {
                        Text("Frequency")
                        Slider(value: $frequency, in: 0 ... 30)
                    }
                    VStack(spacing: 4) {
                        Text("Decay")
                        Slider(value: $decay, in: 0 ... 20)
                    }
                }
            }
            .font(.subheadline)
        }

        Spacer()

        Image("palm_tree")
            .resizable()
            .aspectRatio(contentMode: .fit)
            .clipShape(RoundedRectangle(cornerRadius: 24))
            .modifier(RippleModifier(origin: origin, elapsedTime: time, duration: 2, amplitude: amplitude, frequency: frequency, decay: decay))
            .shadow(radius: 3, y: 2)
            .onTapGesture {
                origin = $0
            }

        Spacer()
    }
    .padding(.horizontal)
}

struct PushEffect<T: Equatable>: ViewModifier {
    var trigger: T

    func body(content: Content) -> some View {
        content.keyframeAnimator(
            initialValue: 1.0,
            trigger: trigger
        ) { view, value in
            view.visualEffect { view, _ in
                view.scaleEffect(value)
            }
        } keyframes: { _ in
            SpringKeyframe(0.95, duration: 0.2, spring: .snappy)
            SpringKeyframe(1.0, duration: 0.2, spring: .bouncy)
        }
    }
}

/// A modifer that performs a ripple effect to its content whenever its
/// trigger value changes.
struct RippleEffect<T: Equatable>: ViewModifier {
    var origin: CGPoint

    var trigger: T

    init(at origin: CGPoint, trigger: T) {
        self.origin = origin
        self.trigger = trigger
    }

    func body(content: Content) -> some View {
        let origin = origin
        let duration = duration

        content.keyframeAnimator(
            initialValue: 0,
            trigger: trigger
        ) { view, elapsedTime in
            view.modifier(RippleModifier(
                origin: origin,
                elapsedTime: elapsedTime,
                duration: duration
            ))
        } keyframes: { _ in
            MoveKeyframe(0)
            LinearKeyframe(duration, duration: duration)
        }
    }

    var duration: TimeInterval { 3 }
}

/// A modifier that applies a ripple effect to its content.
struct RippleModifier: ViewModifier {
    var origin: CGPoint

    var elapsedTime: TimeInterval

    var duration: TimeInterval

    var amplitude: Double = 12
    var frequency: Double = 15
    var decay: Double = 8
    var speed: Double = 1200

    func body(content: Content) -> some View {
        let shader = ShaderLibrary.Ripple(
            .float2(origin),
            .float(elapsedTime),

            // Parameters
            .float(amplitude),
            .float(frequency),
            .float(decay),
            .float(speed)
        )

        let maxSampleOffset = maxSampleOffset
        let elapsedTime = elapsedTime
        let duration = duration

        content.visualEffect { view, _ in
            view.layerEffect(
                shader,
                maxSampleOffset: maxSampleOffset,
                isEnabled: 0 < elapsedTime && elapsedTime < duration
            )
        }
    }

    var maxSampleOffset: CGSize {
        CGSize(width: amplitude, height: amplitude)
    }
}

extension View {
    func onPressingChanged(_ action: @escaping (CGPoint?) -> Void) -> some View {
        modifier(SpatialPressingGestureModifier(action: action))
    }
}

struct SpatialPressingGestureModifier: ViewModifier {
    var onPressingChanged: (CGPoint?) -> Void

    @State var currentLocation: CGPoint?

    init(action: @escaping (CGPoint?) -> Void) {
        self.onPressingChanged = action
    }

    func body(content: Content) -> some View {
        let gesture = SpatialPressingGesture(location: $currentLocation)

        content
            .gesture(gesture)
            .onChange(of: currentLocation, initial: false) { _, location in
                onPressingChanged(location)
            }
    }
}

struct SpatialPressingGesture: UIGestureRecognizerRepresentable {
    final class Coordinator: NSObject, UIGestureRecognizerDelegate {
        @objc
        func gestureRecognizer(
            _ gestureRecognizer: UIGestureRecognizer,
            shouldRecognizeSimultaneouslyWith other: UIGestureRecognizer
        ) -> Bool {
            true
        }
    }

    @Binding var location: CGPoint?

    func makeCoordinator(converter: CoordinateSpaceConverter) -> Coordinator {
        Coordinator()
    }

    func makeUIGestureRecognizer(context: Context) -> UILongPressGestureRecognizer {
        let recognizer = UILongPressGestureRecognizer()
        recognizer.minimumPressDuration = 0
        recognizer.delegate = context.coordinator

        return recognizer
    }

    func handleUIGestureRecognizerAction(
        _ recognizer: UIGestureRecognizerType, context: Context) {
            switch recognizer.state {
                case .began:
                    location = context.converter.localLocation
                case .ended, .cancelled, .failed:
                    location = nil
                default:
                    break
            }
        }
    }
-