Identity Pinning: How to configure server certificates for your app
January 14, 2021

If your app sends or receives data over the network, it’s critical to preserve the privacy and integrity of a person’s information and protect it from data breaches and attacks. You should use the Transport Layer Security (TLS) protocol to protect content in transit and authenticate the server receiving the data.
Note: Pinning certificates is not required. You should deploy pinning configurations with caution, and only if absolutely necessary.
When you connect through TLS, the server provides a certificate or certificate chain to establish its identity. You can further limit the set of server certificates your app trusts by pinning their public-key identities in your app. Here’s how to get started.
When to use pinning
In most cases, pinning is not necessary and should be avoided. By default, when your app connects to a secure TLS network, the system evaluates server trustworthiness by default. Most apps can meet their security requirements by relying on this behavior; however, certain apps may need to further limit the set of trusted certificates.
For example, your app may need to meet regulatory requirements that determine which specific Certificate Authorities (CAs) can be trusted. While Apple platforms ensure by default that only trustworthy CAs are involved, your app can use identity pinning to further limit the set of CAs to those associated with a particular government or organization.
Pinning cannot loosen the trust requirements of your app — it can only tighten them. You still always need to meet the system’s default trust requirements when using public-key certificates involved in a TLS network connection.
Note: When you’ve configured your app to expect a specific set of public keys for a given server, it will refuse to connect to that server unless those public keys are involved. As a result, if the server deploys new certificates that alter the public keys, your app will refuse to connect. At that point, you’ll need to update your app with a pinning configuration that reflects the new set of public keys.
Think long term
If you want to use identity pinning in your app, consider creating a long-term strategy that accounts for both planned and unplanned events so that you can prevent pinning failures.
Your app can proactively provide a great experience by pinning the public keys of CAs, instead of servers. This way, you can deploy server certificates that contain new public keys signed by the same CA without the need for pinning configuration updates.
You can also consider pinning more than one public key, especially when pinning server identities. This way, your app will still be able to connect to configured servers even if they revoke or rotate certificates.
Additionally, plan to provide a fallback experience in your app if it’s unable to connect to a server in the event of a pinning failure. First, think of ways your app experience may be impacted, and come up with mitigating solutions for any negative side effects. Can the app still function without making that connection, and can you provide someone with a temporary recovery path?
You’ll also want to plan for an eventual recovery path. One way you can address pinning failures is through a new pinning configuration, delivered via app update. Consider whether that’s an option given the use cases of your app.
We highly recommend simulating various events and potential failure points when testing your app by acquiring additional public-key certificates for this purpose and varying the configuration of your server accordingly.
How to pin CA public keys
A pinned CA public key must appear in a certificate chain either in an intermediate or root certificate. Pinned keys are always associated with a domain name, and the app will refuse to connect to that domain unless the pinning requirement is met.
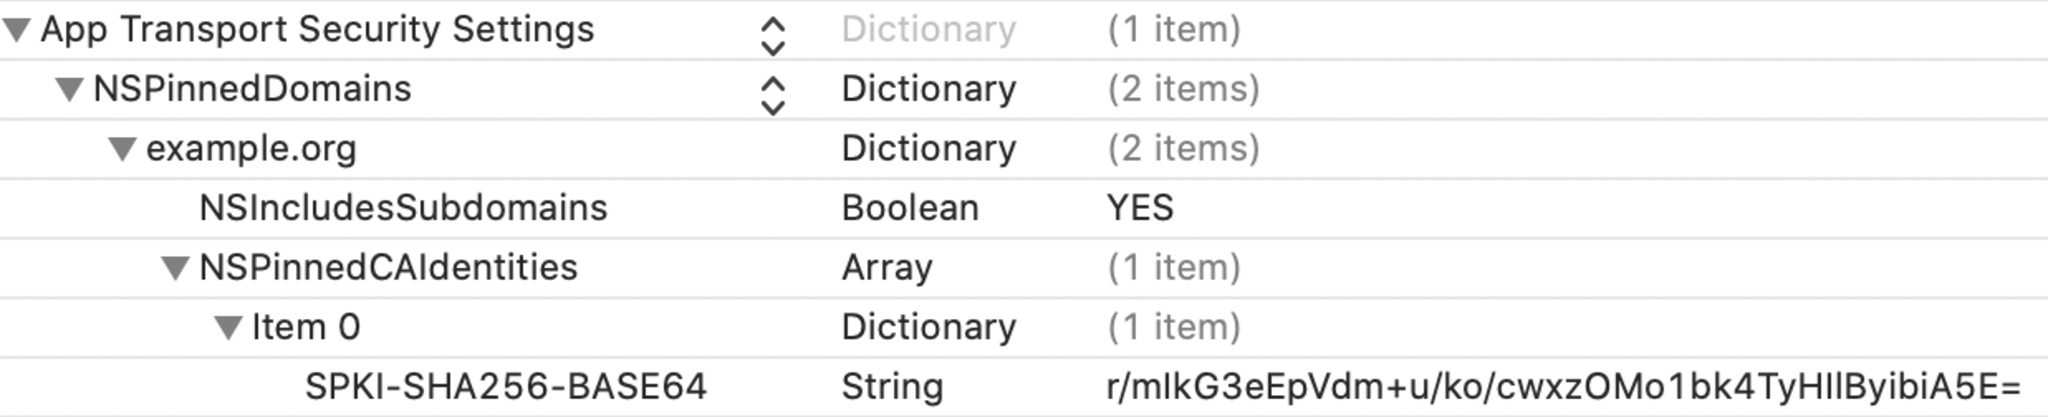
As an example, to require the presence of a specific CA public key when connecting to the example.org domain name, you can add the following entries to the Info.plist file of your app.
<key>NSAppTransportSecurity</key>
<dict>
    <key>NSPinnedDomains</key>
    <dict>
        <key>example.org</key>
        <dict>
            <key>NSIncludesSubdomains</key>
            <true/>
            <key>NSPinnedCAIdentities</key>
            <array>
                <dict>
                    <key>SPKI-SHA256-BASE64</key>
                    <string>r/mIkG3eEpVdm+u/ko/cwxzOMo1bk4TyHIlByibiA5E=</string>
                </dict>
            </array>
        </dict>
    </dict>
</dict>
In this example, the pinned public key is associated with example.org and also subdomains such as math.example.org and history.example.org, but it won’t be associated with advanced.math.example.org, or ancient.history.example.org.
The public key is expressed as the Base64-encoded SHA-256 digest of an X.509 certificate’s DER-encoded ASN.1 Subject Public Key Info structure. Assuming the following PEM-encoded public-key certificate, stored in file ca.pem, you can calculate its SPKI-SHA256-BASE64 value with the openssl command.
-----BEGIN CERTIFICATE-----
MIIDrzCCApegAwIBAgIQCDvgVpBCRrGhdWrJWZHHSjANBgkqhkiG9w0BAQUFADBh
MQswCQYDVQQGEwJVUzEVMBMGA1UEChMMRGlnaUNlcnQgSW5jMRkwFwYDVQQLExB3
d3cuZGlnaWNlcnQuY29tMSAwHgYDVQQDExdEaWdpQ2VydCBHbG9iYWwgUm9vdCBD
QTAeFw0wNjExMTAwMDAwMDBaFw0zMTExMTAwMDAwMDBaMGExCzAJBgNVBAYTAlVT
MRUwEwYDVQQKEwxEaWdpQ2VydCBJbmMxGTAXBgNVBAsTEHd3dy5kaWdpY2VydC5j
b20xIDAeBgNVBAMTF0RpZ2lDZXJ0IEdsb2JhbCBSb290IENBMIIBIjANBgkqhkiG
9w0BAQEFAAOCAQ8AMIIBCgKCAQEA4jvhEXLeqKTTo1eqUKKPC3eQyaKl7hLOllsB
CSDMAZOnTjC3U/dDxGkAV53ijSLdhwZAAIEJzs4bg7/fzTtxRuLWZscFs3YnFo97
nh6Vfe63SKMI2tavegw5BmV/Sl0fvBf4q77uKNd0f3p4mVmFaG5cIzJLv07A6Fpt
43C/dxC//AH2hdmoRBBYMql1GNXRor5H4idq9Joz+EkIYIvUX7Q6hL+hqkpMfT7P
T19sdl6gSzeRntwi5m3OFBqOasv+zbMUZBfHWymeMr/y7vrTC0LUq7dBMtoM1O/4
gdW7jVg/tRvoSSiicNoxBN33shbyTApOB6jtSj1etX+jkMOvJwIDAQABo2MwYTAO
BgNVHQ8BAf8EBAMCAYYwDwYDVR0TAQH/BAUwAwEB/zAdBgNVHQ4EFgQUA95QNVbR
TLtm8KPiGxvDl7I90VUwHwYDVR0jBBgwFoAUA95QNVbRTLtm8KPiGxvDl7I90VUw
DQYJKoZIhvcNAQEFBQADggEBAMucN6pIExIK+t1EnE9SsPTfrgT1eXkIoyQY/Esr
hMAtudXH/vTBH1jLuG2cenTnmCmrEbXjcKChzUyImZOMkXDiqw8cvpOp/2PV5Adg
06O/nVsJ8dWO41P0jmP6P6fbtGbfYmbW0W5BjfIttep3Sp+dWOIrWcBAI+0tKIJF
PnlUkiaY4IBIqDfv8NZ5YBberOgOzW6sRBc4L0na4UU+Krk2U886UAb3LujEV0ls
YSEY1QSteDwsOoBrp+uvFRTp2InBuThs4pFsiv9kuXclVzDAGySj4dzp30d8tbQk
CAUw7C29C79Fv1C5qfPrmAESrciIxpg0X40KPMbp1ZWVbd4=
-----END CERTIFICATE-----

$ cat ca.pem | openssl x509 -inform pem -noout -outform pem -pubkey | openssl pkey -pubin -inform pem -outform der | openssl dgst -sha256 -binary | openssl enc -base64
To introduce redundancy into your pinning configuration, you can associate multiple public keys with a domain name.
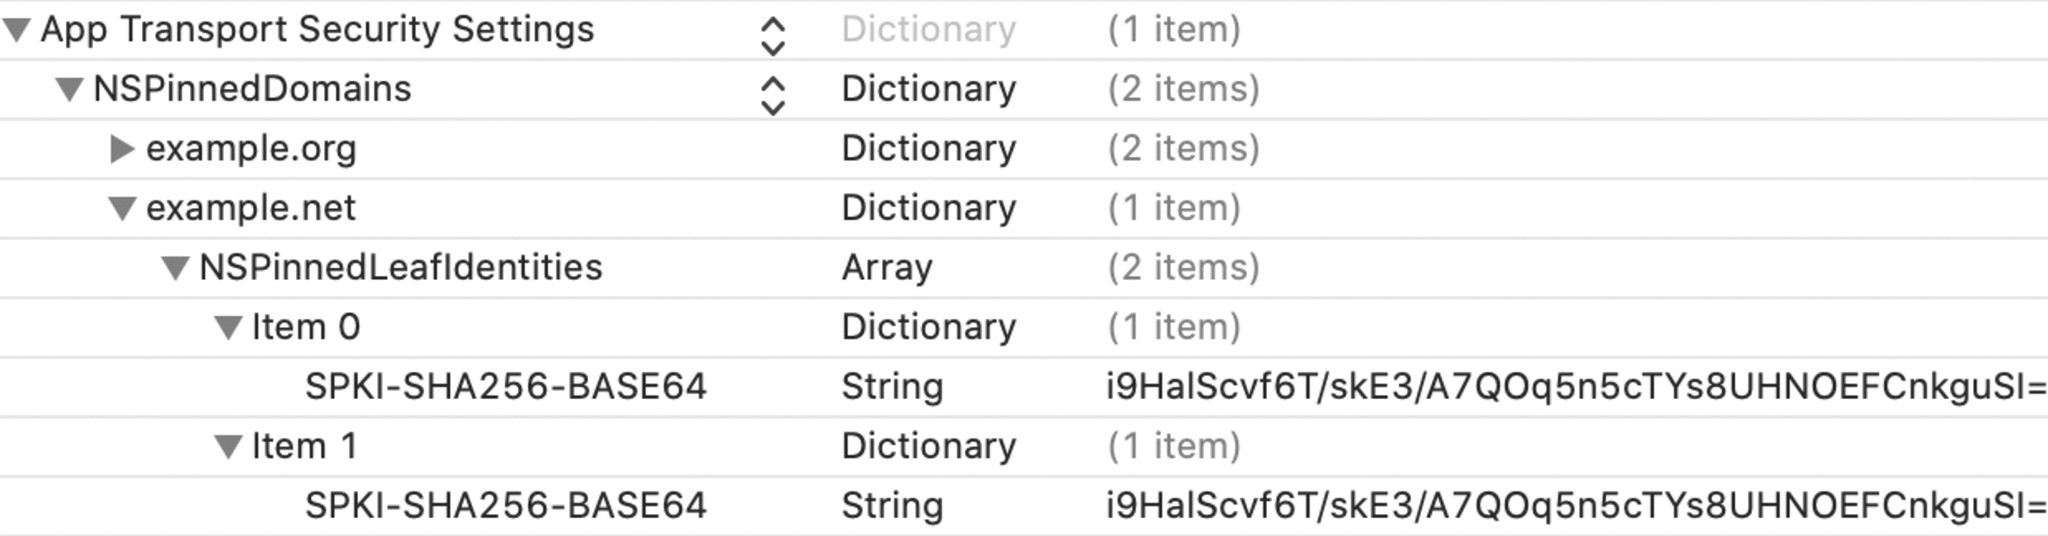
<key>NSAppTransportSecurity</key>
<dict>
    <key>NSPinnedDomains</key>
    <dict>
        <key>example.org</key>
        <dict>
            <key>NSIncludesSubdomains</key>
            <true/>
            <key>NSPinnedCAIdentities</key>
            <array>
                <dict>
                    <key>SPKI-SHA256-BASE64</key>
                    <string>r/mIkG3eEpVdm+u/ko/cwxzOMo1bk4TyHIlByibiA5E=</string>
                </dict>
            </array>
        </dict>
        <key>example.net</key>
        <dict>
            <key>NSPinnedLeafIdentities</key>
            <array>
                <dict>
                    <key>SPKI-SHA256-BASE64</key>
                    <string>i9HaIScvf6T/skE3/A7QOq5n5cTYs8UHNOEFCnkguSI=</string>
                </dict>
                <dict>
                    <key>SPKI-SHA256-BASE64</key>
                    <string>i9HaIScvf6T/skE3/A7QOq5n5cTYs8UHNOEFCnkguSI=</string>
                </dict>
            </array>
        </dict>
    </dict>
</dict>
For example, to pin multiple public keys for the example.net server certificate, you would add individual entries as items in an array to the Info.plist file of your app. To satisfy the pinning requirement for a connection to example.net, the server certificate must include one of those keys.