-
Crea efectos gráficos avanzados con SwiftUI
Descubre cómo crear experiencias personalizadas y completas mediante la combinación creativa de las API de diseño y gráficos de SwiftUI. Te enseñaremos cómo desglosar diseños complejos y utilizar un proceso creativo para encadenar elementos básicos sencillos. Obtén información sobre cómo crear animaciones con sombreadores de capa, cómo anclar vistas con guías de alineación y cómo leer la geometría de diseño mediante las preferencias.
Capítulos
- 0:00 - Introducción
- 1:40 - Desglose del diseño
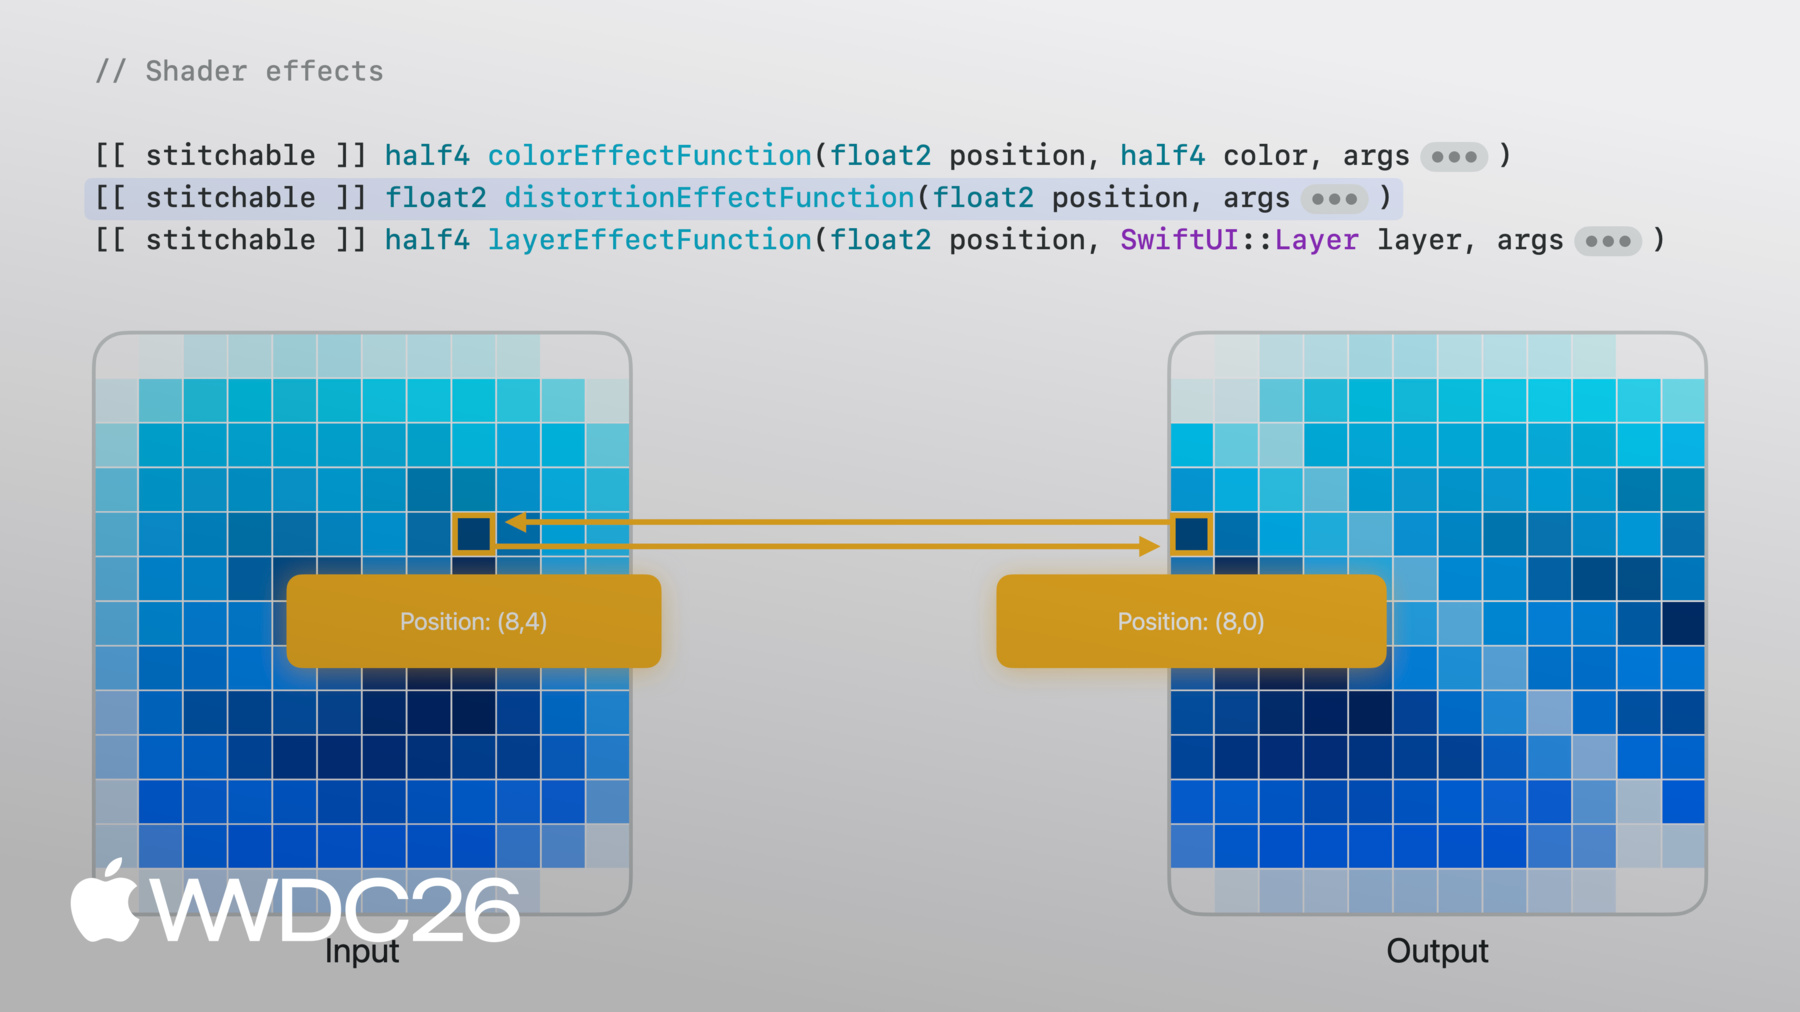
- 4:11 - La portada y los efectos de sombreado
- 11:07 - Control de animaciones mediante el tiempo
- 12:00 - Vista de transcripción sincronizada con el tiempo
- 13:18 - Marcas de tiempo flotantes con guías de alineación
- 16:16 - Flujos de trabajo creativos
- 17:13 - Próximos pasos
Recursos
Videos relacionados
WWDC24
-
Buscar este video…
-
-
4:18 - Cover art image
Image("CoverArt") -
4:24 - Blurred cover art image
Image("CoverArt") .blur(radius: 30) -
7:09 - Applying layer effect in SwiftUI
GeometryReader { proxy in CoverArtView() .layerEffect( ShaderLibrary.backgroundWarp(), maxSampleOffset: .zero ) } .ignoresSafeArea() -
7:21 - Writing layer effect shader in Metal
[[stitchable]] half4 backgroundWarp( float2 position, SwiftUI::Layer layer ) { return layer.sample(position); } -
7:39 - Metal shader with offset parameter
[[stitchable]] half4 backgroundWarp( float2 position, SwiftUI::Layer layer, float2 offset ) { return layer.sample(position + offset); } -
7:55 - SwiftUI layer effect with offset parameter
GeometryReader { proxy in CoverArtView() .layerEffect( ShaderLibrary.backgroundWarp( .float2(.init(x: 0, y: 0)) ), maxSampleOffset: .zero ) } .ignoresSafeArea() -
8:04 - SwiftUI layer effect with full-width offset
GeometryReader { proxy in CoverArtView() .layerEffect( ShaderLibrary.backgroundWarp( .float2(.init(x: proxy.size.width, y: 0)) ), maxSampleOffset: .zero ) } .ignoresSafeArea() -
8:37 - SwiftUI layer effect with noise sampling
GeometryReader { proxy in CoverArtView() .layerEffect( ShaderLibrary.backgroundWarp( .float2(proxy.size), .image(Image("NoiseTexture")) ), maxSampleOffset: .zero ) } .ignoresSafeArea() -
8:55 - Metal shader with noise sampling
[[stitchable]] half4 backgroundWarp( float2 position, SwiftUI::Layer layer, float2 size, texture2d<half> noiseTex ) { constexpr sampler s(address::repeat, filter::linear); float2 uv = position / size; half4 n = noiseTex.sample(s, uv); float2 offset = (float2(n.r, n.g) - 0.5) * 200.0; return layer.sample(position + offset); } -
10:22 - Metal shader with domain warping
[[stitchable]] half4 backgroundWarp( float2 position, SwiftUI::Layer layer, float2 size, texture2d<half> noiseTex ) { constexpr sampler s(address::repeat, filter::linear); float2 uv = position / size; half4 n = noiseTex.sample(s, uv); float2 q = float2(n.r, n.g); n = noiseTex.sample(s, uv + q); float2 offset = (float2(n.r, n.g) - 0.5) * 200.0; return layer.sample(position + offset); } -
11:16 - SwiftUI layer effect with static visual
GeometryReader { proxy in CoverArtView() .layerEffect( ShaderLibrary.backgroundWarp( .float2(proxy.size), .image(Image("NoiseTexture")) ), maxSampleOffset: .zero ) } .ignoresSafeArea() -
11:37 - SwiftUI layer effect with animated visual
@State private var startDate = Date.now TimelineView(.animation) { timeline in let elapsed = timeline.date.timeIntervalSince( startDate ) CoverArtView() .layerEffect( ShaderLibrary.backgroundWarp( .float2(proxy.size), .image(Image("NoiseTexture")), .float(elapsed) ), maxSampleOffset: .zero ) } -
12:15 - Basic transcript view
ScrollView { LazyVStack(alignment: .leading, spacing: 12) { ForEach(sampleTranscript) { line in .font(.title) .fontWeight(.bold) } } } -
12:33 - Time-synced transcript view
@State private var playback = PlaybackState() ScrollViewReader { scrollProxy in ScrollView { LazyVStack(alignment: .leading, spacing: 12) { ForEach(sampleTranscript) { line in Text(line.text) .transcriptLineStyle(isCurrent: line.id == playback.currentLineIndex ) } } } .onChange(of: playback.currentLineIndex, { _, i in scrollProxy.scrollTo(i, anchor: .center) }) } -
13:53 - Overlay with center alignment
Text(line.text) .overlay { Text(line.formattedTimestamp) } -
14:06 - Overlay with bottom leading alignment
Text(line.text) .overlay(alignment: .bottomLeading) { Text(line.formattedTimestamp) } -
14:32 - Overlay with alignment guide override
Text(line.text)
     .overlay(alignment: .bottomLeading) {
          Text(line.formattedTimestamp)
              .alignmentGuide(.bottom) { $0[.top] }
     }
-