-
Introducing ClassKit
The new ClassKit framework lets you organize educational content in your app so that teachers can discover and assign specific activities and view students' progress in the new Schoolwork app. Learn how to adopt ClassKit to your content structure, declare assignable content, and share student progress on activities teachers assign in Schoolwork.
Resources
Related Videos
WWDC21
-
Search this video…
Good morning, everybody.
My name is Pavel and Marin and I will be talking to you about ClassKit today.
Our talk is split in three parts. In first part, we will give you a general overview of ClassKit. We will show you how data flows through the system. In the second part of the talk, we will list all the classes we have in our system and we'll mention a few interesting things about each one class.
And in the end, Marin is going to show us how to adopt ClassKit in an existing cap.
So, let's get started with the Overview.
ClassKit is an education-based framework which means that it is designed to work with in a school environment. It allows you to define assignable content from your app, so that teachers can assign it to students as homework.
Then it allows you to report progress on those pieces of content that were assigned by teachers. And this is done with privacy in mind. What I mean by that is that you can report progress on any assignable piece of content within your app, but teachers will only see progress on the things that they have explicitly assigned to students.
So, why would you adopt ClassKit? Well, for one, this will get a better student experience. Teacher workflow, because they will be able to know exactly what's assignable within your app and assign it to students.
It gives teachers insights within how students are doing in your app. And this enables personalized learning.
If a teacher knows how students are doing within your app exactly, they'll be able to better cater future homework assignments.
Lastly, well, it also gives you a competitive advantage. This is because with teachers while the type of information is surfaced back to them, chances are that they will be advocating for your framework to -- for your app to be used within the school. Speaking of schools, there's a related technology called Apple School Manager, and school admins and IT use this to create managed Apple IDs for everybody within their organization. So, every teacher will get a managed Apple ID and all students will get managed Apple IDs.
Admins also use it to create classes within a school, so for example, in mathematics class we will have a teacher with -- which is a person with a certain managed Apple ID and students, which are people with other managed Apple IDs.
This is also where schools manage all of their content and devices.
And as we mentioned for competitive advantage, this is where schools will be able to enable student progress reports in feature of ClassKit.
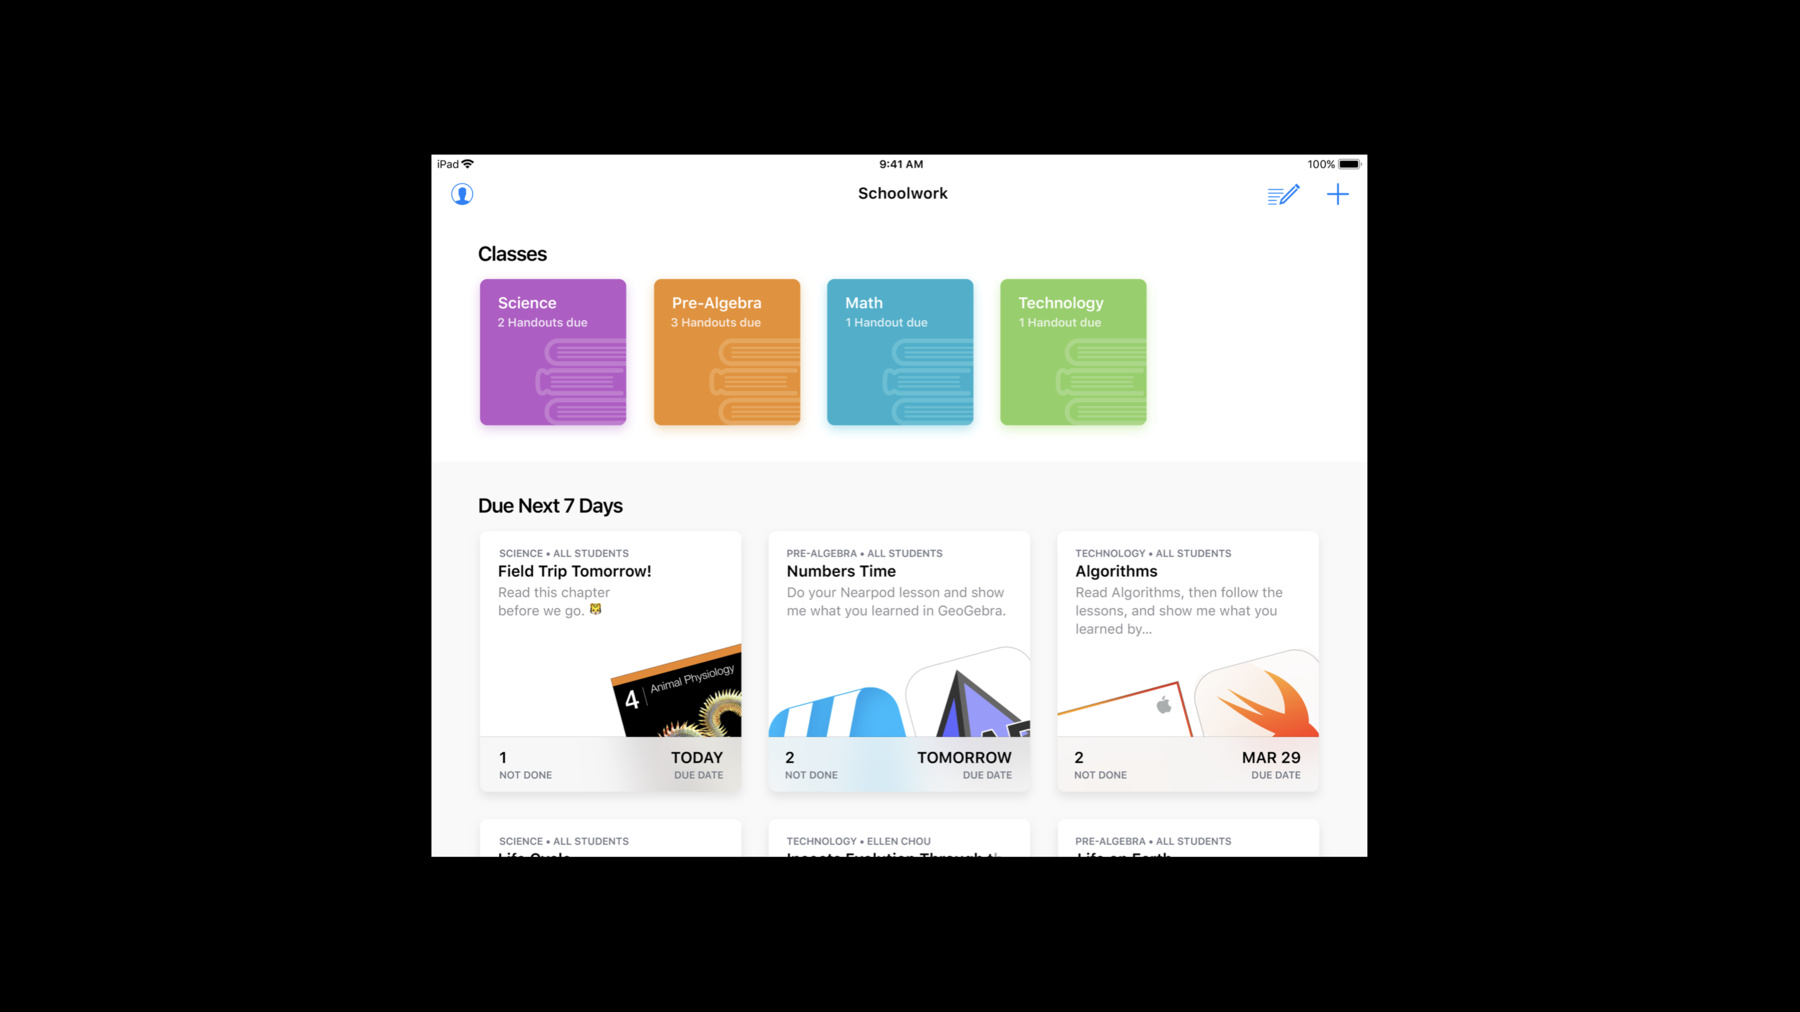
Also, this is where schools are able to purchase apps in bulk. And any app that has enabled ClassKit support, we'll have works with Schoolwork checkmark next to its name. So, Schoolwork is the new education app that is coming out soon.
Students use this app to view handouts that were assigned to them. And teachers use it to create homework assignments. And homework assignments, we call handouts within our system.
Handouts is just a collection of tasks. For example, a piece of content might be a task within a handout.
So, this is also the place where teachers will view progress reports of how students are doing within your app for a given handout.
So, let's actually take a walk, what the life cycle of a handout is.
But before we can create the handout, your app actually needs to be able to declare what pieces of content are assignable.
Within our framework, this is done using a cross code CLS Context.
And what a CLS Context is, is that it allows you to represent your content as a tree structure.
So, there is one main app context redefined for your app. And this acts as the root context of the content tree -- or the context tree.
Also, all of your content is just a descendant of the main app context.
So, we ask that you define your content as accurately as possible because the sooner you define your content, the sooner it will be available to teachers in Schoolwork to assign to students. Assuming that you've created your context tree, a teacher will be able to go to Schoolwork, they will be able to tap the Create New Handout button, which will create a new instance of a handout. Then they will point the handout to a specific piece of content within your app, and once they've done that, they will assign the handout to a student.
Once a student receives that handout, they will then tap on the handout which will open your app. At that point, your app should create the necessary contexts.
And for a better student experience, we ask that you navigate the student to the same piece of content. Marin is going to show us later how this is done in code.
So, assuming that now the student started working on the homework assignment, your app starts reporting progress back to students and all of this progress will be sent to the teacher's device and bundled in what we call a progress record -- a report, or activity report.
So, teachers, once this is done, will have access to that report from within the assigned handout. So, this entire flow involves you having a teacher managed ID, a student managed ID, and maybe a couple of devices or even one device from which you'll be logging in and out, so you can test.
But with all that, we can actually make this a little better and we created something that we call Developer Mode.
What Developer Mode does is that it allows you to act as a teacher, so that you can create handout assignments, assign them to students, and view progress reports for your students, and it also allows you to act as a student, so you can consume those handouts and your app can report progress back to teachers.
There's also a way to reset the development data and I personally had to use this button quite a bit, to be honest.
With that, let's take a look at the classes we have in our framework.
At the very top, we have a Data Store.
It is used to maintain the Context Tree, within our app.
This is also where the main app context is exposed as a property.
And the Data Store also gives tracks of all modified objects within the system.
So, if you'd like to save those object, you can call CLS Data Store, Save with Completion. I'd like to mention also that there is one shared instance of the Data Store that you use to interact with.
So, next, let's talk about contexts. We saw that contexts are a three hierarchy, and Marin is actually going to go in detail later about contexts, how to use them and mention some interesting properties about them, but I'd like to concentrate on Context Identity.
So, identity of a context in ClassKit is two things.
The first one is the Identifier Property, and the Identifier Property allows you to uniquely identify contexts across siblings. What I mean by this is that it's okay for you to have a context with the same identifier, multiple contexts with the same identifier, as long as they don't have the same parent, which will be fine.
So, that is something we call Context Identifier Path. Context Identifier Paths are what we actually use to uniquely identify context within the tree, within the context tree. And what Context Identifier Paths are, well, it's just an area of Context Identifiers.
The way we use them is that we traverse the Context following the path, until we reach a note there -- the last note within the path. Let's actually take a walk how this looks in action.
In this example, we have a context card that's pointing to Section 1 Context within some chapter, within some book.
And we also have our Context Tree. To find Section 1, we will first visit the App Context.
Then we'll visit the Book Context. We will find the of the Book Context with Identifier Chapter 2. We will visit that one, and we will do the same for Section 1.
Since Section 1 is the last thing on our path, then this is what the path is referring to.
So, we have a few ways to look up contexts with our system.
One is using absolute context paths, and to do that, you would call the CLS Data Store Context Matching Identifier Path Method.
The completion block of this method will return all contexts among the paths. So, for example, it will be an array of the Up Context, Book Context, Chapter 2 Context, and Section 1 Context.
If for some reason, Chapter 2 in Section 1 was missing, then that array in the completion block will just continue to Up Context and the Book Context.
And that gives you a chance to create the missing context as something else. There's also a way to look up contexts using relative paths. This is useful if you already have a reference to a context, but you would like to find a descendent of it. And the method for that is called CLS Context Descendent Matching Identifier Path. The difference is that here you will either get the context if it doesn't match the path. There's also a genetic way to contexts and this is done using CLS Data Store Context Matching Predicate. On the example from the slide, we're showing you how to find all children of a given context.
So, there's also a Data Store delegate.
This is used in conjunction with the path quitting methods that we just saw. The definition of the decoration of the delegation is on the screen.
It's usually useful to use this when your contexts are downloaded on demand to -- when all of your context is not available, so you want to create things on demand. The way it works is that as we start querying for a path, for our contexts among the path, if you don't find a context on that path, we will call the Create Context for Identifier Method under Delegate that you've defined, giving you a chance to create the missing context.
And if you do create a context, we will take the context and go add it to the correct place on the tree for you.
So, as I mentioned, it's useful for app for -- with dynamic content. Let's actually take a look at how this work in action.
Again, we have the same identifier path, but in this case, our tree is incomplete. And we also have a delegate. So again, we will visit the App Context.
Then we'll visit the Book Context.
Then we are going to try to visit the Chapter 2 Context, but it doesn't exist. So, we are going to ask a delegate to create it.
If a delegate creates it, we will then attach it to the correct place on the tree, and we'll visit that context.
Then we're going to build the same thing for our Section 1.
Again, since section 1 is the last thing on the path, that means that this is what a path is referring to. Next, let's talk about Activity Objects.
So, Activity Objects are actually the objects which you will use to report progress back to teachers. And they actually translate to Activity Reports. Activity Objects are always associated with contexts. You can officially allocate one on your own.
And the way you would create a new one is by calling CLS Context Creating New Activity, which will return a new activity object associated with the receiver of the method.
If you would like to see if there's currently an activity associated with your context, you can do so by querying for the current activity property on the CLS Context.
I'd like to mention that every time you co-create a new activity, this is the same thing as starting a new attempt at that activity, meaning that a teacher would receive a new progress report. Let's take a look at how would you add progress to an activity. One way is to directly set the progress property.
And that one is to add a progress range, from a start to an end.
Also, know that setting the progress property directly is the same thing as adding a progress range for the start of zero. I'd like to also mention that it's perfectly fine for you to add overlapping progresses arranges or even the same progress arranged multiple times.
Underneath, we take care of the details to make sure that the correct progress is reported to teachers in the end. So, there's one more object that we should talk about and that's Activity Items.
What an Activity Item is, is a quantity that you would to represent to teachers as part of your report.
Each activity can have one primary activity item, and this would be the main piece of information you would to teachers that's apart from progress.
For example, this is useful for a final score of a quiz. You can also have multiple additional activity items, which you would use to add and show extra information to teachers. Like for example, how many hints were given to a student, answer to individual questions, and etcetera.
So, Activity Itemization and Abstract Class, and in our system, we have defined at the moment, three subclasses.
One of them is CLS Quantity Item. This is useful for simple scalar quantities like hints, experience points, and things like that. We also have a score item which is useful to represent X out of Y quantities.
For example, final score of a quiz might be useful for this.
And we also have a Binary Item.
And this one is used to answer Yes or No questions, type of questions. Let's take a look at how would you add a primary activity item to an activity. Well, you will do that by first creating an activity item. In the , we're showing you how to create a Score Item with a title of Total Score.
And then to associate it as a primary activity item activity, you will set it -- you will set the primary activity item property of an activity. To add an additional activity item, you will again create a new Activity Item. In the size, we're showing how to create a quantity item with a type of hints, and then some quantity. To associate it with an activity, you would call CLS Activity Add Additional Activity Item after passing the item you just created. At that point, this activity item will be associated with activity.
So, there's some best practices when dealing with activity items.
One of them is to always save the subclass for a primary activity item.
What I mean by that is that imagine a teacher assigns the same context to two students.
You know, Student A device, you set the primary activity item as a score item.
On Student B device, you set the primary activity item as a binary item. Well, if you do that, we can't actually generate an aggregated report back to teacher because there's no clear heuristic of how to convert from a score item to a binary, or vice versa. Because of that, it is best to always have the same subclass of an activity item as the primary activity item.
Also, please provide clear, concise, but descriptive titles to your activity items. This is because the titles that you set on your activity items will be visible to teachers in their report. And please make use of additional activity items. They're a great way to provide the extra information that teachers will actually need to truly understand how students are doing within your app. With that, I'd like to invite Marin to the stage who is going to show us how all of this works in action.
Hello, everyone. My name is Marin, and I'm an engineer on the ClassKit Team. And I would like to show you how to adopt ClassKit into a preexisting app.
So, to do this, Pavel and I went ahead and built a sample app. The sample app is called Quizler. It's a simple, math, quiz-taking app. The very first screen that you get asks you to select what type of math you'd like to be quizzed on. So, let's go ahead and select the addition quiz.
Once we do that, we'll get presented with another view that asks us if we'd like to view the scoreboard of all the users' high scores, or if we just want to start the quiz. So, let's go ahead and tap Start Quiz. Then, we get presented with each one of our questions. We're just going to answer them, and we get a total score at the end.
So now that we understand what this sample app does, let's talk about the steps that we'll take to adopt ClassKit.
So first we will talk about what type of activity -- context data makes sense for our sample app. After we do that, we'll discuss what type of student generated activity data, might also make sense.
We'll make sure that we support deep-linking. Now, there's two ways to do this. The first way is to use universal links.
So, if you already adopted universal links within your applications, you can simply just set the universal link property that lives on CLS Context.
Now, our sample app does not support universal links, so I'm going to show you the second approach, which is to use NS User Activities Continue Restoration Handler.
Then we'll make sure that we test our implementation using Developer Mode and the Schoolwork app. So, now let's talk about what type of context structure might make sense for this app. As a first approach, we might decide to do a one-to-one map of RUI to a Context Tree. And if we did that, we would end up with a structure that looks something like this.
At the top level, we have our main app context, which is our Quizzler app. Beneath that, we have our Addition Context and a Multiplication Context. And then beneath each one of those, we have the Scoreboard Context and then the actual Quiz Context.
Now, Pavel told us that a context is a part of our application that a teacher will assign to their students.
So, if we keep that in mind, let's first talk about the Scoreboard Context.
Well, what is the Scoreboard Context? It's all the users' high scores.
Now, does that really make sense for a teacher to assign to their students? Not really. So, we're going to go ahead and remove that. Now, we're left with a structure that looks something like this.
So, next let's focus on the Addition Context.
What is the Addition Context within our application? Isn't it really just the addition quiz? It's really just one thing. It's not two. So, those really should be combined into one. So, let's go ahead and do that and then the same goes for the multiplication context.
Now, we're left with a structure that looks something like this. Now, Pavel and I talked about it, and we decided that we may add a subtraction quiz and a division quiz in the future. And if we did that, we could easily add those as siblings.
Now, when you all are thinking about which structure makes sense for your applications, don't just think about your current feature set, but also consider what you might be doing in the future, and make sure that your structure will easily grow with you. So now, let's talk about the context themselves.
We want to make sure that we have clear titles, and that's because the title is the one piece of information that both students and teachers will have to know what this context represents.
We also want to define our context as early as possible.
For our sample app, we have static content. And so, we'll know what context to write as soon as the app launches. So, that's when we'll define ours.
Now, we might also want to always display our context in a particular order for teachers that makes sense.
So, for our sample app, that might mean our addition context should probably also be displayed above the multiplication context. So, to do that, we'll take advantage of the Display Order Property that lives on CLS Context. Now that we've determined what type of context data we're going to write, let's talk about the student generated activity. Here, I have a screenshot of the Schoolwork App, and this is a sample of what some activity data might look like.
For our quiz, I think it definitely makes sense to track the total amount of time that a student spends taking this quiz.
So, to do this, we can go ahead and call the Start and Stop Methods that live on CLS Activity.
Now, it might also be nice to show what the total score was that the student received.
And if we think about it, the total score is probably the most important piece of information about this whole quiz. So, we probably want to highlight it within the Schoolwork UI like we have here. Well, to do this, we can go ahead and create a CLS Score Item, and then we'll set it as the primary activity item. That way, it will get highlighted within the Schoolwork UI. Now, it might also be nice to indicate whether an individual question was correct or not.
So, to do this, we can go ahead and create CLS Binary Items and we'll add each one of those as an additional activity item on our activity.
So, now that we've determined what type of ClassKit close we're going to write, let's go ahead and see what that actually looks like in action. So here, I'm mirroring my display for you and have Xcode on screen.
The first thing that I'm going to do is select my project's target.
Once I do that, I'm going to select the Capabilities Pane, and we're going to find the ClassKit APIs right here.
Then, all we need to do is make sure that we toggle that on, and we're all set to start writing some ClassKit code.
So, first we're going to write our context and we said that we could do that as soon as the app launches. So, let's go ahead and open up the App Delegate.
And in here, let's go ahead and create a function that will publish our context for us.
Here we have our published context function, and what we're going to do is we're going to instantiate an instance if CLS Context, passing in the type of context that this is, giving it a unique identifier, and then a nice, clear, and concise title.
Then we make sure to set our display order because we want our addition quiz to display above our multiplication quiz.
Then, we're going to do the same for our multiplication quiz and a context and make sure to set the display order.
Once we do that, we're going to create a dictionary of our context that we will need to create. Then, we're going to grab the parent context that we want to add these to. Since our structure is flat, we know that our parent context is always going to be our main app context.
Now, let's issue a query to see if any of these contexts already exist. So, we're going to create a predicate, looking for all the context where the parent is the parent we just defined.
Then, we're going to issue that query to the CLS data store's shared instance.
For all the context that match, this predicate we just defined.
This will return an array of context.
We're just going to iterate over all of the context that we know already exist.
Then, for each one of those contexts that's already there, we're going to remove it from our dictionary of context that we need to create. Then, we're going to iterate over the remaining contexts that do not exist, and for each of one those contexts, we're just going to add it as a child context to our parents.
Then we call Save to Save our changes.
Now, what we need to do is call this function when our app launches. So, let's go ahead and run this code to test that our contexts were actually created. Here, I have a device and I'm mirroring my display for you.
So, awesome. Our Quizzler app launched.
But everything looks the same. So, how do we know that these contexts were actually created? Well, this is where we use Developer Mode and Schoolwork. So, I'm going to hit the Home button, and open up the settings up. Now, I'm going to scroll down and I'm going to look for the Developer Settings. When I select the Developer Settings, I'm going to see some ClassKit APIs.
If I select the ClassKit APIs, we can see that we can switch and act as the role of the teacher. So, I just make sure I select that. And now, we can hit the Home button and open up the Schoolwork app.
Now, when the Schoolwork app launches, I first get a Welcome screen. I'll go ahead and dismiss that. And then if we look in the top right-hand corner, I can see that I have a plus button. That's how I know that I'm logged in as a teacher. If I tap on that plus button, I'll get the Create a New Handout view. And I can add an activity.
Then I can select Apps, and we can see our Quizler app is showing up. If I select that, awesome, our contexts are there. So now, we've been able to validate that our contexts actually got created. I'd also like to point out that the addition quiz is displaying above the multiplication quiz. We've also now been able to validate that our display order was set correctly. So, let's go ahead and select the addition quiz. That's going to add that context to this handout. And now, let's just go ahead and send this handout to our class. I'm going to tap on the To field. Select my class. And let's just give a title to this handout. Now, I'm going to go ahead and hit Post. What this does is it sense this handout to my class, and it authorizes the context that's on this handout. So now, that context can start recording progress data.
We can see that my handout posted successfully, and I can tap on it.
Here we see the context that I've added, and I see my nice, app icon is right there next to the context name. If I tap on the icon, it should navigate me straight into the addition math quiz. So, let's go ahead and tap on that.
Uh-oh. Schoolwork launched our app, but this is not the addition math quiz.
Oh, yes. That's right. We forgot to add in deep-linking. So, let's go back to XCode and add that in. So, I'm going to go back to the App Delegate, and let's add in that Continue Restoration Handler. So here, the Continue Restoration Handler will process some user activity.
We're just going to grab that User Activity and get the Context Identifier Path.
Once we have the Context Path, we're going to instantiate our own internal quiz model that's associated with this context.
Then, we're going to make sure that we call our same published context function, and that so, if the context has not been created, we'll make sure to create them. This will return an optional error, and we'll make sure to handle any errors. Then, we're just going to sync back up with our main thread and instantiate our storyboard and also instantiate the correct view controllers for this quiz.
Then we're going to set our quiz on our view controller, and push on the appropriate views.
So, now let's go ahead and run this code and test that our deep-linking is working. So, I'm going to switch back to my device, and then we're going to navigate back to the Schoolwork app.
Here, let's tap on the icon one more time.
Awesome. It launched us straight into the addition math quiz. So, now we're ready to start writing our user generated activity data. So, let's go back to XCode, and let's navigate to the part of our code that gets called when a quiz first starts.
So, here, we said that we wanted to start the timer for our quiz. So, what we're going to do is we're going to issue a query to our CLS Data Source Shared Instance. And then we're going to query in our main app context for all of the descendants, that match the identifier path that's associated with this quiz.
This will return an optional context.
We're going to grab that context, make sure that we called the Become Active, and then we're going to instantiate a new instance of CLS activity. And that's because when this part of our code gets run, we know that the student is taking a new attempt at the quiz.
Then we're just going to cash that activity and a property that we have defined.
Then, we call Start on Activity to start our timer.
We also said that we wanted to report the answer for an individual or question. So, I'm going to navigate to the part of my code that gets called when a student taps on an answer. So here, what we're going to do, is we're going to get that same currently running activity that we just created. Once we have that, we'll instantiate a CLS binary item, giving it a unique identifier, and then a nice, clear title.
Then we'll make sure to pass in the type of binary item that this is. Now, we're going to set the value of whether the student got this question correct or not.
Then we're going to add this binary item as an additional activity item on our currently running activity.
The last thing that we said we wanted to do, was stop the timer and set the total score. So, we're going to navigate to the part of our code that gets called when a student ends an attempt.
Here, we're going to get that same currently running activity.
Once we have that, we're going to create a CLS score item, passing a unique identifier, title, and then we're going to pass in the score the student received out of the total maximum possible score.
Then, we're just going to add that score item as the primary activity item on our activity. Notice, every time I'm doing this, I'm always setting the same subclass of CLS activity item. It's always a score item.
Then, we're just going to call Stop to stop our timer and save to save all of our changes.
So, now let's go ahead and run this code to test that our student generated activity data gets set. So, I switch back to my device, and now we have to switch and act as the role of a student. So, I'm going to go ahead and go back to my Developer's Settings. And the settings are all up here. We can tap on student and now I'm switched to act at the role of a student.
Now, we can go back and open up the Schoolwork app. Here, if you look in the top right-hand corner, there no longer is a plus button, and that's how I know I'm logged in as a student. And we can see that I have the handout the teacher assigned to me. If I tap on that, we can see the context that I need to complete, and I can tap on the icon and it navigates me straight into the quiz.
Now, I can an alert saying that progress data is going to be recorded on my behalf and sent to my teacher. So, I'll dismiss this.
Then we just go through, answer all of our questions, and we get our total score at the end. So, we can see we got 100%. So now, let's go back to the Schoolwork app. Here we can see our activity data showing up. We can see the time and the total score. Notice the total score is highlighted right there in the main part of the . Now, we've been able to validate that our activity item was set correctly. I can also tap on the cell, and I get a popover of all the activity data I've written. I can see the total score and in light gray, I see the title of Total Score that I set.
And then at the bottom, we can see the time, and then each individual question. And then also in light gray, we can see the title that I set for each one of those individuals questions.
So now, we've been able to validate that our activity data was getting written.
So, with that, I would like to reintroduce Pavel back on stage to go ahead and summarize everything that we've seen. Thank you, Marin.
So, I'd like to mention some best practices about ClassKit.
For one, declare your contexts as early as possibly so that they're available to teachers to assign. And also, Marin showed us that not everything needs to be a context .
If it makes sense, take advantage of CLS Data Store Delegate.
And also, please take advantage of additional activity items. They really are a great way to provide extra information that teachers might need to understand what the student is doing within your app. There's also some general best practices about education apps. One of them is to StoreKit dependence.
And this is because in-app purchases don't really work within a school environment. That one is to support purgeable storage. This is a good idea in general, but it's real important in school environments where shared iPods are common, and space is a premium on those. Lastly, implement setting access via Managed App Config. Doing that, makes school admin's jobs a lot easier to configure devices.
You can find links about all of this and the going details at developer.apple.com/education.
Now, with that, have a wonderful rest of WWDC. Thank you for coming. [ Applause ]
-