-
Create engaging content for Swift Playgrounds
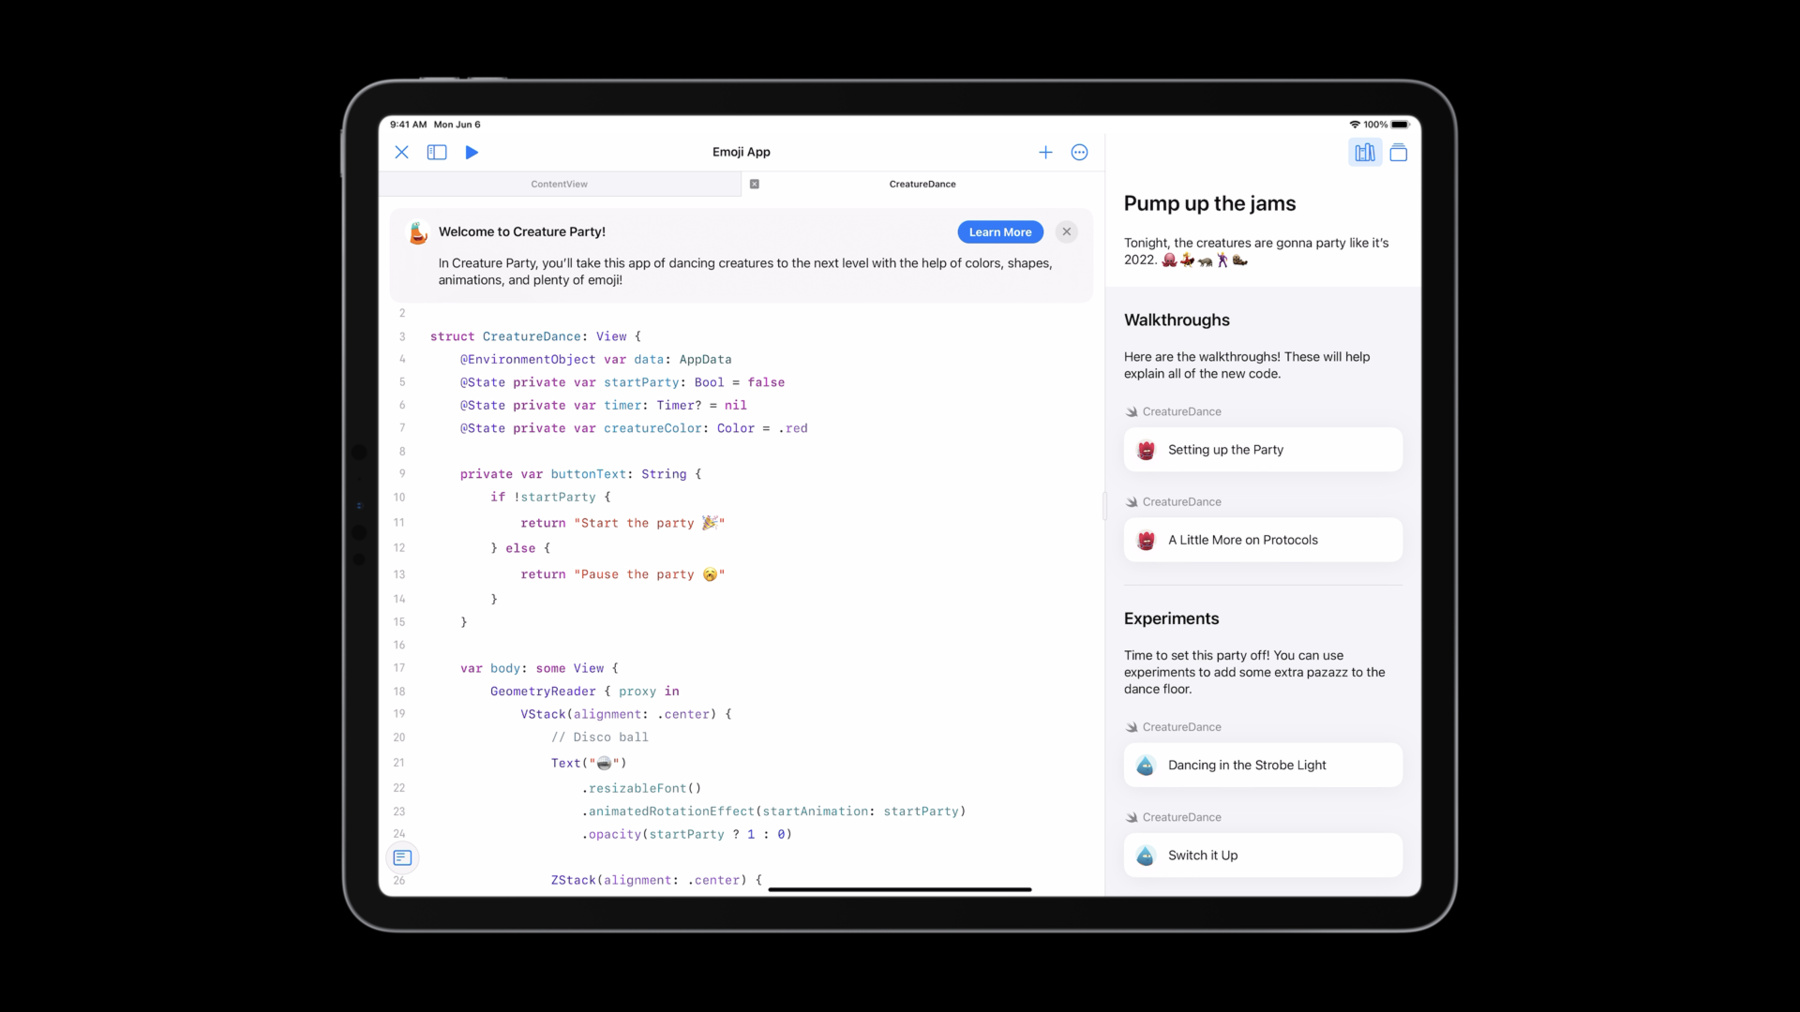
Learn how you can build guided instructional content designed for Swift Playgrounds. Follow along with us as we explore how you can add a guide to a completed sample code project. We'll demonstrate how to add tasks to your learning center to show off relevant code and optional experiment tasks that encourage learners to extend the project with code of their own.
Ressources
Vidéos connexes
WWDC22
-
Rechercher dans cette vidéo…
-
-
1:27 - Dance Floor
let numOfTiles = 100 let squareLength = 150.0 // Dance floor ForEach(0 ..< numOfTiles, id: \.self) { index in let i: CGFloat = CGFloat(index / 10) let j: CGFloat = CGFloat(index % 10) let x = (squareLength * i) - (squareLength) let y = (squareLength * j) - (squareLength * 2) Rectangle() .frame(width: squareLength, height: squareLength) .border(.black, width: 3) .position(x: x, y: y) .randomizedColorEffect(startAnimation: startParty) } .blur(radius: 15) .opacity(startParty ? 1.0 : 0.0) -
1:47 - Dance
ForEach(data.creatures) { creature in Text(creature.emoji) .resizableFont() .animatedScalingEffect(startAnimation: startParty) .randomizedOffsetEffect(startAnimation: startParty, x: midX * 0.6, y: midY * 0.6) .animatedRotationEffect(startAnimation: startParty) .opacity(startParty ? 1.0 : 0.0) } -
2:08 - Disco Ball
Text("🪩") .resizableFont() .animatedRotationEffect(startAnimation: startParty) .opacity(startParty ? 1 : 0) -
5:12 - Guidebook Directive
@GuideBook(title: "Creature Party!", icon: icon.png, background: background.png, firstFile: CreatureDance.swift) { } -
5:28 - Welcome Message
@WelcomeMessage(title: "Welcome to Creature Party!") { In Creature Party, you'll take this app of dancing creatures to the next level with the help of colors, shapes, animations, and plenty of emoji! } -
5:37 - Guide and Step Directives
@Guide { @Step(title: "Pump up the jams") { } } } -
5:53 - Content and Media Directive
@ContentAndMedia { Tonight, the creatures are gonna party like it's 2022. 🐙💃🦝🕺🦦 } -
7:15 - Task Group Directive
@TaskGroup(title: "Walkthroughs") { Here are the walkthroughs! These will help explain all of the new code. } -
7:57 - First Walkthrough Task
@Task(type: walkthrough, id: "partyMode", title: "Setting up the Party", file: CreatureDance.swift) { } -
8:44 - First Walkthrough Page
@Page(id: "1.modifier", title: "") { This is a [view modifier](https://developer.apple.com/documentation/swiftui/viewmodifier). Modifiers let you create unique versions of a view in SwiftUI. } -
9:48 - Walkthrough Highlight
ForEach(data.creatures) { creature in Text(creature.emoji) .resizableFont() /*#-code-walkthrough(1.modifier)*/ .animatedScalingEffect(startAnimation: startParty) /*#-code-walkthrough(1.modifier)*/ .randomizedOffsetEffect(startAnimation: startParty, x: midX * 0.6, y: midY * 0.6) .animatedRotationEffect(startAnimation: startParty) .opacity(startParty ? 1.0 : 0.0) } -
11:56 - First Walkthrough extra pages
@Page(id: "1.struct", title: "") { Custom view modifiers are structures that contain code for explaining how to modify whatever view the given modifier is attached to. } @Page(id: "1.body", title: "") { The body method allows you to add custom view modifications. For example, here you're adding a scaling animation that grows and shrinks the `Creature` over a certain period of time. } -
12:18 - Second Walkthrough Task
@Task(type: walkthrough, id: "protocol", title: "A Little More on Protocols", file: CreatureDance.swift) { @Page(id: "2.protocol", title: "") { All custom view modifiers implement the `ViewModifier` protocol. } @Page(id: "2.body", title: "") { The `ViewModifier` protocol requires all structures that implement it to write the `body(content:)` method. } @Page(id: "2.usage", title: "") { After you've written content for your `body(content:)` method, you can use it on any view you want. Here you'll use it on each `Creature` to add a rotation animation. } } -
14:21 - First Experiment Task
@TaskGroup(title: "Experiments") { Time to set this party off! You can use experiments to add some extra pazazz to the dance floor. @Task(type: experiment, id: "colors", title: "Dancing in the Strobe Light", file: CreatureDance.swift) { } } -
14:48 - First Experiment Page
@Page(id: "3.code", title: "", isAddable: true) { ``` .colorMultiply(creatureColor) ``` } -
15:55 - Experiment Task Comment
ForEach(data.creatures) { creature in Text(creature.emoji) .resizableFont() /*#-code-walkthrough(1.modifier)*/ .animatedScalingEffect(startAnimation: startParty) /*#-code-walkthrough(1.modifier)*/ .randomizedOffsetEffect(startAnimation: startParty, x: midX * 0.6, y: midY * 0.6) /*#-code-walkthrough(2.usage)*/ .animatedRotationEffect(startAnimation: startParty) /*#-code-walkthrough(2.usage)*/ .opacity(startParty ? 1.0 : 0.0) //#-learning-task(colors) } -
17:42 - Experiment Text
@Page(id: "3.lights", title: "") { Next, add some colors to the creatures so it looks like they're dancing under the lights! } -
17:55 - Second Experiment Task
@Task(type: experiment, id: "timer", title: "Switch it Up", file: CreatureDance.swift) {
    @Page(id: "4.lights", title: "") {
      	Now that you have some colors, you can add some code to change the color of the creatures using a timer. Let's add one!
    }
    @Page(id: "4.code", title: "", isAddable: true) {
        ```
        .onTapGesture {
          if let timer = timer {
            timer.invalidate()
            self.timer = nil
          } else {
            creatureColor = Color.randomColor
            timer = Timer.scheduledTimer(withTimeInterval: 2.0, repeats: true, block: { timer in
                                                                                       creatureColor = Color.randomColor
                                                                                      })
          }
        }
        ```
    }
}
-