-
What’s new in Wallet
Explore the newest design updates and developer tools for Apple Wallet passes. Refresh your passes with beautiful new styles for rich, vibrant designs. Discover new barcode formats and a flexible pass actions API. Meet Pass Designer and Pass Builder, powerful tools that simplify designing, personalizing, and distributing your passes at scale.
Chapters
- 0:01 - Introduction
- 0:40 - Poster Generic
- 2:36 - Barcodes
- 4:27 - Featured actions
- 5:46 - Developer tools
- 5:47 - Pass Designer
- 10:40 - Pass Builder
- 13:50 - Personalizing a pass template
- 15:01 - Next steps
Resources
- Pass Designer
- Creating a pass with Pass Designer
- Pass Builder
- Pass.Barcodes
- Learn more about Pass Designer
Related Videos
WWDC25
WWDC24
-
Search this video…
Hi, I'm Shaun. And welcome to "What's New in Wallet". Since their introduction, passes have become an essential part of how people move through their day. From picking up a morning coffee, to tapping through transit gates, to checking in and boarding a flight, all without ever handing over a physical card. Passes help people move through the world faster, more privately, and more securely. In iOS 27, we're taking passes further than ever. iOS 27 introduces a stunning new pass style called Poster Generic. Four new barcode types, giving you more flexibility at the point of presentation. And a powerful new way for passes to surface relevant actions, right below the pass face.
And we're also introducing a brand new suite of developer tools for Mac and server platforms, making it easier than ever to design, personalize, and build great passes.
We have a lot to cover, so let's dive straight in with the brand new pass style, Poster Generic.
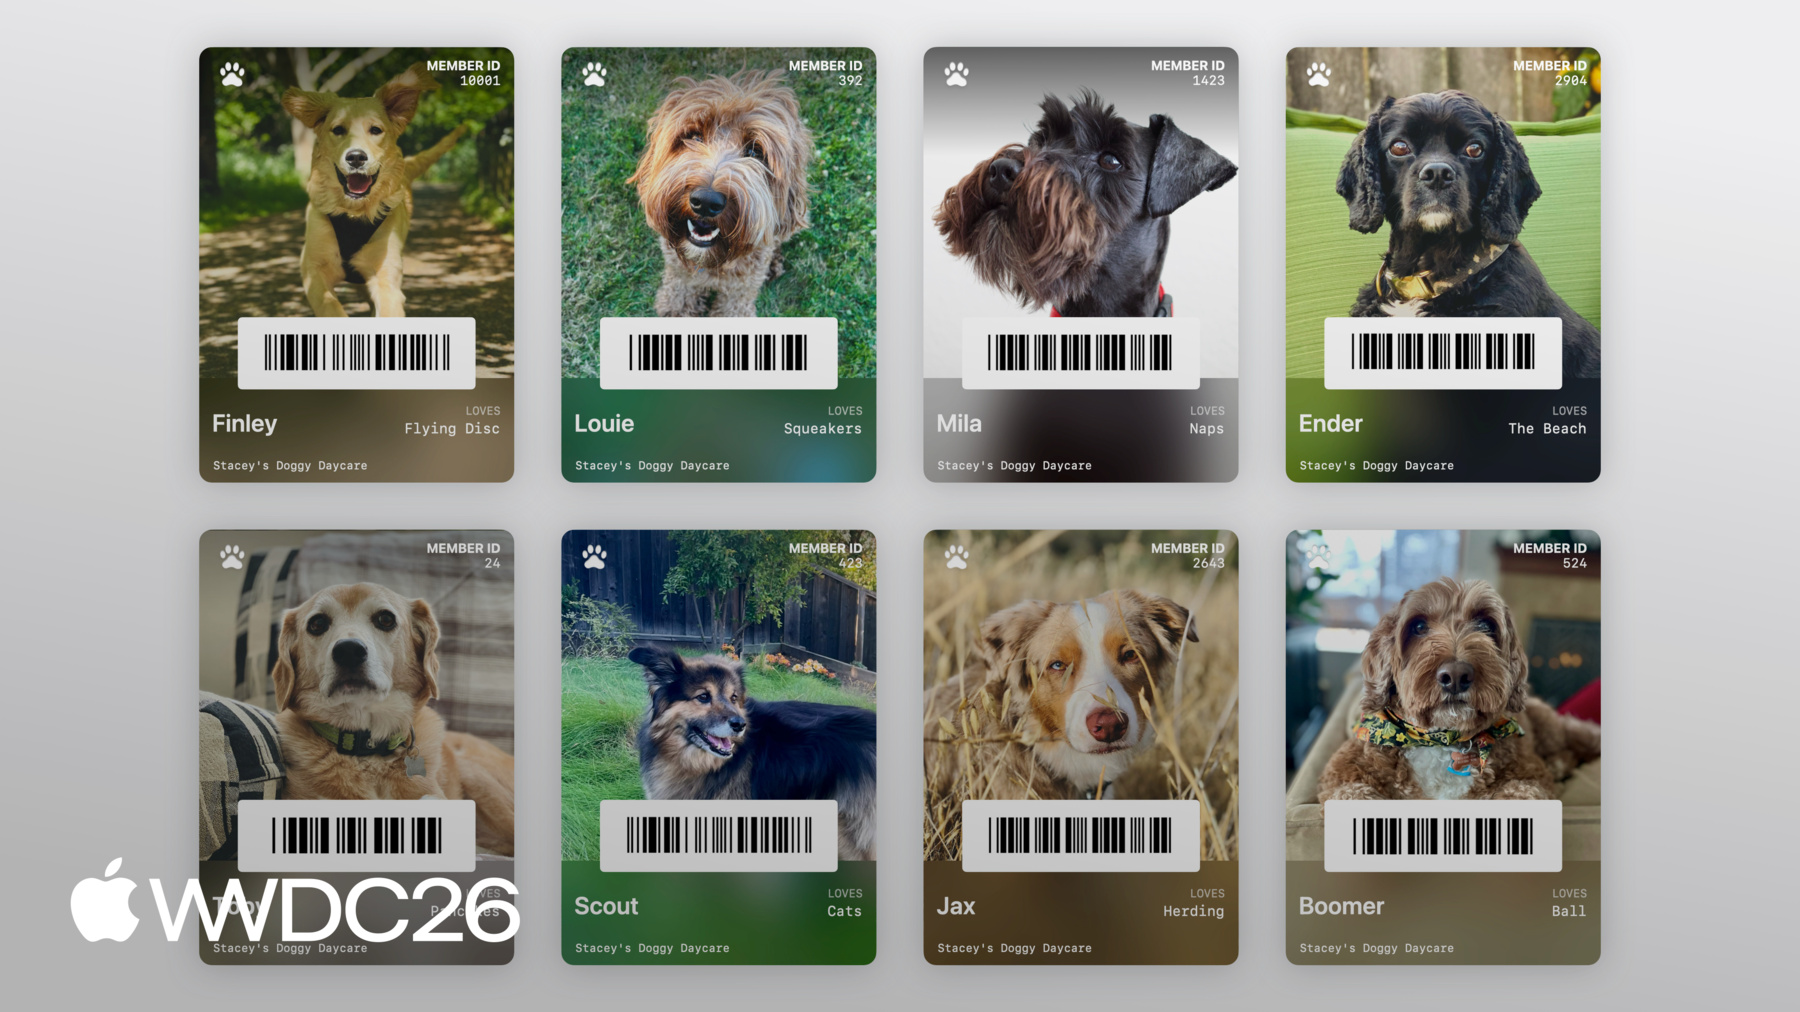
Poster Generic is a great fit for membership cards, loyalty programs, store cards, and anywhere you want bold, colorful artwork to take center stage.
The pass face consists of a background image, a primary logo, header fields, primary fields, a footer field, and lastly, a barcode if supplied. To adopt this pass style, in the pass.json of your pass bundle, specify the posterGeneric top-level style key. Then add your content with the usual pass fields structure, and the pass will take care of laying everything out across the pass face.
One thing to keep in mind, is that the pass face supports a single footer field, so if you include more than one, only the first will be displayed.
Poster Generic requires iOS 27 or later.
To support customers on iOS 26 and earlier, we recommend including the existing generic top-level style key, alongside the posterGeneric style key in your pass.json, with relevant fields under each.
That way, customers who have not yet made the update to iOS 27, will still be able to add your pass to Wallet. Next, in iOS 27, passes support four new barcode types. EAN-13, Code 39, Codabar, and ITF.
These are specified using the existing barcode object and barcodes array in your pass.json.
For example, to present your barcode in Codabar format, set the format of your barcode to PKBarcodeFormatCodabar.
You can find the full list of format definitions in the Wallet Passes documentation. Because previous versions of iOS do not support these new formats, we strongly recommend providing an array of barcodes in priority order. By providing multiple barcodes, you give the system the best chance of rendering a barcode your hardware can scan, regardless of which operating system version your customer is on.
If you only provide one of the new barcode types and nothing else, the pass will not render a barcode on iOS 26 and earlier.
So we recommend leading with your preferred format, and falling back gracefully.
Now we do recognize that there are some circumstances, where supporting multiple barcode types simply isn't an option. If that's your situation, there are two things you should do. First, surface the credential ID in a pass field so it can be entered manually, and make it easy to find. Consider using a primaryField, or headerField, so it's prominent on the pass face.
Second, make sure your front-line staff are trained for manual entry workflows. A pass that can't be scanned, shouldn't result in a blocked customer. Getting this right, can mean the difference between a seamless experience and a frustrating one. Next, lets talk about featured actions.
With the second generation event ticket introduced in iOS 18 you can provide semantic URLs to expose additional user actions drawn below the pass, such as viewing the event schedule. In iOS 27, there's a new flexible API, that allows you to provide actions for all pass styles. In the top level of your pass.json, define the featuredActions key, which takes an array of action objects. Each action is defined as a unique ID, the action type, and a value, such as a URL. For example, to provide an action to view offers, I'd set the identifier to a unique ID, the action type to membershipBenefits, and a URL to navigate the user. Wallet draws this below the pass, with an appropriate colorful icon and a localized call-to-action.
Each pass can contain up to two featured actions. We recommend providing only the most meaningful and relevant actions to your customers, and provide your actions in priority order.
You can find the full list of supported actions types and their expected values in the Wallet Passes documentation. Now, passes have gained a lot of features and functionality over the last decade. And it can be hard to connect what is described in the pass bundle, to the visual representation presented on device.
So we're excited to announce a brand new app, for Mac, that makes designing passes easier than ever. And it's called Pass Designer.
Pass Designer is a what-you-see-is-what-you-get editor, giving you a true-to-iOS rendering of your pass as you build it.
Pass Designer creates template files. To convert a template into a personalized, signed pass ready for distribution, alongside Pass Designer we're also announcing a new Swift on Server package called Pass Builder. Pass Builder runs on Mac and Linux. It provides a Swift API, and a command-line executable, called buildpass.
My friend Stacey runs a doggy day care, and I want to help her create membership cards for each of her fluffy clients. I'm going to use Pass Designer to design a template, and then use Pass Builder on Server to personalize the template, and distribute passes at scale.
Let's jump into Pass Designer.
And here we go. A live preview of the pass on the right, and a sidebar to edit the pass on the left.
The sidebar allows you to configure the pass Identity & Signing configuration, the pass style, images, barcodes, fields, and semantics, if the pass style supports it. So this is a bit of a blank canvas. But I know Stacey takes some gorgeous portrait photos of each dog, so lets experiment with the new Poster Generic style and see how those photos look. So I'll go into Style, and change the pass style to Poster Generic.
And then, I'm gonna navigate to Images in the sidebar and drag in a sample photo, Stacey has given me from my Desktop.
That looks like it fits quite nicely. Now lets add some fields.
I'll navigate to Header Fields in the sidebar, and add a new header field.
I'm going to set the key to DOG_ID, the label to Member ID, and add a placeholder ID to see how it looks. Great. Now lets add some primary fields for dog name, and their favorite toy. In the sidebar, I'm going to navigate to Primary Fields, and add a primary field for name.
I'll set the key to DOG_NAME.
Now here's a neat trick with the Poster Generic pass face, if I omit the label on the first primary field, we'll get the cool bold title for the field value.
So I'm going to type in a placeholder name of Finley. And add a primary field for favorite toy. So again, I'll navigate to Primary Fields, and add a new field.
I'll set the key to LOVES, the label to Loves, and add a placeholder value of Flying Disc. And now lets make it super easy for Stacey to check each dog in and out of daycare, by encoding their member ID, as a barcode.
I'm going to head over to Barcode & NFC.
And write in a placeholder barcode message. This works, but I don't think I need to use that much space for a QR code. Lets try a narrow barcode type instead, such as PDF417.
I'm going to click on the Format picker, and select PDF417. That looks much better. Now lets add some finishing touches, by adding a Primary Logo.
I'll navigate to Images, and drag in the Primary Logo from my Desktop.
And adjusting the colors by navigating to Style, and setting the Label Color. And the final finishing touch, adding "Stacey's Doggy Day Care" to the footer.
I'll navigate to Footer Fields, and add a new field.
And set the text value to Stacey's Doggy Day Care.
Now that's a cute pass, for a very cute dog.
The very last thing to do, is to save our template.
Pass Designer saves templates as pkpasstemplate files.
I'm going to go to File, then Save, and then save the template.
Now, I don't want to create an individual pass for every member of Stacey's Doggy Day Care in Pass Designer. Instead, I want to personalize this template at scale, on a server, using Pass Builder. I'm going to switch over to the Swift server, for Stacey's Doggy Day Care. First, I'm going to add PassBuilder, as a dependency, to the Swift package manifest, and to the server target.
Now I'm going to implement this function createPass in the server source, to generate a personalized pass. The function createPass receives a model already loaded from the database, with the dog's name, membership ID, their favorite toy, and a URL to a gorgeous photo of each dog. Let's get started by first loading the template I made earlier, using the PassPackage type. PassPackage provides a type-safe way to access and configure the pass bundle, including a pass property to interact with the contents of the pass.json. Let's personalize the fields.
I'll call setValue on the pass fields property to set the dog's name, their membership ID and their favorite toy.
Now let's set the background image to the photo of the dog.
I'm going create an instance of PassImage, passing in a URL to the photo of the dog, and assigning it to the background image property on the pass package type. And lets configure the barcode, so dogs can be quickly checked in and out of day care.
I'll create a Pass.Barcode, with the encoded message being the dog's membership ID, and using the PDF417 format.
And lastly, I think it'd be great to have a featured action for clients to view their membership, so lets add that by setting a Pass.Action on featuredActions. And just like that the server is generating a personalized pass. Now, we need to build our pass and sign it for distribution.
As a reminder, to build and sign a pass for Wallet, you need to generate and write a manifest of the contents of your pass, into your pass bundle. Then create a detached signature of the manifest, and write the signature into your pass bundle. Then compress the resulting directory and add the .pkpass file extension. Pass Builder takes care of all of that for you. You just need to provide the certificates. Going back to the server source. Using the PassCertificate type, I'm going to load the pass signing certificate, and the WWDR intermediate certificate. Next, I'm going to create an instance of PassSigner, passing in the certificates. And finally, I'm going to call the signPass function on PassSigner, passing in the personalized package I made earlier, and the URL on disk, to write the signed pass for distribution. And then return the URL.
And now Stacey's doggy day care has gorgeous Wallet Passes for every client.
Pass Builder can also be used from other programming languages. The swift-java project can generate native Java bindings for the Swift API, allowing you to invoke Pass Builder from the Java runtime. We're also making protobuf definitions of the pass package format available, allowing you to generate type-safe models in your preferred programming language. You can then generate a customization message, and invoke the buildpass command line executable, to personalize and sign your pass. For more information on using swift-java, check out the "Explore Swift and Java interoperability" developer session. And for documentation on the buildpass command line, see the Pass Builder developer documentation. Both of which are linked in the session description.
And that's a brief end-to-end demo of Pass Designer and Pass Builder. From designing a template, to personalizing it, to signing it for distribution.
You can find links to download Pass Designer, the Pass Builder source, and comprehensive documentation in the session description.
I've covered a lot today, so for next steps. Check out Pass Designer. Use Pass Designer to experiment with the new Poster Generic style, and check if it's the right fit for your pass.
If you plan on adopting any of the new barcode types, make a plan for providing graceful fallbacks.
And take a moment to identify the most meaningful and relevant actions for your customers, then bring them to life, with featured actions. This is a new chapter for building Wallet Passes, and we're so excited to see all the amazing passes you're going to create. Thanks for watching, and have a wonderful WWDC.
-
-
1:41 - Adopting Poster Generic
// Adopting Poster Generic "posterGeneric": { "headerFields": [ { "key": "memberID", "label": "Guest No.", "value": "102035" } ], "footerFields": [ { "key": "membershipType", "value": "Family Pass" } ] } -
2:11 - Adopting Poster Generic with Generic fallback
// Adopting Poster Generic and supporting Generic on iOS 26 and earlier "posterGeneric": { "headerFields": [ { "key": "memberID", "label": "Guest No.", "value": "102035" } ], "footerFields": [ { "key": "membershipType", "value": "Family Pass" } ] }, "generic": { "headerFields": [ { "key": "memberID", "label": "Guest No.", "value": "102035" } ], "footerFields": [ { "key": "membershipType", "value": "Family Pass" } ] } -
2:52 - Barcodes: Add new types for iOS 27
// Adopting new barcode types "barcodes": [ { "format": "PKBarcodeFormatCodabar" "message": "…" "messageEncoding": "…" } ] -
3:37 - Barcodes: Supporting iOS 26 and earlier
// Adopting new barcode types and supporting iOS 26 and earlier. "barcodes": [ { "format": "PKBarcodeFormatCodabar" "message": "123456789" "messageEncoding": "iso-8859-1" }, { "format": "PKBarcodeFormatQR" "message": "123456789" "messageEncoding": "iso-8859-1" } ] -
4:48 - Featured actions
// Featured actions "featuredActions": [ { "identifier": "my-offer-id", "type": "membershipBenefits", "url": "www.example.com/offers" } ] -
10:56 - Package.swift
// Package.swift import PackageDescription let package = Package( name: "MyServer", products: [ .library( name: "MyServer", targets: ["MyServer"] ), ], dependencies: [ .package(path: "./path/to/PassBuilder") ], targets: [ .target( name: "MyServer", dependencies: [ .product(name: "PassBuilder", package: "PassBuilder") ] ), … ] -
11:05 - CreatePass.swift
// CreatePass.swift import PassBuilder func createPass(for doggo: MemeberModel) async throws -> URL { var package = PassPackage(url: "template.pkpasstemplate") package.pass.fields.setValue(doggo.name, forKey: "DOG_NAME") package.pass.fields.setValue(doggo.favoriteToy, forKey: "LOVES") package.pass.fields.setValue(doggo.id, forKey: "MEMBER_ID") package.background = PassImage(url: doggo.photoURL) package.pass.barcodes = [ Pass.Barcode(message: doggo.id, format: .pdf417) ] package.featuredActions = [ Pass.Action(id: "action-1", type: "viewMembership", url: doggo.membershipURL) ] … } -
13:11 - CreatePass.swift
// CreatePass.swift

import PassBuilder

func createPass(for doggo: MemeberModel) async throws -> URL {
    var package = PassPackage(url: "template.pkpasstemplate")

    package.pass.fields.setValue(doggo.name, forKey: "DOG_NAME")
    package.pass.fields.setValue(doggo.favoriteToy, forKey: "LOVES")
    package.pass.fields.setValue(doggo.id, forKey: "MEMBER_ID")

    package.background = PassImage(url: doggo.photoURL)

    package.pass.barcodes = [
        Pass.Barcode(message: doggo.id, format: .pdf417)
    ]

    package.featuredActions = [
        Pass.Action(id: "action-1", type: "viewMembership", url: doggo.membershipURL)
    ]

    let passCertificate = try PassCertificate(url: "pass.p12", password: "s3cr3t")
    let wwdrCertificate = try PassCertificate(url: "wwdr.cer")

    let signer = PassSigner(
        passCertificate: passCertificate,
        wwdrCertifiate: wwdrCertificate
    )

    let destinationURL = URL(string: "/www/passes/" + doggo.id)
    try signer.signPass(package, writingTo: destinationURL)

    return destinationURL
}
-
-
- 0:01 - Introduction
Since their introduction, Wallet passes have become an essential part of how people move through their day. From picking up a morning coffee — to tapping through transit gates — to checking in and boarding a flight — all without ever handing over a physical card. Passes help people move through the world faster, more privately, and more securely.
- 0:40 - Poster Generic
In iOS 27, Wallet is introducing a brand new pass style called Poster Generic. The pass face consists of a background image, a primary logo, header fields, primary fields, a footer field, and a barcode (if provided). On iOS 26 and earlier, include the Generic pass style in your `pass.json` for backwards compatibility.
- 2:36 - Barcodes
In iOS 27, Wallet passes support four new barcode types: EAN-13, Code 39, Codabar, and Interleaved 2 of 5 (ITF). These are specified using the existing `Barcode` object and `barcodes` array in your `pass.json`. On iOS 26 and earlier, provide support barcode type, such as a QR code.
- 4:27 - Featured actions
In iOS 27, Wallet passes can provide actions for all pass styles, called featured actions. In the top-level of your `pass.json`, define the `featuredActions` key, which takes an array of `Action` objects. Each action is defined as a unique ID, the action type, and a value, such as a URL. Each pass can contain up to 2 featured actions, in priority order.
- 5:46 - Developer tools
We're introducing a brand new suite of developer tools for Mac and server platforms, making it easier than ever to design, personalize, and build great passes with Pass Designer and Pass Builder.
- 5:47 - Pass Designer
Pass Designer is a WYSIWYG editor, giving you a true-to-iOS rendering of your pass as you build it.
- 10:40 - Pass Builder
Pass Builder takes the pass templates created in Pass Designer, and allows you to personalize, sign and validate your passes. Pass Builder can also be used from other programming languages.
- 13:50 - Personalizing a pass template
The swift-java project can generate native Java bindings for the Swift API, allowing you to invoke Pass Builder from the Java runtime. We're also making protobuf definitions of the Pass Package format available, allowing you to generate type-safe models in your preferred programming language. You can then generate a customization message, and invoke the `buildpass` command line executable to personalize and sign your pass.
- 15:01 - Next steps
Check out Pass Designer. Use Pass Designer to experiment with the new Poster Generic style — and check if it's the right fit for your pass. If you plan on adopting any of the new barcode types, make a plan for providing graceful fallbacks. And take a moment to identify the most meaningful and relevant actions for your customers, then bring them to life with featured actions.