Learn how the model element brings interactive 3D content to your websites — now on iOS, iPadOS, macOS, and visionOS. Discover tools for creating and optimizing 3D assets. Explore model element's features and see how web standards are shaping the future of 3D on the web.
Hi, my name is Aleksei an engineer from the Safari team. Today I'm thrilled to tell you about the HTML Model element, and how we're making it easier for developers to bring 3D content to the web across Apple platforms and beyond.
Whether you're a web developer exploring 3D for the first time, or an experienced 3D artist looking to bring your work to the web, I've got everything you need to get started. We pioneered the Model element in visionOS — a native HTML element that makes adding a 3D model as simple as adding an image.
Now the Model element comes to iOS, iPadOS, and macOS! The same markup, the same element works across Apple's platforms.
Your 3D content reaches every Safari visitor whether they are on iPhone on the go, on iPad at the coffee shop, or on Mac at their desk.
You might be familiar with "model-viewer", the go-to JavaScript library for 3D today. It's served developers well, but the Model element is native: no extra library, rendered directly by the platform, with built-in stereoscopic rendering on visionOS. It's also an emerging web standard, so your code is future-proof.
To reach all platforms across the web, a polyfill is available for browsers that don't natively support the Model element yet.
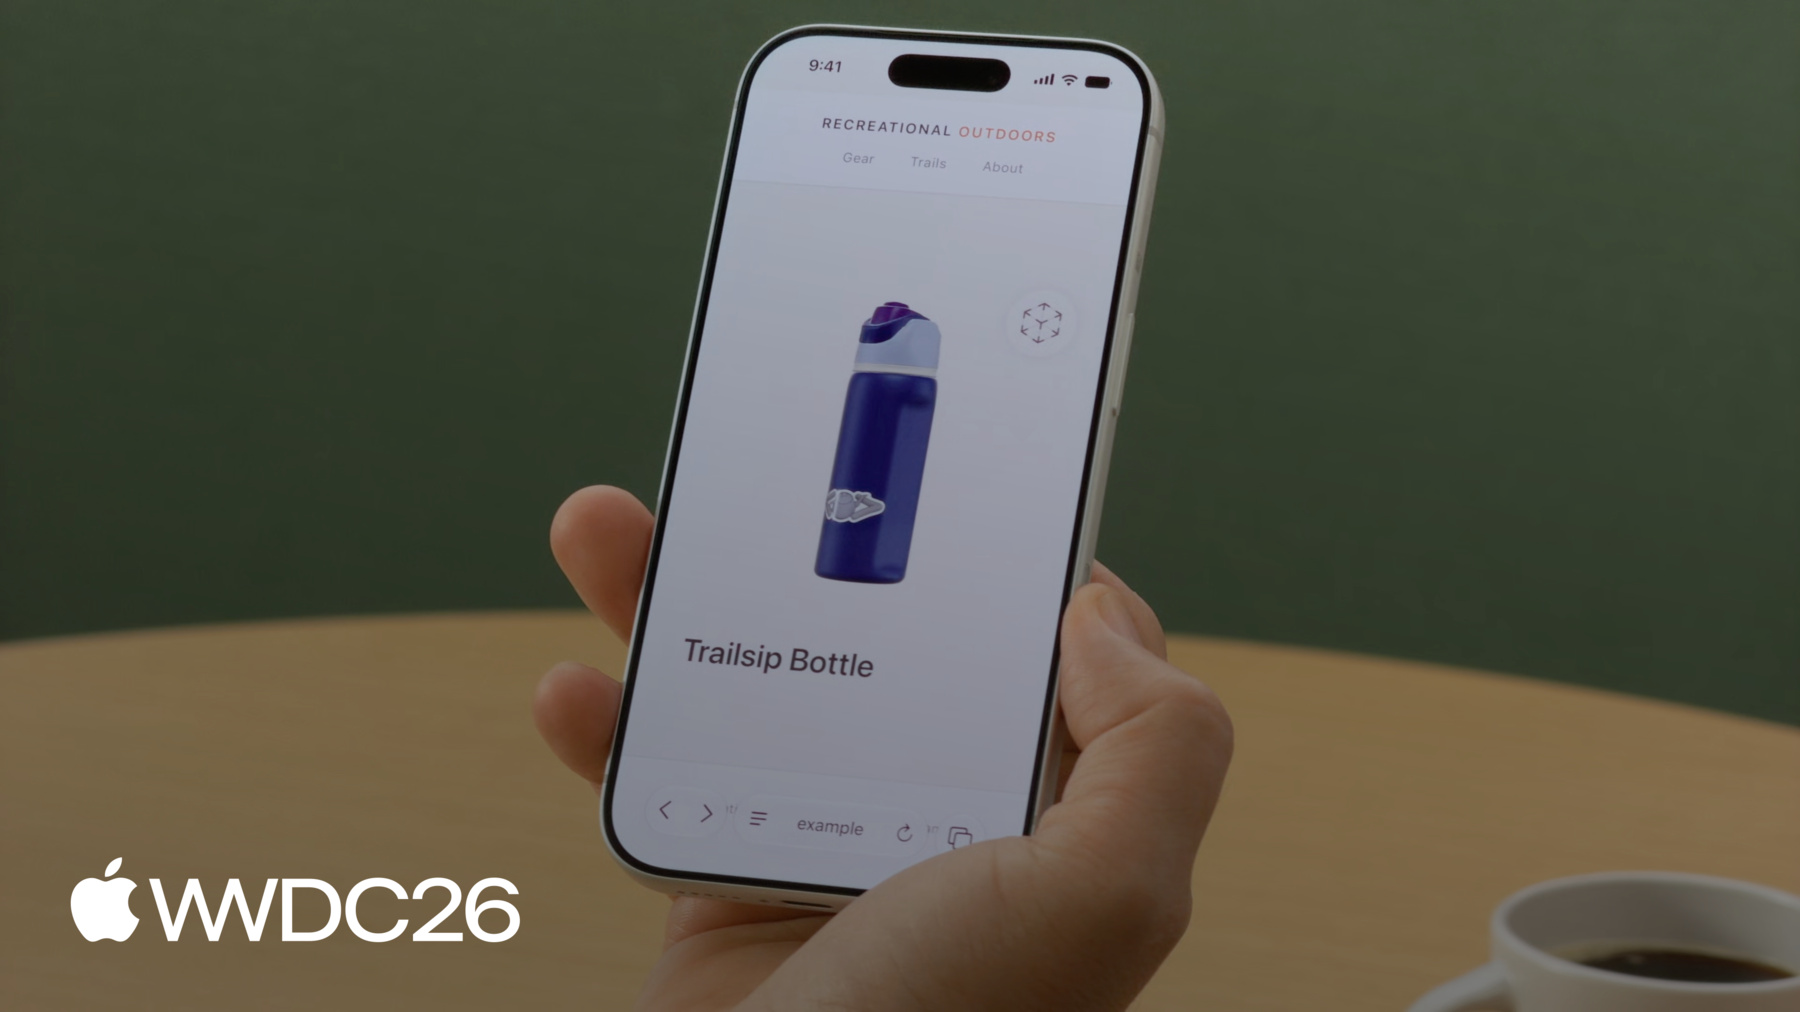
I'll cover that in more detail later. Let's say I'm working on an e-commerce platform for outdoor adventures and I already have images for the products. Today, I'll walk you through adding 3D models to the product pages.
First, I'll show you how to get assets ready. Then, we'll dive into the Model element building up the experience one feature at a time.
And finally, I'll show you command-line tools to optimize models for production. Let's get into it.
What if you don't have 3D assets in the first place? We recommend a Capture, Convert, Create approach using your iPhone to scan real-world objects, converting existing files, or building from scratch in tools like Blender.
But there's also been a revolution in generative AI and with it an entirely new way to make the content you want. You can use images to generate a model that matches a real-world object, or a text prompt for more creative generation. Apps like Tripo3D and Meshy.ai are only a couple to choose from. My store already has a few products, but I want to add an essential: a camping mallet. I started with several images of a mallet and after a few minutes, my model was ready to use. I exported it as a USDZ file.
The Model element supports USDZ — Universal Scene Description, zipped into a single file. It packages everything a 3D model needs: geometry, materials, textures, animations.
Safari supports other formats too, but for the best experience, I would recommend starting with USDZ. It's time to put a model on the page. Now, the mallet is ready as a USDZ file. I'll cover different ways of presenting the Model element. I'll talk about how to embed a model, know when it's ready to display, and handle fallbacks.
How to match the model to my page design. Let visitors interact and explore.
I'll guide you on how to implement custom transforms and play animations.
And bring models into the real world with AR Quick Look and spatial computing. OK, starting with loading a model.
Just like tag or you point tag at a file with the source attribute, and the browser handles the rest. No plugins required. You can also use the tag with a specified mime type again the same pattern as
It's also important to think about fallback. The simplest approach: place an tag inside your tag. Older versions of Safari and browsers that don't yet support the Model element will render the image instead. Your visitors still get an idea of the product. 3D models can be tens of megabytes or more in size, so it can take a while to load. The ready promise lets you know when the model is actually loaded and ready to display.
While the model is loading, it's a good idea to provide a visual cue like a spinner. Hide it when the ready promise resolves.
And if something unexpected happens, handle it in the catch block and show your fallback content.
You can also polyfill the model functionality as well. A polyfill retrofits the API of a new standard via JavaScript letting you use modern features even before they land on every platform. The Model element samples at the W3C show an example of exactly this. If the native element isn't defined on the window, they load the polyfill library to fill in as much of the functionality as they can, as close to the native API as possible. Just make sure to test the functionality of both the polyfill and the native element, and remember that some features of the element can not be polyfilled, such as the stereoscopic display on spatial platforms like Apple Vision Pro.
The Model element is rendered in its own virtual space, so it won't pick up the page's background. To match your page design, set background-color directly on the model. Keep in mind: the background is always rendered opaque, even if you specify a color with transparency it will be converted. Now we have a model loaded and integrated into the existing page. Giving our visitors an option to interact with it is a natural next step. Let me show you how easy that is.
The stagemode attribute with value orbit lets your visitors rotate the model freely side-to-side and if they tilt it up or down, it gently springs back to its original angle. Interactive, but always looking its best. The attribute also makes the model slightly smaller — it's rescaled to ensure no parts get clipped during rotation. Sometimes you want to add custom interactivity to the experience. The entityTransform property lets you set exact viewing angles via JavaScript and I'm going to add two buttons to show how it works: one for Side view, and a Reset button to bring the model back to its original orientation. To use entityTransform, you'll need to disable orbit — either remove stagemode attribute or set it to "none".
When you transform the model manually, parts of it may get clipped or even disappear if rotated out of the visible area. You might need to adjust the position to make it visible.
To implement a transform I create a DOMMatrix — this represents the model's orientation in 3D space — then call rotateSelf to define the rotation. Here we're rotating 135 degrees around the Y axis to get the side view.
Finally, assign it to model.entityTransform to apply the change.
Capture the initial transform up front then use it to reset the model back to its original orientation.
The views switched instantly from one to another. To make that transition smooth, you can animate the rotation with requestAnimationFrame. First, set up the state: the current angle, the animation duration in milliseconds — 500 gives you half a second which feels snappy but smooth — and a reference to cancel any inflight animation.
The animateTo first cancels any running animation so transitions don't conflict, captures the current angle as the starting point, and marks the start time.
Then I add the step function. On each frame, it computes how far along the animation is, eases the rotation for a smooth finish, and updates entityTransform with a new DOMMatrix. While the animation is still running, it requests the next frame.
Finally, assign animateTo calls to the buttons. Side view animates to 135 degrees… reset to 0.
Let's see it in action. When a user taps Side button, the model smoothly rotates to show the side view. After tapping Reset it glides right back to where it started.
Custom transforms and animations give you full control, but they require extra work: bounding boxes, clipping, manual animation code. If your use-case allows it, the orbit stagemode gets you interactive 3D with a single attribute. Choose what works best for your product.
Models can also come to life with built-in animation. These animations are typically authored in 3D tools like Blender or Maya and baked into the USDZ file. The Model element plays the first animation track, and with a couple of lines of JavaScript, you can control the playback rate or even run it in reverse by providing a negative value.
To do that, I implement a simple play function that sets playbackRate on the model and calls model's play() method — that's it. A positive value plays forward, a negative one reverses it. Here I'm using 5 and -5 for a faster playback.
So far, the store visitors can explore products in 3D right on the page. But what if they want to see how it looks in their environment? Wrap the model in an tag with rel="ar" attribute, point to the same resource, and on iOS and iPadOS, your customers get a full AR Quick Look experience.
On visionOS, the Model element was already making 3D content feel like a natural part of the web.
With stereoscopic rendering, models gain real depth. Your customers can pull the product out of the page and examine it as if it were right in their hands.
visionOS also supports immersive website environments which use the Model element and let you transport your audience right inside a scene, all from Safari.
If you want to learn more about this feature, be sure to check the "Explore immersive website environments" session. It explains the API in detail.
With the assets ready and the model elements in place, let's see it all come together.
Here's our catalog page with 3D models.
And the interactive exploration is my personal favorite. Your customers can rotate, tilt, and view every angle of the product, exploring it in the way they want. All running right in Safari.
Our product page looks fantastic running locally, but you may find loading can take a while over the internet. It would be great if we could get these models smaller. To do that, I'm going to run a command-line tool called usdcrush on the boot model.
And with no change in quality, the file goes from 7.9 MB down to 1.9 MB! That's crushing savings! When we open both versions side- by-side in Safari — they look identical. Same visual quality, significantly smaller file.
If you have a 3D file, but no image for it yet, you can use usdrecord tool to generate a thumbnail or a fallback image directly, specifying things like output format or rendering from a custom camera if there's one in the file. And unlike a screenshot, you can write a script — well, who am I kidding? Your favorite LLM can write the script — to run it across your entire catalog. Both these command-line tools are already installed on your Mac. They're part of a larger suite of tools for working with USD content. You can learn more about all of them and the overall USD ecosystem… in the WWDC24 session "What's new in USD and MaterialX". The Model element started on visionOS, and with iOS, iPadOS, and macOS support, it's expanding across the Apple family and we want to bring it to the web at large. Our team actively contributing to the model specification at the W3C, and we would love to hear from you. If there are features you would add or use cases we haven't considered, now is a great time to share your feedback. Web standards are shaped by the developer community, and your voice matters. For 3D content in the USDZ file format, the Alliance of OpenUSD has published the full specification, a clear, vendor-neutral reference. The alliance also provides conversion tools and resources to help you integrate USDZ into your existing content pipelines. That's the Model element — from assets to production. Now, let me tell you about next steps.
Try to create a 3D model of your own using text-based prompts or images you already have.
Add a tag to your website, point it at a USDZ file, and see how it comes to life in Safari. Use the USD tools to optimize your assets. Play with it on different platforms and see how the element adapts.
Join the Immersive Web Community Group at the W3C. Bring your use cases, your feedback, and your ideas.
Catch up on the related sessions. Like "Immersive website environments." And for a deeper dive into spatial web features, see "What's new for the spatial web" from WWDC25.
I can't wait to see what you build. Thank you and have a great WWDC!
<!-- Using the src attribute --><modelsrc="mallet.usdz"></model><!-- Using a <source> child for MIME type --><model><sourcesrc="mallet.usdz"type="model/vnd.usdz+zip"></model>
The HTML model element, which brings 3D content to the web as simply as an image and now extends from visionOS to iOS, iPadOS, and macOS — how it compares to the model-viewer library and where it stands as an emerging web standard.
Approaches for creating 3D content: scanning with iPhone, converting existing files, authoring in tools like Blender, and generating models from images or text prompts. Why USDZ is the recommended format — it bundles geometry, materials, textures, and animations into a single file.
Embed a model with the tag's src attribute or a nested . Use a nested as a fallback for older browsers, await the ready promise to know when the model can be displayed, and load the W3C polyfill so the element works where it isn't supported natively.
Set background-color directly on the model element to match the surrounding page. The model renders in its own virtual space and doesn't inherit page styles, and any background is composited as fully opaque.
Add stagemode="orbit" to let visitors rotate the model with automatic spring-back and clipping protection. For custom interactivity, disable stagemode and drive the entityTransform property with a DOMMatrix to snap the model to specific viewing angles from JavaScript.
Animate between custom orientations by updating entityTransform inside requestAnimationFrame. The pattern captures a starting angle, eases each frame's rotation, and cancels any in-flight animation so successive transitions don't conflict.
Play animations baked into a USDZ file using the element's play() method and playbackRate property. Positive rates play forward, negative rates reverse, and the magnitude scales speed.
Use usdcrush to shrink USDZ files (often by 4x) with no perceived quality loss, and usdrecord to render thumbnails or fallback images from a 3D file. Both ship with macOS as part of the broader USD tool suite.
Generate a 3D model from images or a prompt, add a tag to your site, optimize assets with usdcrush, and join the W3C Immersive Web Community Group to help shape the spec.