-
Design immersive environments for visionOS apps and the spatial web
Learn how you can create photoreal visionOS environments for your apps, websites, and SharePlay experiences. Discover the design principles that make environments feel truly immersive and find out how you can create or capture reference materials, prepare high-fidelity CG assets, and craft real-time effects such as motion and lighting.
Chapters
- 0:00 - Introduction
- 1:17 - Pre-production
- 5:07 - Production
- 8:41 - Post-production
- 15:07 - Next steps
Resources
-
Search this video…
Hello, my name is Michael Breymann and I'm a human interface designer at Apple, working on system environments for visionOS.
In visionOS, system environments are more than simple backdrops. They are photo-realistic natural landscapes, designed for spatial computing, that transport you to a different time and place. Here in Haleakala, you get a stunning panoramic view above the clouds.
But unlike flat media or a panoramic image, which does not respond to changes in perspective, this environment offers true depth and parallax, giving someone the same experience they would see in the real world. When you combine this with motion and audio, the scene feels alive, and it immerses the viewer in the space.
In this talk, I'll take you through each part of the design process, for making your own immersive environments, pre-production, production, and post-production.
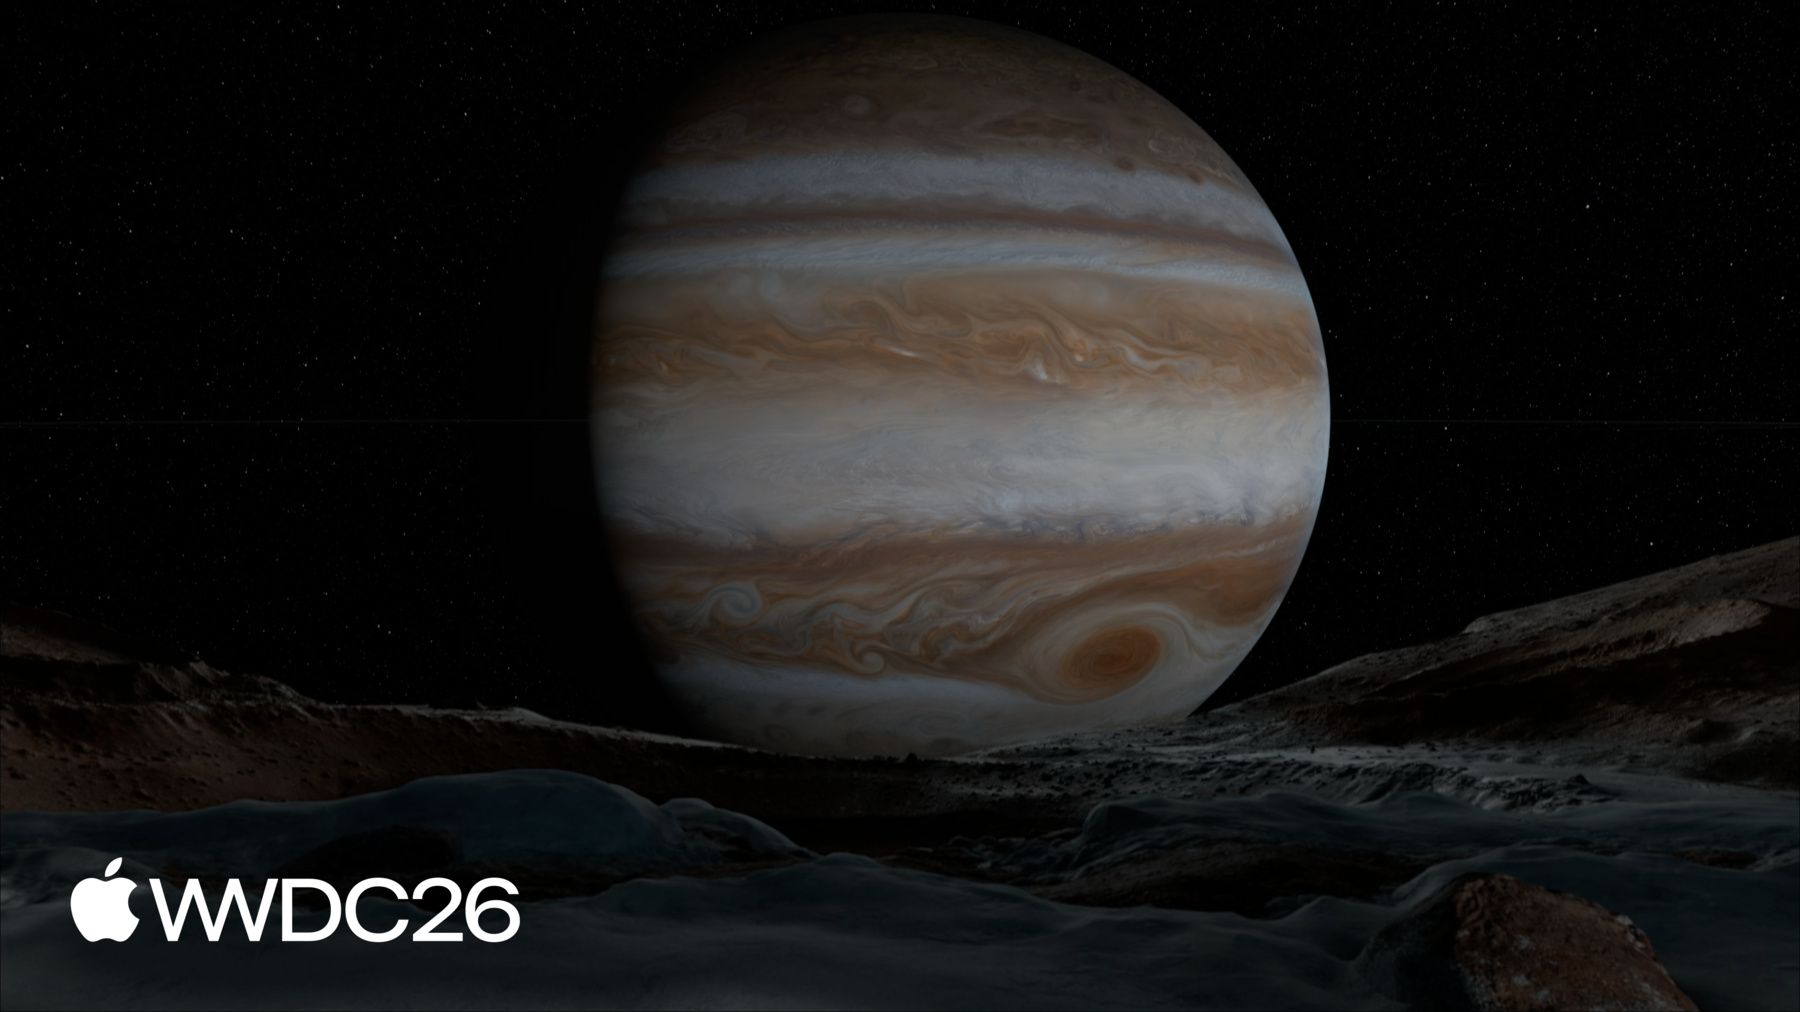
I'll share the principles and concepts at each stage that you'll need to create a compelling immersive experience, with examples from six of the visionOS system environments: Mount Hood, the Moon, Jupiter, Yosemite, Thorsmork, and Bora Bora.
It's time to get started with pre-production. When our team kicks off a new environment, we first spend time identifying some questions about our intent. Why are we building this particular environment? What are the qualities we want to bring to life? And how is the viewer going to use this space? These are all important questions to ask yourself about your project.
For example, when our team started thinking about use cases for system environments, watching media in large format, was especially exciting to us.
We wanted the media experience to feel cinematic, so we sculpted the terrains to fit a large screen, and researched the optimal center line for viewing.
The Keynote environment was built for a different purpose: to give people a space to practice public speaking, as though they are live on stage in the real world. Here, sound is intentionally absent, to keep them focused, and the lighting is concentrated on the stage, just as it would be if they were presenting in front of an audience. You might want your environment to be a backdrop for your app's content, or to showcase an experience from the web. Whatever you're designing, this ideation phase is such a key part of building environments, and answering these questions early on, helps you save time and avoid costly mistakes later in production. If you're designing an environment that exists in the real world, like Mount Hood, it's incredibly helpful to scout your location in advance. Consider where you want to place the viewer in the scene for their primary viewpoint, as well as what will be visible to them if they decide to turn around.
In visionOS, viewers will see approximately 81° of the scene in their field of view, when fully immersed.
Scouting is also helpful, for knowing what features you won't want to showcase in your environment. The panorama in the top view shows our Mount Hood location.
Notice the road, and the dense vegetation as the camera pans around to the back side. Our team flagged these for replacement when we got into production.
The panorama in the bottom view shows the result after our team made these changes.
Of course, sometimes the environment you want to create, won't be easily accessible in the real world. When we worked on the Moon environment, for example, we relied on photography from the Apollo missions to help us visualize our scene.
Reference materials, like photography and videography, are essential if you're building an environment like this.
You can confirm any assumptions you already had, and reconcile any discrepancies. You can also use reference material, to help you better understand a location here on Earth.
For example, our team created a lighting study using Digital Elevation Models of the Yosemite valley, and the Earth's orbit, to determine the exact days and times we wanted to capture.
Whether you're building your environment from scratch or a real location, here are a few things to keep in mind, when planning for the next stages of production. Try to visualize your environment in terms of layers, building from the background to the foreground. Identify which scene elements will need to have motion, and start thinking about what spatial audio you can attach to them. This will help you get ahead of any complications, that might disrupt your asset creation. One last thing! Often, during pre-production, you will discover things that will change your plan for the better.
For the Jupiter environment, for example, we built a scale model of the solar system so that we could understand how the Sun would light Jupiter's moons.
During this process, we realized that we wanted a system that allows for the passage of time, and this became a key design requirement for the final environment.
To recap, when you begin pre-production for your environment, make sure you're clear on your intent.
Scout your scene by visiting real-world locations and collecting reference material. Consider the composition and layering of your environment, and what you might want to remove or change. And use all the resources you get from pre-production, to refine your ideas through iteration. Because having a solid plan for how you will approach the build of your environment, prepares you for the next phase of development: production.
It takes time to build complex 3D scenes. But you can make it easier on yourself, and anyone you're working with, by capturing high-quality photography at the source. The Yosemite environment is a great example. During our team's advance scouting, we identified the exact viewpoint we wanted. Here, the viewer is in Yosemite Valley, with a clear shot into the mid-distance. This sort of framing is ideal for environments. You can always add detail into the foreground with CG elements, but it's much harder to remove things that obstruct the view.
When we were ready to enter production, we returned to this spot in the valley with our equipment and a very detailed shoot schedule. Seasons, weather, and even the time of day can dramatically change what you're able to capture, and that was certainly true for the Yosemite environment. Lighting can change quickly, especially around sunrise and sunset.
Plan to spend more time in your location, and shoot more photography, than you think you will need.
Every image you take, can be used to create your environment's 3D assets later on, so it's important to capture source imagery that is directly usable. Here are a few tips: use a tripod with your camera leveled 1 meter off the ground, and ensure a deep depth of field.
If possible, set up another camera 2 meters off the ground to trigger at the same time. This alternate view is especially helpful during Post-Production, to fill in parts of the scene that are not visible from the primary view. And remember, you are creating a 360° environment, so you will need to use a rig and lens that covers all views, and ultimately produces a stitched panorama.
The dynamic range of an environment can be quite large, from the Sun to the shadows, so shoot bracketed exposures to ensure you capture all the details. Know your target output display, and capture more resolution than you think you will need. For visionOS, an environment will be sharp at 40 pixels per degree, so 360° panorama of 14,400 by 7,200 pixels is an ideal target.
In addition to your primary photography, it's also a good idea to capture secondary photography on location for reference and measurements.
The point clouds produced by photogrammetry and LiDAR, can be meshed and used as starting points for 3D assets, but the data is also useful for distance measurements. You might discover, for example, that your seemingly flat terrain actually has a slope. And with that knowledge, you might make different choices about how you construct your 3D assets. Lighting reference is especially helpful when making CG assets integrate seamlessly into your environment. Macbeth charts, as well as chrome and gray spheres, should be shot at the same time as your primary photography.
Video of scene elements in motion will also provide invaluable reference when creating believable shader effects. Take note of what sounds, if any, are associated with motion, so that you can source the appropriate audio.
And if it's not possible to capture a panorama through photography, you will need to create a rendered panorama, using your favorite digital content creation tool.
The advantage of creating a rendered panorama, is that you have ultimate control over the entire scene at any given time. Production helps set you, and your environment, up for success. Careful preparation, will help you capture the best photography for the next stage of the process.
High-quality imagery gives you, or your technical artists, valuable data to work with.
Secondary photography and reference material can provide you with extra information about the scene to make your 3D work easier.
Lastly, this is not a one-size-fits-all process. If you're a small team with limited resources, you can adapt your production with these best practices in mind.
After the production phase, you should have enough material to create a high-resolution source panorama. With this and your reference content, you're now ready to begin designing your 3D asset.
The first step, however? Cleanup.
Let's take a look at the principal photography from the Thorsmork environment, and how our team approached cleaning up this panorama.
There are a couple of obvious things here that you wouldn't want in the final environment.
Like the camera rig.
As well as footprints and people, which would detract from the landscape.
But the cleanup process is also where those notes taken in pre-production come in handy. Let's take a look at a few scene elements, that are interfering with our ideal composition. Like here, the vegetation in the mid ground is too busy.
And these bushes, are too dominant in frame.
Once we identified the key elements we wanted removed, our team went to work and refined the imagery through iterations of digital matte painting and rendering CG assets. It's very important to pay attention to color balance and lighting consistency, throughout this process.
Post-production involves making many creative decisions about the look of your environment, but there's another critical aspect of this stage. Maintaining visual fidelity as you prepare the final asset. Because a 3D mesh is needed to achieve a sense of parallax and depth, you'll move your refined panorama, to textures in UV space. The parts of the scene that are not visible in the panorama need to be filled in. This is where secondary photography and CG renders supplement the primary view. During this process, it's helpful to always do an A/B comparison between your 3D asset and your panorama, to make sure your texture transfer is retaining the highest quality. Make sure that all scene elements have consistent sharpness, especially when compared to those nearby, so that they convey the proper scale.
Try flopping your scene to look at it in a new way. At this point in post-production, your eyes may be too accustomed to seeing the same thing, so you can use this trick to make sure your composition is still working. You can also subject your environment to extreme gamma and gain values. This technique can reveal any color and values inconsistencies, along with any data loss during texture transfer, which may become more obvious when viewed on different displays. Many aspects of post-production involve creative choices, but there's also a lot of technical artistry that supports this phase.
To learn more about what is required to render your environments in real-time, check out "Optimize your custom environments for visionOS".
Now that you have a textured mesh, the visual base of your environment is complete, but you'll need a couple more elements to complete the sense of immersion. Sound and motion.
Sound can be incredibly impactful for creating immersion, and you can place spatial audio sources to help amplify that effect. For example, in this environment, an emitter with a rippling water sound attached, is located in a part of the river where the water flows around large rocks.
The design and implementation of spatial audio, are big topics in themselves. So check out these two excellent talks, to learn more about how sounds can enhance the sense of immersion, in your environments. And speaking of the river, it also needs to move! For any aspect of your environment that needs motion, custom shaders can help you create the best visuals, while still being power efficient. Now, Thorsmork is a subarctic landscape, and there aren't a lot of motion features to design here. So let's travel south, to Bora Bora in French Polynesia, an environment rich with movement. Landscapes like Bora Bora have lots of complex motion and light interactions. I'll speed up the passage of time, so you can see them more clearly. The clouds, which at first seem static, are actually evolving, casting shadows throughout the environment. The palm trees sway in the wind, and the waves break a little differently each time as they hit the shore. All of these details add realism to the environment. But motion and light can be some of the most expensive things to render. For a scene like Bora Bora, our team had to think creatively about how we could achieve the visual intent, without breaking our real-time rendering budget. I'm going to share a few of the techniques we used, and explain how you can take advantage of them in your environment.
Let's start with the sky, a huge part of the scene.
We wanted it to feel like the clouds are continuously evolving with a sense of direction. UV flow maps made this possible, at little cost. And by weighting the flow speed in different parts of the sky, it feels massive, with depth and scale.
Cloud shadows can be achieved not through rendered lights, as you might expect, but rather a scrolling mask that darkens the terrain textures. The direction and speed of the clouds above are matched, so that they feel connected, even though they're not.
Let's go back to real-time speed, and examine another part of the environment.
Here under the palm trees, the more dense, clearly defined shadows, are pre-rendered into flip book textures that darken the terrain textures.
In this way, you can trade the expense of rendering soft shadows, for a believable approximation.
Counterintuitively, it's often the case that less is more. Offloading complex shading work to precomputed data textures, allows you to produce motion that would otherwise be too expensive to render real-time. These palm fronds, for example, have their mesh complexity greatly reduced. And the wind motion comes from a UV flow map, to produce the final effect. Notice also how the trunks and fronds sway more gently than the leaflets. This is achieved through hierarchical vertex animation and layered sine waves. By stacking low frequency and high frequency motion, you can create variety that is never repetitive. In fact, lots of expensive rendering can be reduced through artful layering of textures and compositing operations. Water, for example, can have its hue saturation and brightness modulated over time, to simulate subsurface scattering of sunlight.
The waves can move through layers of normal maps and scrolling textures. The sum of these effects, is greater than its parts.
Making all of these effects work together and feel like they exist in the same world, requires artistry and creative direction. To make sure you're developing the right features and controls for your shaders, remember your visual reference can be a great resource to articulate what you need to build. So let's recap. In post-production, you take all your planning, reference, and photography, and bring your environment to life.
You'll clean up your panorama, refine your scene in 3D and make sure your elements feel right, and add supporting details like sound and motion to complete the sense of immersion.
Designing for immersive environments is really about producing convincing results and presenting an illusion that feels authentic. You're in control of this, so at each stage of production, you will want to check your creative decisions for their merits.
To close, keep these things in mind as you start designing your environment. Be intentional with everything you do. You should be able to explain the reasoning behind everything you add or remove.
Create a composition that works. Every scene element should feel like it belongs, wherever it lives.
And all aspects of the scene should be tied together with sound and motion.
Good design makes your craft and execution stronger, and applies whether you're an individual, a small team, or a large studio.
I'll leave you with a final thought.
Often the best way to know your designs are working, is to try to break them. Don't get too attached to any one idea. Do something unexpected, and be receptive to the outcome. Some of your best work will be the result of the surprises that you embrace along the way.
-
-
- 0:00 - Introduction
Get an overview of immersive environments for visionOS and how they differ from panoramas and flat media. Learn how you can design your own photorealistic natural landscapes for your apps and the spatial web.
- 1:17 - Pre-production
Time to get started with pre-production. Michael shares common questions you can ask yourself to identify the kind of environment you want to create. Learn how to scout local and faraway locations, identify items you might want to omit, and plan for the production stage.
- 5:07 - Production
Discover how you can capture high-quality photography on location that you can use during the 3D asset creation process. Michael shares tips and tricks for capturing great primary source content and secondary photography, whether you're operating on your own or have a team and advanced resources at your disposal.
- 8:41 - Post-production
Find out how to process your source material into a high-resolution panorama, clean up your images, and start designing your 3D asset. Learn about common items you might want to remove from your initial content. Discover how to maintain photorealistic quality in your 3D content. And find out how to incorporate motion and Spatial Audio into your scene.
- 15:07 - Next steps
As you start to design your own environments, make intentional choices and create compositions that work for your apps and experiences. And don't forget to integrate sound and motion!