-
Build a responsive camera app that launches quickly
Discover how to build a camera app that launches instantly so people never miss the perfect shot. Explore how to optimize the entire camera launch sequence — from app startup to first preview frame. Ensure your app has a polished camera experience by learning about new API's that deliver faster launches, and best practices for smooth preview rendering and maintaining sustainable performance.
Chapters
- 0:00 - Introduction
- 2:02 - Fast Launch
- 6:52 - Adopt deferred start
- 15:06 - Steady preview
- 18:04 - Sustained performance
- 21:14 - Deterministic file writing
Resources
- Build a responsive camera app that launches quickly
- Performance and metrics
- AVCam: Building a camera app
Related Videos
WWDC26
WWDC23
-
Search this video…
Hello, my name is Jake. I'm an engineer on the camera performance team. Welcome to build a responsive camera app that launches quickly. When launch is slow, people notice. From years of optimizing the native camera app, I've learned that the single most important factor in making a camera launch feel fast is how quickly the preview frame appears on the display.
I want to capture a cool shot of my dominoes, but I forgot to launch my camera before the dominoes were already falling. I've placed a red domino in the middle, so it's essential that I launch and capture the moment just before the red domino falls As the app launches, there's a period of blank preview. By the time preview begins rendering, I've already missed the red domino tumbling over.
Having the preview render shortly after the app has launched allows customers to capture a quick action shot, ensuring they don't miss the moment. I'll help you build a camera app designed for performance. In this video, I'll talk about four main topics to enhance performance. First, I'll discuss how to accelerate a camera launch experience. So preview is up and running without a hitch.
Then, I'll talk about best practices for rendering preview, so no frames are dropped. Third, I'll touch on APIs that help sustain performance, even in challenging environments. Lastly, I'll introduce a new API, designed to offer deterministic file write performance for high data rate video captures. I'll start with Fast Launch.
There are four stages of a camera app launch sequence. First, the app launches.
This covers the time for the linker to load the binary, run static initializers, and create UI scenes, plus anything else the app does before creating a capture session. Second, the session is configured and started. Initializing the capture session, committing the configuration, and starting the session all take time and system resources.
Third, once the session is started, all AV capture output objects initialize. This time varies with the number of outputs and their quality settings.
Finally, preview begins streaming and frames start flowing to the app. I'll walk through specific optimizations for each of these stages. The app's UI plays an important role in the camera launch experience. When designing a launch flow, split the work into two phases. Resources critical for launching and displaying preview, and resources that can be created after preview is running.
Take AVCam, for example, the classic sample camera app for AV Foundation. There are several UI elements. A camera preview, a shutter button, an image well, and a mode picker. The camera preview is the most critical UI element for someone the moment they launch the app Because this is what makes the camera feel like it's ready to use. The image well and the mode picker aren't needed before preview renders, so this work should wait until after preview starts.
UI elements aren't the only factor in launch time. Any resource created before preview is rendered will influence launch time.
Applying these two phases to AVCAM, I create the shutter button in preview on launch, but fade in all other UI elements after launch finishes. Now that the app's impact to launch is reduced, I'll focus on how AV capture session and its related objects impact the next stage, session configuration.
Configuring and starting AV capture session takes a lot of system resources and allocations that directly impact App Launch.
A typical AV capture session consists of an AV capture device input, usually the camera or microphone. AV capture connection wires the capture device to the outputs. In this example, I want two outputs, one for preview and one for capture. The AV Capture Video Preview layer is the output for displaying the preview.
While the AV capture photo output serves as the output for image captures. These objects together power an app's camera experience.
Because AV Capture Session coordinates all the capture objects, I want to create it first, as soon as the main thread finishes UI setup.
Creating AV capture session blocks the main thread. To avoid a hang, create it in parallel with UI initialization.
When displaying preview on launch, dispatch AV capture session creation off the main thread. This allows the session setup to run in the background while the apps UI scene is being created.
Committing multiple configurations extends launch time. Commit a single configuration up front to avoid lengthy reconfigurations during launch. Start running and stop running on A B capture session are blocking calls. Don't call them on the main thread, or the app will hang. Next, I'll cover the most expensive part of camera launch. Initializing AV capture outputs. Initializing AV capture outputs noticeably slows down launch.
To render preview, the app only needs a preview layer or one output initialized. Outputs like the movie file output and photo output aren't needed for preview. To reduce time spent initializing outputs, adopt the Deferred Start API, available in iOS 26 and later.
Deferred start lets apps put off output initialization until launch has finished. In this launch sequence, all AV capture outputs initialize before the first preview frame renders.
The idea with deferred start is to postpone any output that isn't needed for launch until after preview has started. With Deferred Start, the launch sequence changes. The app launches, configures the session, and starts it. Now only the preview output initializes before the first frame displays. The system then either runs the deferred initialization automatically when conditions allow, or waits for the app to signal when it's a good time.
Every AVCapture output, an AV Capture Video Preview layer, has an isdeferred start enabled property. Set it to true to defer that output. To optimize for launch, defer all outputs except the output used to render preview.
There are two ways to specify when deferred start runs. Automatic start and manual start.
Apps recompiled against the iOS 26 in later SDKs use automatic mode by default.
The automatically runs deferred start property is set to true when in this mode. In automatic mode, the system picks the best time to initialize the deferred outputs.
This happens shortly after preview appears on the device.
The session sends two delegate callbacks so the app knows when deferred start begins and ends.
Session will run deferred start fires before output initialization begins, and session did run deferred start fires after it completes.
Now, I'll show how to adopt this.
First, I'll create a class that handles the delegate callbacks from the deferred start API.
Session Will Run Deferred Start is called Before Deferred Start Begins. This is a good place to create any background resources the app needs.
Session Did Run Deferred Start is called After Deferred Start completes. At this point, all capture outputs are initialized and ready to use. Now, I'll add deferred start to the capture session. During configuration, set automatically runs deferred start to true on AV capture session Remember, if your app recompiled against iOS 26 and later, this is automatically set to true for you. Next, enable deferred start on every output that isn't required for launch. Here, I defer the photo capture output and use the video preview layer to render preview. Then, I'll attach the delegate callback class from earlier to the capture session. The session is now configured, so I'll commit the configuration and call start running.
For apps that want finer control, the Deferred Start API also offers a manual mode with Run Deferred Start when needed.
In manual mode, the app tells the system when to begin deferred start. This is useful for apps that want to read preferences or set up UI before the heavy initialization begins. Or for apps using video data output to render preview, which I'll discuss in more detail later in this video. With manual mode, the sequence changes.
Once the app finishes startup work, such as creating non-critical resources, call run deferred start when needed on the capture session.
This tells the system it could run deferred start. To opt into manual mode, set automatically runs deferred start on AV capture session to false.
In this example, I want to render preview myself, using AVCapture video data output. So I'll disable deferred start on this output. I'll leave the rest of the code the same as the previous example.
Next, I need to decide when to run deferred start on the deferred output. To do that, I'll track whether the first frame has been presented Here, I'm using a CA meta layer. Once the first frame is presented, I'll set up any non-critical UI elements until AV capture session to run deferred start on the postponed outputs. After the first frame is presented, no special handling is needed.
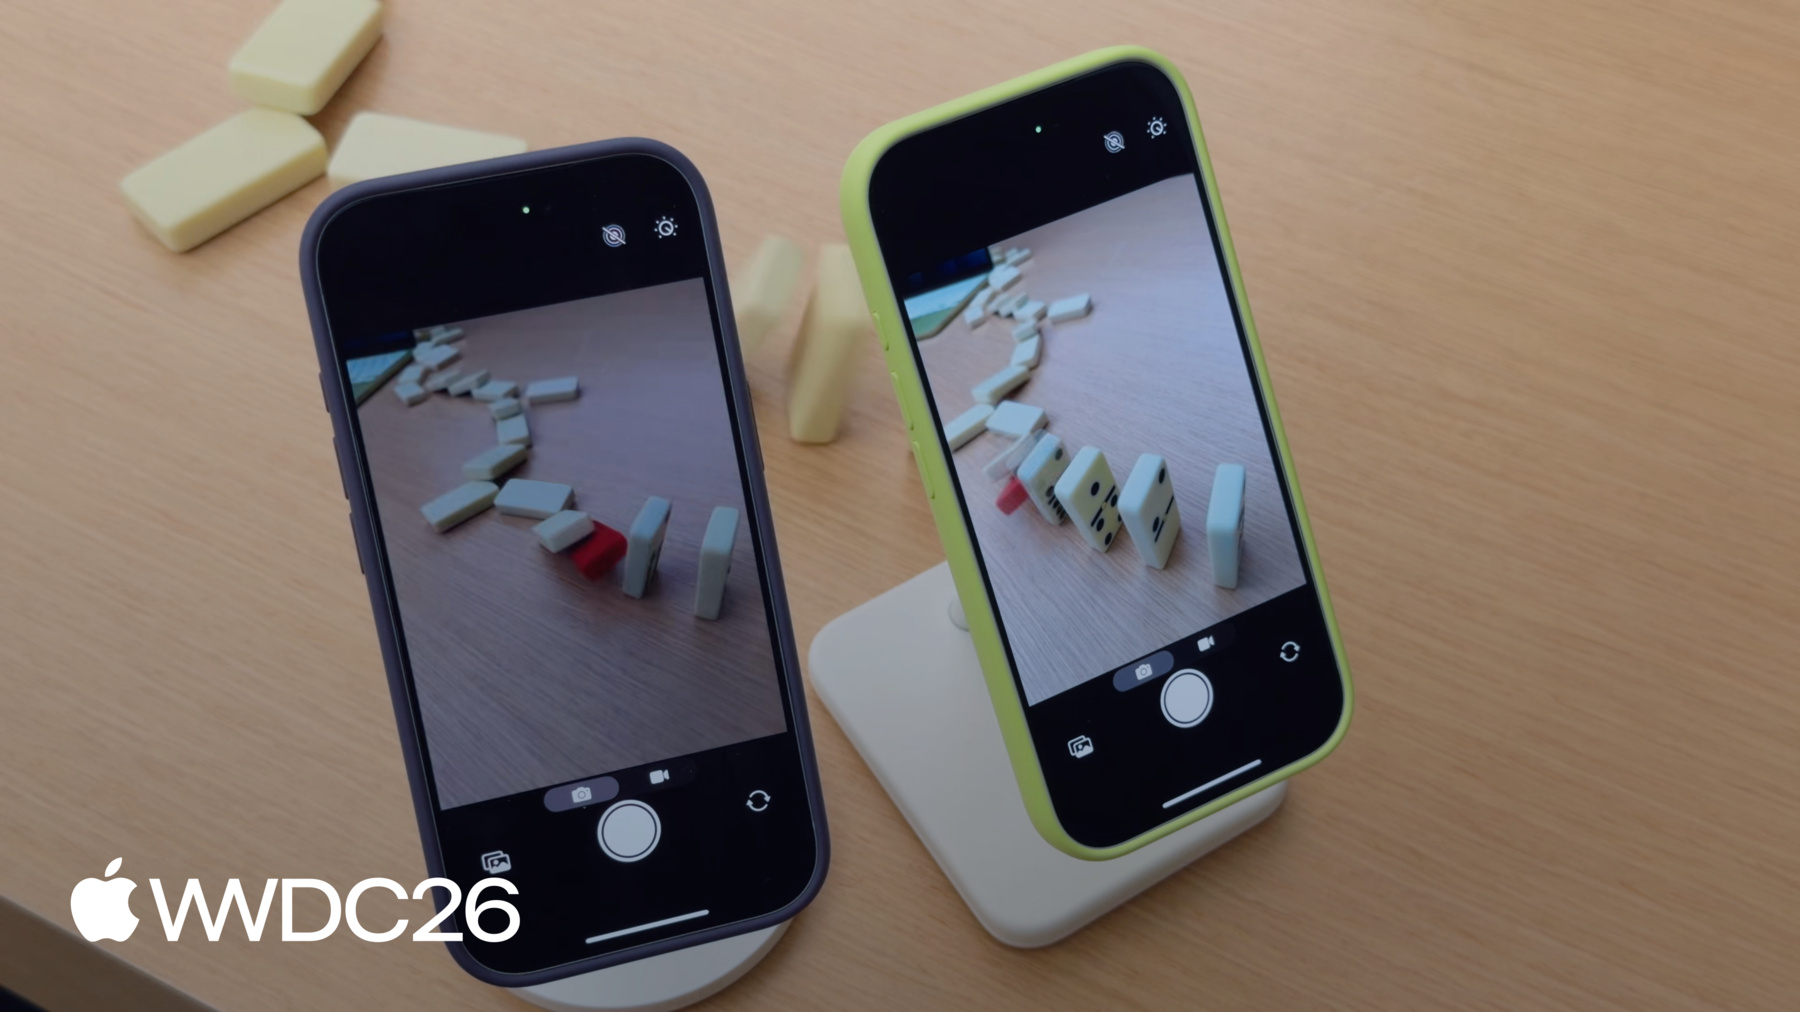
To verify the launch is faster with Deferred Start, I set up a lightboard in the lab. My goal is to compare the difference in position of the LED pattern in preview. The phone on the right has deferred start enabled. The one on the left doesn't. I want to capture the pattern when both the red and green LEDs are on screen.
I screenshotted the moment when one device successfully shows preview. The deferred start phone on the right is clearly able to capture that expanding pattern.
By the time the phone, without deferred start, finishes launching, the green LEDs have nearly faded out, missing that clear separation.
I also timed the launch sequence on both phones. Without deferred start, the app launch was close to a second. With deferred start? Launch is cut in half. That's a two times faster launch. This is a massive step forward in launch times. Preview is up and running faster than ever. For complex capture sessions, apps may see an even bigger improvement.
Deferring AV capture photo output does have a catch. Preview starts much sooner, but the time to the first capture stays the same.
Because the photo output is deferred, the system has to finish initializing it before a capture can begin. Preview is up quickly, but someone can still miss the shot. To solve this problem, set is responsive capture enabled to true on AV capture photo output This property adds buffering between starting a capture and when processing begins, so people can capture the moment, even if the photo output isn't fully ready yet. The green phone enables responsive capture in conjunction with deferred start. As the dominoes fall, I quickly launch and take a picture.
The green phone allowed me to get a perfect shot of the dominoes, while the purple phone missed the moment.
To learn more about how to use responsive capture and how to capture stunning, high-resolution images, watch Implement High Resolution Photo Capture from WWDC26.
Once preview is running, keeping a steady framerate and cadence is essential. Otherwise, the camera feels laggy. Next, I'll share best practices for rendering preview.
Revisiting the session architecture from earlier, the easiest way to render preview is with AV Capture Video Preview Layer. It shows exactly what the camera sees directly in the app's UI. AV Capture Video Preview Layer is optimized for rendering preview. No need to process video frames in the app. AV Capture Video Preview Layer does this automatically, handling tricky situations such as HDR tone mapping. It also keeps CPU and GPU overhead low, which saves power and leaves more headroom for the UI.
And it's tuned for low latency preview, so the app shows what the camera sees with very little delay.
As a trade-off for simplicity, AV Capture Video Preview Layer does not allow for per-frame access.
For apps that want more control over preview rendering, then AV Capture Video Data Output is the better choice. AV Capture Video Data Output takes the place of AV Capture Video Preview Layer in the session architecture and becomes the primary output for displaying frames on the device.
AV Capture Video Data Output gives more control over the flow of preview, enabling apps to process individual frames.
It also lets the app apply a custom UI overlay on each frame.
And per frame processing makes it easier to integrate with Metal and to analyze frame data.
Use AV Capture Video Preview Layer when you just need to show the camera feed. And remember, apps using AV Capture Video Preview Layer are opted into automatic deferred start when recompiled against iOS 26 and later. Use AV capture video data output when per-frame processing is the priority.
Deferred start doesn't apply automatically with AVCapture video data output, so adopt manual deferred start to get the same launch gains. When rendering preview, keep per framework short. This helps avoid frame drops and keeps the experience fluid. As the device heats up, performance gets harder to maintain, because the system throttles to adapt.
Monitor the session's performance and adjust to system conditions for a sustainable experience. Next, I'll cover APIs that let your app monitor performance and adapt to system conditions. Revisiting the architecture from earlier, there's a capture session, a photo output, and a preview layer. This is a fairly basic setup, but it grows in complexity as an app adds more cameras or input devices.
As complexity grows, so does the performance cost. Understanding the capture session's cost helps you design for a sustainable experience. The hardware cost API returns a value between 0 and 1. It tells you what share of the session's hardware is actively in use.
A value above one means the system can't support the configuration. Several things contribute to this cost.
the number of cameras used, the active formats of the source devices, such as using 1080p or 4K , The frame rate of the source device's formats? Hardware cost assumes the format's max frame rate. So if you're running at a lower frame rate, like 30 frames per second instead of 60 frames per second Use the framerate override property to reduce the cost.
And lastly, the use of binned formats. Binned formats use less hardware bandwidth since these formats group pixels.
The system pressure cost API also returns a value between 0 and 1. It represents the cost of the session's current configuration. When it goes above 1, the configuration is unsustainable. To adjust to the current system state, monitor the system pressure state property of AV capture device As the system pressure state increases, consider reducing the capture device's frame rate, or throttling any use of the GPU or Apple Neural Engine, or minimizing UI work.
Use the hardware cost in system pressure state API after initial session setup.
After committing the configuration, check that the hardware cost doesn't exceed the device's capabilities.
Once hardware cost is at or below 1, observe AV Capture device's system pressure state and register a handler for state changes.
Use this handler to adapt using the techniques I just covered. Video capture is also sensitive to performance issues once the device enters a pressured state Traditional file system input-output is variable because the system is juggling competing operations, memory fragmentation, and device storage wear.
This means file input-output behavior is non-deterministic. High data rate video captures, like ProRes , need sustained, high bandwidth input-output to record smoothly without dropping frames. To address this challenge, use AV Pro Video Storage, new in iOS 27. This class tracks and manages pre-allocated storage for high data rate video captures. It's a system-wide resource that all apps share.
AV Pro Video Storage works with the existing movie recording APIs. Applications opt in by setting usespro video storage on AV CaptureMovie file output. or an AV asset writer when using AV capture video data output to record content.
The system handles allocation and file input output, so write performance stays consistent for high data rate codecs. Camera settings is updated so people can control how much storage to allocate. The remaining capacity method reports how much storage is left. That value decreases during a recording and stops decreasing when the recording stops.
Use the open settings method to take someone from your app to the settings UI.
To use AV Pro Video Storage, first check that the storage is supported.
AV Pro Video Storage is a singleton, so use the shared method to obtain the instance of this object.
Next, create the Movie File Output, AV Capture Session, AV Capture Connections, and select the format for recording.
Use the new isProVideoStorage supported method on AVCaptureMovie file output to check for compatibility.
Before recording, confirm the storage is not busy resizing or servicing file creation or deletion requests. Finally, turn on Pro Video Storage on the Movie File Output and start recording. During capture, The recording is written to the pre-allocated storage and then moved to the specified location once the capture finishes.
As I mentioned before, this feature also works great with AV Asset Writer.
I covered ways to optimize a camera app for launch, best practices for rendering preview, APIs for sustained performance, and how to get deterministic file write speeds for ProRes captures. Adopt deferred start with the quality photo output. You'll keep launch fast and get gorgeous image quality too. Analyze performance in other parts of your camera app. Use instruments and Xcode to measure, identify, and fix performance issues. And remember, most of the time you're developing your app at a desk or in a controlled environment. But people use your app in the real world. Test and measure performance in all conditions, like on a hot sunny day. Lastly, watch Create a More Responsive Camera Experience from WWDC23 and implement high-resolution photo capture from WWDC26 To learn how to integrate capture responsiveness into your app. Performance isn't just a feature, it's the foundation of a great camera experience. Keep optimizing and keep capturing. Thanks for watching.
-
-
9:14 - Automatic deferred start delegate
import AVFoundation class DeferredStartDelegate: NSObject, AVCaptureSessionDeferredStartDelegate { func sessionWillRunDeferredStart(_ session: AVCaptureSession) { // This is called before deferred start begins for the deferred outputs } func sessionDidRunDeferredStart(_ session: AVCaptureSession) { // This is called after deferred start completes for all outputs } } -
9:46 - Adopt automatic deferred start
import AVFoundation let captureSession = AVCaptureSession() captureSession.beginConfiguration() captureSession.automaticallyRunsDeferredStart = true let videoPreviewLayer = AVCaptureVideoPreviewLayer(session: captureSession) videoPreviewLayer.isDeferredStartEnabled = false let photoOutput = AVCapturePhotoOutput() photoOutput.isDeferredStartEnabled = true captureSession.addOutput(photoOutput) captureSession.setDeferredStartDelegate(deferredStartDelegate, deferredStartDelegateCallbackQueue: sessionQueue) captureSession.commitConfiguration() captureSession.startRunning() -
11:30 - Adopt manual deferred start
import AVFoundation let captureSession = AVCaptureSession() captureSession.beginConfiguration() captureSession.automaticallyRunsDeferredStart = false let videoOutput = AVCaptureVideoDataOutput() captureSession.addOutput(videoOutput) videoOutput.isDeferredStartEnabled = false let photoOutput = AVCapturePhotoOutput() photoOutput.isDeferredStartEnabled = true captureSession.addOutput(photoOutput) captureSession.setDeferredStartDelegate(deferredStartDelegate, deferredStartDelegateCallbackQueue: sessionQueue) captureSession.commitConfiguration() captureSession.startRunning() -
11:53 - Manage runDeferredStartWhenNeeded
import AVFoundation import QuartzCore private var firstFramePresented = false guard let drawable = layer.nextDrawable() if (!firstFramePresented) { drawable.addPresentedHandler({ drawable in // Set up postponed UI elements captureSession.runDeferredStartWhenNeeded() }) firstFramePresented = true } -
14:07 - Enable responsive capture
import AVFoundation func configurePhotoOutput(for session: AVCaptureSession, device: AVCaptureDevice) { let photoOutput = AVCapturePhotoOutput() guard session.canAddOutput(photoOutput) else { return } session.addOutput(photoOutput) photoOutput.maxPhotoQualityPrioritization = .quality // Responsive capture lets the photo output capture immediately photoOutput.isResponsiveCaptureEnabled = photoOutput.isResponsiveCaptureSupported } -
20:16 - Monitor for system pressure
import AVFoundation let captureSession = AVCaptureSession() let device = activeVideoInput?.device captureSession.beginConfiguration() // ... captureSession.commitConfiguration() guard captureSession.hardwareCost <= 1.0 else { print("hardwareCost \(captureSession.hardwareCost) — cannot start session. Reconfiguring.") setupLowCostConfiguration() } captureSession.startRunning() let systemPressureObserver = device?.observe(\.systemPressureState, options: [.initial, .new], changeHandler: { /* Handle state change */ }) -
22:17 - Manage pro video storage
import AVFoundation func configureProVideoStorage() { guard AVProVideoStorage.isSupported else { return } let storage = AVProVideoStorage.shared guard storage.remainingCapacity != 0 else { storage.openSettings() return } } -
22:43 - Adopt AVProVideoStorage for deterministic file write speeds
import AVFoundation

guard AVProVideoStorage.isSupported else { return }
guard let pvs = AVProVideoStorage.shared else { return }

// Configure and set up AVCaptureSession, AVCaptureConnections and format
// ...
let movieOutput = AVCaptureMovieFileOutput()

guard movieOutput.isProVideoStorageSupported else { return }
guard !pvs.isBusy else { return }

let movieFileURL = FileManager.default.temporaryDirectory
            .appendingPathComponent(UUID().uuidString)
            .appendingPathExtension("mov")

movieOutput.usesProVideoStorage = true // Also available with AVAssetWriter
movieOutput.startRecording(to: movieFileURL, recordingDelegate: delegate)
-
-
- 0:00 - Introduction
Why a fast-appearing preview frame is the single biggest factor in a camera launch feeling responsive, and what the session covers — accelerating launch, rendering best practices, and capturing the moment without missing it.
- 2:02 - Fast Launch
Learn how to minimize UI overhead and explore best practices for creating and configuring AVCaptureSession to get the camera preview on screen faster.
- 6:52 - Adopt deferred start
Discover the deferred start API that allows you to defer the initialization of expensive capture outputs until after the preview is running, featuring both automatic and manual modes.
- 15:06 - Steady preview
Explore best practices for rendering preview frames, comparing the simplicity of AVCaptureVideoPreviewLayer against the flexibility of AVCaptureVideoDataOutput.
- 18:04 - Sustained performance
Learn how to assess hardware cost and adapt to system pressure using new APIs to maintain a smooth and responsive camera experience under demanding conditions.
- 21:14 - Deterministic file writing
Adopt the AVProVideoStorage API to achieve sustained high-bandwidth input/output required for high data-rate video captures like ProRes.